


使用symbian应用程序创建向导可以创建带有皮肤支持的工程。使得你的应用程序可以很方便的使用系统皮肤。
创建方法如下:
1打开开始菜单s60sdk的目录下Tools 然后选择Application Wizard创建一个app
2在第二个向导页面上你可以看到Add support for的选项,选择下面的skins然后继续创建。你就可以得到一个支持皮肤的工程了。
如果是一个已有工厂以前没有支持皮肤功能,也可以手工添加。步骤如下
1) 在ui里面 ui ConstructL函数里面将原来的BaseConstructL();换成BaseConstructL( EAknEnableSkin );
2) Container 里面加入头文件
#include <AknsBasicBackgroundControlContext.h> //skin
3) container里面添加成员变量 并在ConstructL里面初始化它。
.h里面加成员变量 MAknsControlContext* iBackGround; // for skins support
.cpp里面ConstructL里初始化
SetRect(aRect);
iBackGround = CAknsBasicBackgroundControlContext::NewL( KAknsIIDQsnBgAreaMain, Rect(), EFalse );
// 或者为此处,自己换皮肤
iBackGround = CAknsBasicBackgroundControlContext::NewL(
KAknsIIDQsnBgAreaMain, Rect(), EFalse);
MAknsSkinInstance* skin = AknsUtils::SkinInstance();
TFileName bitmapFile(KSysIconFile);
User::LeaveIfError(CompleteWithAppPath(bitmapFile));
CAknsItemDef* mainBgItemDef = AknsUtils::CreateBitmapItemDefL(
KAknsIIDQsnBgAreaMain, bitmapFile,
EMbmSymbian_ua_guiBgon);//EMbmTestskinA为自己的图片
skin->SetLocalItemDefL(mainBgItemDef);
//
放在setrect之后!!!!!!!否则无法看到皮肤
4) Container 的
Draw(const TRect& aRect) const
{
CWindowGc& gc = SystemGc();
// TODO: Add your drawing code here
// example code...
// draw background
MAknsSkinInstance* skin = AknsUtils::SkinInstance();
MAknsControlContext* cc = AknsDrawUtils::ControlContext( this );
AknsDrawUtils::Background( skin, cc, this, gc, aRect );
}
5) Container 的
TTypeUid::Ptr MopSupplyObject(TTypeUid aId);
TTypeUid::Ptr MopSupplyObject(TTypeUid aId)
{
if(aId.iUid == MAknsControlContext::ETypeId && iBackGround)
{
return MAknsControlContext::SupplyMopObject( aId, iBackGround);
}
return CCoeControl::MopSupplyObject( aId );
}
用下面的方法我们可以获取系统皮肤的相关颜色:
MAknsSkinInstance* skin = AknsUtils::SkinInstance();
TRgb color;
AknsUtils::GetCachedColor(skin,color,KAknsIIDQsnScrollColors,EAknsCIQsnIconColorsCG10);
我作了一个枚举颜色的程序:
void TestSkinColor(TAknsItemID aID,const TDesC& aName, const MObjectProvider* aMop,CWindowGc& aGc)
...{
MAknsSkinInstance* skin = AknsUtils::SkinInstance();
MAknsControlContext* cc = AknsDrawUtils::ControlContext( aMop );
TRgb color;
TInt columnNum=4;
TInt result=KErrNone;
TInt index=0;
while(result==KErrNone)
...{
result=AknsUtils::GetCachedColor(skin,color,aID,index);
if(result!=KErrNone)
...{
RDebug::Print(aName);
RDebug::Print(_L("GetColorFaild,index=%d"),index);
}
else
...{
RDebug::Print(aName);
RDebug::Print(_L("[%d]Color(%d,%d,%d)"),index,color.Red(),color.Green(),color.Blue());
}
TInt x,y;
x=index%columnNum;
y=index/columnNum;
TRect colorRect(TPoint(10*x+1,10*y+1),TSize(8,8));
aGc.SetBrushColor(color);
aGc.SetBrushStyle(CGraphicsContext::ESolidBrush);
aGc.DrawRoundRect(colorRect,TSize(2,2));
index++;
}
}
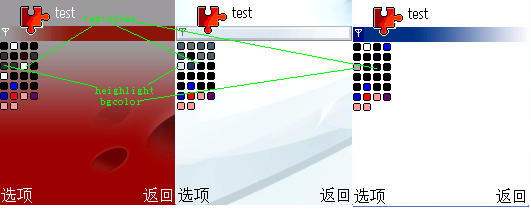
这是在不同皮肤下取到的颜色对比:
本文来自CSDN博客,转载请标明出处:http://blog.csdn.net/windcao/archive/2007/09/10/1779413.aspx
二 Grid使用自定义的皮肤
在一的基础上做如下修改
ConstructL()中添加:
iBackGround = CAknsBasicBackgroundControlContext::NewL( KAknsIIDQsnBgAreaMain, Rect(), EFalse );
MAknsSkinInstance* skin = AknsUtils::SkinInstance();
_LIT(KBitmapPath,"bg.mbm");
TFileName bitmapFile (KBitmapPath);
User::LeaveIfError(CompleteWithAppPath(bitmapFile));
CAknsItemDef* mainBgItemDef = AknsUtils::CreateBitmapItemDefL(KAknsIIDQsnBgAreaMain,bitmapFile,EMbmBgBg);
skin->SetLocalItemDefL( mainBgItemDef );
SizeChanged()中添加:
if ( iBackGround )
{
iBackGround->SetRect( Rect() );
if ( &Window() )
iBackGround->SetParentPos( PositionRelativeToScreen() );
}
三 Listbox使用自己定义的皮肤
在一的基础上做如下修改
void CTdjgmcqeListBox::ConstructL(
		const TRect& aRect,
		const CCoeControl* aParent,
		MEikCommandObserver* aCommandObserver )
	{
    ...
    _LIT(KMbmFile, "z://resource//apps//Tdjgmcqe.mbm");
    MAknsSkinInstance* skin = AknsUtils::SkinInstance();
    CAknsItemData* item = skin->GetCachedItemData(KAknsIIDQsnBgAreaMainListGene);
    if(item==NULL)
        {
        item = skin->CreateUncachedItemDataL(KAknsIIDQsnBgAreaMainListGene);
        }
    if(item->Type()==EAknsITMaskedBitmap)
        {
        CAknsItemDef* def = AknsUtils::CreateMaskedBitmapItemDefL(KAknsIIDQsnBgAreaMainListGene, KMbmFile, EMbmTdjgmcqeMainarea, EMbmTdjgmcqeMainareamask);
        skin->SetLocalItemDefL(def);
        }
    else
    	{
        CAknsItemDef* def = AknsUtils::CreateBitmapItemDefL(KAknsIIDQsnBgAreaMainListGene, KMbmFile, EMbmTdjgmcqeMainarea);
        skin->SetLocalItemDefL(def);
    	}
    ...
	}
参考:http://wiki.forum.nokia.com/index.php/How_to_use_custom_background_for_listbox  四 Label Edwin使用系统字体颜色      label	//	TRgb textColor1; // text color when not highlighted  ---- 系统字体颜色
	//	AknsUtils::GetCachedColor(skin, textColor1, KAknsIIDQsnTextColors,
	//			EAknsCIQsnTextColorsCG9);
	//	iLabel1->OverrideColorL(EColorLabelTextEmphasis, textColor1);
	//	iLabel1->SetEmphasis(CEikLabel::EPartialEmphasis);
	//	iLabel1->SetBrushStyle(CWindowGc::ENullBrush);
//edwin		{
		//set color
		CCharFormatLayer* FormatLayer = CEikonEnv::NewDefaultCharFormatLayerL();
		TCharFormat charFormat;
		TCharFormatMask charFormatMask;
		FormatLayer->Sense(charFormat, charFormatMask);
		TRgb textColor; // text color when not highlighted  ---- 系统字体颜色
		AknsUtils::GetCachedColor(skin, textColor, KAknsIIDQsnTextColors,
				EAknsCIQsnTextColorsCG9);
		charFormat.iFontPresentation.iTextColor = textColor;
		charFormatMask.SetAttrib(EAttColor);
		FormatLayer->SetL(charFormat, charFormatMask);
		iRichText1->SetCharFormatLayer(FormatLayer); // Edwin takes the ownership
		}


 425
425

 被折叠的 条评论
为什么被折叠?
被折叠的 条评论
为什么被折叠?
 到【灌水乐园】发言


