


1.Windows下安装Ubuntu
直接去微软商店搜索下载Ubuntu18.04就行,你也可以使用镜像
2.安装完毕后,进入ubuntu,更换apt源为阿里云源
- 备份 sources.list
sudo cp /etc/apt/sources.list /etc/apt/sources.list.bak
- 编辑 sources.list
sudo vim /etc/apt/sources.list
然后将下面的阿里源替换进去
deb http://mirrors.aliyun.com/ubuntu/ bionic main restricted universe multiverse
deb http://mirrors.aliyun.com/ubuntu/ bionic-security main restricted universe multiverse
deb http://mirrors.aliyun.com/ubuntu/ bionic-updates main restricted universe multiverse
deb http://mirrors.aliyun.com/ubuntu/ bionic-proposed main restricted universe multiverse
deb http://mirrors.aliyun.com/ubuntu/ bionic-backports main restricted universe multiverse
deb-src http://mirrors.aliyun.com/ubuntu/ bionic main restricted universe multiverse
deb-src http://mirrors.aliyun.com/ubuntu/ bionic-security main restricted universe multiverse
deb-src http://mirrors.aliyun.com/ubuntu/ bionic-updates main restricted universe multiverse
deb-src http://mirrors.aliyun.com/ubuntu/ bionic-proposed main restricted universe multiverse
deb-src http://mirrors.aliyun.com/ubuntu/ bionic-backports main restricted universe multiverse
- 更新以及升级
sudo apt update
sudo apt upgrade
3.创建root权限的用户,并且设置为默认登陆用户
- 创建用户
adduser username # 你的用户名
New UNIX password: # 随后按照提示输入密码等信息
- 赋予root权限
sudo vim /etc/sudoers
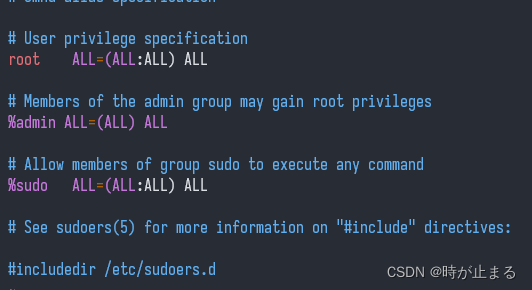
在文件的root ALL=(ALL:ALL) ALL 这一行下面添加(你的用户名 ALL=(ALL:ALL) ALL)
username ALL=(ALL:ALL) ALL
- 设置你的用户为默认登陆用户
sudo vim /etc/wsl.conf
写入以下内容(username记得替换成你的用户名)
#Set the user when launching a distribution with WSL.
[user]
default=username
完全退出系统后再进入就会生效
4.安装一些帮助操作系统的工具。
- 先安装一个oh-my-zsh,用着不好看的shell怎么好好工作(摸鱼)嘛。
#安装zsh,已经有zsh的话就当更新了
sudo apt install zsh -y
# 设置zsh为默认shell
chsh -s /bin/zsh
# 安装oh-my-zsh
sh -c "$(curl -fsSL https://raw.github.com/robbyrussell/oh-my-zsh/master/tools/install.sh)"
#(可选)进入配置文件设置主题
vim ~/.zshrc
具体主题安装可以参考oh-my-zsh的wiki
2.安装zsh的一些常用插件
# 在shell中提示node版本插件
git clone https://github.com/spaceship-prompt/spaceship-vue.git $ZSH_CUSTOM/plugins/spaceship-vue
# Zsh命令自动补全插件
git clone https://github.com/zsh-users/zsh-autosuggestions $ZSH_CUSTOM/plugins/zsh-autosuggestions
# Zsh命令语法高亮插件
git clone https://github.com/zsh-users/zsh-syntax-highlighting.git $ZSH_CUSTOM/plugins/zsh-syntax-highlighting
# 用来在shell中提示node版本的主题(也有其他的提示样式,可自行翻阅文档)
git clone https://github.com/spaceship-prompt/spaceship-prompt.git "$ZSH_CUSTOM/themes/spaceship-prompt" --depth=1
ln -s "$ZSH_CUSTOM/themes/spaceship-prompt/spaceship.zsh-theme" "$ZSH_CUSTOM/themes/spaceship.zsh-theme"
# 自动跳转目录插件
sudo apt install autojump
非异步显示node版本,为spaceship创建默认配置文件~/.spaceshiprc.zsh(可选)
SPACESHIP_NODE_ASYNC=false # 设置读取node版本不为异步读取
- 配置
~/.zshrc文件
# 不需要提示node版本的话可以不用我现在这个主题
ZSH_THEME="spaceship"
# 添加zsh-autosuggestions以及autojump到plugins中
plugins=(
        git
        zsh-autosuggestions
        autojump
        zsh-syntax-highlighting
        spaceship-vue # node版本显示插件
)
# 输入v快速进入neovim
alias v=nvim
# oh-my-zsh直接使用plugins引入即可
# source "$ZSH_CUSTOM/plugins/zsh-syntax-highlighting/zsh-syntax-highlighting.zsh"
- 安装oh-my-tmux,美化一下tmux的界面!
cd ~
git clone https://github.com/gpakosz/.tmux.git
ln -s -f .tmux/.tmux.conf
cp .tmux/.tmux.conf.local .
5.准备前端代码工具环境。
- 安装Node版本工具Volta,参考这里的方法,node环境就准备好了。
- 安装pnpm以及yarn用来帮助安装node包。
# yarn 可以直接用npm下载
npm install -g yarn
# pnpm 可能会遇到网络问题,没有魔法的话只能多试几次了
curl -fsSL https://get.pnpm.io/install.sh | sh -
- 安装neovim,vim的项目已经不再维护了,neovim还很活跃(赞美大佬)!
sudo add-apt-repository ppa:neovim-ppa/stable
sudo apt update
sudo apt install neovim
- neovim最新版可以直接去下载官方构建完成的压缩包直接解压
# 下载
sudo wget https://github.com/neovim/neovim/releases/download/stable/nvim-linux64.tar.gz
# 解压
sudo tar xzvf nvim-linux64.tar.gz
# 移动到应用安装目录
sudo mv nvim-linux64 /usr/local/nvim
# 建立软连接
sudo ln -s /usr/local/nvim/bin/nvim /usr/bin/nvim
# 看看版本号,如果看到版本号就说明安装成功啦!
nvim -v
# NVIM v0.9.4
# Build type: Release
# LuaJIT 2.1.1692716794
- neovim的配置,参考我的vim编辑器配置,然后将其导入neovim的配置
~/.config/nvim/init.vim中,这里是为了和老版本兼容,当然你也可以用init.lua。
# 在init.vim中写入下面的内容引入之前vim的配置
source ~/.vimrc
好啦,前端需要的东西就这些啦,✿✿✿完结撒花✿✿✿


 2739
2739


 被折叠的 条评论
为什么被折叠?
被折叠的 条评论
为什么被折叠?
 到【灌水乐园】发言


