


Particle Groups
粒子群组
At the beginning of this chapter, we stated particles are in groups, which is by default the empty group (‘’). Using the GroupGoal affector is it possible to let the particle change groups. To visualize this we would like to create a small firework, where rockets start into space and explode in the air into a spectacular firework.
在本章开头,我们说明了粒子是成组的,默认情况下是空组(“”)。使用GroupGoal影响器可以让粒子更改群组。为了将其形象化,我们想创造一个小型烟花,火箭从太空发射,在空中爆炸,形成壮观的烟花。
The example is divided into 2 parts. The 1st part called “Launch Time” is concerned to set up the scene and introduce particle groups and the 2nd part called “Let there be fireworks” focuses on the group changes.
该示例分为两部分。第一部分称为“发射时间”,是关于设置场景和引入粒子组,第二部分称为“让有烟花”侧重于群组的变化。
Let’s get started!
让我们开始吧!
Launch Time
发射时间
To get it going we create a typical dark scene:
为了让它继续下去,我们创建了一个典型的黑暗场景:
import QtQuick 2.5
import QtQuick.Particles 2.0

Rectangle {
    id: root
    width: 480; height: 240
    color: "#1F1F1F"
    property bool tracer: false
}
The tracer property will be used to switch the tracer scene wide on and off. The next thing is to declare our particle system:
“跟踪器”属性将用于打开和关闭整个跟踪器场景。下一件事是声明我们的粒子系统:
ParticleSystem {
    id: particleSystem
}
And our two image particles (one for the rocket and one for the exhaust smoke):
以及我们的两个图像粒子(一个用于火箭,一个用于尾气):
ImageParticle {
    id: smokePainter
    system: particleSystem
    groups: ['smoke']
    source: "assets/particle.png"
    alpha: 0.3
    entryEffect: ImageParticle.None
}

ImageParticle {
    id: rocketPainter
    system: particleSystem
    groups: ['rocket']
    source: "assets/rocket.png"
    entryEffect: ImageParticle.None
}
You can see in on the images, they use the groups property to declare to which group the particle belongs. It is enough to just declare a name and an implicit group will be created by Qt Quick.
您可以在图像中看到,它们使用“groups”属性来声明粒子属于哪个群组。只需声明一个名称就足够了,Qt Quick将创建一个隐式组。
Now it’s time to emit some rockets into the air. For this, we create an emitter on the bottom of our scene and set the velocity in an upward direction. To simulate some gravity we set an acceleration downwards:
现在是向空中发射火箭的时候了。为此,我们在场景底部创建一个发射器,并设置向上方向的速度。为了模拟重力,我们设置了向下的加速度:
Emitter {
    id: rocketEmitter
    anchors.bottom: parent.bottom
    width: parent.width; height: 40
    system: particleSystem
    group: 'rocket'
    emitRate: 2
    maximumEmitted: 4
    lifeSpan: 4800
    lifeSpanVariation: 400
    size: 32
    velocity: AngleDirection { angle: 270; magnitude: 150; magnitudeVariation: 10 }
    acceleration: AngleDirection { angle: 90; magnitude: 50 }
    Tracer { color: 'red'; visible: root.tracer }
}
The emitter is in the group ‘rocket’, the same as our rocket particle painter. Through the group name, they are bound together. The emitter emits particles into the group ‘rocket’ and the rocket particle painter will pain them.
发射器在“rocket”组中,与我们的火箭粒子绘制器相同。通过组名,它们被绑定在一起。发射器将粒子发射到“rocket”组中,火箭粒子绘制器将绘制显示。
For the exhaust, we use a trail emitter, which follows our rocket. It declares an own group called ‘smoke’ and follows the particles from the ‘rocket’ group:
对于尾气,我们使用跟踪火箭的尾迹发射器。它宣布了一个名为“smoke”的小组,并跟踪来自“rocket”小组的粒子:
TrailEmitter {
    id: smokeEmitter
    system: particleSystem
    emitHeight: 1
    emitWidth: 4
    group: 'smoke'
    follow: 'rocket'
    emitRatePerParticle: 96
    velocity: AngleDirection { angle: 90; magnitude: 100; angleVariation: 5 }
    lifeSpan: 200
    size: 16
    sizeVariation: 4
    endSize: 0
}
The smoke is directed downwards to simulate the force the smoke comes out of the rocket. The emitHeight and emitWidth specify the are around the particle followed from where the smoke particles shall be emitted. If this is not specified then they are of the particle followed is taken but for this example, we want to increase the effect that the particles stem from a central point near the end of the rocket.
烟雾被向下引导,以模拟烟雾从火箭中冒出的力。emitHeight和emitWidth指定了粒子周围的位置,以及烟雾粒子的发射位置。如果未指定,则它们是跟随的粒子,但在本例中,我们希望增加粒子来自火箭末端附近中心点的效果。
If you start the example now you will see the rockets fly up and some are even flying out of the scene. As this is not really wanted we need to slow them down before they leave the screen. A friction affector can be used here to slow the particles down to a minimum threshold:
如果你现在开始这个例子,你会看到火箭飞起来,有些甚至飞出了场景。因为这不是我们真正想要的,所以我们需要在他们离开屏幕之前让他们慢下来。这里可以使用摩擦影响器将颗粒速度降低到最小阈值:
Friction {
    groups: ['rocket']
    anchors.top: parent.top
    width: parent.width; height: 80
    system: particleSystem
    threshold: 5
    factor: 0.9
}
In the friction affector, you also need to declare which groups of particles it shall affect. The friction will slow all rockets, which are 80 pixels downwards from the top of the screen down by a factor of 0.9 (try 100 and you will see they almost stop immediately) until they reach a velocity of 5 pixels per second. As the particles have still an acceleration downwards applied the rockets will start sinking toward the ground after they reach the end of their life-span.
在“摩擦力影响器”中,还需要声明它将影响哪些粒子组。摩擦将使所有火箭减速,从屏幕顶部向下80像素,下降0.9倍(尝试100次,你会看到它们几乎立即停止),直到它们达到每秒5像素的速度。由于粒子仍有向下施加的加速度,火箭在寿命结束后将开始向地面下沉。
As climbing up in the air is hard work and a very unstable situation we want to simulate some turbulences while the ship is climbing:
由于在空中攀爬是一项艰苦的工作,而且是一种非常不稳定的情况,我们希望在船舶攀爬时模拟一些湍流:
Turbulence {
    groups: ['rocket']
    anchors.bottom: parent.bottom
    width: parent.width; height: 160
    system: particleSystem
    strength: 25
    Tracer { color: 'green'; visible: root.tracer }
}
Also, the turbulence needs to declare which groups it shall affect. The turbulence itself reaches from the bottom 160 pixels upwards (until it reaches the border of the friction). They also could overlap.
此外,湍流还需要声明它将影响哪些群组。湍流本身从底部向上达到160像素(直到到达摩擦边界)。它们也可能重叠。
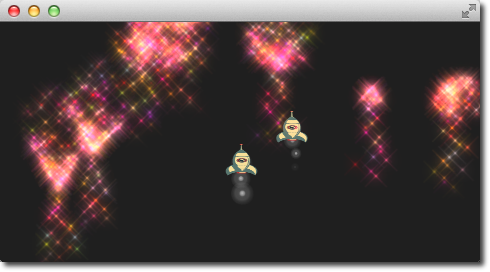
When you start the example now you will see the rockets are climbing up and then will be slowed down by the friction and fall back to the ground by the still applied downwards acceleration. The next thing would be to start the firework.
当你现在开始这个例子时,你会看到火箭正在向上爬升,然后会因摩擦力而减速,并因仍然施加的向下加速度而落回地面。接下来就是开始放烟火。
TIP
注
The image shows the scene with the tracers enabled to show the different areas. Rocket particles are emitted in the red area and then affected by the turbulence in the blue area. Finally, they are slowed down by the friction affector in the green area and start falling again, because of the steady applied downwards acceleration.
该图像显示了启用跟踪器以显示不同区域的场景。火箭粒子在红色区域发射,然后受到蓝色区域湍流的影响。最后,绿色区域中的摩擦影响器会减慢它们的速度,并由于稳定的向下加速度而再次开始下降。
Let there be fireworks
放烟花吧
To be able to change the rocket into a beautiful firework we need add a ParticleGroup to encapsulate the changes:
为了将火箭变成美丽的烟花,我们需要添加一个ParticleGroup来封装这些变化:
ParticleGroup {
    name: 'explosion'
    system: particleSystem
}
We change to the particle group using a GroupGoal affector. The group goal affector is placed near the vertical center of the screen and it will affect the group ‘rocket’. With the groupGoal property we set the target group for the change to ‘explosion’, our earlier defined particle group:
我们使用一个GroupGoal影响因子切换到粒子组。小组目标影响器位于屏幕的垂直中心附近,它将影响群组“rocket”。通过groupGoal属性,我们将目标组设置为“explosion”,这是我们之前定义的粒子组:
GroupGoal {
    id: rocketChanger
    anchors.top: parent.top
    width: parent.width; height: 80
    system: particleSystem
    groups: ['rocket']
    goalState: 'explosion'
    jump: true
    Tracer { color: 'blue'; visible: root.tracer }
}
The jump property states the change in groups shall be immediately and not after a certain duration.
跳转属性jump规定分组的变化应立即进行,而不是在一定的持续时间之后。
TIP
注
In the Qt 5 alpha release we could the duration for the group change not get working. Any ideas?
在Qt5 alpha版本中,我们可以看到组更改的持续时间不起作用。有什么想法吗?
As the group of the rocket now changes to our ‘explosion’ particle group when the rocket particle enters the group goal area we need to add the firework inside the particle group:
当火箭粒子进入组目标区域时,火箭组现在变为我们的“explosion”粒子组,我们需要在粒子组内添加烟花:
// inside particle group
TrailEmitter {
    id: explosionEmitter
    anchors.fill: parent
    group: 'sparkle'
    follow: 'rocket'
    lifeSpan: 750
    emitRatePerParticle: 200
    size: 32
    velocity: AngleDirection { angle: -90; angleVariation: 180; magnitude: 50 }
}
The explosion emits particles into the ‘sparkle’ group. We will define soon a particle painter for this group. The trail emitter used follows the rocket particle and emits per rocket 200 particles. The particles are directed upwards and vary by 180 degrees.
爆炸将粒子发射到“sparkle”群组中。我们将很快为这个群组定义一个粒子绘制器。使用的轨迹发射器跟随火箭粒子,每火箭发射200个粒子。粒子朝上,变化180度。
As the particles are emitted into the ‘sparkle’ group, we also need to define a particle painter for the particles:
当粒子发射到“sparkle”组时,我们还需要为粒子定义一个粒子绘制器:
ImageParticle {
    id: sparklePainter
    system: particleSystem
    groups: ['sparkle']
    color: 'red'
    colorVariation: 0.6
    source: "assets/star.png"
    alpha: 0.3
}
The sparkles of our firework shall be little red stars with an almost transparent color to allow some shine effects.
我们的焰火的火花将是小红星,颜色几乎透明,以允许一些发光效果。
To make the firework more spectacular we also add a second trail emitter to our particle group, which will emit particles in a narrow cone downwards:
为了让烟花更加壮观,我们还向粒子组添加了第二个轨迹发射器,它将向下发射窄圆锥体中的粒子:
// inside particle group
TrailEmitter {
    id: explosion2Emitter
    anchors.fill: parent
    group: 'sparkle'
    follow: 'rocket'
    lifeSpan: 250
    emitRatePerParticle: 100
    size: 32
    velocity: AngleDirection { angle: 90; angleVariation: 15; magnitude: 400 }
}
Otherwise, the setup is similar to the other explosion trail emitter. That’s it.
当然,设置与另一个爆炸轨迹发射器类似。就这样。
Here is the final result.
以下是最终结果。
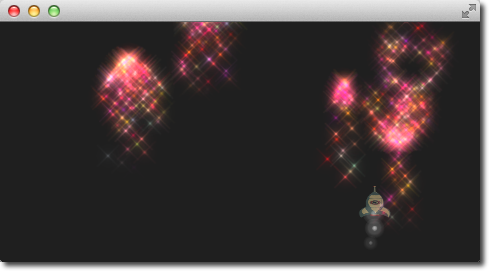
Here is the full source code of the rocket firework.
以下是火箭烟火的完整源代码。
import QtQuick
import QtQuick.Particles

Rectangle {
    id: root
    width: 480; height: 240
    color: "#1F1F1F"
    property bool tracer: false

    ParticleSystem {
        id: particleSystem
    }

    ImageParticle {
        id: smokePainter
        system: particleSystem
        groups: ['smoke']
        source: "assets/particle.png"
        alpha: 0.3
    }

    ImageParticle {
        id: rocketPainter
        system: particleSystem
        groups: ['rocket']
        source: "assets/rocket.png"
        entryEffect: ImageParticle.Fade
    }

    Emitter {
        id: rocketEmitter
        anchors.bottom: parent.bottom
        width: parent.width; height: 40
        system: particleSystem
        group: 'rocket'
        emitRate: 2
        maximumEmitted: 8
        lifeSpan: 4800
        lifeSpanVariation: 400
        size: 128
        velocity: AngleDirection { angle: 270; magnitude: 150; magnitudeVariation: 10 }
        acceleration: AngleDirection { angle: 90; magnitude: 50 }
        Tracer { color: 'red'; visible: root.tracer }
    }

    TrailEmitter {
        id: smokeEmitter
        system: particleSystem
        group: 'smoke'
        follow: 'rocket'
        size: 16
        sizeVariation: 8
        emitRatePerParticle: 16
        velocity: AngleDirection { angle: 90; magnitude: 100; angleVariation: 15 }
        lifeSpan: 200
        Tracer { color: 'blue'; visible: root.tracer }
    }

    Friction {
        groups: ['rocket']
        anchors.top: parent.top
        width: parent.width; height: 80
        system: particleSystem
        threshold: 5
        factor: 0.9

    }

    Turbulence {
        groups: ['rocket']
        anchors.bottom: parent.bottom
        width: parent.width; height: 160
        system: particleSystem
        strength:25
        Tracer { color: 'green'; visible: root.tracer }
    }


    ImageParticle {
        id: sparklePainter
        system: particleSystem
        groups: ['sparkle']
        color: 'red'
        colorVariation: 0.6
        source: "assets/star.png"
        alpha: 0.3
    }

    GroupGoal {
        id: rocketChanger
        anchors.top: parent.top
        width: parent.width; height: 80
        system: particleSystem
        groups: ['rocket']
        goalState: 'explosion'
        jump: true
        Tracer { color: 'blue'; visible: root.tracer }
    }

    ParticleGroup {
        name: 'explosion'
        system: particleSystem

        TrailEmitter {
            id: explosionEmitter
            anchors.fill: parent
            group: 'sparkle'
            follow: 'rocket'
            lifeSpan: 750
            emitRatePerParticle: 200
            size: 32
            velocity: AngleDirection { angle: -90; angleVariation: 180; magnitude: 50 }
        }

        TrailEmitter {
            id: explosion2Emitter
            anchors.fill: parent
            group: 'sparkle'
            follow: 'rocket'
            lifeSpan: 250
            emitRatePerParticle: 100
            size: 32
            velocity: AngleDirection { angle: 90; angleVariation: 15; magnitude: 400 }
        }
    }
}示例源码下载


 7260
7260


 被折叠的 条评论
为什么被折叠?
被折叠的 条评论
为什么被折叠?
 到【灌水乐园】发言


