


Vertex Shader
顶点着色器
The vertex shader can be used to manipulate the vertexes provided by the shader effect. In normal cases, the shader effect has 4 vertexes (top-left, top-right, bottom-left and bottom-right). Each vertex reported is from type vec4. To visualize the vertex shader we will program a genie effect. This effect is used to let a rectangular window area vanish into one point, like a genie disappearing into a lamp.
顶点着色器可用于操纵着色器效果提供的顶点。在正常情况下,着色器效果有4个顶点(左上、右上、左下和右下)。报告的每个顶点都来自vec4类型。为了可视化顶点着色器,我们将编程一个精灵效果。这种效果可以让矩形窗口区域消失在一个点上,就像精灵消失在一盏灯中一样。
Setting up the scene
设置场景
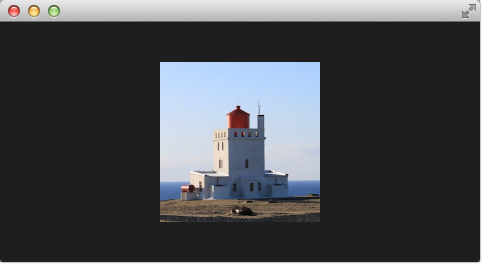
First, we will set up our scene with an image and a shader effect.
首先,我们将使用图像和着色器效果设置场景。
import QtQuick
Rectangle {
width: 480; height: 240
color: '#1e1e1e'
Image {
id: sourceImage
width: 160; height: width
source: "../../assets/lighthouse.jpg"
visible: false
}
Rectangle {
width: 160; height: width
anchors.centerIn: parent
color: '#333333'
}
ShaderEffect {
id: genieEffect
width: 160; height: width
anchors.centerIn: parent
property variant source: sourceImage
property bool minimized: false
MouseArea {
anchors.fill: parent
onClicked: genieEffect.minimized = !genieEffect.minimized
}
}
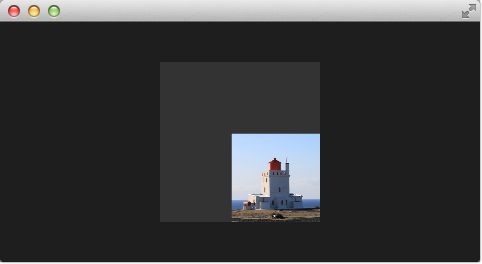
}This provides a scene with a dark background and a shader effect using an image as the source texture. The original image is not visible on the image produced by our genie effect. Additional we added a dark rectangle on the same geometry as the shader effect so we can better detect where we need to click to revert the effect.
这将提供一个具有深色背景的场景,以及使用图像作为源纹理的着色器效果。原始图像在精灵效果产生的图像上不可见。另外,我们在与着色器效果相同的几何体上添加了一个黑色矩形,这样我们可以更好地检测需要单击以恢复效果的位置。
The effect is triggered by clicking on the image, this is defined by the mouse area covering the effect. In the onClicked handler we toggle the custom boolean property minimized. We will use this property later to toggle the effect.
点击图像会触发效果,这是由覆盖效果的鼠标区域定义的。在onClicked处理kkd中,我们切换自定义布尔属性minimized。稍后我们将使用此属性触发效果。
Minimize and normalize
最小化和正常化
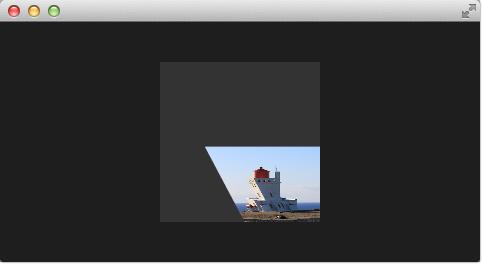
After we have set up the scene, we define a property of type real called minimize, the property will contain the current value of our minimization. The value will vary from 0.0 to 1.0 and is controlled by a sequential animation.
设置完场景后,我们定义了一个名为minimize的实数类型属性,该属性将包含最小化的当前值。该值将在0.0到1.0之间变化,并由连续动画控制。
property real minimize: 0.0

SequentialAnimation on minimize {
    id: animMinimize
    running: genieEffect.minimized
    PauseAnimation { duration: 300 }
    NumberAnimation { to: 1; duration: 700; easing.type: Easing.InOutSine }
    PauseAnimation { duration: 1000 }
}

SequentialAnimation on minimize {
    id: animNormalize
    running: !genieEffect.minimized
    NumberAnimation { to: 0; duration: 700; easing.type: Easing.InOutSine }
    PauseAnimation { duration: 1300 }
}
The animation is triggered by the toggling of the minimized property. Now that we have set up all our surroundings we finally can look at our vertex shader.
动画是通过切换最小化属性触发的。现在,我们已经设置了所有的环境,我们终于可以看看我们的顶点着色器。
#version 440

layout(location=0) in vec4 qt_Vertex;
layout(location=1) in vec2 qt_MultiTexCoord0;

layout(location=0) out vec2 qt_TexCoord0;

layout(std140, binding=0) uniform buf {
    mat4 qt_Matrix;
    float qt_Opacity;

    float minimize;
    float width;
    float height;
} ubuf;

out gl_PerVertex {
    vec4 gl_Position;
};

void main() {
    qt_TexCoord0 = qt_MultiTexCoord0;
    vec4 pos = qt_Vertex;
    pos.y = mix(qt_Vertex.y, ubuf.height, ubuf.minimize);
    pos.x = mix(qt_Vertex.x, ubuf.width, ubuf.minimize);
    gl_Position = ubuf.qt_Matrix * pos;
}
The vertex shader is called for each vertex so four times, in our case. The default qt defined parameters are provided, like qt_Matrix, qt_Vertex, qt_MultiTexCoord0, qt_TexCoord0. We have discussed the variable already earlier. Additional we link the minimize, width and height variables from our shader effect into our vertex shader code. In the main function, we store the current texture coordinate in our qt_TexCoord0 to make it available to the fragment shader. Now we copy the current position and modify the x and y position of the vertex:
在我们的例子中,顶点着色器对每个顶点调用四次。提供了默认的qt定义参数,如qt_Matrix, qt_Vertex, qt_MultiTexCoord0, qt_TexCoord0。我们之前已经讨论过这个变量。另外,我们将着色器效果中的minimize、宽度width 和高度height 变量链接到顶点着色器代码中。在main函数中,我们将当前纹理坐标存储在qt_TexCoord0中,以使其可用于片段着色器。现在,我们复制当前位置并修改顶点的x和y位置:
vec4 pos = qt_Vertex;
pos.y = mix(qt_Vertex.y, ubuf.height, ubuf.minimize);
pos.x = mix(qt_Vertex.x, ubuf.width, ubuf.minimize);
The mix(…) function provides a linear interpolation between the first 2 parameters on the point (0.0-1.0) provided by the 3rd parameter. So in our case, we interpolate for y between the current y position and the hight based on the current minimized value, similar for x. Bear in mind the minimized value is animated by our sequential animation and travels from 0.0 to 1.0 (or vice versa).
mix(…)函数在第三个参数提供的点(0.0-1.0)上的前两个参数之间提供线性插值。因此,在我们的例子中,我们根据当前最小值在当前y位置和高点之间为y插值,类似于x。请记住,最小值由我们的连续动画设置动画,并从0.0移动到1.0(反之亦然)。
The resulting effect is not really the genie effect but is already a great step towards it.
由此产生的效果并不是真正的精灵效果,而是朝着它迈出了一大步。
Primitive Bending
原始弯曲
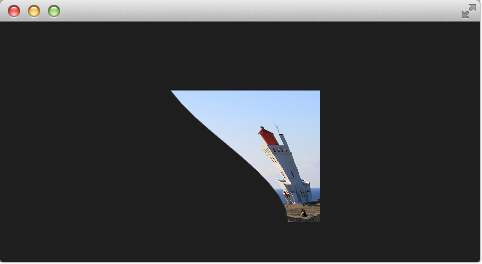
So minimized the x and y components of our vertexes. Now we would like to slightly modify the x manipulation and make it depending on the current y value. The needed changes are pretty small. The y-position is calculated as before. The interpolation of the x-position depends now on the vertexes y-position:
所以最小化顶点的x和y分量。现在,我们想稍微修改x操作,使其取决于当前的y值。所需的更改非常小。y位置的计算与之前一样。x位置的插值现在取决于顶点的y位置:
float t = pos.y / ubuf.height;
pos.x = mix(qt_Vertex.x, ubuf.width, t * minimize);
This results in an x-position tending towards the width when the y-position is larger. In other words, the upper 2 vertexes are not affected at all as they have a y-position of 0 and the lower two vertexes x-positions both bend towards the width, so they bend towards the same x-position.
这导致当y位置较大时,x位置趋向于宽度。换句话说,上面两个顶点完全不受影响,因为它们的y位置为0,而下面两个顶点的x位置都向宽度弯曲,因此它们向相同的x位置弯曲。
Better Bending
更好的弯曲
As the bending is not really satisfying currently we will add several parts to improve the situation. First, we enhance our animation to support an own bending property. This is necessary as the bending should happen immediately and the y-minimization should be delayed shortly. Both animations have in the sum the same duration (300+700+1000 and 700+1300).
由于弯曲不是真正令人满意,目前我们将增加几个部分,以改善这种情况。首先,我们增强动画以支持自己的弯曲特性。这是必要的,因为弯曲应立即发生,y最小化应很快延迟。两个动画的总持续时间相同(300+700+1000和700+1300)。
We first add and animate bend from QML.
我们首先从QML添加弯曲并设置动画。
property real bend: 0.0
property bool minimized: false


// change to parallel animation
ParallelAnimation {
    id: animMinimize
    running: genieEffect.minimized
    SequentialAnimation {
        PauseAnimation { duration: 300 }
        NumberAnimation {
            target: genieEffect; property: 'minimize';
            to: 1; duration: 700;
            easing.type: Easing.InOutSine
        }
        PauseAnimation { duration: 1000 }
    }
    // adding bend animation
    SequentialAnimation {
        NumberAnimation {
            target: genieEffect; property: 'bend'
            to: 1; duration: 700;
            easing.type: Easing.InOutSine }
        PauseAnimation { duration: 1300 }
    }
}
We then add bend to the uniform buffer, ubuf and use it in the shader to achive a smoother bending.
然后,我们将bend添加到uniform缓冲区ubuf中,并在着色器中使用它来实现更平滑的弯曲。
#version 440
layout(location=0) in vec4 qt_Vertex;
layout(location=1) in vec2 qt_MultiTexCoord0;
layout(location=0) out vec2 qt_TexCoord0;
layout(std140, binding=0) uniform buf {
mat4 qt_Matrix;
float qt_Opacity;
float minimize;
float width;
float height;
float bend;
} ubuf;
out gl_PerVertex {
vec4 gl_Position;
};
void main() {
qt_TexCoord0 = qt_MultiTexCoord0;
vec4 pos = qt_Vertex;
pos.y = mix(qt_Vertex.y, ubuf.height, ubuf.minimize);
float t = pos.y / ubuf.height;
t = (3.0 - 2.0 * t) * t * t;
pos.x = mix(qt_Vertex.x, ubuf.width, t * ubuf.bend);
gl_Position = ubuf.qt_Matrix * pos;
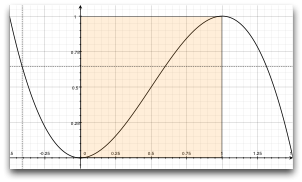
}The curve starts smooth at the 0.0 value, grows then and stops smoothly towards the 1.0 value. Here is a plot of the function in the specified range. For us, only the range from 0..1 is from interest.
曲线从0.0值开始平滑,然后向1.0值平滑增长并停止。下面是指定范围内函数的曲线图。对我们来说,只有0的范围。。1是出于兴趣。
We also need to increase the number of vertex points. The vertex points used can be increased by using a mesh.
我们还需要增加顶点的数量。使用网格可以增加使用的顶点。
mesh: GridMesh { resolution: Qt.size(16, 16) }
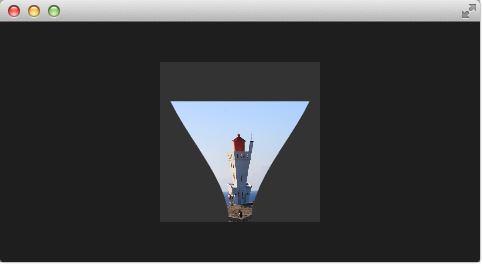
The shader effect now has an equality distributed grid of 16x16 vertexes instead of the 2x2 vertexes used before. This makes the interpolation between the vertexes look much smoother.
着色器效果现在具有由16x16个顶点组成的均匀分布网格,而不是以前使用的2x2个顶点。这使得顶点之间的插值看起来更加平滑。

You can see also the influence of the curve being used, as the bending smoothes at the end nicely. This is where the bending has the strongest effect.
您还可以看到所使用的曲线的影响,因为弯曲在末端很平滑。这是弯曲产生最大影响的地方。
Choosing Sides
选择消失方向
As a final enhancement, we want to be able to switch sides. The side is towards which point the genie effect vanishes. Until now it vanishes always towards the width. By adding a side property we are able to modify the point between 0 and width.
作为最后的增强,我们希望能够改变消失方向。边是精灵效果消失的方向。直到现在,它总是向宽度方向消失。通过添加边属性side,我们可以修改0和宽度之间的点。
ShaderEffect {
    ...
    property real side: 0.5
    ...
}
#version 440

layout(location=0) in vec4 qt_Vertex;
layout(location=1) in vec2 qt_MultiTexCoord0;

layout(location=0) out vec2 qt_TexCoord0;

layout(std140, binding=0) uniform buf {
    mat4 qt_Matrix;
    float qt_Opacity;

    float minimize;
    float width;
    float height;
    float bend;
    float side;
} ubuf;

out gl_PerVertex {
    vec4 gl_Position;
};

void main() {
    qt_TexCoord0 = qt_MultiTexCoord0;
    vec4 pos = qt_Vertex;
    pos.y = mix(qt_Vertex.y, ubuf.height, ubuf.minimize);
    float t = pos.y / ubuf.height;
    t = (3.0 - 2.0 * t) * t * t;
    pos.x = mix(qt_Vertex.x, ubuf.side * ubuf.width, t * ubuf.bend);
    gl_Position = ubuf.qt_Matrix * pos;
}
Packaging
打包
The last thing to-do is packaging our effect nicely. For this, we extract our genie effect code into an own component called GenieEffect. It has the shader effect as the root element. We removed the mouse area as this should not be inside the component as the triggering of the effect can be toggled by the minimized property.
最后要做的是把我们的效果很好地包装起来。为此,我们将精灵效果代码提取到一个名为GenieEffect的组件中。它具有作为根元素的着色器效果。我们删除了鼠标区域,因为它不应该在组件内部,因为可以通过最小化属性minimized切换效果的触发。
// GenieEffect.qml
import QtQuick

ShaderEffect {
    id: genieEffect
    width: 160; height: width
    anchors.centerIn: parent
    property variant source
    mesh: GridMesh { resolution: Qt.size(10, 10) }
    property real minimize: 0.0
    property real bend: 0.0
    property bool minimized: false
    property real side: 1.0


    ParallelAnimation {
        id: animMinimize
        running: genieEffect.minimized
        SequentialAnimation {
            PauseAnimation { duration: 300 }
            NumberAnimation {
                target: genieEffect; property: 'minimize';
                to: 1; duration: 700;
                easing.type: Easing.InOutSine
            }
            PauseAnimation { duration: 1000 }
        }
        SequentialAnimation {
            NumberAnimation {
                target: genieEffect; property: 'bend'
                to: 1; duration: 700;
                easing.type: Easing.InOutSine }
            PauseAnimation { duration: 1300 }
        }
    }

    ParallelAnimation {
        id: animNormalize
        running: !genieEffect.minimized
        SequentialAnimation {
            NumberAnimation {
                target: genieEffect; property: 'minimize';
                to: 0; duration: 700;
                easing.type: Easing.InOutSine
            }
            PauseAnimation { duration: 1300 }
        }
        SequentialAnimation {
            PauseAnimation { duration: 300 }
            NumberAnimation {
                target: genieEffect; property: 'bend'
                to: 0; duration: 700;
                easing.type: Easing.InOutSine }
            PauseAnimation { duration: 1000 }
        }
    }

    vertexShader: "genieeffect.vert.qsb"
}
// genieeffect.vert
#version 440
layout(location=0) in vec4 qt_Vertex;
layout(location=1) in vec2 qt_MultiTexCoord0;
layout(location=0) out vec2 qt_TexCoord0;
layout(std140, binding=0) uniform buf {
mat4 qt_Matrix;
float qt_Opacity;
float minimize;
float width;
float height;
float bend;
float side;
} ubuf;
out gl_PerVertex {
vec4 gl_Position;
};
void main() {
qt_TexCoord0 = qt_MultiTexCoord0;
vec4 pos = qt_Vertex;
pos.y = mix(qt_Vertex.y, ubuf.height, ubuf.minimize);
float t = pos.y / ubuf.height;
t = (3.0 - 2.0 * t) * t * t;
pos.x = mix(qt_Vertex.x, ubuf.side * ubuf.width, t * ubuf.bend);
gl_Position = ubuf.qt_Matrix * pos;
}You can use now the effect simply like this:
现在,您可以简单地使用以下效果:
import QtQuick

Rectangle {
    width: 480; height: 240
    color: '#1e1e1e'

    GenieEffect {
        source: Image { source: '../../assets/lighthouse.jpg' }
        MouseArea {
            anchors.fill: parent
            onClicked: parent.minimized = !parent.minimized
        }
    }
}
We have simplified the code by removing our background rectangle and we assigned the image directly to the effect, instead of loading it inside a standalone image element.
我们通过删除背景矩形简化了代码,并将图像直接指定给效果,而不是将其加载到独立的图像元素中。
示例源码下载


 241
241


 被折叠的 条评论
为什么被折叠?
被折叠的 条评论
为什么被折叠?
 到【灌水乐园】发言


