


Using FileIO
使用FileIO
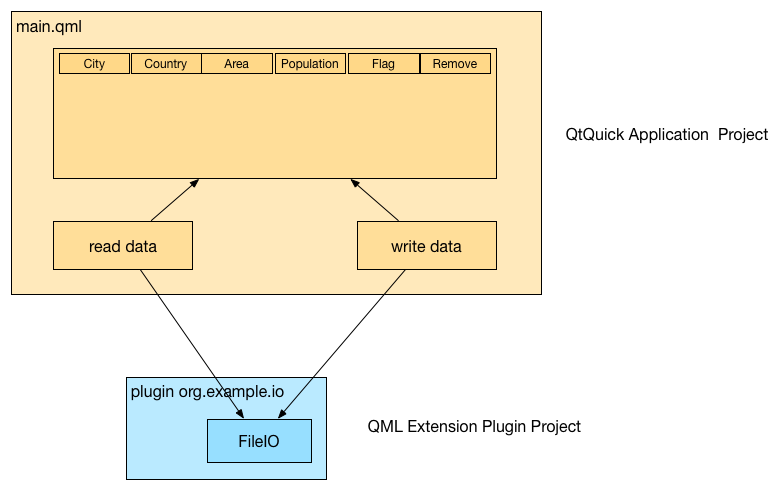
Now we can use our newly created file to access some data. In this example, we will some city data in a JSON format and display it in a table. We build this as two projects: one for the extension plugin (called fileio) which provides us a way to read and write text from a file, and the other, which displays the data in a table, (CityUI). The CityUI uses the fileioextension for reading and writing files.
现在我们可以使用新创建的文件来访问一些数据。在本例中,我们将以JSON格式显示一些城市数据,并将其显示在表中。我们将其构建为两个项目:一个用于扩展插件(称为fileio),它为我们提供了从文件中读取和写入文本的方法,另一个用于在表中显示数据(CityUI)。CityUI使用fileio扩展读取和写入文件。
JSON data is just text that is formatted in such a way that it can be converted into a valid JS object/array and back to text. We use our FileIO to read the JSON formatted data and convert it into a JS object using the built in Javascript function JSON.parse(). The data is later used as a model for the table view. This is implemented in the read document and write document functions shown below.
JSON数据只是文本,其格式可以转换为有效的JS对象/数组并返回文本。我们使用FileIO读取JSON格式的数据,并使用内置Javascript函数JSON.parse()将其转换为JS对象。这些数据后来被用作表视图的模型。这是在如下所示的读文档和写文档功能中实现的。
FileIO {
    id: io
}

function readDocument() {
    io.source = openDialog.fileUrl
    io.read()
    view.model = JSON.parse(io.text)
}

function saveDocument() {
    var data = view.model
    io.text = JSON.stringify(data, null, 4)
    io.write()
}
The JSON data used in this example is in the cities.json file. It contains a list of city data entries, where each entry contains interesting data about the city such as what is shown below.
本例中使用的JSON数据位于cities.json文件中。它包含一个城市数据条目列表,每个条目都包含有关城市的有趣数据,如下图所示。
[
    {
        "area": "1928",
        "city": "Shanghai",
        "country": "China",
        "flag": "22px-Flag_of_the_People's_Republic_of_China.svg.png",
        "population": "13831900"
    },
    ...
]
The Application Window
应用程序窗口
We use the Qt Creator QtQuick Application wizard to create a Qt Quick Controls 2 based application. We will not use the new QML forms as this is difficult to explain in a book, although the new forms approach with a ui.qml file is much more usable than previous. So you can remove/delete the forms file for now.
我们使用Qt Creator QtQuick应用程序向导创建基于Qt Quick Controls 2的应用程序。我们不会使用新的QML表单,因为这很难在一本书中解释,尽管新表单使用的是ui.qml文件比以前的更有用。因此,您现在可以删除表单文件。
The basic setup is an ApplicationWindow which can contain a toolbar, menubar, and status bar. We will only use the menubar to create some standard menu entries for opening and saving the document. The basic setup will just display an empty window.
基本设置是一个应用程序窗口ApplicationWindow ,其中可以包含工具栏、菜单栏和状态栏。我们将只使用菜单栏创建一些用于打开和保存文档的标准菜单项。基本设置只会显示一个空窗口。
import QtQuick 2.5
import QtQuick.Controls 1.3
import QtQuick.Window 2.2
import QtQuick.Dialogs 1.2

ApplicationWindow {
    id: root
    title: qsTr("City UI")
    width: 640
    height: 480
    visible: true
}
Using Actions
使用动作
To better use/reuse our commands we use the QML Action type. This will allow us later to use the same action also for a potential toolbar. The open and save and exit actions are quite standard. The open and save action do not contain any logic yet, this we will come later. The menubar is created with a file menu and these three action entries. Additional we prepare already a file dialog, which will allow us to pick our city document later. A dialog is not visible when declared, you need to use the open() method to show it.
为了更好地使用/重用我们的命令,我们使用QML Action类型。这将允许我们以后对潜在的工具栏使用相同的操作。打开、保存和退出操作非常标准。“打开”和“保存”操作还不包含任何逻辑,我们将稍后介绍。菜单栏由一个文件菜单和这三个操作条目创建。另外,我们已经准备了一个文件对话框,它将允许我们以后选择我们的城市文件。对话框在声明时不可见,需要使用open()方法来显示它。
Action {
    id: save
    text: qsTr("&Save")
    shortcut: StandardKey.Save
    onTriggered: {
        saveDocument()
    }
}

Action {
    id: open
    text: qsTr("&Open")
    shortcut: StandardKey.Open
    onTriggered: openDialog.open()
}

Action {
    id: exit
    text: qsTr("E&xit")
    onTriggered: Qt.quit();
}

menuBar: MenuBar {
    Menu {
        title: qsTr("&File")
        MenuItem { action: open }
        MenuItem { action: save }
        MenuSeparator {}
        MenuItem { action: exit }
    }
}

FileDialog {
    id: openDialog
    onAccepted: {
        root.readDocument()
    }
}
Formatting the Table
格式化表格
The content of the city data shall be displayed in a table. For this, we use the TableView control and declare 4 columns: city, country, area, population. Each column is a standard TableViewColumn. Later we will add columns for the flag and remove operation which will require a custom column delegate.
城市数据的内容应显示在表格中。为此,我们使用TableView控件并声明4列:城市、国家、地区、人口。每列都是标准的TableViewColumn。稍后,我们将为标志添加列,并删除需要自定义列委托的操作。
TableView {
    id: view
    anchors.fill: parent
    TableViewColumn {
        role: 'city'
        title: "City"
        width: 120
    }
    TableViewColumn {
        role: 'country'
        title: "Country"
        width: 120
    }
    TableViewColumn {
        role: 'area'
        title: "Area"
        width: 80
    }
    TableViewColumn {
        role: 'population'
        title: "Population"
        width: 80
    }
}
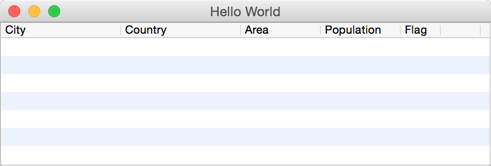
Now the application should show you a menubar with a file menu and an empty table with 4 table headers. The next step will be to populate the table with useful data using our FileIO extension.
现在,应用程序应该向您显示一个带有文件菜单的菜单栏和一个带有4个表头的空表。下一步是使用我们的FileIO扩展用有用的数据填充表。
The cities.json document is an array of city entries. Here is an example.
cities.json文档是城市条目的数组。下面是一个例子。
[
    {
        "area": "1928",
        "city": "Shanghai",
        "country": "China",
        "flag": "22px-Flag_of_the_People's_Republic_of_China.svg.png",
        "population": "13831900"
    },
    ...
]
Our job is it to allow the user to select the file, read it, convert it and set it onto the table view.
我们的工作是允许用户选择文件、读取文件、转换文件并将其设置到表视图中。
Reading Data
读取数据
For this we let the open action open the file dialog. When the user has selected a file the onAccepted method is called on the file dialog. There we call the readDocument() function. The readDocument() function sets the URL from the file dialog to our FileIO object and calls the read() method. The loaded text from FileIO is then parsed using the JSON.parse() method and the resulting object is directly set onto the table view as a model. How convenient is that?
为此,我们让“打开”操作打开“文件”对话框。当用户选择了一个文件时,会在文件对话框中调用onAccepted方法。我们在这里调用readDocument()函数。readDocument()函数将文件对话框中的URL设置为FileIO对象,并调用read()方法。然后使用JSON解析从FileIO加载的文本。parse()方法,生成的对象作为模型直接设置到表视图中。这方便吗?
Action {
    id: open
    ...
    onTriggered: {
        openDialog.open()
    }
}

...

FileDialog {
    id: openDialog
    onAccepted: {
        root.readDocument()
    }
}

function readDocument() {
    io.source = openDialog.fileUrl
    io.read()
    view.model = JSON.parse(io.text)
}


FileIO {
    id: io
}
Writing Data
写入数据
For saving the document, we hook up the “save” action to the saveDocument() function. The save document function takes the model from the view, which is a JS object and converts it into a string using the JSON.stringify() function. The resulting string is set to the text property of our FileIO object and we call write() to save the data to disk. The “null” and “4” parameters on the stringify function will format the resulting JSON data using indentation with 4 spaces. This is just for better reading of the saved document.
为了保存文档,我们将“save”操作连接到saveDocument()函数。saveDocument()函数从视图中获取模型,该视图是一个JS对象,并使用JSON.stringify() 函数将其转换为字符串。结果字符串被设置为FileIO对象的text属性,我们调用write()将数据保存到磁盘。stringify函数上的“null”和“4”参数将使用带有4个空格的缩进来格式化生成的JSON数据。这只是为了更好地阅读保存的文档。
Action {
    id: save
    ...
    onTriggered: {
        saveDocument()
    }
}

function saveDocument() {
    var data = view.model
    io.text = JSON.stringify(data, null, 4)
    io.write()
}

FileIO {
    id: io
}
This is basically the application with reading, writing and displaying a JSON document. Think about all the time spend by writing XML readers and writers. With JSON all you need is a way to read and write a text file or send receive a text buffer.
这基本上就是一个可以读取、写入和显示JSON文档的应用程序。想想写XML读取器和编写器所花费的所有时间。使用JSON,您只需要读写文本文件或发送接收文本缓冲区。
Finishing Touch
最后的工作
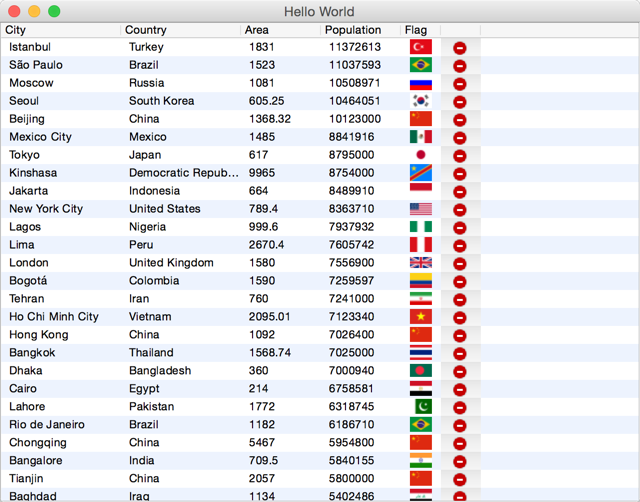
The application is not fully ready yet. We still want to show the flags and allow the user to modify the document by removing cities from the model.
应用程序还没有完全准备好。我们仍然希望显示标志,并允许用户通过从模型中删除城市来修改文档。
In this example, the flag files are stored relative to the main.qml document in a flags folder. To be able to show them the table column needs to define a custom delegate for rendering the flag image.
在本例中,标志文件是相对于flags文件夹中的main.qml文件存储的。为了能够显示它们,表列需要定义一个用于呈现标志图像的自定义委托。
TableViewColumn {
    delegate: Item {
        Image {
            anchors.centerIn: parent
            source: 'flags/' + styleData.value
        }
    }
    role: 'flag'
    title: "Flag"
    width: 40
}
That is all that is needed to show the flag. It exposes the flag property from the JS model as styleData.value to the delegate. The delegate then adjusts the image path to pre-pend 'flags/' and displays it as an Image element.
这就是展示旗帜所需要的一切。它将JS模型中的flag属性作为styleData.value暴露到委托项。然后,委托将图像路径调整,添加前缀'flags/',并将其显示在图像Image元素类型中。
For removing we use a similar technique to display a remove button.
对于移除,我们使用类似的技术来显示移除按钮。
TableViewColumn {
    delegate: Button {
        iconSource: "remove.png"
        onClicked: {
            var data = view.model
            data.splice(styleData.row, 1)
            view.model = data
        }
    }
    width: 40
}
For the data removal operation, we get a hold on the view model and then remove one entry using the JS splice function. This method is available to us as the model is from the type JS array. The splice method changes the content of an array by removing existing elements and/or adding new elements.
对于数据删除操作,我们先保留视图模型,然后使用JS splice函数删除一个条目。我们可以使用这种方法,因为模型来自JS数组类型。splice方法通过删除现有元素和/或添加新元素来更改数组的内容。
A JS array is unfortunately not so smart as a Qt model like the QAbstractItemModel, which will notify the view about row changes or data changes. The view will not show any updated data by now as it is never notified of any changes. Only when we set the data back to the view, the view recognizes there is new data and refreshes the view content. Setting the model again using view.model = data is a way to let the view know there was a data change.
不幸的是,JS数组不如QAbstractItemModel这样的Qt模型智能,后者会通知视图行更改或数据更改。视图现在不会显示任何更新的数据,因为它从未收到任何更改的通知。只有当我们将数据设置回视图时,视图才能识别有新数据并刷新视图内容。使用view.model = data再次设置模型是一种让视图知道数据发生了更改的方法。
示例源码下载


 594
594


 被折叠的 条评论
为什么被折叠?
被折叠的 条评论
为什么被折叠?
 到【灌水乐园】发言


