


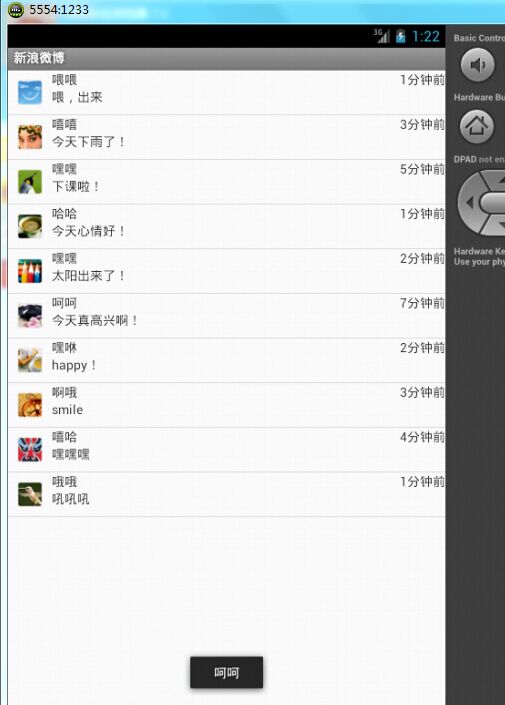
这是运行的效果图
首先新建一个新项目,在drawable-hdpi下导入需要的头像图片。
在layout下新建一个List_item.xml文件,代码如下:
<LinearLayout xmlns:android="http://schemas.android.com/apk/res/android"
    android:layout_width="fill_parent"
    android:layout_height="fill_parent"
    android:orientation="horizontal" >
    //左边图片
    <ImageView
        android:id="@+id/photo"
        android:padding="10dp"
        android:layout_width="48dp"
        android:layout_height="48dp" />
    <LinearLayout
        android:layout_width="fill_parent"
        android:layout_height="wrap_content"
        android:orientation="vertical" >
        <LinearLayout
            android:layout_width="fill_parent"
            android:layout_height="wrap_content"
            android:orientation="horizontal" >
            //发布人
            <TextView
                android:id="@+id/name"
                android:layout_width="wrap_content"
                android:layout_height="wrap_content" />
                //发布时间
           <TextView
                android:id="@+id/publish"
                android:layout_width="fill_parent"
                android:layout_height="wrap_content"
                android:gravity="right" />
        </LinearLayout>
        //发布内容
        <TextView
            android:id="@+id/content"
            android:layout_width="wrap_content"
            android:layout_height="wrap_content" />
    </LinearLayout>
</LinearLayout>
自定义标题栏
在values下新建mytitlebar.xml代码为:
<?xml version="1.0" encoding="utf-8"?>
<resources xmlns:android="http://schemas.android.com/apk/res/android">
    <style name="myTitleBg">

    </style>
    <style name="myTheme" parent="android:Theme">
        <item name="android:windowNoTitle">false</item>
        <item name="android:windowTitleSize">30dp</item>
        <item name="android:windowTitleBackgroundStyle">@style/myTitleBg</item>
    </style>
</resources>
具体代码为:
package com.example.weibo;

import java.util.ArrayList;
import java.util.HashMap;
import java.util.List;
import java.util.Map;
import android.os.Bundle;
import android.app.Activity;
import android.view.Menu;
import android.view.View;
import android.widget.AdapterView;
import android.widget.ListView;
import android.widget.SimpleAdapter;
import android.widget.AdapterView.OnItemClickListener;
import android.widget.Toast;


public class MainActivity extends Activity {
 定义数据集合
    List<Map<String, ?>> data;
    ListView listView;
    @Override
    public void onCreate(Bundle savedInstanceState) {
        super.onCreate(savedInstanceState);
        setContentView(R.layout.activity_main);
        data = getData();
        //创建SimpleAdapter绑定数据
        SimpleAdapter adapter = new SimpleAdapter(this, data,
                R.layout.list_item, new String[] { "photo", "name", "publish",
                        "content" }, new int[] { R.id.photo, R.id.name,
                        R.id.publish, R.id.content });
        listView=(ListView) this.findViewById(R.id.listView);
        listView.setAdapter(adapter);
        listView.setOnItemClickListener(new ListClickHandler());

    }
    private class ListClickHandler implements OnItemClickListener{

        @Override
        public void onItemClick(AdapterView<?> adapterView, View view, int position,
                long id) {
            Map<String, String> item=(Map<String, String>) data.get(position);
            Toast.makeText(MainActivity.this, item.get("name").toString(), Toast.LENGTH_LONG).show();
        }

    }

    private List<Map<String, ?>> getData() {
        List<Map<String, ?>> data = new ArrayList<Map<String, ?>>();
        Map<String, Object> item = new HashMap<String, Object>();
        item.put("photo", R.drawable.p1);
        item.put("name", "喂喂 ");
        item.put("publish", "1分钟前");
        item.put("content", "喂,出来");
        data.add(item);
        item = new HashMap<String, Object>();
        item.put("photo", R.drawable.p2);
        item.put("name", "嘻嘻");
        item.put("publish", "3分钟前");
        item.put("content", "今天下雨了!");
        data.add(item);
        item = new HashMap<String, Object>();
        item.put("photo", R.drawable.p3);
        item.put("name", "嘿嘿");
        item.put("publish", "5分钟前");
        item.put("content", "下课啦!");
        data.add(item);
        item = new HashMap<String, Object>();
        item.put("photo", R.drawable.p4);
        item.put("name", "哈哈");
        item.put("publish", "1分钟前");
        item.put("content", "今天心情好!");
        data.add(item);
        item = new HashMap<String, Object>();
        item.put("photo", R.drawable.p5);
        item.put("name", "嘿嘿");
        item.put("publish", "2分钟前");
        item.put("content", "太阳出来了!");
        data.add(item);
        item = new HashMap<String, Object>();
        item.put("photo", R.drawable.p6);
        item.put("name", "呵呵");
        item.put("publish", "7分钟前");
        item.put("content", "今天真高兴啊!");
        data.add(item);
        item = new HashMap<String, Object>();
        item.put("photo", R.drawable.p7);
        item.put("name", "嘿咻");
        item.put("publish", "2分钟前");
        item.put("content", "happy!");
        data.add(item);
        item = new HashMap<String, Object>();
        item.put("photo", R.drawable.p8);
        item.put("name", "啊哦");
        item.put("publish", "3分钟前");
        item.put("content", "smile");
        data.add(item);
        item = new HashMap<String, Object>();
        item.put("photo", R.drawable.p9);
        item.put("name", "嘻哈");
        item.put("publish", "4分钟前");
        item.put("content", "嘿嘿嘿");
        data.add(item);
        item = new HashMap<String, Object>();
        item.put("photo", R.drawable.p10);
        item.put("name", "哦哦");
        item.put("publish", "1分钟前");
        item.put("content", "吼吼吼");
        data.add(item);
        return data;
    }

    @Override
    public boolean onCreateOptionsMenu(Menu menu) {
        getMenuInflater().inflate(R.menu.main, menu);
        return true;
    }

}


 1万+
1万+

 被折叠的 条评论
为什么被折叠?
被折叠的 条评论
为什么被折叠?
 到【灌水乐园】发言


