


这个系列共三篇文章:
dubbo生产部署图文实例(一):dubbo本地模拟RPC
dubbo生产部署图文实例(二):用maven打包dubbo项目并部署到云平台
dubbo生产部署图文实例(三):部署tomcat暴露html格式日志,并定期清理日志
这三篇博客的目的主要是通过一个小的实例来本地模拟dubbo PRC,并用maven打包部署到云平台上。部署成功之后,用tomcat静态资源服务器将日志通过html形式暴露并做定期清理。经过这个过程,可以对dubbo的使用和生产中的部署有更加深入的理解。文中记录了需要的所有代码和详细的过程截图,就算第一次接触dubbo的初学者也可以跟着一步一步做出来。
源代码:
https://github.com/AntonyWujiang/testDubbox.git
clone方法上一篇博客有,这一篇不再重复
4 Server打包
将Server服务器部署到云平台,首先要把Server打包。Maven给我们提供了非常简便的方式。在打包之前需要先对testServer进行配置。
4.1 修改testServer配置
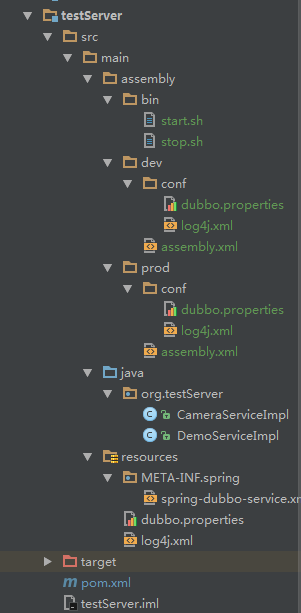
在原来的testServer的main下新建assembly文件夹,并加入文件如下图所示(具体代码不妨在这里,整个assembly文件夹我上传到网盘了,可以下载下来看看: https://pan.baidu.com/s/1hsL1E7q
以下几点需要注意一下:
1.
此处时用的dubbo.protocol.port我设置的是20881,可以根据自己的需要在dubbo.properties中进行修改,只要不冲突就好;
2.
dev中的log4j:
    <root>
        <priority value="info" />
         <appender-ref ref="console" />
        <!--<appender-ref ref="user" />-->
    </root>
prod中的log4j:
    <root>
        <priority value="warn" />
         <!--<appender-ref ref="console" />-->
        <appender-ref ref="user" />
    </root>`
log4j记录有五种级别:DEBUG、INFO、WARN、ERROR和FATAL。注意上面的区别,prod环境中,如果把log4j的priority value设置为info,那么记录的东西可能多的让计算机爆炸。
3.
修改testServer的pom.xml文件为(可以注意看一下profile标签中的skipAssemblyDEV一项,可以更好地帮助你理解maven打不同的包的实现方式):
<?xml version="1.0"?>
<project xsi:schemaLocation="http://maven.apache.org/POM/4.0.0 http://maven.apache.org/xsd/maven-4.0.0.xsd" xmlns="http://maven.apache.org/POM/4.0.0"
    xmlns:xsi="http://www.w3.org/2001/XMLSchema-instance">
  <modelVersion>4.0.0</modelVersion>
  <parent>
    <groupId>com.sf.test</groupId>
    <artifactId>testDubbox</artifactId>
    <version>${project_version}</version>
  </parent>
  <groupId>com.sf.test</groupId>
  <artifactId>testServer</artifactId>
  <version>${project_version}</version>
  <name>testServer</name>
  <url>http://maven.apache.org</url>
  <properties>
    <project.build.sourceEncoding>UTF-8</project.build.sourceEncoding>
  </properties>

    <profiles>
        <profile>
            <id>dev</id>
            <activation>
                <activeByDefault>true</activeByDefault>
            </activation>
            <properties>
                <env.devMode>dev</env.devMode>
                <skipAssemblyDEV>false</skipAssemblyDEV>
                <skipAssemblyPROD>true</skipAssemblyPROD>
            </properties>
        </profile>

        <profile>
            <id>prod</id>
            <activation>
                <activeByDefault>false</activeByDefault>
            </activation>
            <properties>
                <env.devMode>prod</env.devMode>
                <skipAssemblyDEV>true</skipAssemblyDEV>
                <skipAssemblyPROD>false</skipAssemblyPROD>
            </properties>
        </profile>
    </profiles>
    <!--部署profile结束-->

    <build>
        <plugins>
            <plugin>
                <groupId>org.apache.maven.plugins</groupId>
                <artifactId>maven-compiler-plugin</artifactId>
                <configuration>
                    <source>1.7</source>
                    <target>1.7</target>
                </configuration>
            </plugin>

            <!--部署插件-->
            <plugin>
                <groupId>org.apache.maven.plugins</groupId>
                <artifactId>maven-deploy-plugin</artifactId>
                <configuration>
                    <skip>true</skip>
                </configuration>
            </plugin>
            <plugin>
                <groupId>org.apache.maven.plugins</groupId>
                <artifactId>maven-jar-plugin</artifactId>
                <configuration>
                    <excludes>
                        <exclude>**/dubbo.properties</exclude>
                        <exclude>**/jdbc.properties</exclude>
                        <exclude>**/log4j.xml</exclude>
                    </excludes>
                </configuration>
            </plugin>
            <plugin>
                <groupId>org.apache.maven.plugins</groupId>
                <artifactId>maven-assembly-plugin</artifactId>
                <executions>
                    <execution>
                        <id>make-assembly-dev</id>
                        <phase>package</phase>
                        <goals>
                            <goal>single</goal>
                        </goals>
                        <configuration>
                            <skipAssembly>${skipAssemblyDEV}</skipAssembly>
                            <descriptors>
                                <descriptor>src/main/assembly/dev/assembly.xml</descriptor>
                            </descriptors>
                            <finalName>${project.artifactId}</finalName>
                        </configuration>
                    </execution>

                    <execution>
                        <id>make-assembly-prod</id>
                        <phase>package</phase>
                        <goals>
                            <goal>single</goal>
                        </goals>
                        <configuration>
                            <skipAssembly>${skipAssemblyPROD}</skipAssembly>
                            <descriptors>
                                <descriptor>src/main/assembly/prod/assembly.xml</descriptor>
                            </descriptors>
                            <finalName>${project.artifactId}</finalName>
                        </configuration>
                    </execution>
                </executions>
            </plugin>
            <!--部署插件end-->

        </plugins>
    </build>

  <dependencies>
    <dependency>
    <groupId>com.sf.test</groupId>
    <artifactId>testClient</artifactId>
    <version>${project_version}</version>
    </dependency>
    <dependency>
            <groupId>com.alibaba</groupId>
            <artifactId>dubbo</artifactId>
        </dependency>
        <dependency>
            <groupId>com.caucho</groupId>
            <artifactId>hessian</artifactId>
        </dependency>
        <dependency>
            <groupId>junit</groupId>
            <artifactId>junit</artifactId>
            <scope>test</scope>
        </dependency>
        <dependency>
            <groupId>log4j</groupId>
            <artifactId>log4j</artifactId>
        </dependency>
        <dependency>
            <groupId>org.slf4j</groupId>
            <artifactId>slf4j-api</artifactId>
        </dependency>
        <dependency>
                <groupId>com.101tec</groupId>
                <artifactId>zkclient</artifactId>
        </dependency>
        <dependency>
                <groupId>org.springframework</groupId>
                <artifactId>spring-test</artifactId>
                <scope>test</scope>
            </dependency>
  </dependencies>


</project>
4.
打开dev文件夹中的assembly.xml,可以看到其中有这样的代码:
        <fileSet>
            <directory>src/main/assembly/bin</directory>
            <outputDirectory>bin</outputDirectory>
            <directoryMode>0755</directoryMode>
            <fileMode>0755</fileMode>
        </fileSet>
可以复习一下0755代表的文件模式的含义:
1代表execute,2代表写,4代表读
第一位0代表十进制;第二位代表用户,7=1+2+4,即用户具有读/写/执行权限;第三位代表组用户,5=1+4,即组用户具有读/写权限;第四位代表其他用户,5=1+4,即其他用户具有读/写权限
4.2 maven将testServer打包
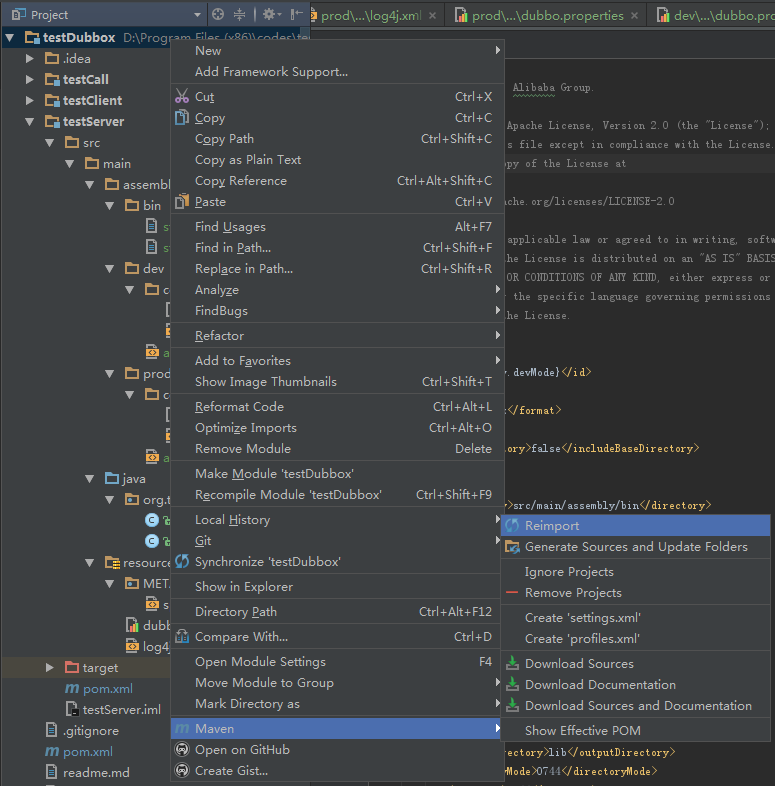
按照上面配置好之后,通常需要reimport整个项目的maven
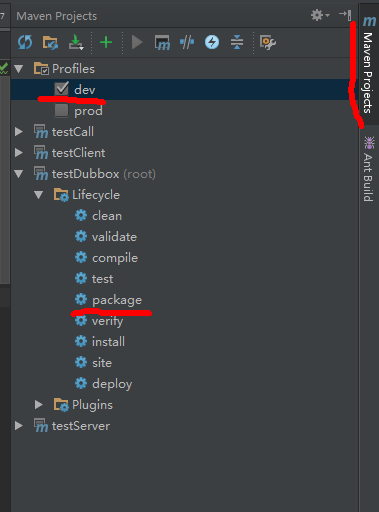
点击idea右侧的maven Project,在其中选择打包的方式,这里只需要模拟开发环境打包就可以了,勾选dev,双击package命令
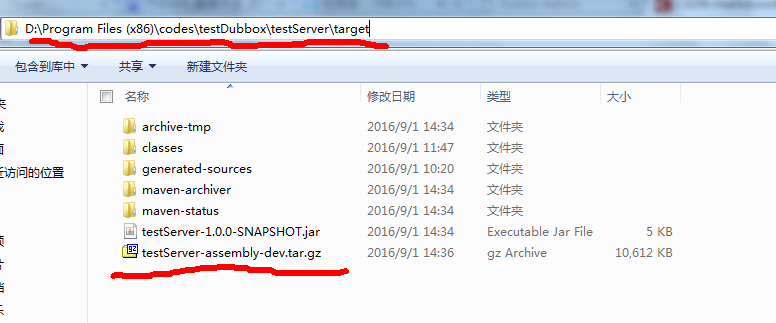
在控制台看到打包完成后,可以去自己项目所在的目录的testServer文件夹下的target文件夹,能看到打完的tar.gz包。打开压缩包,里面有三个文件夹:bin,conf,lib

5 部署到云平台
5.1 上传tar.gz包
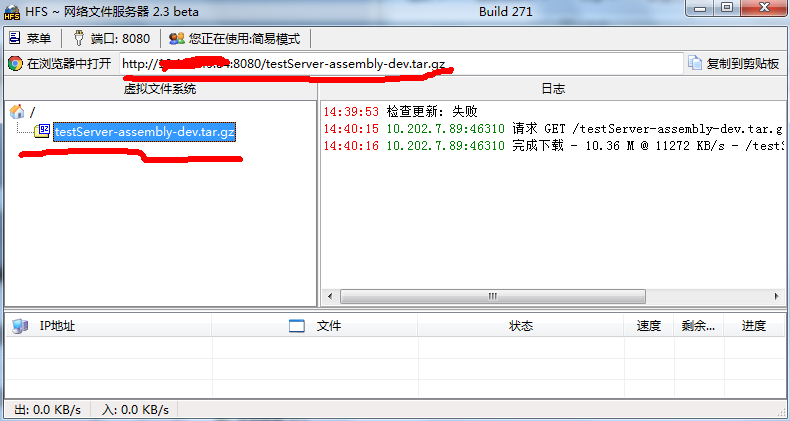
这里上传需要用到hfs网络文件服务器,不到1M,百度一下下载下来。将刚才的tar.gz包拖进来即可、拖进来之后会自动生成一个链接,http://后面的几个数字就是自己电脑的ip地址,可以在cmd中输入ipconfig验证一下
5.2 部署
部署需要用到另一个小工具putty来远程管理linux,当然也可以选择secureCRT,putty体积很小,但是secureCRT功能更多。本例中用putty示例。
打开putty,第一步会让你login并输入密码,这个就看你需要部署的用户名和密码是什么了
- mkdir+文件名
创建指定的名称的目录 - pwd
显示自己目前所处的目录 - cd+第一步中创建的目录
切换至第一步中创建的目录 - wget+5.1中生成的链接
从远程服务器将通过hfs上传的tar.gz包下载到本地服务器 - ll
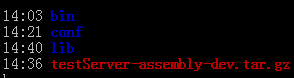
查看目录下的所有文件,可以看到tar.gz包已经下载到当前目录中; - tar zxvf testServer-assembly-dev.tar.gz
解压包 - ll
查看一下解压之后有哪些文件夹,和我们的预期一样,有三个文件夹,bin config和lib
- ./bin/start.sh
部署
此时去云平台看,就能看到Server部署成功

说明
如有转载,请务必注明出处
http://blog.csdn.net/antony9118/article/details/52401012


 6267
6267

 被折叠的 条评论
为什么被折叠?
被折叠的 条评论
为什么被折叠?
 到【灌水乐园】发言


