


前一篇博客中有谈论到混合高斯模型GMM,但是只是在上面的一个小应用,可能没有很彻底的分析,大部分读者看起来有点吃力,那么在这篇微博中就给大家分析一下GMM在前景检测的原理以及在OpenCV中的运用,当然长篇大论的原理我还是不全部写出来的,依旧会贴出其他高手的博客,他们写的个人觉得已经够详细了,再总结已经没什么意思了,也总结不出太多的新意,在这里也是作为记录,谈谈自己的小感悟以及运行的结果和函数的使用。
1、原理
如果大家想了解最原汁原味的原理,那还是看原作者的论文吧,如果想了解浓缩版的,和基本的实现步骤,那可以访问以下几篇博客
②、 混合高斯模型GMM
当然,看完了论文,还会觉得有点云里雾里的感觉,不知道怎么做到的,怎么实现,那这时候就得看看源代码了
③、 我的OpenCV学习笔记(25):c++版本的高斯混合模型的源代码完全注释(OpenCV的源代码)
④、运动检测(前景检测)之(二)混合高斯模型GMM(挺不错的GMM代码实现,同时也提供了很多不错的链接)
有了原理,又提供了函数库,有了函数接口,那肯定得试一下效果如何
本人也是根据上面提供的代码测试了效果,加强了一点注解,感觉不错。
GMM算法不同于其他的背景相减方法,因为有时背景也存在部分区域的震荡变化,那如果按照一般的前景检测方法,则会频繁的检测到错误的前景,GMM算法则有效的克服了这一点,那是因为GMM算法有效的做到了以下几点:
(1)、对每个像素建立多个高斯模型(即存在多个滑动平均值),那么背景像素就可以在多个均值之间波动,而不会被误判,如果有新的像素值不属于其中的一个高斯模型,则认为是前景。
(2)、不仅仅保存滑动平均值,还保存了滑动方差,由方差和均值产生了一个高斯模型,于是我们可以获知某个像素值属于哪个高斯模型的概率,如果新像素不属于其中的一个高斯模型,则认为是前景。
(3)、增加了学习因子,如果某个模型被击中的频率不够频繁,那么权值就会减少,减少到最后把该模型移除,如果一个像素是前景,那么新的高斯模型会被建立,刚开始权值较小,但是如果该前景一直不动,不离开,则权重加大,慢慢的和背景融为一体,成为了新的背景。
2、代码实现
- #include "opencv2/core/core.hpp"
- #include "opencv2/video/background_segm.hpp"
- #include "opencv2/highgui/highgui.hpp"
- #include "opencv2/imgproc/imgproc.hpp"
- #include <stdio.h>
- using namespace std;
- using namespace cv;
- //this is a sample for foreground detection functions
- string src_img_name="WavingTrees/b00";
- const char *src_img_name1;
- Mat img, fgmask, fgimg;
- int i=-1;
- char chari[500];
- bool pause=false;
- //第一种gmm,用的是KaewTraKulPong, P. and R. Bowden (2001).
- //An improved adaptive background mixture model for real-time tracking with shadow detection.
- BackgroundSubtractorMOG bg_model(200,5,0.7,10);
- void refineSegments(const Mat& img, Mat& mask, Mat& dst)
- {
- int niters = 3;
- vector<vector<Point> > contours;
- vector<Vec4i> hierarchy;
- Mat temp;
- dilate(mask, temp, Mat(), Point(-1,-1), niters);//膨胀,3*3的element,迭代次数为niters
- erode(temp, temp, Mat(), Point(-1,-1), niters*2);//腐蚀
- dilate(temp, temp, Mat(), Point(-1,-1), niters);
- findContours( temp, contours, hierarchy, CV_RETR_CCOMP, CV_CHAIN_APPROX_SIMPLE );//找轮廓
- dst = Mat::zeros(img.size(), CV_8UC3);
- if( contours.size() == 0 )
- return;
- // iterate through all the top-level contours,
- // draw each connected component with its own random color
- int idx = 0, largestComp = 0;
- double maxArea = 0;
- //轮廓模式为CV_RETR_CCOMP,第一层为连通域的外围边界,因为我们前景颜色值为255,背景为0
- //所以得到的轮廓为外围边界,所以我们只需要第一层,hierarchy[idx][0]表示为下一个轮廓的索引
- //如果到达最后一个轮廓,则hierarchy[idx][0]=-1;
- //如需详细了解可访问网址:http://blog.csdn.net/chenjiazhou12/article/details/22304099
- for( ; idx >= 0; idx = hierarchy[idx][0] )
- {
- const vector<Point>& c = contours[idx];
- double area = fabs(contourArea(Mat(c)));
- if( area > maxArea )
- {
- maxArea = area;
- largestComp = idx;//找出包含面积最大的轮廓
- }
- }
- Scalar color( 0, 255, 0 );
- drawContours( dst, contours, largestComp, color, CV_FILLED, 8, hierarchy );
- }
- int main(int argc, const char** argv)
- {
- img=imread("WavingTrees/b00000.bmp");
- if(img.empty())
- {
- namedWindow("image",1);
- namedWindow("foreground image",1);
- namedWindow("mean background image", 1);
- }
- for(;;)
- {
- if(!pause)
- {
- //读取图片文件
- i++;
- itoa(i,chari,10);
- if(i<10)
- {
- src_img_name+="00";
- }
- else if(i<100)
- {
- src_img_name+="0";
- }
- else if(i>283)
- {
- i=-1;
- }
- src_img_name+=chari;
- src_img_name+=".bmp";
- img=imread(src_img_name);
- if( img.empty() )
- break;
- //update the model
- bg_model(img, fgmask,0.005 );//计算前景mask图像,其中输出fgmask为8-bit二进制图像,第3个参数为学习速率,如果学习速率为0,则为背景相减法
- refineSegments(img, fgmask, fgimg);
- imshow("image", img);
- imshow("foreground image", fgimg);
- src_img_name="WavingTrees/b00";
- }
- char k = (char)waitKey(80);
- if( k == 27 ) break;
- if( k == ' ' )
- {
- pause=!pause;
- }
- }
- return 0;
- }

#include "opencv2/core/core.hpp"
#include "opencv2/video/background_segm.hpp"
#include "opencv2/highgui/highgui.hpp"
#include "opencv2/imgproc/imgproc.hpp"
#include <stdio.h>

using namespace std;
using namespace cv;

//this is a sample for foreground detection functions
string src_img_name="WavingTrees/b00";
const char *src_img_name1;
Mat img, fgmask, fgimg;
int i=-1;
char chari[500];
bool pause=false;

//第一种gmm,用的是KaewTraKulPong, P. and R. Bowden (2001).
//An improved adaptive background mixture model for real-time tracking with shadow detection.
BackgroundSubtractorMOG bg_model(200,5,0.7,10);

void refineSegments(const Mat& img, Mat& mask, Mat& dst)
{
	int niters = 3;

	vector<vector<Point> > contours;
	vector<Vec4i> hierarchy;

	Mat temp;

	dilate(mask, temp, Mat(), Point(-1,-1), niters);//膨胀,3*3的element,迭代次数为niters
	erode(temp, temp, Mat(), Point(-1,-1), niters*2);//腐蚀
	dilate(temp, temp, Mat(), Point(-1,-1), niters);

	findContours( temp, contours, hierarchy, CV_RETR_CCOMP, CV_CHAIN_APPROX_SIMPLE );//找轮廓

	dst = Mat::zeros(img.size(), CV_8UC3);

	if( contours.size() == 0 )
		return;

	// iterate through all the top-level contours,
	// draw each connected component with its own random color
	int idx = 0, largestComp = 0;
	double maxArea = 0;
	//轮廓模式为CV_RETR_CCOMP,第一层为连通域的外围边界,因为我们前景颜色值为255,背景为0
	//所以得到的轮廓为外围边界,所以我们只需要第一层,hierarchy[idx][0]表示为下一个轮廓的索引
	//如果到达最后一个轮廓,则hierarchy[idx][0]=-1;
	//如需详细了解可访问网址:http://blog.csdn.net/chenjiazhou12/article/details/22304099
	for( ; idx >= 0; idx = hierarchy[idx][0] )
	{
		const vector<Point>& c = contours[idx];
		double area = fabs(contourArea(Mat(c)));
		if( area > maxArea )
		{
			maxArea = area;
			largestComp = idx;//找出包含面积最大的轮廓
		}
	}
	Scalar color( 0, 255, 0 );
	drawContours( dst, contours, largestComp, color, CV_FILLED, 8, hierarchy );
}

int main(int argc, const char** argv)
{
	img=imread("WavingTrees/b00000.bmp");
	if(img.empty())
	{
		namedWindow("image",1);
		namedWindow("foreground image",1);
		namedWindow("mean background image", 1);
	}
	for(;;)
	{
		if(!pause)
		{
			//读取图片文件
			i++;
			itoa(i,chari,10);
			if(i<10)
			{
				src_img_name+="00";
			}
			else if(i<100)
			{
				src_img_name+="0";
			}
			else if(i>283)
			{
				i=-1;
			}

			src_img_name+=chari;
			src_img_name+=".bmp";

			img=imread(src_img_name);
			if( img.empty() )
				break;

			//update the model
			bg_model(img, fgmask,0.005 );//计算前景mask图像,其中输出fgmask为8-bit二进制图像,第3个参数为学习速率,如果学习速率为0,则为背景相减法
			refineSegments(img, fgmask, fgimg);

			imshow("image", img);
			imshow("foreground image", fgimg);

			src_img_name="WavingTrees/b00";

		}
		char k = (char)waitKey(80);
		if( k == 27 ) break;

		if( k == ' ' )
		{
			pause=!pause;
		}
	}

	return 0;
}
3、实现结果
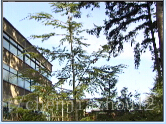

图1、开始背景建模

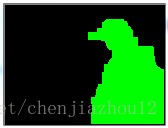
图2、前景检测
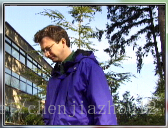

图3、前景检测


图4、前景检测
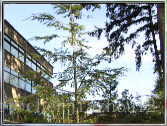

图5、后期背景检测
总结:刚开始时,树叶都是在摇晃的,所以把树当成前景,如图1所示,但当训练很多副图片之后,模型慢慢适应了树叶的晃动,于是能把树叶也当成背景,如图5所示,由于人物是不时的插进来,于是一直被认为是前景来处理,所以GMM对背景的震荡变化有较好的处理效果。
4、用到的类或函数
BackgroundSubtractorMOG
构造函数
- BackgroundSubtractorMOG::BackgroundSubtractorMOG(int history, int nmixtures, double backgroundRatio, double noiseSigma=0)
BackgroundSubtractorMOG::BackgroundSubtractorMOG(int history, int nmixtures, double backgroundRatio, double noiseSigma=0)
history :历史帧数的长度,如果是默认构造函数,则值为200
nmixtures :高斯模型个数,如果是默认构造函数,则值为5
backgroundRatio :背景门限,如果是默认构造函数,则值为0.7
noiseSigma :噪声方差,默认为0,如果是默认构造函数,则值为15
- void BackgroundSubtractorMOG::operator()(InputArray image, OutputArray fgmask, double learningRate=0)
void BackgroundSubtractorMOG::operator()(InputArray image, OutputArray fgmask, double learningRate=0)
功能:更新背景模型,返回前景mask
image:输入图片
fgmask:输出前景mask
learningRate:学习速率,如果为0,则为背景相减法


 2万+
2万+


 被折叠的 条评论
为什么被折叠?
被折叠的 条评论
为什么被折叠?
 到【灌水乐园】发言


