


先看下面的效果图:
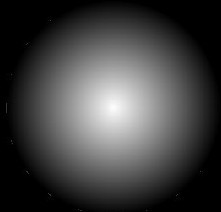
没有灯光,没有设置材质属性,没有绘制球体,更加没有设置球体的漫反射系数。。。其实是将一个特殊的纹理映射到一个圆上的结果。
纹理生成函数,类似棋盘函数,所以只需将红皮书上棋盘函数稍作修改:
int fakeSphere(int i, int j)
{
	float s = (float)i / checkImageWidth;
	float t = (float)j / checkImageHeight;

	float r = sqrt( (s - 0.5) * (s - 0.5) + (t - 0.5) * (t - 0.5) );
	if( r < 0.5 )
		return (int)((1 - r / 0.5) * 255);
  	return (int)(0.2*255);
}

void makeCheckImage(void)
{
	int i, j, c;

	for (i = 0; i < checkImageHeight; i++) {
		for (j = 0; j < checkImageWidth; j++) {
			//c = ((((i&0x8)==0)^((j&0x8))==0))*255;
			c = fakeSphere(i, j);
			checkImage[i][j][0] = (GLubyte) c;
			checkImage[i][j][1] = (GLubyte) c;
			checkImage[i][j][2] = (GLubyte) c;
			checkImage[i][j][3] = (GLubyte) 255;
		}
	}
}
就可以生成下图中的贴图。
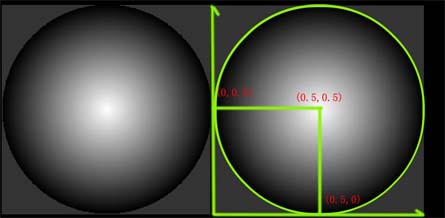
如上图左图:在纹理坐标系中,圆形区域的半径为0.5。
x = ( cos (theta*i)+1 ) * 0.5;
y = ( sin (theta*i)+1 ) * 0.5;
可以取得圆形区域的所有的纹理坐标值。而且满足( 0<=x<=1, 0<=y<=1)
然后将圆形区域映射到一个圆形区域上。
代码如下:
GLvoid draw_circle(const GLfloat radius,const GLuint num_vertex)
{
	GLfloat vertex[4];
	GLfloat texcoord[2];

	const GLfloat delta_angle = 2.0*M_PI/num_vertex;

	glEnable(GL_TEXTURE_2D);
	glBindTexture(GL_TEXTURE_2D,texName);
	glTexEnvi(GL_TEXTURE_ENV,GL_TEXTURE_ENV_MODE,GL_REPLACE);
	glBegin(GL_TRIANGLE_FAN);

	//draw the vertex at the center of the circle
	texcoord[0] = 0.5;
	texcoord[1] = 0.5;
	glTexCoord2fv(texcoord);
	vertex[0] = vertex[1] = vertex[2] = 0.0;
	vertex[3] = 1.0;
	glVertex4fv(vertex);

	//draw the vertex on the contour of the circle
	for(int i = 0; i < num_vertex ; i++)
	{
		//纹理圆的纹理坐标空间为:直径为1的圆
		texcoord[0] = (std::cos(delta_angle*i) + 1.0)*0.5;
		texcoord[1] = (std::sin(delta_angle*i) + 1.0)*0.5;
		glTexCoord2fv(texcoord);

		vertex[0] = std::cos(delta_angle*i) * radius;
		vertex[1] = std::sin(delta_angle*i) * radius;
		vertex[2] = 0.0;
		vertex[3] = 1.0;
		glVertex4fv(vertex);
	}

	texcoord[0] = (1.0 + 1.0)*0.5;
	texcoord[1] = (0.0 + 1.0)*0.5;
	glTexCoord2fv(texcoord);

	vertex[0] = 1.0 * radius;
	vertex[1] = 0.0 * radius;
	vertex[2] = 0.0;
	vertex[3] = 1.0;
	glVertex4fv(vertex);
	glEnd();

	glDisable(GL_TEXTURE_2D);
}
通过调用函数draw_circle(2.0, 20); 即可实现图中的效果。
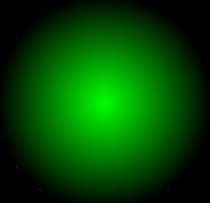
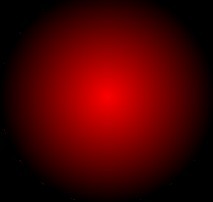
当然了改变颜色只需要修改函数makeCheckImage中的
//灰色
checkImage[i][j][0] = (GLubyte) c;
checkImage[i][j][1] = (GLubyte) c;
checkImage[i][j][2] = (GLubyte) c;
//红色
checkImage[i][j][0] = (GLubyte) c;
checkImage[i][j][1] = (GLubyte) 0;
checkImage[i][j][2] = (GLubyte) 0;
//绿色
checkImage[i][j][0] = (GLubyte) 0;
checkImage[i][j][1] = (GLubyte) c;
checkImage[i][j][2] = (GLubyte) 0;
add by RYF 2013-1-25
本文主要函数纹理,结合该纹理,结合alpha融合 可以绘制抗锯齿的线条:http://answers.oreilly.com/topic/1669-how-to-render-anti-aliased-lines-with-textures-in-ios-4/


 591
591

 被折叠的 条评论
为什么被折叠?
被折叠的 条评论
为什么被折叠?
 到【灌水乐园】发言


