官方学习文档 配置_MyBatis中文网
一.mybatis是什么
我们创建一个项目采用结构为:dao层,service层,controller层...
其中dao层是用来操作数据库的,包括操作各种实体类的接口,和具体实现类。
而mybatis就是用来替换dao层中具体实现类的工具。
二.使用mybatis
1.搭建环境
创建maven项目,导入依赖
 <dependencies>
        <!--        mysql驱动-->
        <dependency>
            <groupId>mysql</groupId>
            <artifactId>mysql-connector-java</artifactId>
            <version>8.0.28</version>
        </dependency>
        <!--        junit @Test-->
        <dependency>
            <groupId>junit</groupId>
            <artifactId>junit</artifactId>
            <version>4.11</version>
            <scope>test</scope>
        </dependency>
        <!--        mybatis-->
        <dependency>
            <groupId>org.mybatis</groupId>
            <artifactId>mybatis</artifactId>
            <version>3.5.2</version>
        </dependency>
    </dependencies>
准备数据库,创建mybatis数据库,创建student表
CREATE TABLE `student`(
	id int UNSIGNED PRIMARY key auto_increment,
	name VARCHAR(10) NOT NULL DEFAULT "",
	age int UNSIGNED DEFAULT 0
)charset=utf8

INSERT INTO student VALUES(1,"小张",20),(2,"小豆",23),(3,"小马",18),(4,"小红",11),(5,"小小",12)
2.建立项目
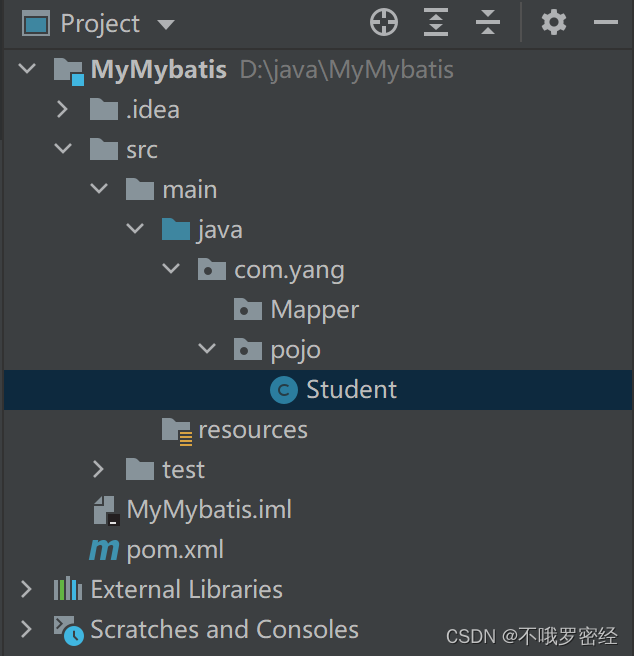
建项目包,pojo包,Mapper包(相当于dao包)

编写Student实体类(可以使用lombook插件来偷懒)
@Data  //无参构造,get,set,toString,hashCode,equals
@AllArgsConstructor //有参构造
@NoArgsConstructor //无参构造(有有参后无参会消失,所以重新加上)
public class Student {
    private int id;
    private String name;
    private int age;
}
编写Mapper接口
public interface studentMapper {}配置mybatis文件
<?xml version="1.0" encoding="UTF-8" ?>
<!DOCTYPE configuration
PUBLIC "-//mybatis.org//DTD Config 3.0//EN"
"https://mybatis.org/dtd/mybatis-3-config.dtd">
<!--configuration核心配置文件-->
<configuration>
<environments default="development">
<environment id="development">
<transactionManager type="JDBC"/>
<dataSource type="POOLED">
<property name="driver" value="com.mysql.jdbc.Driver"/>
<property name="url" value="jdbc:mysql://localhost:3306/mybatis?useSSL=false&useUnicode=true&characterEncoding=UTF-8"/>
<property name="username" value="root"/>
<property name="password" value="123"/>
</dataSource>
</environment>
</environments>
</configuration>
3.编写代码
创建utils包,编写工具类,获得sqlSeesion
public class MybatisUtils {
    private static SqlSessionFactory build=null;
    static {
        String resource="mybatis-config.xml";
        try {
            Reader resourceAsReader = Resources.getResourceAsReader(resource);
            build = new SqlSessionFactoryBuilder().build(resourceAsReader);
        } catch (IOException e) {
            e.printStackTrace();
        }
    }
    public static SqlSession getSqlSession() {
        return build.openSession();
    }
}
开始写业务代码
(1) 在Mapper接口中编写方法
public interface studentMapper {
    //查询所有学生
    List<Student> getAllStudent();
}
(2) 编写Mapper.xml
<?xml version="1.0" encoding="UTF-8" ?>
<!DOCTYPE mapper
        PUBLIC "-//mybatis.org//DTD mapper 3.0//EN"
        "https://mybatis.org/dtd/mybatis-3-mapper.dtd">

<mapper namespace="com.yang.Mapper.studentMapper">
    <select id="getAllStudent" resultType="com.yang.pojo.Student">
        select * from student
    </select>
</mapper>
(3) 在mybatis-config.xml中注册该xml
 <mappers>
        <mapper resource="com/yang/Mapper/studentMapper.xml"/>
 </mappers>
(4)测试
public void getAllStudent() {
        SqlSession sqlSession = MybatisUtils.getSqlSession();
        studentMapper mapper = sqlSession.getMapper(studentMapper.class);
        List<Student> allStudent = mapper.getAllStudent();
        for (Student student : allStudent) {
            System.out.println(student);
        }
        sqlSession.close();
    }
三.增删改查以及各参数意思
1.代码
<mapper namespace="com.yang.Mapper.studentMapper">
    <select id="getAllStudent" resultType="com.yang.pojo.Student">
        select * from student
    </select>
    <select id="getStudentById" resultType="com.yang.pojo.Student">
        select * from student where id=#{id}
    </select>
    <insert id="addStudent" parameterType="com.yang.pojo.Student">
        insert into student (id,name,age) values (#{id},#{name},#{age})
    </insert>
    <update id="updateStudent" parameterType="com.yang.pojo.Student">
        update student set name=#{name},age=#{age} where id=#{id}
    </update>
    <delete id="deleteStudent" >
        delete from student where id=#{id}
    </delete>
</mapper>
2.解释
(1) 不像jdbc,mybatis中的事务不是自动提交,所以增删改都要提交事务才可以
sqlSession.commit();
我们也可以直接返回有自动事务提交的sqlSession
build.openSession(true);
(2) namespace 就是该Mapper.xml绑定的Mapper接口
id 就是接口中的方法
resultType 就是执行完该sql语句返回的类型是什么,是List中的泛型或者单独类型
parameterType 就是传入的参数
- 可传入的参数有三种类型 基本类型以及其包装类 实体类
- Mapmybatis把基本类型和包装类,Map都起了别名
实体类我们也可以自己定义别名(讲解配置文件时会说明) eg.int 别名为 _int Integer别名为int Map别名map
- 传入基本类型可以不写,如传入int型,我们可以不写,也可以写为parameterType="_int" #{id}可以直接取到
- 传入包装类,必须要写,如parameterType="com.yang.pojo.Student"(自己定义别名后用别名)
#{id}可以直接取到实体类的字段名 - 传入Map类,必须要写,如parameterType="map"
#{key}可以直接取到key对应的值
(3) 增删改是没有resultType的,系统默认为int
3.实体类和数据库的字段不一致
情况一:
如果只是因为java的驼峰命名规则和数据库加下划线的方式不对应
我们可以在配置文件中使用settings的属性配置

情况二:
如果不是上述情况
eg.pojo中为 uid,uname,upwd
数据库中为id,name,pwd
我们可以用resultMap,对结果进行映射
<mapper namespace="com.yang.Mapper.userMapper">
    <select id="getAllUser" resultMap="resultMap">
        select * from user
    </select>
    <resultMap id="resultMap" type="com.yang.pojo.User">
        <result property="uid" column="id"/>
        <result property="uname" column="name"/>
        <result property="upwd" column="pwd"/>
    </resultMap>
</mapper>
四.mybatis-config.xml配置文件讲解
- configuration(配置)
- properties(属性)
- settings(设置)
- typeAliases(类型别名)
- typeHandlers(类型处理器)
- objectFactory(对象工厂)
- plugins(插件)
- environments(环境配置)
- environment(环境变量)
- transactionManager(事务管理器)
- dataSource(数据源)
- environment(环境变量)
- databaseIdProvider(数据库厂商标识)
- mappers(映射器)
(配置文件都是有顺序的,上面就是书写位置)
几个常用配置
1.属性(properties)
我们可以通过properties属性来实现引用配置文件
这些属性都是可外部配置且可动态替换的,既可以在典型的Java属性文件中配置,亦可通过properties元素的子元素来传递。【db.properties】
编写一个配置文件
db.properties
diver=com.mysql.cj.jdbc.Driver
url=jdbc:mysql://localhost:3306/mybatis?useSSL=true&useUnicode=true&characterEncoding=UTF-8
username=root
password=123
在核心配置文件中映入
    <!--引入外部配置文件-->
    <properties resource="db.properties">
        <property name="username" value="root"/>
        <property name="pwd" value="123123"/>
</properties>- 可以直接引入外部文件
- 可以在其中增加一些属性配置
- 如果两个文件有同一个字段,优先使用外部配置文件的!
2. 设置

使用log4j,打开日志功能。
1.导包
         <dependency>
            <groupId>log4j</groupId>
            <artifactId>log4j</artifactId>
            <version>1.2.17</version>
        </dependency>
2.在mybatis-config.xml中配置日志
<settings>
     <setting name="logImpl" value="LOG4J"/>
</settings>
3.导入log4j.properties
#将等级为DEBUG的日志信息输出到console和file这两个目的地,console和file的定义在下面的代码
log4j.rootLogger = DEBUG,console ,file

#控制台输出的相关设置
log4j.appender.console = org.apache.log4j.ConsoleAppender
log4j.appender.console.Target = System.out
log4j.appender.console.Threshold = DEBUG
log4j.appender.console.layout = org.apache.log4j.PatternLayout
log4j.appender.console.layout.ConversionPattern =  [%c]-%m%n

#文件输出的相关设置
log4j.appender.file = org.apache.log4j.RollingFileAppender
log4j.appender.file.File = ./log/kuang.log
log4j.appender.file.MaxFileSize = 10mb
log4j.appender.file.Threshold = DEBUG
log4j.appender.file.layout = org.apache.log4j.PatternLayout
log4j.appender.file.layout.ConversionPattern = [%p][%d{yy-MM-dd}][%c]%m%n

#日志输出级别
log4j.logger.org.mybatis=DEBUG
log4j.logger.java.sql=DEBUG
log4j.logger.java.sql.Statement=DEBUG
log4j.logger.java.sql.ResultSet=DEBUG
log4j.logger.java.sql.PreparedStatement=DEBUG
3. 类型别名(typeAliases)
类型别名是为Java类型设置一个短的名字。
存在的意义仅在于用来减少类完全限定名的冗余。
【注】mapper不能起别名
方法一:给实体类起别名
    <!--可以给实体类起别名-->
    <typeAliases>
        <typeAlias type="com.yang.pojo.User" alias="User" />
    </typeAliases>
方法二:指定一个包名
MyBatis会在包名下面搜索需要的JavaBean,比如:
扫描实体类的包,它的默认别名就为这个类的类名,首字母小写!
    <!--可以给实体类起别名-->
    <typeAliases>
        <package name="com.kuang.pojo"/>
    </typeAliases>
在实体类比较少的时候,使用第一种方式。
如果实体类十分多,建议使用第二种。
第一种可以DIY别名,第二种则不行,如果非要改,需要在实体上增加注解
@Alias("user")
//实体类
public class User {}
4.映射器(mappers)
MapperRegistry:注册绑定我们的Mapper文件;
方式一:建议使用
    <!--每一个Mapper.xml都需要在Mybatis核心配置文件中注册!-->
    <mappers>
        <mapper resource="com/yang/dao/UserMapper.xml"/>
    </mappers>
方式二:使用class文件绑定注册
    <!--每一个Mapper.xml都需要在Mybatis核心配置文件中注册!-->
    <mappers>
        <mapper class="com.yang.dao.UserMapper"/>
    </mappers>
使用条件:1. 接口和它的配置文件必须同命 2.接口和它的配置文件必须在同一包下
方式三:使用扫描包进行注入绑定
    <!--每一个Mapper.xml都需要在Mybatis核心配置文件中注册!-->
    <mappers>
        <package name="com.yang.dao"/>
    </mappers>
使用条件:1. 接口和它的配置文件必须同命 2.接口和它的配置文件必须在同一包下
五. 一对多处理 多对一处理
复杂的属性,我们需要单独处理 对象:association 集合:collection
器中javaType代表该属性是什么类型,ofType代表集合中的泛型是什么类型
1.多对一处理
多对一:
- 多个学生,对应一个老师
- 对于学生而言,关联–多个学生,关联一个老师【多对一】
- 对于老师而言,集合–一个老师,有很多个学生【一对多】
实体类:
@Data
@AllArgsConstructor
@NoArgsConstructor
public class Student {
    private int id;
    private String name;
    private Teacher teacher;
}
@Data
@AllArgsConstructor
@NoArgsConstructor
public class Teacher {
private int id;
private String name;
}方法一:子查询
    <!--
      思路:
          1.查询所有的学生信息
          2.根据查询出来的学生的tid,寻找对应的老师! 子查询-->
    <select id="getStudent" resultMap="StudentTeacher">
        select * from mybatis.student
    </select>

    <resultMap id="StudentTeacher" type="Student">
        <result property="id" column="id"/>
        <result property="name" column="name"/>
        <!--  复杂的属性,我们需要单独处理 对象:association 集合:collection      -->
        <association property="teacher" column="tid" javaType="Teacher" select="getTeacher"/>
    </resultMap>

    <select id="getTeacher" resultType="Teacher">
        select * from mybatis.teacher where id = #{id}
    </select>
方法二:连表查询 【推荐】
<mapper namespace="com.yang.study.Mapper.studentMapper">
    <select id="getAllStudent" resultMap="studentTeacher">
        SELECT s.id,s.name sname,t.name tname
        FROM student s,teacher t
        where s.tid=t.id
    </select>
    <resultMap id="studentTeacher" type="student">
        <result property="id" column="id"/>
        <result property="name" column="sname"/>
        <association property="teacher" javaType="Teacher">
            <result property="name" column="tname"/>
        </association>
    </resultMap>
</mapper>
2.一对多
比如:一个老师拥有多个学生!
对于老师而言,就是一对多的关系!
实体类:
@Data
@AllArgsConstructor
@NoArgsConstructor
public class Student {
    private int id;
    private String name;
    private int tid;
}
@Data
@AllArgsConstructor
@NoArgsConstructor
public class Teacher {
private int id;
private String name;
List<Student> students;
}方法一:子查询
    <select id="getTeacher2" resultMap="TeacherStudent2">
        select * from mybatis.teacher where id = #{tid}
    </select>

    <resultMap id="TeacherStudent2" type="Teacher">
        <collection property="students" javaType="ArrayList" ofType="Student" select="getStudentByTeacherId" column="id"/>
    </resultMap>

    <select id="getStudentByTeacherId" resultType="Student">
        select * from  mybatis.student where tid = #{tid}
    </select>
方法二:连表查询 【推荐】
<mapper namespace="com.yang.study.Mapper.studentMapper">
    <select id="getAllStudent" resultMap="studentTeacher">
        SELECT t.id tid,t.name tname,s.id sid,s.`name` sname
        FROM student s,teacher t
        where s.tid=t.id
    </select>
    <resultMap id="studentTeacher" type="teacher">
        <result property="id" column="tid"/>
        <result property="name" column="tname"/>
        <collection property="students" ofType="student">
            <result property="id" column="sid"/>
            <result property="name" column="sname"/>
        </collection>
    </resultMap>

</mapper>
六.动态SQL
if
choose (when, otherwise)
trim (where, set)
foreach
if和where
<select id="getBolgIf" parameterType="map" resultType="blog">
        select * from blog
        <where>
            <if test="title!=null">
                and title=#{title}
            </if>
            <if test="author!=null">
                and author=#{author}
            </if>
        </where>
    </select>
where的功能是若有子句返回,加上where; 并且去掉首句的and 或者 or ,没有加上的功能,所以不是首句的一定要加上and 好的书写习惯就是所有的都加上and
choose(when,otherwise)
<select id="getBolgChoose" resultType="blog" parameterType="map">
        select * from blog
        <where>
            <choose>
                <when test="title!=null">
                    and title=#{title}
                </when>
                <when test="author!=null">
                    and author=#{author}
                </when>
                <otherwise>
                    and views=#{views}
                </otherwise>
            </choose>
        </where>
    </select>
choose(when,otherwise) 相当于 if else if else
set
<update id="updateBolgSet" parameterType="map">
        update blog
        <set>
            <if test="title!=null">
                ,title=#{title}
            </if>
            <if test="author!=null">
                ,author=#{author}
            </if>
        </set>
        where id=#{id}
    </update>
与where是一致的,“,”可以加前面也可以加后面
foreach
查询指定的id号数据
例如:查询id为1~3的数据
SELECT * FROM blog
WHERE (id=1 or id=2 or id=3)
如果这样写死,就没什么大用,我们可以用集合传进来我们要的指定id,通过foreach来遍历
其中 foreach属性中的
- collection 代表从map中传入的集合的key叫什么
- item 代表从集合中取出的每个元素叫什么
- open代表遍历开始前加上什么
- separator 代表每个遍历的语句用什么连接
- close 代表遍历结束后加上什么
    <select id="getBolgForeach" parameterType="map" resultType="blog">
        select * from blog
        <where>
            <foreach collection="ids" item="id" open="(" separator="or" close=")">
                id=#{id}
            </foreach>
        </where>
    </select>
测试类
HashMap<Object, Object> map = new HashMap<>();
        ArrayList<Integer> ids=new ArrayList<>();
        ids.add(1);
        ids.add(2);
        map.put("ids",ids);

        for (Blog bolgForeach : mapper.getBolgForeach(map)) {
            System.out.println(bolgForeach);
        }
七.注解开发
注解在UserMapper接口上实现,并删除UserMapper.xml文件
@Select("select * from user")
    List<User> getUsers();
需要在mybatis-config.xml核心配置文件中绑定接口
 <!--绑定接口!-->
    <mappers>
        <mapper class="com.kuang.dao.UserMapper" />
    </mappers>
注意问题
1.路径问题
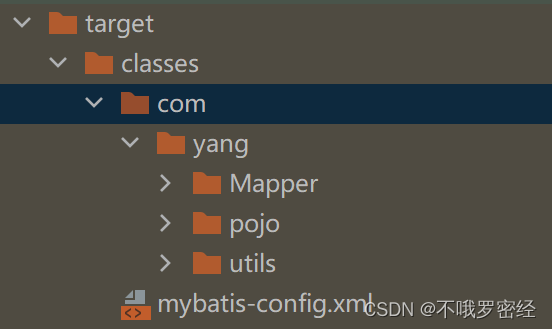
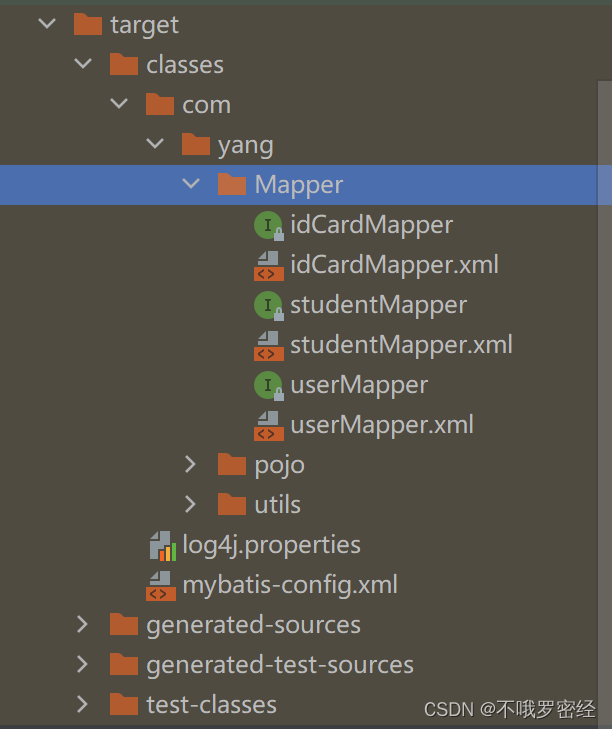
(1) 使用maven项目,运行程序后产生一个target文件,我们的路径默认在classes
classes包括resources包底下文件和java包底下部分文件(只包括类,配置文件不会读入)
为了解决java包下的配置文件不读入的问题
我们可以在pom.xml中配置build
<build>
        <resources>
            <resource>
                <directory>src/main/java</directory>
                <includes>
                    <include>**/*.xml</include>
                    <include>**/*.properties</include>
                </includes>
                <filtering>false</filtering>
            </resource>

            <resource>
                <directory>src/main/resources</directory>
                <includes>
                    <include>**/*.xml</include>
                    <include>**/*.properties</include>
                </includes>
                <filtering>false</filtering>
            </resource>
        </resources>
    </build>
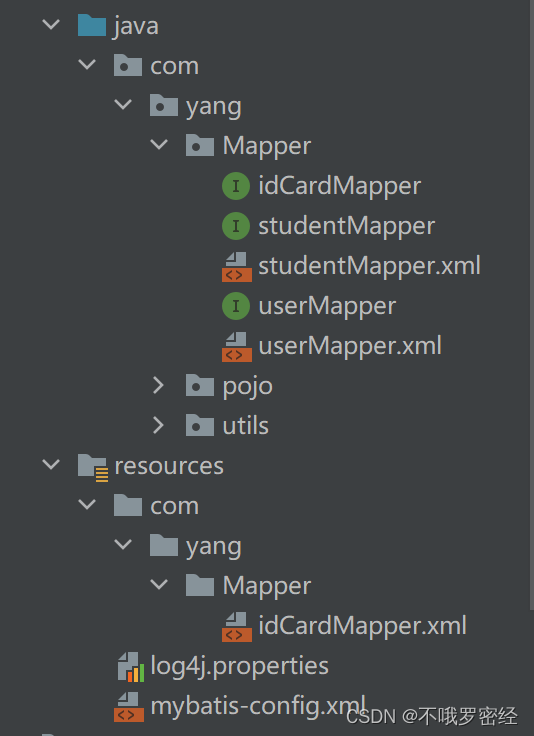
(2)maven也会把resources和java中一样的路径合并


注意:在resources中创建目录时连着创建是不对的,连着建是适用于包的
如果resources连着建,其不会认为是多个目录,而是一个叫com.yang.Mapper的目录

2.maven项目没有打包resources目录
pom.xml中
![]()
改为
![]()
3.@Param
具体可以看 https://blog.csdn.net/Sunshineoe/article/details/114697944
@Param的作用就是给参数命名,比如在mapper里面某方法A(int id),当添加注解后A(@Param("userId") int id),也就是说外部想要取出传入的id值,只需要取它的参数名userId就可以了。将参数值传如SQL语句中,通过#{userId}进行取值给SQL的参数赋值。
既可以给普通类型命名,也可以给JavaBean类型命名。
eg.
public User selectUser(@Param("userName") String name,@Param("password") String pwd);建议每个基本类型都写上@Param,不论有无别名都要写


 326
326

 被折叠的 条评论
为什么被折叠?


