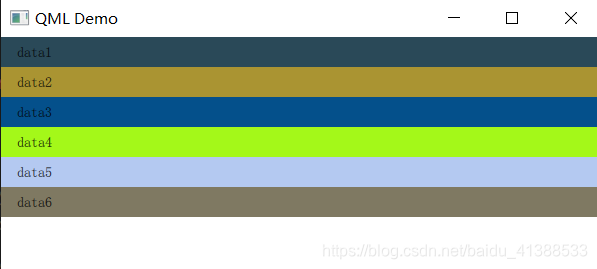
QML ListView import QtQuick 2.14
import QtQuick.Window 2.14
import QtQuick.Controls 2.5
import QtQuick.Controls 1.4 as Ctr_1_4
import QtQuick.Layouts 1.15
import "./common.js" as FunJs
Window {
id: window
width: 600
height: 480
visible: true
title: "QML Demo"
Item {
id: rootItem
anchors.fill: parent
property var colorBuilder: FunJs.getColorBudider(Qt.rgba)
ListView{
id:rootView
anchors.fill:parent
model:["data1","data2","data3","data4","data5","data6"]
delegate: ItemDelegate{
width: rootItem.width
text: modelData
background: Rectangle{
color: rootItem.colorBuilder()
}
onClicked: {
console.log(modelData)
}
}
//滚动条指示器 不可拖动
//ScrollIndicator.vertical: ScrollIndicator{}
//滚动条 可拖动
ScrollBar.vertical: ScrollBar{}
}
}
}
function getColorRangeRandom(max){
    return Math.floor(Math.random() * max)
}


function  getColorRandom(){
    let red = getColorRangeRandom(256)
    let green = getColorRangeRandom(256)
    let blue = getColorRangeRandom(256)
    return {red: red / 255, green: green / 255, blue: blue / 255}
}


function getColorBudider(rgbFunction){
    return function(){
        let color = getColorRandom()
        return rgbFunction(color.red, color.green, color.blue)
    }
}
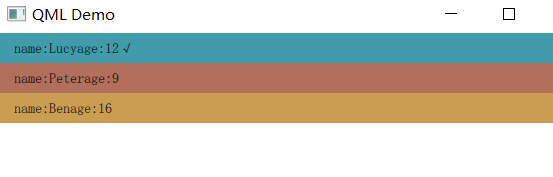
示例2 import QtQuick 2.14
import QtQuick.Window 2.14
import QtQuick.Controls 2.5
import QtQuick.Controls 1.4 as Ctr_1_4
import QtQuick.Layouts 1.15
import "./common.js" as FunJs
Window {
id: window
width: 600
height: 480
visible: true
title: "QML Demo"
Item {
id: rootItem
anchors.fill: parent
property var colorBuilder: FunJs.getColorBudider(Qt.rgba)
ListView{
id:rootView
anchors.fill:parent
model:[
{name: "Lucy", age: "12"},
{name: "Peter", age: "9"},
{name: "Ben", age: "16"}
]
delegate: ItemDelegate{
width: rootItem.width
text: "name:" + modelData.name + "age:" + modelData.age + (rootView.currentIndex === index ? '√' : "")
background: Rectangle{
color: rootItem.colorBuilder()
}
onClicked: {
console.log(modelData)
rootView.currentIndex = index
}
}
//滚动条指示器 不可拖动
//ScrollIndicator.vertical: ScrollIndicator{}
//滚动条 可拖动
ScrollBar.vertical: ScrollBar{}
}
}
}
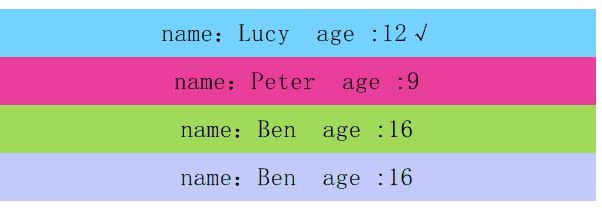
ListMdel import QtQuick 2.14
import QtQuick.Window 2.14
import QtQuick.Controls 2.5
import QtQuick.Controls 1.4 as Ctr_1_4
import QtQuick.Layouts 1.15
import "./common.js" as FunJs
Window {
id: window
width: 600
height: 480
visible: true
title: "QML Demo"
Item {
id: rootItem
anchors.fill: parent
property var colorBuilder: FunJs.getColorBudider(Qt.rgba)
ListView{
id:rootView
anchors.fill:parent
model:ListModel{
id: listModel
ListElement {
name: "Lucy"
age: "12"
}
ListElement {
name: "Peter"
age: "9"
}
ListElement {
name: "Ben"
age: "16"
}
}
delegate: Rectangle{
width: rootView.width
height: rootView.height * 0.1
color: rootItem.colorBuilder()
Text{
//如果要文字居中设置,则Text的父对象必须显示设置宽高,不要使用锚点设置
anchors.fill: parent
text: "name:" + name + " age :" + age + (parent.isCurrentIndex() ? "√" : "")
font.pointSize: 15
verticalAlignment: Text.AlignVCenter
horizontalAlignment: Text.AlignHCenter
}
MouseArea{
anchors.fill: parent
onClicked: {
let data = listModel.get(index)
console.log(JSON.stringify(data))
setCurrentIndex()
}
}
function isCurrentIndex(){
return rootView.currentIndex === index
}
function setCurrentIndex(){
rootView.currentIndex = index
}
}
Component.onCompleted: {
listModel.append({ name: "Ben",age: "16"})
}
//滚动条 可拖动
ScrollBar.vertical: ScrollBar{}
}
}
}
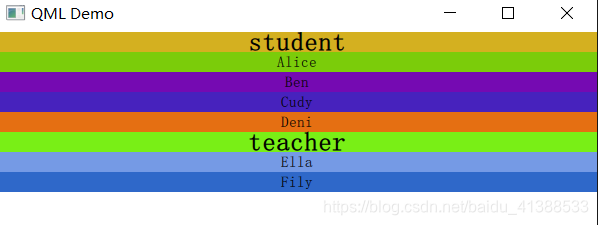
Section import QtQuick 2.14
import QtQuick.Window 2.14
import QtQuick.Controls 2.5
import QtQuick.Controls 1.4 as Ctr_1_4
import QtQuick.Layouts 1.15
import "./common.js" as FunJs
Window {
id: window
width: 600
height: 480
visible: true
title: "QML Demo"
Item {
id: rootItem
anchors.fill: parent
property var colorBuilder: FunJs.getColorBudider(Qt.rgba)
ListView{
id:rootView
anchors.fill: parent
model:ListModel{
ListElement{
name:"Alice"
group: "student"
}
ListElement{
name:"Ben"
group: "student"
}
ListElement{
name:"Cudy"
group: "student"
}
ListElement{
name:"Deni"
group: "student"
}
ListElement{
name:"Ella"
group: "teacher"
}
ListElement{
name:"Fily"
group: "teacher"
}
}
delegate: Rectangle{
width: parent.width
height: 20
color: rootItem.colorBuilder()
required property string name
Text{
anchors.centerIn: parent
text: name
}
}
section.property: "group"
section.delegate: Rectangle{
width: parent.width
height: 20
color: rootItem.colorBuilder()
required property string section
Text {
anchors.centerIn: parent
text: section
font.bold: true
font.pointSize: 16
}
}
}
}
}
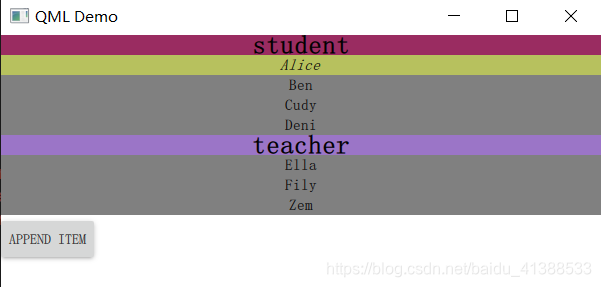
附加属性和信号 import QtQuick 2.14
import QtQuick.Window 2.14
import QtQuick.Controls 2.5
import QtQuick.Controls 1.4 as Ctr_1_4
import QtQuick.Layouts 1.15
import "./common.js" as FunJs
Window {
id: window
width: 600
height: 480
visible: true
title: "QML Demo"
Item {
id: rootItem
anchors.fill: parent
property var colorBuilder: FunJs.getColorBudider(Qt.rgba)
ListView{
id:rootView
anchors.fill: parent
model:ListModel{
ListElement{
name:"Alice"
group: "student"
}
ListElement{
name:"Ben"
group: "student"
}
ListElement{
name:"Cudy"
group: "student"
}
ListElement{
name:"Deni"
group: "student"
}
ListElement{
name:"Ella"
group: "teacher"
}
ListElement{
name:"Fily"
group: "teacher"
}
}
delegate: Rectangle{
width: ListView.view.width
height: 20
color: ListView.isCurrentItem ? rootItem.colorBuilder() : "gray"
required property string name
Text{
anchors.centerIn: parent
text: name
font.italic: parent.ListView.isCurrentItem
}
}
section.property: "group"
section.delegate: Rectangle{
width: parent.width
height: 20
color: rootItem.colorBuilder()
required property string section
Text {
anchors.centerIn: parent
text: section
font.bold: true
font.pointSize: 16
}
}
footer: Button{
text: "append item"
onClicked: {
rootView.model.append({name:"Zem", group: "teacher"})
}
}
}
}
}


 7981
7981

 被折叠的 条评论
为什么被折叠?
被折叠的 条评论
为什么被折叠?
 到【灌水乐园】发言


