


自己开发了一个股票智能分析软件,功能很强大,需要的点击下面的链接获取:
https://www.cnblogs.com/bclshuai/p/11380657.html
Qt动画
目录
1 简介
1.1 Qt动画类介绍
2 基础动画实现
2.1 Qt控件大小缩放和位置变化
2.2 透明度控制隐藏和显示
2.3 并行动画
2.4 串行动画
2.5 动画执行方向设置
2.6 动画循环次数设置
2.7 动画执行结束的操作
3 Qt的高级动画应用
3.1 Qt自定义动画属性实现背景色透明度动画
3.2 Tab条选择跟随移动
3.2.1 应用场景说明
3.2.2 实现方法
3.3 Qt实现数字滚动动画效果
3.3.1 应用场景说明
3.3.2 实现方法
4 附录
4.1 Qt动画QEasingCurve的速度曲线
1 简介
1.1 Qt动画类介绍
| 自己开发了一个股票智能分析软件,功能很强大,需要的点击下面的链接获取: https://www.cnblogs.com/bclshuai/p/11380657.html Qt动画 目录 1 简介 1.1 Qt动画类介绍 2 基础动画实现 2.1 Qt控件大小缩放和位置变化 2.2 透明度控制隐藏和显示 2.3 并行动画 2.4 串行动画 2.5 动画执行方向设置 2.6 动画循环次数设置 2.7 动画执行结束的操作 3 Qt的高级动画应用 3.1 Qt自定义动画属性实现背景色透明度动画 3.2 Tab条选择跟随移动 3.2.1 应用场景说明 3.2.2 实现方法 3.3 Qt实现数字滚动动画效果 3.3.1 应用场景说明 3.3.2 实现方法 4 附录 4.1 Qt动画QEasingCurve的速度曲线
1 简介1.1 Qt动画类介绍
2 基础动画实现2.1 Qt控件大小缩放和位置变化通过修改geometry属性实现坐标和大小的动画效果。通过创建QPropertyAnimation对象,关联widget控件ui.widgetProcess,设置属性geometry。QRect(x,y,width,hight),通过设置x,y改变位置,通过设置width和hight来改变大小。如下图所示,相似度widget向上移动同时隐藏。进度显示widget窗口从下往上移动,从隐藏到显示。
下面是坐标控制 QPropertyAnimation * pWidgetProcessUp = new QPropertyAnimation(ui.widgetProcess, "geometry"); pWidgetProcessUp->setDuration(300);//设置动画执行时间,单位毫秒 pWidgetProcessUp->setStartValue(QRect(140, 688, 534, 48));//初始值 pWidgetProcessUp->setEndValue(QRect(140, 668, 534, 48));//结束值 pWidgetProcessUp->setEasingCurve(QEasingCurve::Linear);设置速度曲线 pWidgetProcessUp->start(QAbstractAnimation::DeleteWhenStopped);//执行动画,结束后删除对象 2.2 透明度控制隐藏和显示因为qt控件没有透明度属性opacity,所以需要通过QGraphicsOpacityEffect实现控件绘图效果实现透明度改变 头文件定义 QGraphicsOpacityEffect* m_widgetProcessOpacity; 构造函数中定义 m_widgetProcessOpacity=new QGraphicsOpacityEffect (ui.widgetProcess);//创建QGraphicsOpacityEffect对象关联控件ui.widgetProcess m_widgetProcessOpacity->setOpacity(0);//设置透明度为0,隐藏控件 ui.widgetProcess->setGraphicsEffect(m_widgetProcessOpacity);//控件添加绘图效果 函数中使用 QPropertyAnimation* pWidgetProcessOpacity = new QPropertyAnimation(m_widgetProcessOpacity, "opacity", ui.widgetProcess); pWidgetProcessOpacity->setDuration(300); pWidgetProcessOpacity->setStartValue(0); pWidgetProcessOpacity->setEndValue(1); pWidgetProcessOpacity->setEasingCurve(QEasingCurve::Linear); pWidgetProcessOpacity->start(QAbstractAnimation::DeleteWhenStopped);//执行动画,结束后删除对象。
2.3 并行动画实际使用中需要将多个控件的属性动画一起执行,实现丰富的动画效果,将多个属性动画QPropertyAnimation添加到一个QParallelAnimationGroup,实现并行执行动画。例如将上面的两个动画合并,同时改变控件ui.widgetProcess的位置、大小、透明度。 QParallelAnimationGroup* pParaTwo = new QParallelAnimationGroup(this); pParaTwo->addAnimation(pWidgetProcessUp); pParaTwo->addAnimation(pWidgetProcessOpacity); pParaTwo-> start(QAbstractAnimation::DeleteWhenStopped);//执行后删除 2.4 串行动画可以实现同一个控件的不同属性变化串行,也可以实现多个控件的串行动画。还可以在动画之间添加暂停动画QPauseAnimation,实现延时的效果。 QSequentialAnimationGroup* pSequenAno = new QSequentialAnimationGroup(this); //透明度从0变为1,显示出来; pSequenAno->addAnimation(pWidgetProcessOpacity); //暂停一秒 QPauseAnimation *pPauseAnimation = new QPauseAnimation(this); pPauseAnimation->setDuration(1000); //再向上移动 pSequenAno->addAnimation(pWidgetProcessUp); pSequenAno->start(QAbstractAnimation::DeleteWhenStopped); 2.5 动画执行方向设置Qt动画执行可以设置执行方向,为正向Forward和方向Backward,例如透明度变化正向是初始值setStartValue(0);结束值设置setEndValue(1);控件从隐藏到显示。可以设置动画执行方向为反向,pWidgetProcessOpacity –>s etDirection(QAbstractAnimation::Backward),这样就可以执行显示到隐藏的动画。动画的执行一般是双向的,可以通过方向控制,避免创建反向的动画流程。 enum Direction { Forward, Backward }; 2.6 动画循环次数设置有时需要执行动画多次,或者无限循环下去,可以设置动画循环次数。设置为-1时表示无限循环。 void setLoopCount(int loopCount); 2.7 动画执行结束的操作动画结束之后执行一些清理工作,或者属性设置工作,可以连接QAbstractAnimation::finished信号,动画结束之后再执行一些操作。也可以将动画对象的清理放入槽函数中。这样就不能start(QAbstractAnimation::DeleteWhenStopped); connect(pSequenAno, &QAbstractAnimation::finished, [=]() { ui.pushButtonAddVideo->setDisabled(true); ui.pushButtonDelVideo->setDisabled(true); ui.pushButtonAddPic->setDisabled(true); ui.pushButtonDelPic->setDisabled(true); PausePlayVedio(1, 0);//先创建索引,准确时间定位 });
3 Qt的高级动画应用3.1 Qt自定义动画属性实现背景色透明度动画自定义一个背景色透明度的属性,在定义get和set方法,在set方法中去通过setstytlesheet去设置背景色的透明度。 Q_PROPERTY(int alpha READ alpha WRITE setAlpha) 动画执行的过程中,通过set方法动态的设置背景色透明度。可以通过setKeyValueAt函数设置关键点的取值,step取值范围是0~1,可以设置几个值。动画执行过程中就会在这个几个值之间切换。 void setKeyValueAt(qreal step, const QVariant &value); 头文件实现 #ifndef MAIN_WINDOW_H #define MAIN_WINDOW_H
...
class MainWindow : public CustomWindow { Q_OBJECT Q_PROPERTY(int alpha READ alpha WRITE setAlpha)
public: explicit MainWindow(QWidget *parent = 0); ~MainWindow();
private: int alpha() const; void setAlpha(const int alpha);
private: int m_nAlpha; QLabel *m_pLabel; };
#endif // MAIN_WINDOW_H 源文件实现 #include "main_window.h"
MainWindow::MainWindow(QWidget *parent) : CustomWindow(parent) { ...
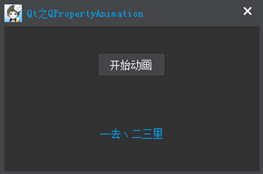
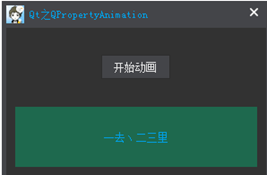
QPushButton *pStartButton = new QPushButton(this); pStartButton->setText(QString::fromLocal8Bit("开始动画"));
m_pLabel = new QLabel(this); m_pLabel->setText(QString::fromLocal8Bit("一去丶二三里")); m_pLabel->setAlignment(Qt::AlignCenter); m_pLabel->setStyleSheet("color: rgb(0, 160, 230);");
QPropertyAnimation *pAnimation = new QPropertyAnimation(); pAnimation->setTargetObject(this); pAnimation->setPropertyName("alpha"); pAnimation->setDuration(1000); pAnimation->setKeyValueAt(0, 255); pAnimation->setKeyValueAt(0.5, 100); pAnimation->setKeyValueAt(1, 255); pAnimation->setLoopCount(-1); //永远运行,直到stop connect(pStartButton, SIGNAL(clicked(bool)), pAnimation, SLOT(start()));
... }
int MainWindow::alpha() const { return m_nAlpha; }
void MainWindow::setAlpha(const int alpha) { m_nAlpha = alpha; QString strQSS = QString("color: rgb(0, 160, 230); ").arg(m_nAlpha); m_pLabel->setStyleSheet(strQSS); } 注意事项: (1)需要用QVariantAnimation检测你自定义的QVariant类型是否支持。 (2)声明属性的类必须是一个QObject,必须为属性提供一个setter(这样,QPropertyAnimation才可以设置属性的值)。 3.2 Tab条选择跟随移动3.2.1 应用场景说明如下图所示,初始状态,tab条在第一张图片下方,当鼠标放入第三张图片上时,触发了hover信号,tab条则会延长到第三张图片。如果单击第三张图片,tab条则会切换到第三张图片,如果没有单击则失去hover时,tab条还原到第一张图片。从而实现选择切换的动画显示。
3.2.2 实现方法(1) 现在图片显示的自定义widget类中重写鼠标进入、离开、单击的函数,自定义三种信号,鼠标进入、离开、点击时触发信号传递到外面。 signals: void signalPicClicked();//鼠标单击信号 void signalEnterPicWidget(); void signalLeavePicWidget(); protected: void enterEvent(QEvent *e); //进入QWidget瞬间事件 void leaveEvent(QEvent *e); //离开QWidget瞬间事件 void mousePressEvent(QMouseEvent* e); void enterEvent(QEvent *e); //进入QWidget瞬间事件 void leaveEvent(QEvent *e); //离开QWidget瞬间事件 (2) 将三种信号进行连接
for (int i = 0; i < 4; i++) { //鼠标进入信号绑定 connect(&m_Pic[i], &PicWidget::signalEnterPicWidget, this, [=]() { //延长tab条到当前index int iCurrentPosX = 164; if (i != m_iCurrentPicIndex)//不是当前图片索引时才去延长 { if (i == 0) { iCurrentPosX = 164; } else if (i == 1) { iCurrentPosX = 268; } else if (i == 2) { iCurrentPosX = 372; } else if (i == 3) { iCurrentPosX = 476; } QPropertyAnimation * linelength = new QPropertyAnimation(ui.line, "geometry"); linelength->setDuration(300); QRect rect = ui.line->geometry(); linelength->setStartValue(rect); linelength->setEasingCurve(QEasingCurve::Linear); if (i<m_iCurrentPicIndex)//hover触发的图片在当前图片左边,x发生变化,同时长度向左延伸 { linelength->setEndValue(QRect(iCurrentPosX, rect.top(), 32+ abs(i - m_iCurrentPicIndex) * 104, rect.height())); } else//hover触发的图片在当前图片右边,x不需要变化,长度向右延伸 { linelength->setEndValue(QRect(m_iCurrentPosX, rect.top(), 32 + abs(i - m_iCurrentPicIndex) * 104, rect.height())); }//执行动画 linelength->start(QAbstractAnimation::DeleteWhenStopped); } }); //鼠标放入之后没有点击而是离开了。还原位置 connect(&m_Pic[i], &PicWidget::signalLeavePicWidget, this, [=]() { QPropertyAnimation * linelength = new QPropertyAnimation(ui.line, "geometry"); linelength->setDuration(300); QRect rect = ui.line->geometry(); linelength->setStartValue(rect); linelength->setEasingCurve(QEasingCurve::Linear); if (i >m_iCurrentPicIndex)//坐标改变,同时向右延伸 { linelength->setEndValue(QRect(m_iCurrentPosX, rect.top(),32, 4)); } else//坐标不变只改变长度 { linelength->setEndValue(QRect(m_iCurrentPosX, rect.top(),32, 4)); } linelength->start(QAbstractAnimation::DeleteWhenStopped);
}); //鼠标单击后,切换位置,并且修改当前图片索引和当前位置值 connect(&m_Pic[i], &PicWidget::signalPicClicked, this, [=]() { QPropertyAnimation * linelength = new QPropertyAnimation(ui.line, "geometry"); linelength->setDuration(300); QRect rect = ui.line->geometry(); linelength->setStartValue(rect); linelength->setEasingCurve(QEasingCurve::Linear); if (i==0) { m_iCurrentPosX = 164; } else if (i==1) { m_iCurrentPosX = 268; } else if (i==2) { m_iCurrentPosX = 372; } else if (i==3) { m_iCurrentPosX = 476; } if (i>m_iCurrentPicIndex) { linelength->setEndValue(QRect(m_iCurrentPosX, rect.top(), 32, 4));// } else { linelength->setEndValue(QRect(m_iCurrentPosX, rect.top(), 32, 4));// } linelength->start(QAbstractAnimation::DeleteWhenStopped); m_iCurrentPicIndex = i; if (m_Pic[i].getPath()!="") { SourcePicChanged(m_Pic[i].getPath()); } }); }
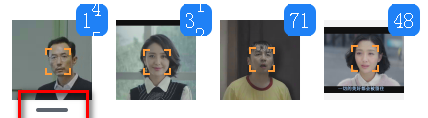
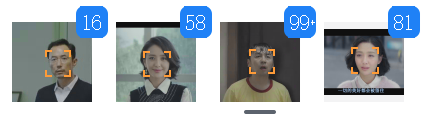
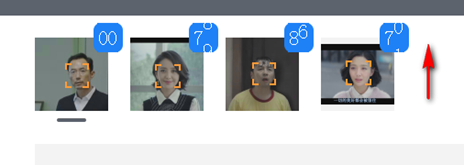
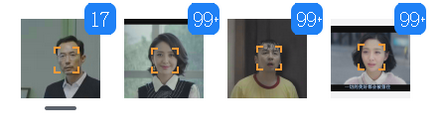
3.3 Qt实现数字滚动动画效果3.3.1 应用场景说明如下图所示,需要显示人脸检测的数量,变动画的方式实现个位数字滚动,个位由9变成0时,十位也要滚动,实现进位。当个位十位都是9时,数字不在增加,而是显示加号+。
3.3.2 实现方法实现方案,个位十位都有上下两个label显示数字。通过QPropertyAnimation属性动画控制两个label位置同时向上。动画结束后,再将两个label还原到原始位置。在还原位置之前,先前上面的labelnum值设置为下面labelnum1的值,下面labelnum1的值设置为+1后的值,避免出现数字闪现变小的问题。
头文件实现 #ifndef NUMSHOWWIDGET_H #define NUMSHOWWIDGET_H #include <QPropertyAnimation> #include<QParallelAnimationGroup> #include <QSequentialAnimationGroup> #include <QWidget> #include"ui_NumShowWidget.h" #include<QMutex> #include<QWaitCondition> #include<QTimer> class NumShowWidget : public QWidget { Q_OBJECT
public: NumShowWidget(); ~NumShowWidget(); void initNum();//个位十位上下初始化0,1值 /* 设置为某个值,会根据数字增量的大小增加数字值,根据time求出平均动画时间步长。增量大时速度快,增量小时速度慢 */ void setNum(int num,int time); void addNum(int num, int time); public slots: void SlotTimeAddNum(); int getNum(); void pushNum(int num); private: Ui::NumShowWidget ui; int m_tenwei = 0;//十位 int m_gewei = 0;//个位 QLabel* m_tenCurrent = NULL;//十位当前label QLabel* m_tenDown=NULL;//十位下面的label QLabel* m_geCurrent = NULL;//个位当前label QLabel* m_geDown = NULL;//个位下面的label int m_count = 0;//动画执行的次数,增量为10,则执行十次上滚动画 int m_num=0;//保存当前显示的数字。 QParallelAnimationGroup* tenAnimation; QMutex m_mutex; QWaitCondition m_FinishAnimation; QTimer m_checktime; QMutex m_addNumMutex; QVector<int> m_vectNum; bool m_bFinishAni=true; QPropertyAnimation * tenCurrent =NULL; QPropertyAnimation * tenDown = NULL; }; #endif // NUMSHOWWIDGET_H 源文件实现 #include "NumShowWidget.h" #include"hlog1.h" #include<QFontDatabase> NumShowWidget::NumShowWidget() { ui.setupUi(this); setWindowModality(Qt::NonModal); setWindowFlags(Qt::FramelessWindowHint); this->resize(32, 32); m_tenCurrent = ui.labelten; m_tenDown = ui.labelten1; m_geCurrent = ui.labelnum; m_geDown = ui.labelnum1; m_tenCurrent->setText("0"); m_tenDown->setText("1"); m_geCurrent->setText("0"); m_geDown->setText("1"); ui.labelplus->hide(); tenAnimation = new QParallelAnimationGroup(this); tenCurrent = new QPropertyAnimation(m_tenCurrent, "geometry"); tenCurrent->setDuration(100); tenCurrent->setStartValue(QRect(4, 0, 12, 32)); tenCurrent->setEndValue(QRect(4, -32, 12, 32)); tenAnimation->addAnimation(tenCurrent); tenDown = new QPropertyAnimation(m_tenDown, "geometry"); tenDown->setDuration(100); tenDown->setStartValue(QRect(4, 32, 12, 32)); tenDown->setEndValue(QRect(4, 0, 12, 32)); tenAnimation->addAnimation(tenDown); connect(tenAnimation, &QAbstractAnimation::finished, this, [=]() { m_tenCurrent->setText(QString::number(m_tenwei++)); m_tenCurrent->setGeometry(4, 0, 12, 32); m_tenCurrent->raise(); m_tenDown->setGeometry(4, 32, 12, 32); m_tenDown->setText(QString::number((m_tenwei + 1))); }); m_checktime.setInterval(1000); connect(&m_checktime, &QTimer::timeout, this, &NumShowWidget::SlotTimeAddNum); m_checktime.start(); }
NumShowWidget::~NumShowWidget() { if (tenAnimation != NULL) { delete tenAnimation; tenAnimation = NULL; } }
void NumShowWidget::initNum() { m_tenwei = 1; m_gewei = 1; m_num = 0; m_tenCurrent->setText("0"); m_tenCurrent->setGeometry(QRect(4, 0, 12, 32)); m_tenDown->setText("1"); m_tenDown->setGeometry(QRect(4, 32, 12, 32)); m_geCurrent->setText("0"); m_geDown->setText("1"); m_geCurrent->setGeometry(QRect(15, 0, 12, 32)); m_geDown->setGeometry(QRect(15, 32, 12, 32)); ui.labelplus->hide(); m_vectNum.clear(); m_bFinishAni = true;
}
void NumShowWidget::setNum(int num, int time) { if (ui.labelplus->isVisible()) { return; } m_num = ui.labelten->text().toInt()*10+ui.labelnum->text().toInt(); if (num <= m_num)//值没有变 { m_mutex.lock(); m_bFinishAni = true; m_mutex.unlock(); return; } addNum(num - m_num, time); }
void NumShowWidget::addNum(int num, int time) {
if (num <= 0) { return; } LOG_INFO("NUCOUNT LOCK"); int steptime = time / num;//动画时间步长 tenCurrent->setDuration(steptime); tenDown->setDuration(steptime); m_count = num; QParallelAnimationGroup* paraAnimation = new QParallelAnimationGroup(this); QPropertyAnimation * geCurrent = new QPropertyAnimation(m_geCurrent, "geometry"); geCurrent->setDuration(steptime); geCurrent->setStartValue(QRect(15, 0, 12, 32)); geCurrent->setEndValue(QRect(15, -32, 12, 32)); paraAnimation->addAnimation(geCurrent); QPropertyAnimation *geDown = new QPropertyAnimation(m_geDown, "geometry"); geDown->setDuration(steptime); geDown->setStartValue(QRect(15, 32, 12, 32)); geDown->setEndValue(QRect(15, 0, 12, 32)); paraAnimation->addAnimation(geDown); paraAnimation->start(); connect(paraAnimation, &QAbstractAnimation::finished, this, [=]() { m_count--; m_geCurrent->setText(QString::number(m_gewei++)); m_geCurrent->setGeometry(15, 0, 12, 32); m_geCurrent->raise(); m_geDown->setGeometry(15, 32, 12, 32); if (m_gewei >= 10) { if (m_tenwei < 10) { tenAnimation->start(); } else { ui.labelplus->show(); m_mutex.lock(); m_bFinishAni = true; m_mutex.unlock(); delete paraAnimation; LOG_INFO("NUCOUNT ULOCK"); return; } m_gewei = 0; } m_geDown->setText(QString::number((m_gewei) % 10)); if (m_count > 0) { paraAnimation->start(); } else { m_mutex.lock(); m_bFinishAni = true; m_mutex.unlock(); delete paraAnimation; LOG_INFO("NUCOUNT ULOCK");
} }) } void NumShowWidget::SlotTimeAddNum() { if (m_bFinishAni) { int num = getNum(); if (num > 0) { m_mutex.lock(); m_bFinishAni = false; m_mutex.unlock(); setNum(num, 1000);
} } } int NumShowWidget::getNum() { m_addNumMutex.lock(); if (m_vectNum.size() > 0) { int num = m_vectNum.front(); m_vectNum.pop_front(); m_addNumMutex.unlock(); return num; } else { m_addNumMutex.unlock(); return -1; }
} void NumShowWidget::pushNum(int num) { m_addNumMutex.lock(); m_vectNum.push_back(num); m_addNumMutex.unlock(); }
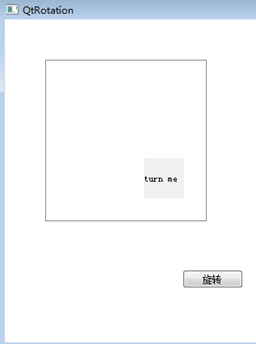
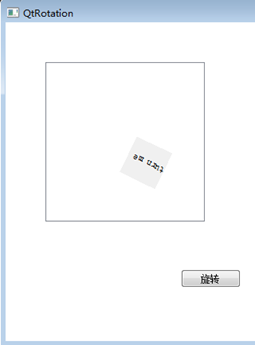
3.4 QT图片旋转动画3.4.1 应用场景说明删除图片,图片旋转滚动到垃圾箱或者删除按钮时,需要有个滚动旋转的动画效果。需要用到QGraphicsView,QGraphicsScene,QGraphicsWidget,QLabel类,QGraphicsView类相当于黑色的框,和电视的外框类似,QGraphicsScene相当于动画播放区域,下图中的黑色框内部的白色区域,在这个白色区域内播放动画。QGraphicsWidget相当于是动画区域内的一个包装类,将QLabel写上文字或者通过setpixmap接口设置图片后,添加到一个QGraphicsWidget,将QGraphicsWidget添加到QGraphicsScene,QGraphicsScene放到QGraphicsView,就可以实现旋转图片或者文字的动画效果。
3.4.2 实现方法(1) 定义旋转角度属性 头文件定义 #ifndef ROTATIONVIEW_H #define ROTATIONVIEW_H
#include <QGraphicsScene> #include <QGraphicsView> #include <QGraphicsWidget> #include <QTextEdit> #include <QPushButton> #include <QGraphicsProxyWidget> #include <QGraphicsLinearLayout>
class RotationView : public QGraphicsView { Q_OBJECT Q_PROPERTY(int angle READ turnangle WRITE setturnangle)//自定义角度属性 public: RotationView(QWidget *parent); ~RotationView(); int turnangle() { return angle; };//get方法 void setturnangle(int angle);//set方法,动画会通过这个函数输入插值,使图片转动。 void startMove(); private: QGraphicsView* view = NULL; int angle=0; QGraphicsWidget *pushButton = NULL; };
#endif // ROTATIONVIEW_H
(2) 源文件实现
#include "RotationView.h" #include<windows.h> #include <QLabel> #include <QPropertyAnimation> #include <QRect> RotationView::RotationView(QWidget *parent) : QGraphicsView(parent) { //setWindowModality(Qt::NonModal); setWindowFlags(Qt::FramelessWindowHint); QGraphicsScene* scene = new QGraphicsScene(this); // 创建部件,并关联它们的信号和槽 QPushButton *button = new QPushButton("clear"); QLabel* plabel = new QLabel("turn me"); // button->resize(100, 100); button->setGeometry(0, 0, 100, 100); // 将部件添加到场景中 pushButton = scene->addWidget(plabel); scene->addItem(pushButton); view = new QGraphicsView(scene,this); view->setVerticalScrollBarPolicy(Qt::ScrollBarAlwaysOff); view->setHorizontalScrollBarPolicy(Qt::ScrollBarAlwaysOff); pushButton->setParent(view); pushButton->setPos(100, 100);
view->resize(200, 200); //view->setStyleSheet("border:0px;"); view->show();
//view->setStyleSheet("border:0px;"); //setturnangle(90); }
RotationView::~RotationView() {
}
void RotationView::setturnangle(int angle) { QRectF r = pushButton->boundingRect(); //for (int i = 1; i <= 100; i++) //{ pushButton->setTransform(QTransform() .translate(r.width() / 2, r.height() / 2) .rotate(angle - 360 * 1, Qt::ZAxis) .translate(-r.width() / 2, -r.height() / 2)); view->update(); //} }
void RotationView::startMove() { QPropertyAnimation * linelength = new QPropertyAnimation(pushButton, "geometry"); linelength->setDuration(3000);
linelength->setStartValue(QRect(5,5,50,50)); linelength->setEndValue(QRect(100, 100, 50, 50)); linelength->setEasingCurve(QEasingCurve::Linear); linelength->start(QAbstractAnimation::DeleteWhenStopped); } (3) 定义对象设置属性动画
#include "qtrotation.h" #include"RotationView.h" #include <QPropertyAnimation> QtRotation::QtRotation(QWidget *parent) : QMainWindow(parent) { ui.setupUi(this); RotationView* roview = new RotationView(this); roview->setGeometry(50, 50, 200, 200); QPropertyAnimation* rotation = newQPropertyAnimation(roview, "angle", this); rotation->setDuration(300); rotation->setStartValue(0); rotation->setEndValue(720); rotation->setLoopCount(20); rotation->setEasingCurve(QEasingCurve::Linear);
connect(ui.pushRotation, &QPushButton::clicked, this, [=]() { roview->startMove(); rotation->start(); }); }
4 附录4.1 Qt动画QEasingCurve的速度曲线https://doc.qt.io/archives/qt-4.8/qeasingcurve.html
| ||||||||||||||||||||||||||||||||||||||||||||||||||||||||||||||||||||||||||||||||||||||||||||||||||||||||||||||||||||||||||||||||||||||||||||||||


2 基础动画实现
2.1 Qt控件大小缩放和位置变化
通过修改geometry属性实现坐标和大小的动画效果。通过创建QPropertyAnimation对象,关联widget控件ui.widgetProcess,设置属性geometry。QRect(x,y,width,hight),通过设置x,y改变位置,通过设置width和hight来改变大小。如下图所示,相似度widget向上移动同时隐藏。进度显示widget窗口从下往上移动,从隐藏到显示。
下面是坐标控制
QPropertyAnimation * pWidgetProcessUp = new QPropertyAnimation(ui.widgetProcess, "geometry");
pWidgetProcessUp->setDuration(300);//设置动画执行时间,单位毫秒
pWidgetProcessUp->setStartValue(QRect(140, 688, 534, 48));//初始值
pWidgetProcessUp->setEndValue(QRect(140, 668, 534, 48));//结束值
pWidgetProcessUp->setEasingCurve(QEasingCurve::Linear);设置速度曲线
pWidgetProcessUp->start(QAbstractAnimation::DeleteWhenStopped);//执行动画,结束后删除对象
2.2 透明度控制隐藏和显示
因为qt控件没有透明度属性opacity,所以需要通过QGraphicsOpacityEffect实现控件绘图效果实现透明度改变
头文件定义
QGraphicsOpacityEffect* m_widgetProcessOpacity;
构造函数中定义
m_widgetProcessOpacity=new QGraphicsOpacityEffect (ui.widgetProcess);//创建QGraphicsOpacityEffect对象关联控件ui.widgetProcess
m_widgetProcessOpacity->setOpacity(0);//设置透明度为0,隐藏控件
ui.widgetProcess->setGraphicsEffect(m_widgetProcessOpacity);//控件添加绘图效果
函数中使用
QPropertyAnimation* pWidgetProcessOpacity = new QPropertyAnimation(m_widgetProcessOpacity, "opacity", ui.widgetProcess);
pWidgetProcessOpacity->setDuration(300);
pWidgetProcessOpacity->setStartValue(0);
pWidgetProcessOpacity->setEndValue(1);
pWidgetProcessOpacity->setEasingCurve(QEasingCurve::Linear);
pWidgetProcessOpacity->start(QAbstractAnimation::DeleteWhenStopped);//执行动画,结束后删除对象。
2.3 并行动画
实际使用中需要将多个控件的属性动画一起执行,实现丰富的动画效果,将多个属性动画QPropertyAnimation添加到一个QParallelAnimationGroup,实现并行执行动画。例如将上面的两个动画合并,同时改变控件ui.widgetProcess的位置、大小、透明度。
QParallelAnimationGroup* pParaTwo = new QParallelAnimationGroup(this);
pParaTwo->addAnimation(pWidgetProcessUp);
pParaTwo->addAnimation(pWidgetProcessOpacity);
pParaTwo-> start(QAbstractAnimation::DeleteWhenStopped);//执行后删除
2.4 串行动画
可以实现同一个控件的不同属性变化串行,也可以实现多个控件的串行动画。还可以在动画之间添加暂停动画QPauseAnimation,实现延时的效果。
QSequentialAnimationGroup* pSequenAno = new QSequentialAnimationGroup(this);
//透明度从0变为1,显示出来;
pSequenAno->addAnimation(pWidgetProcessOpacity);
//暂停一秒
QPauseAnimation *pPauseAnimation = new QPauseAnimation(this);
pPauseAnimation->setDuration(1000);
//再向上移动
pSequenAno->addAnimation(pWidgetProcessUp);
pSequenAno->start(QAbstractAnimation::DeleteWhenStopped);
2.5 动画执行方向设置
Qt动画执行可以设置执行方向,为正向Forward和方向Backward,例如透明度变化正向是初始值setStartValue(0);结束值设置setEndValue(1);控件从隐藏到显示。可以设置动画执行方向为反向,pWidgetProcessOpacity –>s etDirection(QAbstractAnimation::Backward),这样就可以执行显示到隐藏的动画。动画的执行一般是双向的,可以通过方向控制,避免创建反向的动画流程。
enum Direction {
Forward,
Backward
};
2.6 动画循环次数设置
有时需要执行动画多次,或者无限循环下去,可以设置动画循环次数。设置为-1时表示无限循环。
void setLoopCount(int loopCount);
2.7 动画执行结束的操作
动画结束之后执行一些清理工作,或者属性设置工作,可以连接QAbstractAnimation::finished信号,动画结束之后再执行一些操作。也可以将动画对象的清理放入槽函数中。这样就不能start(QAbstractAnimation::DeleteWhenStopped);
connect(pSequenAno, &QAbstractAnimation::finished, [=]() {
ui.pushButtonAddVideo->setDisabled(true);
ui.pushButtonDelVideo->setDisabled(true);
ui.pushButtonAddPic->setDisabled(true);
ui.pushButtonDelPic->setDisabled(true);
PausePlayVedio(1, 0);//先创建索引,准确时间定位
});
3 Qt的高级动画应用
3.1 Qt自定义动画属性实现背景色透明度动画
自定义一个背景色透明度的属性,在定义get和set方法,在set方法中去通过setstytlesheet去设置背景色的透明度。
Q_PROPERTY(int alpha READ alpha WRITE setAlpha)
动画执行的过程中,通过set方法动态的设置背景色透明度。可以通过setKeyValueAt函数设置关键点的取值,step取值范围是0~1,可以设置几个值。动画执行过程中就会在这个几个值之间切换。
void setKeyValueAt(qreal step, const QVariant &value);
头文件实现
#ifndef MAIN_WINDOW_H
#define MAIN_WINDOW_H
...
class MainWindow : public CustomWindow
{
Q_OBJECT
Q_PROPERTY(int alpha READ alpha WRITE setAlpha)
public:
explicit MainWindow(QWidget *parent = 0);
~MainWindow();
private:
int alpha() const;
void setAlpha(const int alpha);
private:
int m_nAlpha;
QLabel *m_pLabel;
};
#endif // MAIN_WINDOW_H
源文件实现
#include "main_window.h"
MainWindow::MainWindow(QWidget *parent)
: CustomWindow(parent)
{
...
QPushButton *pStartButton = new QPushButton(this);
pStartButton->setText(QString::fromLocal8Bit("开始动画"));
m_pLabel = new QLabel(this);
m_pLabel->setText(QString::fromLocal8Bit("一去丶二三里"));
m_pLabel->setAlignment(Qt::AlignCenter);
m_pLabel->setStyleSheet("color: rgb(0, 160, 230);");
QPropertyAnimation *pAnimation = new QPropertyAnimation();
pAnimation->setTargetObject(this);
pAnimation->setPropertyName("alpha");
pAnimation->setDuration(1000);
pAnimation->setKeyValueAt(0, 255);
pAnimation->setKeyValueAt(0.5, 100);
pAnimation->setKeyValueAt(1, 255);
pAnimation->setLoopCount(-1); //永远运行,直到stop
connect(pStartButton, SIGNAL(clicked(bool)), pAnimation, SLOT(start()));
...
}
int MainWindow::alpha() const
{
return m_nAlpha;
}
void MainWindow::setAlpha(const int alpha)
{
m_nAlpha = alpha;
QString strQSS = QString("color: rgb(0, 160, 230); ").arg(m_nAlpha);
m_pLabel->setStyleSheet(strQSS);
}
注意事项:
(1)需要用QVariantAnimation检测你自定义的QVariant类型是否支持。
(2)声明属性的类必须是一个QObject,必须为属性提供一个setter(这样,QPropertyAnimation才可以设置属性的值)。
3.2 Tab条选择跟随移动
3.2.1 应用场景说明
如下图所示,初始状态,tab条在第一张图片下方,当鼠标放入第三张图片上时,触发了hover信号,tab条则会延长到第三张图片。如果单击第三张图片,tab条则会切换到第三张图片,如果没有单击则失去hover时,tab条还原到第一张图片。从而实现选择切换的动画显示。
3.2.2 实现方法
(1) 现在图片显示的自定义widget类中重写鼠标进入、离开、单击的函数,自定义三种信号,鼠标进入、离开、点击时触发信号传递到外面。
signals:
void signalPicClicked();//鼠标单击信号
void signalEnterPicWidget();
void signalLeavePicWidget();
protected:
void enterEvent(QEvent *e); //进入QWidget瞬间事件
void leaveEvent(QEvent *e); //离开QWidget瞬间事件
void mousePressEvent(QMouseEvent* e);
void enterEvent(QEvent *e); //进入QWidget瞬间事件
void leaveEvent(QEvent *e); //离开QWidget瞬间事件
(2) 将三种信号进行连接
for (int i = 0; i < 4; i++)
{
//鼠标进入信号绑定
connect(&m_Pic[i], &PicWidget::signalEnterPicWidget, this, [=]() {
//延长tab条到当前index
int iCurrentPosX = 164;
if (i != m_iCurrentPicIndex)//不是当前图片索引时才去延长
{
if (i == 0)
{
iCurrentPosX = 164;
}
else if (i == 1)
{
iCurrentPosX = 268;
}
else if (i == 2)
{
iCurrentPosX = 372;
}
else if (i == 3)
{
iCurrentPosX = 476;
}
QPropertyAnimation * linelength = new QPropertyAnimation(ui.line, "geometry");
linelength->setDuration(300);
QRect rect = ui.line->geometry();
linelength->setStartValue(rect);
linelength->setEasingCurve(QEasingCurve::Linear);
if (i<m_iCurrentPicIndex)//hover触发的图片在当前图片左边,x发生变化,同时长度向左延伸
{
linelength->setEndValue(QRect(iCurrentPosX, rect.top(), 32+ abs(i - m_iCurrentPicIndex) * 104, rect.height()));
}
else//hover触发的图片在当前图片右边,x不需要变化,长度向右延伸
{
linelength->setEndValue(QRect(m_iCurrentPosX, rect.top(), 32 + abs(i - m_iCurrentPicIndex) * 104, rect.height()));
}//执行动画
linelength->start(QAbstractAnimation::DeleteWhenStopped);
}
});
//鼠标放入之后没有点击而是离开了。还原位置
connect(&m_Pic[i], &PicWidget::signalLeavePicWidget, this, [=]() {
QPropertyAnimation * linelength = new QPropertyAnimation(ui.line, "geometry");
linelength->setDuration(300);
QRect rect = ui.line->geometry();
linelength->setStartValue(rect);
linelength->setEasingCurve(QEasingCurve::Linear);
if (i >m_iCurrentPicIndex)//坐标改变,同时向右延伸
{
linelength->setEndValue(QRect(m_iCurrentPosX, rect.top(),32, 4));
}
else//坐标不变只改变长度
{
linelength->setEndValue(QRect(m_iCurrentPosX, rect.top(),32, 4));
}
linelength->start(QAbstractAnimation::DeleteWhenStopped);
});
//鼠标单击后,切换位置,并且修改当前图片索引和当前位置值
connect(&m_Pic[i], &PicWidget::signalPicClicked, this, [=]() {
QPropertyAnimation * linelength = new QPropertyAnimation(ui.line, "geometry");
linelength->setDuration(300);
QRect rect = ui.line->geometry();
linelength->setStartValue(rect);
linelength->setEasingCurve(QEasingCurve::Linear);
if (i==0)
{
m_iCurrentPosX = 164;
}
else if (i==1)
{
m_iCurrentPosX = 268;
}
else if (i==2)
{
m_iCurrentPosX = 372;
}
else if (i==3)
{
m_iCurrentPosX = 476;
}
if (i>m_iCurrentPicIndex)
{
linelength->setEndValue(QRect(m_iCurrentPosX, rect.top(), 32, 4));//
}
else
{
linelength->setEndValue(QRect(m_iCurrentPosX, rect.top(), 32, 4));//
}
linelength->start(QAbstractAnimation::DeleteWhenStopped);
m_iCurrentPicIndex = i;
if (m_Pic[i].getPath()!="")
{
SourcePicChanged(m_Pic[i].getPath());
}
});
}
3.3 Qt实现数字滚动动画效果
3.3.1 应用场景说明
如下图所示,需要显示人脸检测的数量,变动画的方式实现个位数字滚动,个位由9变成0时,十位也要滚动,实现进位。当个位十位都是9时,数字不在增加,而是显示加号+。
3.3.2 实现方法
实现方案,个位十位都有上下两个label显示数字。通过QPropertyAnimation属性动画控制两个label位置同时向上。动画结束后,再将两个label还原到原始位置。在还原位置之前,先前上面的labelnum值设置为下面labelnum1的值,下面labelnum1的值设置为+1后的值,避免出现数字闪现变小的问题。
头文件实现
#ifndef NUMSHOWWIDGET_H
#define NUMSHOWWIDGET_H
#include <QPropertyAnimation>
#include<QParallelAnimationGroup>
#include <QSequentialAnimationGroup>
#include <QWidget>
#include"ui_NumShowWidget.h"
class NumShowWidget : public QWidget
{
Q_OBJECT
public:
NumShowWidget();
~NumShowWidget();
void initNum();//个位十位上下初始化0,1值
/*
设置为某个值,会根据数字增量的大小增加数字值,根据time求出平均动画时间步长。增量大时速度快,增量小时速度慢
*/
void setNum(int num,int time);
void addNum(int num, int time);
private:
Ui::NumShowWidget ui;
int m_tenwei = 0;//十位
int m_gewei = 0;//个位
QLabel* m_tenCurrent = NULL;//十位当前label
QLabel* m_tenDown=NULL;//十位下面的label
QLabel* m_geCurrent = NULL;//个位当前label
QLabel* m_geDown = NULL;//个位下面的label
int m_count = 0;//动画执行的次数,增量为10,则执行十次上滚动画
int m_num=0;//保存当前显示的数字。
QParallelAnimationGroup* tenAnimation;
};
#endif // NUMSHOWWIDGET_H
源文件实现
#include "NumShowWidget.h"
NumShowWidget::NumShowWidget()
{
ui.setupUi(this);
setWindowModality(Qt::NonModal);
setWindowFlags(Qt::FramelessWindowHint);
this->resize(32, 32);
m_tenCurrent = ui.labelten;
m_tenDown = ui.labelten1;
m_tenCurrent->setText("0");
m_tenDown->setText("1");
m_geCurrent = ui.labelnum;
m_geCurrent->setText("0");
m_geDown = ui.labelnum1;
m_geDown->setText("1");
ui.labelplus->hide();
tenAnimation = new QParallelAnimationGroup(this);
QPropertyAnimation * tenCurrent = new QPropertyAnimation(m_tenCurrent, "geometry");
tenCurrent->setDuration(100);
tenCurrent->setStartValue(QRect(4, 0, 12, 32));
tenCurrent->setEndValue(QRect(4, -32, 12, 32));
tenAnimation->addAnimation(tenCurrent);
QPropertyAnimation * tenDown = new QPropertyAnimation(m_tenDown, "geometry");
tenDown->setDuration(100);
tenDown->setStartValue(QRect(4, 32, 12, 32));
tenDown->setEndValue(QRect(4, 0, 12, 32));
tenAnimation->addAnimation(tenDown);
connect(tenAnimation, &QAbstractAnimation::finished, this, [=]() {
m_tenCurrent->setText(QString::number(m_tenwei++));
m_tenCurrent->setGeometry(4, 0, 12, 32);
m_tenCurrent->raise();
m_tenDown->setGeometry(4, 32, 12, 32);
m_tenDown->setText(QString::number((m_tenwei + 1)));
});
}
NumShowWidget::~NumShowWidget()
{
if (tenAnimation != NULL)
{
delete tenAnimation;
tenAnimation = NULL;
}
}
void NumShowWidget::initNum()
{
m_tenwei = 1;
m_gewei = 1;
m_num = 0;
m_tenCurrent->setText("0");
m_tenCurrent->setGeometry(QRect(4, 0, 12, 32));
m_tenDown->setText("1");
m_tenDown->setGeometry(QRect(4, 32, 12, 32));
m_geCurrent->setText("0");
m_geDown->setText("1");
m_geCurrent->setGeometry(QRect(15, 0, 12, 32));
m_geDown->setGeometry(QRect(15, 32, 12, 32));
ui.labelplus->hide();
}
void NumShowWidget::setNum(int num, int time)
{
if (num > 99)
{
if (m_num < 99)
{
addNum(99 - m_num, time);
m_num =num;
}
else
{
ui.labelplus->show();
}
}
else
{
addNum(num - m_num, time);
m_num = num;
}
}
void NumShowWidget::addNum(int num, int time)
{
if (num <= 0)
{
return;
}
int steptime = time / num;//动画时间步长
m_count = num;
QParallelAnimationGroup* paraAnimation = new QParallelAnimationGroup(this);
QPropertyAnimation * geCurrent = new QPropertyAnimation(m_geCurrent, "geometry");
geCurrent->setDuration(steptime);
geCurrent->setStartValue(QRect(15, 0, 12, 32));
geCurrent->setEndValue(QRect(15, -32, 12, 32));
paraAnimation->addAnimation(geCurrent);
QPropertyAnimation *geDown = new QPropertyAnimation(m_geDown, "geometry");
geDown->setDuration(steptime);
geDown->setStartValue(QRect(15, 32, 12, 32));
geDown->setEndValue(QRect(15, 0, 12, 32));
paraAnimation->addAnimation(geDown);
paraAnimation->start();
connect(paraAnimation, &QAbstractAnimation::finished, this, [=]() {
m_count--;
m_geCurrent->setText(QString::number(m_gewei++));
m_geCurrent->setGeometry(15, 0, 12, 32);
m_geCurrent->raise();
m_geDown->setGeometry(15, 32, 12, 32);
if (m_gewei >= 10)
{
if (m_tenwei < 10)
{
tenAnimation->start();//十位进一位
}
m_gewei = 0;
}
m_geDown->setText(QString::number((m_gewei) % 10));
if (m_count > 0)
{
paraAnimation->start();
}
else
{
delete paraAnimation;
}
});
}
4 附录
4.1 Qt动画QEasingCurve的速度曲线
https://doc.qt.io/archives/qt-4.8/qeasingcurve.html
ConstantValueDescriptionQEasingCurve::Linear0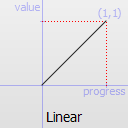
Easing curve for a linear (t) function: velocity is constant.QEasingCurve::InQuad1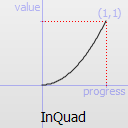
Easing curve for a quadratic (t^2) function: accelerating from zero velocity.QEasingCurve::OutQuad2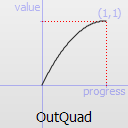
Easing curve for a quadratic (t^2) function: decelerating to zero velocity.QEasingCurve::InOutQuad3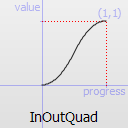
Easing curve for a quadratic (t^2) function: acceleration until halfway, then deceleration.QEasingCurve::OutInQuad4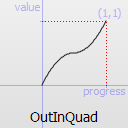
Easing curve for a quadratic (t^2) function: deceleration until halfway, then acceleration.QEasingCurve::InCubic5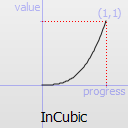
Easing curve for a cubic (t^3) function: accelerating from zero velocity.QEasingCurve::OutCubic6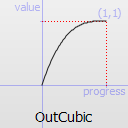
Easing curve for a cubic (t^3) function: decelerating to zero velocity.QEasingCurve::InOutCubic7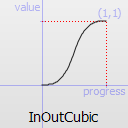
Easing curve for a cubic (t^3) function: acceleration until halfway, then deceleration.QEasingCurve::OutInCubic8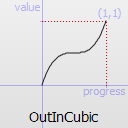
Easing curve for a cubic (t^3) function: deceleration until halfway, then acceleration.QEasingCurve::InQuart9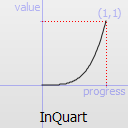
Easing curve for a quartic (t^4) function: accelerating from zero velocity.QEasingCurve::OutQuart10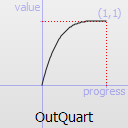
Easing curve for a quartic (t^4) function: decelerating to zero velocity.QEasingCurve::InOutQuart11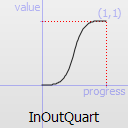
Easing curve for a quartic (t^4) function: acceleration until halfway, then deceleration.QEasingCurve::OutInQuart12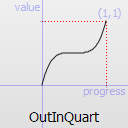
Easing curve for a quartic (t^4) function: deceleration until halfway, then acceleration.QEasingCurve::InQuint13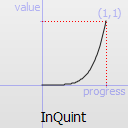
Easing curve for a quintic (t^5) easing in: accelerating from zero velocity.QEasingCurve::OutQuint14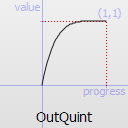
Easing curve for a quintic (t^5) function: decelerating to zero velocity.QEasingCurve::InOutQuint15
Easing curve for a quintic (t^5) function: acceleration until halfway, then deceleration.QEasingCurve::OutInQuint16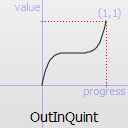
Easing curve for a quintic (t^5) function: deceleration until halfway, then acceleration.QEasingCurve::InSine17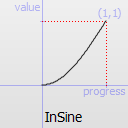
Easing curve for a sinusoidal (sin(t)) function: accelerating from zero velocity.QEasingCurve::OutSine18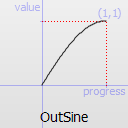
Easing curve for a sinusoidal (sin(t)) function: decelerating from zero velocity.QEasingCurve::InOutSine19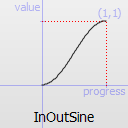
Easing curve for a sinusoidal (sin(t)) function: acceleration until halfway, then deceleration.QEasingCurve::OutInSine20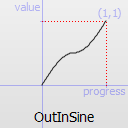
Easing curve for a sinusoidal (sin(t)) function: deceleration until halfway, then acceleration.QEasingCurve::InExpo21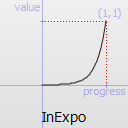
Easing curve for an exponential (2^t) function: accelerating from zero velocity.QEasingCurve::OutExpo22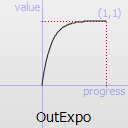
Easing curve for an exponential (2^t) function: decelerating from zero velocity.QEasingCurve::InOutExpo23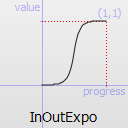
Easing curve for an exponential (2^t) function: acceleration until halfway, then deceleration.QEasingCurve::OutInExpo24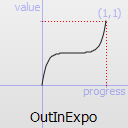
Easing curve for an exponential (2^t) function: deceleration until halfway, then acceleration.QEasingCurve::InCirc25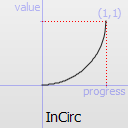
Easing curve for a circular (sqrt(1-t^2)) function: accelerating from zero velocity.QEasingCurve::OutCirc26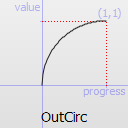
Easing curve for a circular (sqrt(1-t^2)) function: decelerating from zero velocity.QEasingCurve::InOutCirc27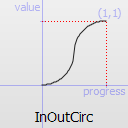
Easing curve for a circular (sqrt(1-t^2)) function: acceleration until halfway, then deceleration.QEasingCurve::OutInCirc28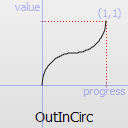
Easing curve for a circular (sqrt(1-t^2)) function: deceleration until halfway, then acceleration.QEasingCurve::InElastic29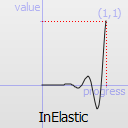
Easing curve for an elastic (exponentially decaying sine wave) function: accelerating from zero velocity. The peak amplitude can be set with the amplitude parameter, and the period of decay by the period parameter.QEasingCurve::OutElastic30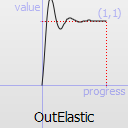
Easing curve for an elastic (exponentially decaying sine wave) function: decelerating from zero velocity. The peak amplitude can be set with the amplitude parameter, and the period of decay by the period parameter.QEasingCurve::InOutElastic31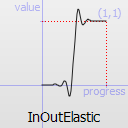
Easing curve for an elastic (exponentially decaying sine wave) function: acceleration until halfway, then deceleration.QEasingCurve::OutInElastic32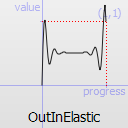
Easing curve for an elastic (exponentially decaying sine wave) function: deceleration until halfway, then acceleration.QEasingCurve::InBack33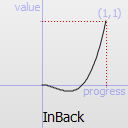
Easing curve for a back (overshooting cubic function: (s+1)*t^3 - s*t^2) easing in: accelerating from zero velocity.QEasingCurve::OutBack34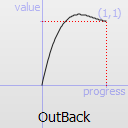
Easing curve for a back (overshooting cubic function: (s+1)*t^3 - s*t^2) easing out: decelerating to zero velocity.QEasingCurve::InOutBack35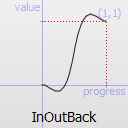
Easing curve for a back (overshooting cubic function: (s+1)*t^3 - s*t^2) easing in/out: acceleration until halfway, then deceleration.QEasingCurve::OutInBack36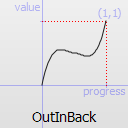
Easing curve for a back (overshooting cubic easing: (s+1)*t^3 - s*t^2) easing out/in: deceleration until halfway, then acceleration.QEasingCurve::InBounce37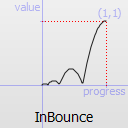
Easing curve for a bounce (exponentially decaying parabolic bounce) function: accelerating from zero velocity.QEasingCurve::OutBounce38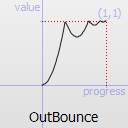
Easing curve for a bounce (exponentially decaying parabolic bounce) function: decelerating from zero velocity.QEasingCurve::InOutBounce39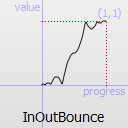
Easing curve for a bounce (exponentially decaying parabolic bounce) function easing in/out: acceleration until halfway, then deceleration.QEasingCurve::OutInBounce40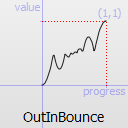
Easing curve for a bounce (exponentially decaying parabolic bounce) function easing out/in: deceleration until halfway, then acceleration.QEasingCurve::Custom45This is returned if the user specified a custom curve type with setCustomType(). Note that you cannot call setType() with this value, but type() can return it.


 960
960


 被折叠的 条评论
为什么被折叠?
被折叠的 条评论
为什么被折叠?
 到【灌水乐园】发言


