AntV X6 实现两点之间连线上 多个圆点等距分布 匀速移动

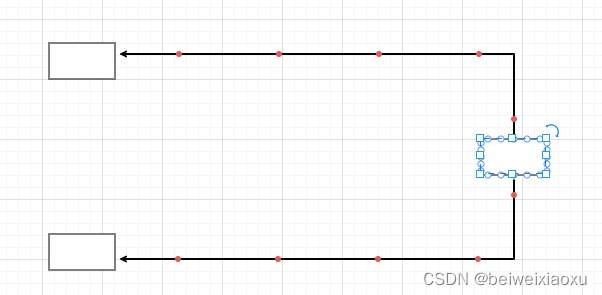
本文介绍了如何使用AntV X6框架,在两点之间的连线上实现多个圆点等距分布并匀速移动的效果。当元素被选中时,圆点开始运动;失去选中状态时,运动停止。查看提供的CodeSandbox示例以了解更多详情。
摘要由CSDN通过智能技术生成

实现效果

 实现代码

选中时运动

 graph.on("node:selected", ({ node }) => {

      /* 获取连出的线 */
      const connectEdges = graph.getConnectedEdges(node, { outgoing: true });

      connectEdges.map((edge) => {
        /* 获取边的长度 */
        const view = graph.findViewByCell(edge) as EdgeView;
        const length = view.path.length();
        /* 小球个数 */
        const circleNum = Math.ceil(length / 100);

        /* 图形 */
        let markup = edge.getMarkup();
        const attrOption: IObjectAny = {
          circleGroup: {
            r: 3,
            fill: '#db5e5e',
          },
        };

        /* 图形个数 */
        for (let i = 0; i < circleNum; i++) {
          const selector = 'circle' + i + edge.id
          markup = [
  • 3
    点赞
  • 2
    收藏
    觉得还不错? 一键收藏
  • 2
    评论
AntV X6中选中多个节点,您可以使用以下步骤: 1. 创建一个变量来存储选中的节点: ```javascript const selectedNodes = new Set(); ``` 2. 在节点上添加事件监听器,当节点被点击时将其添加到选中节点的集合中: ```javascript graph.on('node:click', ({ node }) => { const nodeId = node.getID(); if (selectedNodes.has(nodeId)) { selectedNodes.delete(nodeId); // 取消选中节点的样式处理 node.attr('body/style', { fill: '#ffffff' }); } else { selectedNodes.add(nodeId); // 选中节点的样式处理 node.attr('body/style', { fill: '#ffcc00' }); } }); ``` 3. 如果需要实现多选框的功能,您可以在画布上添加一个矩形框,监听鼠标事件来选择多个节点: ```javascript let selectionBox = null; let startPoint = null; let endPoint = null; graph.on('blank:pointerdown', ({ x, y }) => { startPoint = { x, y }; selectionBox = graph.addNode({ shape: 'rect', attrs: { x, y, width: 0, height: 0, stroke: '#999999', fill: 'rgba(0,0,0,0.1)', }, zIndex: 9999, }); }); graph.on('blank:pointermove', ({ x, y }) => { if (!startPoint || !selectionBox) return; endPoint = { x, y }; const width = Math.abs(endPoint.x - startPoint.x); const height = Math.abs(endPoint.y - startPoint.y); const attrs = { width, height, x: startPoint.x < endPoint.x ? startPoint.x : endPoint.x, y: startPoint.y < endPoint.y ? startPoint.y : endPoint.y, }; selectionBox.attr(attrs); }); graph.on('blank:pointerup', () => { if (selectionBox) { const box = selectionBox.getBBox(); graph.getNodes().forEach((node) => { const nodeBox = node.getBBox(); if (box.intersect(nodeBox)) { const nodeId = node.getID(); selectedNodes.add(nodeId); // 选中节点的样式处理 node.attr('body/style', { fill: '#ffcc00' }); } }); selectionBox.remove(); selectionBox = null; startPoint = null; endPoint = null; } }); ``` 通过以上步骤,您就可以实现AntV X6中选中多个节点的功能。希望对您有所帮助!如果您还有任何问题,请随时提问。

“相关推荐”对你有帮助么?

  • 非常没帮助
  • 没帮助
  • 一般
  • 有帮助
  • 非常有帮助
提交
评论 2
添加红包

请填写红包祝福语或标题

红包个数最小为10个

红包金额最低5元

当前余额3.43前往充值 >
需支付:10.00
成就一亿技术人!
领取后你会自动成为博主和红包主的粉丝 规则
hope_wisdom
发出的红包
实付
使用余额支付
点击重新获取
扫码支付
钱包余额 0

抵扣说明:

1.余额是钱包充值的虚拟货币,按照1:1的比例进行支付金额的抵扣。
2.余额无法直接购买下载,可以购买VIP、付费专栏及课程。

余额充值