


官方配置文档:surfelwarp代码库
配置参考博客:https://blog.csdn.net/qq_42968061/article/details/112232125
注:需要说明的是参考的博客原作者已经写的非常详细,但其中有两步:安装显卡驱动和CUDA的过程可以简化,简化后的配置门槛更低一些,当初爬过按官网配置CUDA的坑,算是比较痛苦的,再次感谢原作者分享~
实现的配置:Ubuntu18.04+cuda9.1+cilantro
我的硬件:小米笔记本电脑Pro15.6,显卡:GeForce MX250
一、安装Ubuntu18.04
由于我的笔记本是win10的系统所以接下来我要安装win10和Ubuntu18.04的双系统
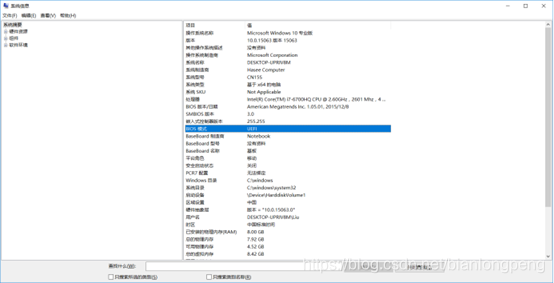
1.1 查看自己的电脑是MBR启动还是UEFI格式启动
方法:win+r打开cmd命令窗输入msinfo32回车确认出现以下信息
- MBR启动:
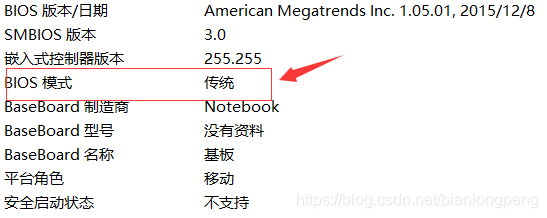
- UEFI启动
1.2 下载Ubuntu系统镜像
下载链接
选择对应的版本即可,需要指出的是ubuntu系统一般分为i386和amd64,如果电脑是32位的就选择i386,如果是64位的两个都可
1.3 制作UEFI格式U盘启动盘
将ISO镜像种的所有文件复制到一个干净的U盘种即可(MBR启动的需要用UltralSO将镜像写入U盘,该方法对UEFI同样可以)
1.4 压缩磁盘,新建分区
桌面电脑图标右键–>管理–>存储–>磁盘管理
选择磁盘–>右键压缩卷–>选择合适大小–>压缩完推出,保持未分区状态,不要格式化
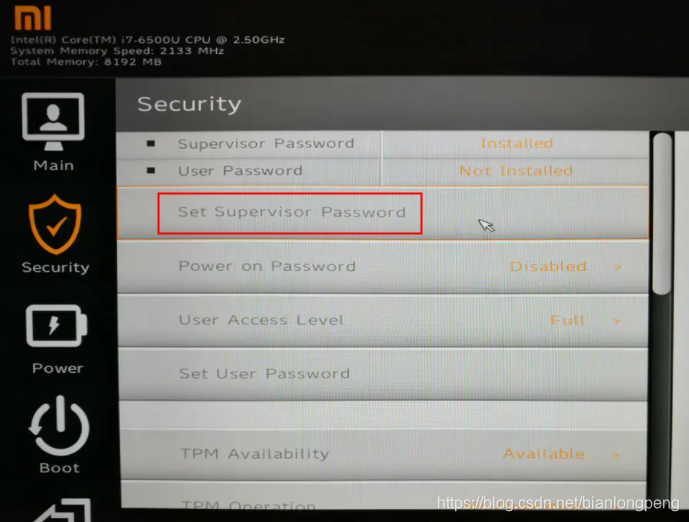
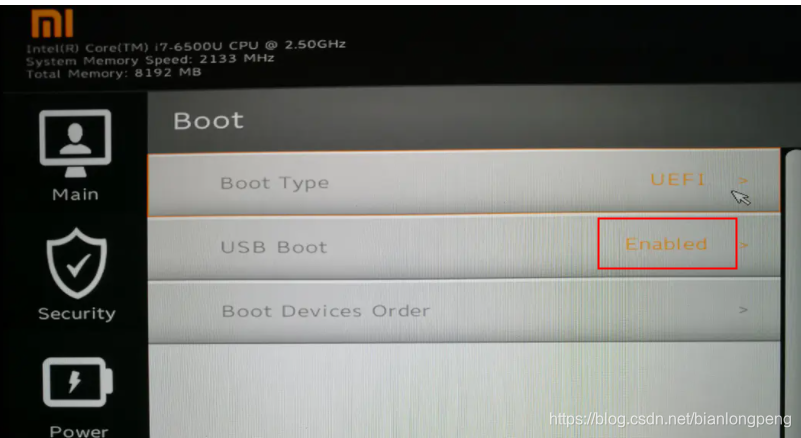
1.5 关闭Secure Boot(必须,否则安装完Ubuntu后重启没有引导菜单,只能进Win10)
-
进入BIOS:按住F2重启电脑
-
Security–>Set Supervisor Password(必须设置,否则下面的Secure Boot无法更改)
-
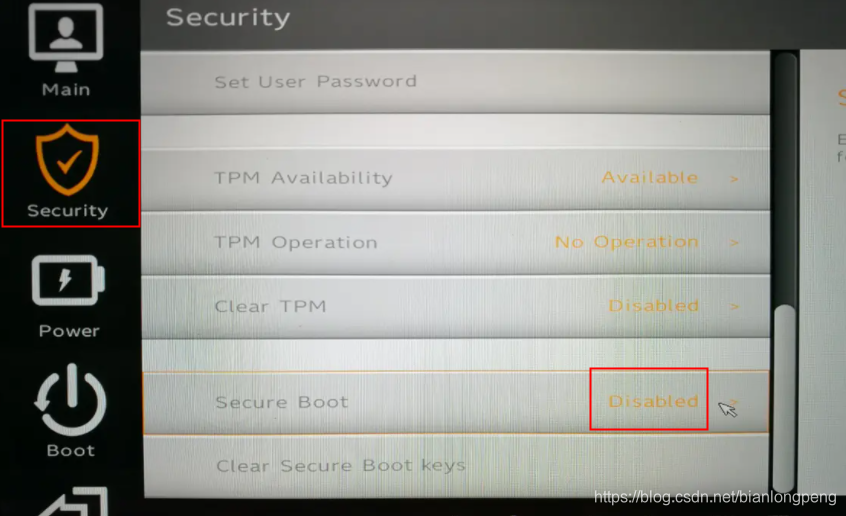
Security–>Secure Boot–>设置为Disabled
-
Boot–>USB Boot–>设置Enabled
-
最后F10后回车,保存重启
1.6 安装
- 进入启动U盘,同进入BIOS类似,在上面重启后按F12进入选择菜单,选择你的U盘
- 按照提示步骤安装,但是分区时要选择其他选项
- 分区:
/boot text4 300MB(这个分区不能没有,用来安装引导)
/ text4 140G
swap 1000MB - 分区完后,下面安装启动引导器的设备选择/boot所在的分区
- 安装完重启会出现一个选择菜单,选择Ubuntu进入linux系统;选择Windows boot Manager则进入Win10

二、配置编译surfelwarp
2.1 新建一个项目目录Project,然后依次运行
以下安装编译都建议以root权限进行,防止不必要的麻烦
sudo apt-get update
sudo apt install git
git clone https://github.com/weigao95/surfelwarp.git
git clone https://github.com/stevenlovegrove/Pangolin.git
git clone https://github.com/kzampog/cilantro.git
此时项目目录应为:
Project/ # 根目录
|-- surfelwarp/ # surfelwarp项目
| |-- …
|
|-- Pangolin/ # Pangolin项目
| |-- …
|
|-- cilantro/ # cilantro项目
| |-- …
2.2 检查库版本,这些库版本出现差错会编译失败
- cmake>=3.16
cmake安装 - Eigen3.3.9
在surfelwarp/external/eigen3.4文件夹下运行命令:
mkdir build
cd build
cmake ..
sudo make install
[注]:安装成功后
DELGEN_INCLUDE_DIR=/usr/local/include/eigen3
Eigen3_DIR=/usr/local/share/eigrn3/cmake
- gcc>=6
ubuntu18.04自带gcc7,这里需要指出的是如果安装的是cuda9,gcc=7则后面编译surfelwarp主文件夹时会报gcc don’t support GNU version的error,这是因为cuda9编译要求gcc<=6,对gcc进行降级即可
查看gcc版本
注:这里必须要用gcc-6的版本,大于和小于的版本都试了都会出问题
gcc--version
安装gcc:
sudo apt-get install gcc-[version] g++-[version] -y
- CUDA安装
安装cuda前需要安装显卡驱动,查看显卡驱动命令:
nvidia-smi
安装显卡驱动:首先查看显卡适合的驱动信息
ubuntu-drivers devices

按照推荐的版本安装即可:
#[这是我的推荐版本,不同的要替换为自己的版本]
sudo apt install nvidia-driver-460
驱动安装完重启,注:一定要重启
reboot
通过nvidia-smi查看驱动安装情况,之后安装cuda
nvidia-smi
sudo apt install nvidia-cuda-tookit
安装成功后查看
nvcc -V
- boost 1.74
boost安装
2.3 构建Pangolin项目
构建时处于Project目录下,安装Pangolin项目依赖:
sudo apt install libgl1-mesa-dev
sudo apt install libglew-dev
构建:
cd Pangolin
mkdir build_static && mkdir install_static
cd build_static
cmake -DCMAKE_INSTALL_PREFIX=../install_static -DBUILD_SHARED_LIBRARIES=OFF -DCUDA_ARCH=61 ..
make -j8 && make install
cd ../..                               # 返回Project目录
注:此处eigen版本必须为3.4,否则会在构建surfelwarp过程种出现CUDA的编译错误,这是由于老版本的eigen没有CUDA9以上的版本支持
2.4 构建cilantro项目
在cilantro文件夹下运行命令:
git checkout e9eb9f3c5c75710eb6cfeeb6313b5a73aaa06a28
mkdir build_static && mkdir install_static
cd build_static
cmake -DCMAKE_INSTALL_PREFIX=../install_static -DBUILD_SHARED_LIBRARIES=OFF -DPangolin_DIR=../../Pangolin/install_static/lib/cmake/Pangolin  -DCUDA_ARCH=61 ..
make -j4 && make install
cd ../..
2.5 构建surfelwarp
安装相关依赖:
sudo apt-get install libopencv-dev libglfw3 libglfw3-dev
修复make时include路径报错,修改surfelwarp/commom文件夹下的point_cloud_typedefs.h的第13行:
#include <cilantro/point_cloud.hpp>
修改surfelwarp/visualization文件夹下的PointCloudVisualizer.cpp的第17行和18行
#include <cilantro/visualizer.hpp>
#include <cilantro/common_renderables.hpp>
修改surfelwarp/apps/surfelwarp_app/main.cpp
#include "common/common_utils.h"
#include "common/ConfigParser.h"
#include "core/SurfelWarpSerial.h"
#include <boost/filesystem.hpp>

int main(int argc, char** argv) {
	using namespace surfelwarp;
	//Get the config path
	std::string config_path;

	config_path = "/你的路径/surfelwarp/test_data/boxing_config.json";

auto& config = ConfigParser::Instance();
config.ParseConfig(config_path);
执行编译命令:
cd surfelwarp
mkdir build && cd build
cmake -DVISUALIZATION_LIBRARY=cilantro -Dcilantro_DIR=../../cilantro/install_static -DCUDA_ARCH=61 ..
make -j8
配置成功:

注意:构建surfelwarp时需要先安装boost,且需要使用cilantro可视化而非pcl,否则会默认使用pcl编译并报错
2.6 运行
下载数据:下载boxing
下载模型:模型文件
下载后将模型文件放置在surfelwarp/test_data目录下,目录结构如下
surfelwarp/test_data#根目录
|--binary
|--boxing
|--boxing_config.json
|--sintel_small_speed
修改boxing_config.json文件
"data_prefix":"/你的路径/Project/surfelwarp/test_data/boxing/data",
"gpc_model_path":"/你的路径/Project/surfelwarp/test_data/sintel_small_speed",
保存,在surfelwarp/build/apps/surfelwarp_app运行:
./surfelwarp_app /path/to/config
三、参考
https://blog.csdn.net/baidu_36602427/article/details/86548203
https://blog.csdn.net/qq_42968061/article/details/112232125
https://www.jianshu.com/p/406d73350270
https://www.jianshu.com/p/8d5ad27b96b9
https://zhuanlan.zhihu.com/p/59618999
https://blog.csdn.net/weixin_38208741/article/details/70821023
https://github.com/ethereum-mining/ethminer/issues/731


 被折叠的 条评论
为什么被折叠?
被折叠的 条评论
为什么被折叠?
 到【灌水乐园】发言


