


ViewDragHelper实现相册中图片滑动查看功能
ViewDragHelper是SupportV4提供的实用工具类,主要用于多视图下View的拖拽滑动效果,比如侧滑栏,抽屉都能实现。程序员无需再去处理繁琐的onTouch事件问题。
本文主要实现一个简单的图片滑动查看效果
实现过程
 - 初始化ViewDragHelper
 - 复写ViewDragHelper.Callback接口方法
 - 传递onTouch事件
 - 编写业务逻辑
1. 初始化ViewDragHelper
ViewDragHelper viewDragHelper;
private void init() { //this 指parent ViewGroup实例引用
viewDragHelper = ViewDragHelper.create(this, callback);
}
2. 实现Callback接口
private ViewDragHelper.Callback callback = new ViewDragHelper.Callback() {
手指捕获时可以得到当前是那个View,返回true表示可以被拖拽移动
public boolean tryCaptureView(View child, int pointerId) {
return false;
}
当某个View发生变化后 触发这个方法,可以获取到left,top新的值,以及变化量dx,dy
public void onViewPositionChanged(View changedView, int left, int top, int dx, int dy) {
super.onViewPositionChanged(changedView, left, top, dx, dy);
}
当手指释放时触发这个方法,这里可以写动画处理,参数为x,y方向的速度
public void onViewReleased(View releasedChild, float xvel, float yvel) {
super.onViewReleased(releasedChild, xvel, yvel);
}
上下拖拽view top为新的位置,dy为变化量
public int clampViewPositionVertical(View child, int top, int dy) {
return top;
}
左右拖拽view left为新的位置 dx为变化量
public int clampViewPositionHorizontal(View child, int left, int dx) {
return left;
}
};
3. 传递事件
交给dragHelper去做
public boolean onInterceptTouchEvent(android.view.MotionEvent ev) {
return viewDragHelper.shouldInterceptTouchEvent(ev);
};
@Override
public boolean onTouchEvent(MotionEvent event) {
viewDragHelper.processTouchEvent(event);
return true;
}
4. 编写具体逻辑
我们具体的业务基本都在回调函数中,我们的代码是扩展FrameLayout,下面的代码都放在子类中
import android.support.v4.view.ViewCompat;
import android.support.v4.widget.ViewDragHelper;
import android.support.v4.widget.ViewDragHelper.Callback;
public class SmartShowImageLayout extends FrameLayout {
//代码都添加到这里
}
XML布局
<RelativeLayout xmlns:android="http://schemas.android.com/apk/res/android"
xmlns:tools="http://schemas.android.com/tools"
android:layout_width="match_parent"
android:layout_height="match_parent" >
<com.gaofeng.mobile.smart.images.SmartShowImageLayout
android:id = "@+id/layout"
android:layout_width="fill_parent"
android:layout_height="fill_parent"
android:layout_centerHorizontal="true" >
<ImageView
android:id="@+id/cachenext"
android:layout_width="wrap_content"
android:layout_height="wrap_content"
android:layout_gravity="center"
/>
<ImageView
android:id="@+id/next"
android:layout_width="wrap_content"
android:layout_height="wrap_content"
android:layout_gravity="center"
android:src = "@drawable/m06"
/>
<ImageView
android:id="@+id/currentview"
android:layout_width="wrap_content"
android:layout_height="wrap_content"
android:layout_gravity="center"
android:src="@drawable/m05"
/>
</com.gaofeng.mobile.smart.images.SmartShowImageLayout>
</RelativeLayout>
首先创建实体保存必要的变量
final class Holder {
public ImageView imageView;//显示的View
//记住以前的位置
public int left;
public int top;
public int right;
public int bottom;
public void setPosition(int l, int t, int r, int b) {
this.left = l;
this.top = t;
this.right = r;
this.bottom = b;
}
public void setImageView(ImageView imageView) {
this.imageView = imageView;
}
}
Holder next, current, cachenext;//下一张,当前显示,cachenext未使用
//初始化Holder
public void initHolder() {
Log.d(TAG, "initHolder");
if (cachenext == null) { //本文中未用
cachenext = new Holder();
View view = getChildAt(0);
cachenext.setPosition(view.getLeft(), view.getTop(),
view.getRight(), view.getBottom());
cachenext.imageView = (ImageView) view;
}
if (next == null) {
next = new Holder();
View view = getChildAt(1);
next.setPosition(view.getLeft(), view.getTop(), view.getRight(),
view.getBottom());
next.imageView = (ImageView) view;
// 设置默认的scale和alpha
next.imageView.setScaleX(defScaleX);
next.imageView.setScaleY(defScaleY);
next.imageView.setAlpha(defAlpha);
}
if (current == null) {
current = new Holder();
View view = getChildAt(2);
current.setPosition(view.getLeft(), view.getTop(), view.getRight(),
view.getBottom());
current.imageView = (ImageView) view;
}
}
protected void onLayout(boolean changed, int left, int top, int right, int bottom) {
super.onLayout(changed, left, top, right, bottom);
Log.d(TAG, "onLayout:" + changed);
if (changed) {
initHolder(); //布局完成放置,我们才能获取具体位置值
}
};
//变量初始化
boolean isSmooth = true;
int direction; // 1 is Left, 2 is Right
//初始化下一张的 scale和alpha 值,用来添加特效的
float defScaleX = 0.2f;
float defScaleY = 0.2f;
float defAlpha = 0.2f;
int screenWidth = 0;//屏幕宽度
int screenHeight = 0;//屏幕高度
int currentIndex = 0;
//图片资源
final static int images[] = { R.drawable.m03, R.drawable.m04,
R.drawable.m05, R.drawable.m06 };
//重写父类方法 获取屏幕宽高
protected void onSizeChanged(int w, int h, int oldw, int oldh) {
super.onSizeChanged(w, h, oldw, oldh);
this.screenWidth = getWidth();
this.screenHeight = getHeight();
Log.d(TAG, "onSizeChanged:" + this.screenWidth + " "
+ this.screenHeight);
};
下面是核心代码都在Callback中
public boolean tryCaptureView(View childView, int pointId) {
return true;//默认View都可捕获
}
public int clampViewPositionHorizontal(View child, int left, int dx) {
if (dx < 0) { //这里是向左移动
direction = 1;
return left;
} else if (dx > 0) { //向右边滑动
direction = 2;
//最多移动到原始位置
if (child == current.imageView && left > current.left) {
return child.getLeft();
}
}
return left; // 返回变化过的坐标
};
public int clampViewPositionVertical(View child, int top, int dy) {
return child.getTop();// 上下不滑动,返回默认值
};
public void onViewPositionChanged(View changedView, int left, int top, int dx, int dy) {
super.onViewPositionChanged(changedView, left, top, dx, dy);
if (changedView == next.imageView) { //当滑动的是next图片时,我们把位移传给当前current的图片
// 下一张图片暂时不滑动
changedView.layout(next.left, next.top, next.right, next.bottom);
int _left = current.imageView.getLeft() + dx;
int _right = current.imageView.getRight() + dx;
if (current.imageView.getLeft() > current.left) { // 只能让图片回到原来位置
current.imageView.layout(current.left, current.top,current.right, current.bottom);
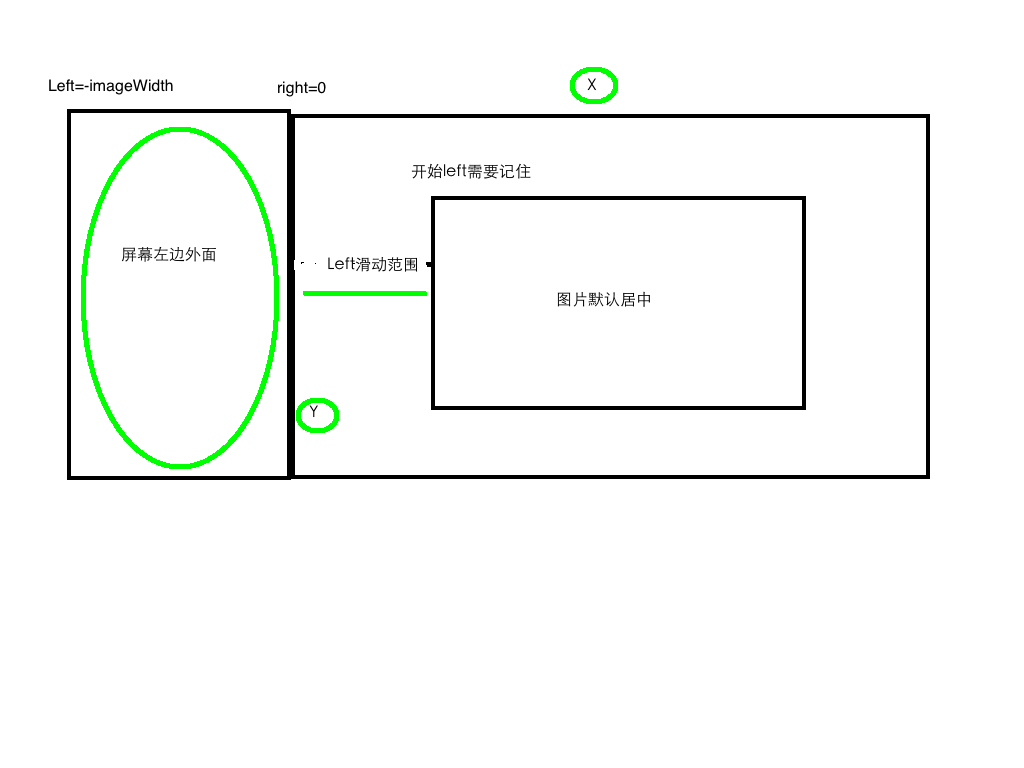
} else if (_right >= 0) {
// 最多滑倒屏幕最左边,就不滑动了 left=-宽度 或者 right =0
current.imageView.layout(_left, current.top, _right,current.bottom);
}
if (_right <= 4) { //这里处理的不太好,滑动的时候不能一次性滑倒最边缘处,所以可能多出4个位置px
current.imageView.layout(_left + _right, current.top, 0,current.bottom);
}
}
//滑动过程中,next图片动画
viewDragAnimate(dx, current.right, next);
// 已经完全滑动到屏幕外边,我们要调换图片
if (current.imageView.getRight() <= 0) {
if (!viewreleased) {
adjustView(current, next);
}
}
invalidate();
};
//来看动画处理
float scaleM = defScaleX; // X 和 Y 都一样
float alphaM = defAlpha;
private void viewDragAnimate(int dx, int right, Holder change) {
float distance = right;// 0 - right 为滑动范围
float factor = (1 - defScaleX) / distance;// 计算每一步扩大因子
factor = factor * Math.abs(dx);//乘以步伐
if (dx < 0) { // 扩大
scaleM += factor;
alphaM += factor;
} else if (dx > 0) { // 放小
scaleM -= factor;
alphaM -= factor;
}
// 检测不越界
if (scaleM >= 1.0) {
scaleM = 1.0f;
}
if (scaleM <= defScaleX) {
scaleM = defScaleX;
}
if (alphaM >= 1.0) {
alphaM = 1.0f;
}
if (alphaM <= defAlpha) {
alphaM = defAlpha;
}
change.imageView.setScaleX(scaleM);
change.imageView.setScaleY(scaleM);
change.imageView.setAlpha(alphaM);
}
private void adjustView(Holder current, Holder next) {
Log.d(TAG, "adjustView>>>");
// 交换一下位置,未来实现滑动前一张图片
Holder temp = current; // CURRENT -> NextCache
cachenext.imageView.setImageDrawable(temp.imageView.getDrawable());
cachenext.setPosition(temp.left, temp.top, temp.right, temp.bottom);
cachenext.imageView.layout(
temp.imageView.getLeft(),
temp.imageView.getTop(),
temp.imageView.getRight(),
temp.imageView.getBottom());
//nextcache考虑未来向右边滑动时
// NEXT -> CURRENT
Bitmap bitmap = ((BitmapDrawable) next.imageView.getDrawable()).getBitmap();
int w = bitmap.getWidth();
int h = bitmap.getHeight();
current.imageView.setImageBitmap(bitmap);
current.left = (screenWidth - w) / 2; // 重新计算图片位置
current.top = (screenHeight - h) / 2;
current.right = current.left + w;
current.bottom = current.top + h;
FrameLayout.LayoutParams fm = new FrameLayout.LayoutParams(w, h);
fm.gravity = Gravity.CENTER;// 重新设置 否则可能不会居中
current.imageView.setLayoutParams(fm);
current.imageView.layout(current.left, current.top, current.right,current.bottom);
// 重新开始next图片
scaleM = defScaleX; // X 和 Y 都一样
alphaM = defAlpha;
bitmap = BitmapFactory.decodeResource(getResources(),images[currentIndex++]);
next.imageView.setImageBitmap(bitmap);
next.imageView.setScaleX(defScaleX);
next.imageView.setScaleY(defScaleY);
next.imageView.setAlpha(defAlpha);
w = bitmap.getWidth();
h = bitmap.getHeight();
next.left = (screenWidth - w) / 2;
next.top = (screenHeight - h) / 2;
next.right = next.left + w;
next.bottom = next.top + h;
fm = new FrameLayout.LayoutParams(w, h);
fm.gravity = Gravity.CENTER;
next.imageView.setLayoutParams(fm);
next.imageView.layout(next.left, next.top, next.right, next.bottom);
if (currentIndex >= images.length) {
currentIndex = 0;
}
}
最后是动画
public void onViewReleased(View releasedChild, float xvel, float yvel) {
super.onViewReleased(releasedChild, xvel, yvel);
viewreleased = true;//滑动过程中 避免修改View
resetPositionSmoothly();
};
private void resetPositionSmoothly() {
if (isSmooth) {
int destLeft;
int p = current.left / 2; // 一共能滑动多少,一半以内回到原来地方,一半以外滑动到屏幕外面
if (current.imageView.getLeft() < p) {
destLeft = -(current.right - current.left);// 滑倒屏幕外
} else {
destLeft = current.left;// 恢复
}
//带动画滑动效果
boolean isok = viewDragHelper.smoothSlideViewTo(current.imageView,destLeft, current.top);
if (isok) {
ViewCompat.postInvalidateOnAnimation(this);
}
}
}
@Override
public void computeScroll() {
super.computeScroll();
if (viewDragHelper.continueSettling(true)) {
ViewCompat.postInvalidateOnAnimation(this);
} else {
viewreleased = false;
}
}
OK 代码就这些,基本功能实现就是这样的,大部分都是计算坐标,ViewDragHelper让我们减少了很多代码。


 984
984

 被折叠的 条评论
为什么被折叠?
被折叠的 条评论
为什么被折叠?
 到【灌水乐园】发言


