


目录
1.介绍
文章介绍的是unity打包xcode工程完毕后,开启terminal执行打包脚本。
xcode 8.1+,unity5.5+ , 脚本适用于mac系统。
2.Unity代码
打包完毕最后,调用Buildipa()。
public static string ProjectPath(){
	string currentDir = Application.dataPath;
	int index = currentDir.LastIndexOf ("/");
	currentDir = currentDir.Remove (index);
	index = currentDir.LastIndexOf ("/");
	currentDir = currentDir.Remove (index);
	return currentDir;
}
public static string XcodePath(){
	return ProjectPath () + "/Unity_IOS";//'Unity_IOS'替换为你的xcode工程导出的文件夹名称
}

/*
此代码的功能: 打开terminal,执行buildios.sh
"osascript" 是apple script,osascript可以主动打开一个terminal,并且在终端显示构建IPA的Log
当然你也可以直接调用shell,下方有例子。我不用shell是因为shell是在后台执行,我看不到详细Log
*/
public void Buildipa() {
    Process myCustomProcess = new Process();
	myCustomProcess.StartInfo.FileName = "osascript";
	myCustomProcess.StartInfo.Arguments = string.Format ("-e 'tell application \"Terminal\" \n activate \n do script \"cd {0} && sh {1} {2}\" \n end tell'",Application.dataPath + "/_PlatformAssets/", "buildios.sh", XCodeProjectMod.XcodePath ());
	myCustomProcess.StartInfo.UseShellExecute = false;
	myCustomProcess.StartInfo.RedirectStandardOutput = false;
	myCustomProcess.Start();
	myCustomProcess.WaitForExit ();
}
//打开shell (不推荐)
Process myCustomProcess = new Process();
myCustomProcess.StartInfo.FileName = "/bin/sh";
myCustomProcess.StartInfo.Arguments = Application.dataPath + "/_PlatformAssets/buildios.sh" + " " + XCodeProjectMod.XcodePath() + " " + "test";
myCustomProcess.StartInfo.UseShellExecute = false;
myCustomProcess.StartInfo.RedirectStandardOutput = false;
myCustomProcess.Start();
myCustomProcess.WaitForExit ();
3. ipa打包脚本—buildios.sh
echo "Start Building"
#project_path="xxxxxxxxx"
project_path=$1
scheme_name="Unity-iPhone"
export_plist=${project_path}/exportArgs.plist
project_name="Unity-iPhone.xcodeproj"
build_output_dir="build"
configuration="Release"
archivePath=${build_output_dir}/${scheme_name}.xcarchive

cd $project_path

echo "Clean Xcode"

xcodebuild clean

xcodebuild archive -project "${project_name}" -scheme "${scheme_name}" -configuration "$configuration" -archivePath "${archivePath}"

#xcrun obsoleted
#xcrun -sdk iphoneos PackageApplication -v ${build_path}/Release-iphoneos/rok.app -o ${build_path}/${ipa_name}.ipa

xcodebuild -exportArchive -archivePath "${archivePath}" -exportOptionsPlist "${export_plist}" -exportPath "${build_output_dir}"

open ${project_path}

echo "Successfully exported and signed the ipa file"

#python emailPy.py "$result"文章参考:http://liumh.com/2015/11/25/ios-auto-archive-ipa/
exportArgs.plist 文件是导出ipa 必要文件(可自行查阅资料,下方是plist文件,请自行创建一个plist文件)
<?xml version="1.0" encoding="UTF-8"?>
<!DOCTYPE plist PUBLIC "-//Apple//DTD PLIST 1.0//EN" "http://www.apple.com/DTDs/PropertyList-1.0.dtd">
<plist version="1.0">
<dict>
	<key>method</key>
	<string>development</string>
	<key>compileBitcode</key>
	<string>NO</string>
</dict>
</plist>
Xcode9 此配置有变化 链接跳转 点击打开链接
4.打包脚本推荐
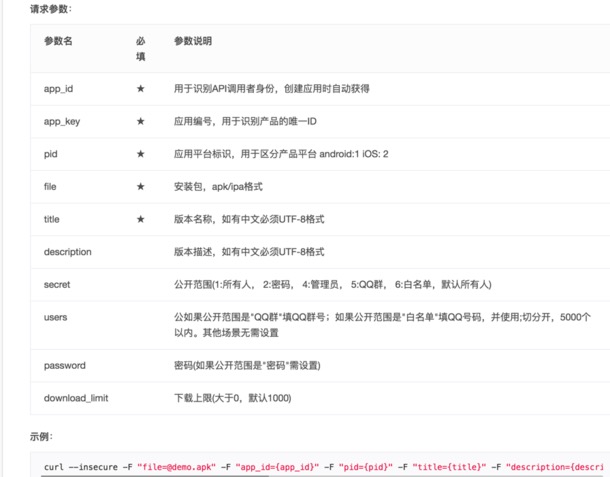
5.Feature 2017.5.13 打包上传
打包完毕ipa后,上传至bugly,上传至蒲公英同理。
1是上传新包,2是覆盖包
1> result=$(curl --insecure -F "file=@文件ipa位置" -F "app_id=你的bugly项目appid" -F "pid=2" -F "secret=1" -F "title="helloworld" https://api.bugly.qq.com/beta/apiv1/exp?app_key=你的appkey)
2> result=$(curl --insecure -X 'PUT' -F "file=@文件ipa位置" -F "exp_id=你已经上传的包的id,就是点击项目,url后面的串" https://api.bugly.qq.com/beta/apiv1/exp?app_key=你的appkey)
在打包ipa shell脚本添加: python emailPy.py "$result" ,请看Part-3 发送邮件通知。


 217
217


 被折叠的 条评论
为什么被折叠?
被折叠的 条评论
为什么被折叠?
 到【灌水乐园】发言


