


目录
第十章-RabbitMQ之Spring客户端源码
1. 前言
经过前面前面的学习,我们已经掌握了rabbitmq的基本用法,高级用法延迟队列、死信队列等,已经研究过了amqp-client的java客户端源码,由于我们在使用的时候,一般还是以SpringBoot为主,那经过Spring封装后的客户端源码是是如何实现的呢?
同学们最好需要有研读过 Spring源码及SpringBoot 源码的经验,会更好衔接一下,不过关系也不大。
由于Spring 体系的庞大,封装的rabbit客户端实现的功能也很多,例 创建连接、生产者推送消息,事务,消费者消费等等内容,那我们这次只抽取rabbitmq消费的部分,进行研读。
集成starter
        <dependency>
            <groupId>org.springframework.boot</groupId>
            <artifactId>spring-boot-starter-amqp</artifactId>
        </dependency>
2. 客户端消费代码
2.1 消费的实现方式
如之前我们提到的集成SpringBoot后的使用方式:
@RabbitHandler
@RabbitListener(queues = "SolarWaterHeater")
@RabbitHandler
@RabbitListener(queuesToDeclare = @Queue("SolarWaterHeater")) @RabbitHandler
@RabbitListener(bindings = @QueueBinding(
value = @Queue("SolarWaterHeater-RedWine"),
key = "REDWINE",
exchange = @Exchange(value = "routing-exchange", type = ExchangeTypes.DIRECT, durable = "false")))
2.2 消费中注解解释
这里面出现了两个注解
第一个:RabbitHandler 看下它的解释:
* Annotation that marks a method to be the target of a Rabbit message
* listener within a class that is annotated with {@link RabbitListener}.
如果一天类上面的注解是RabbitListener,那RabbitHandler标注的方法,即是Rabbit的消息监听者。
@Target({ ElementType.METHOD, ElementType.ANNOTATION_TYPE })
这个注解只能标注到Method
第二个 RabbitListener
1. Annotation that marks a method to be the target of a Rabbit message listener标注的方法是一个消息监听者
2. When defined at the class level, a single message listener container is used to
* service all methods annotated with {@code @RabbitHandler}
如果标注到类上,那标注RabbitHandler的方法即是消息监听
链一个:@RabbitListener和@RabbitHandler的使用_sliver1836的博客-CSDN博客
2.3 推测Spring实现过程
所以,我们后续的源码分析即基于此两个注解开展。
在开始看代码之前,我们先想一想,我们之前的使用java amqp客户端开发消费逻辑的过程,
1、创建连接
2、创建Channel
3、声明队列、Exchange、绑定关系
4、监听方法实现 继承DefaultConumer
5、basic.Consume 注册到Broker
6、Broker消息推送,监听方法实现消费
那现在Spring就靠两个注解就帮我们实现了消息的消费,有没有很神奇。顿时感叹程序猿越来越幸福,写代码如此简单了呢?但有利就有弊,Spring帮我们封装的太多,而我们知道的底层却太少了。
闲话少说,到这,大家想一下,如果让你写个注解,就去实现上面6个步骤的内容,你该如何去做呢?
开发自定义注解大家都应该做过,大致的逻辑应该是不是可以,在系统启动的时候,我们就会抓取到标注注解的方法,有此类的方法时,我们认为需要使用mq,我们在后端服务中依次的去执行上面中的6个步骤。这样把注解的方法实现了监听,后续监听消息进行消费。
这里只是一个大概的推测,大家自己自行发挥想像。
3.MQ消费源码分析
从哪入手呢?首先点开 RabbitListener 的源码,然后Download源码。
到这个界面:
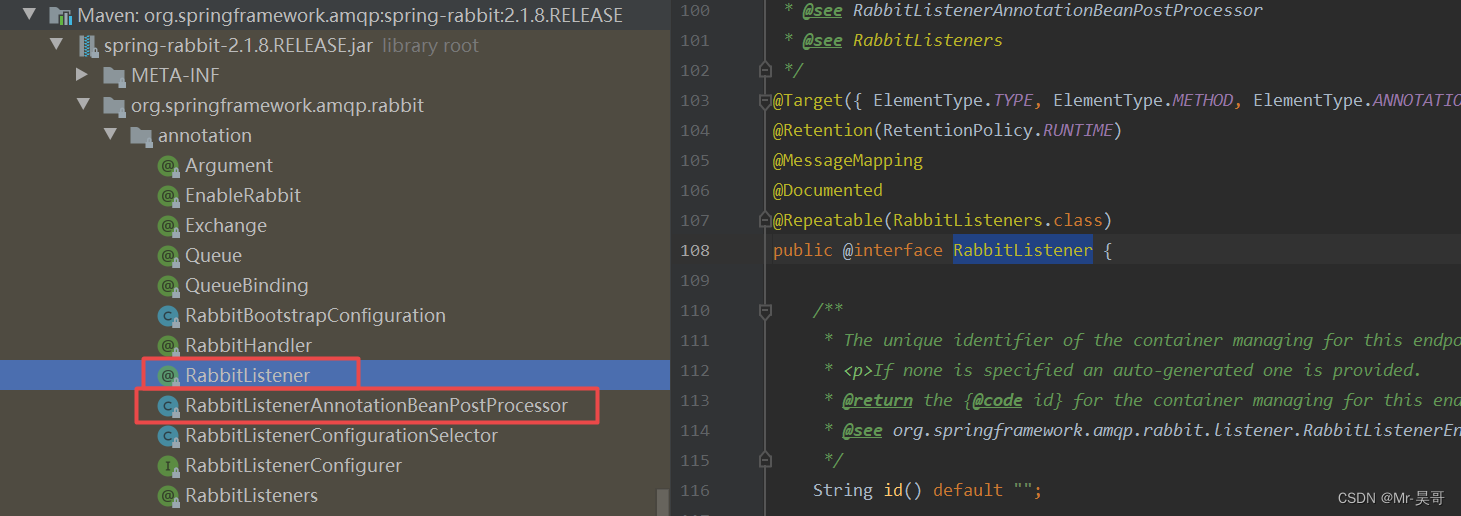
我们不再研读RabbitListener这个注解的功能了,大家自己看。
然后紧接着看到 RabbitListenerAnnotationBeanPostProcessor
这个类有什么特点呢?首先是处理RabbitListener 的处理类,然后呢是一个BeanPostProcessor继承了BeanPostProcessor 接口-读过Spring源码的同学,肯定就能得到最有效的信息了,这个类会在系统初始化的时候,执行postProcessAfterInitialization()这个方法。如果没读过Spring源码的话就先跟着节奏走吧。
从这开始了我们的切入。
3.1 集成SpringBoot 启动过程
接着上面的步骤呢,我们往上简单倒一下,
首先 这是一个SpringBoot 项目,通过SpringBoot 的启动类的Main 方法进行启动,然后开始扫描各个组件,初始化各种信息,这个不再细聊。【需要读SpringBoot源码】
其次呢,SpringBoot 只是对Spring 的封装,还是需要回到Spring 的类初始化的过程中去。【需要读Spring源码】
如下呢,即Spring 的核心初始化方法:无论Spring 再怎么升级,这几个核心方法基本不会怎么变化了,这里面我们找到 【registerBeanPostProcessors】,从这里面就会触发到我们上面所说的-
RabbitListenerAnnotationBeanPostProcessor 了。
@Override
	public void refresh() throws BeansException, IllegalStateException {
		synchronized (this.startupShutdownMonitor) {
			// Prepare this context for refreshing.
			prepareRefresh();

			// Tell the subclass to refresh the internal bean factory.
			ConfigurableListableBeanFactory beanFactory = obtainFreshBeanFactory();

			// Prepare the bean factory for use in this context.
			prepareBeanFactory(beanFactory);

			try {
				// Allows post-processing of the bean factory in context subclasses.
				postProcessBeanFactory(beanFactory);

				// Invoke factory processors registered as beans in the context.
				invokeBeanFactoryPostProcessors(beanFactory);

				// Register bean processors that intercept bean creation.
				registerBeanPostProcessors(beanFactory);

				// Initialize message source for this context.
				initMessageSource();

				// Initialize event multicaster for this context.
				initApplicationEventMulticaster();

				// Initialize other special beans in specific context subclasses.
				onRefresh();

				// Check for listener beans and register them.
				registerListeners();

				// Instantiate all remaining (non-lazy-init) singletons.
				finishBeanFactoryInitialization(beanFactory);

				// Last step: publish corresponding event.
				finishRefresh();
			}

			catch (BeansException ex) {
				if (logger.isWarnEnabled()) {
					logger.warn("Exception encountered during context initialization - " +
							"cancelling refresh attempt: " + ex);
				}

				// Destroy already created singletons to avoid dangling resources.
				destroyBeans();

				// Reset 'active' flag.
				cancelRefresh(ex);

				// Propagate exception to caller.
				throw ex;
			}

			finally {
				// Reset common introspection caches in Spring's core, since we
				// might not ever need metadata for singleton beans anymore...
				resetCommonCaches();
			}
		}
	}
随着Spring 的启动,开始触发到了RabbitListenerAnnotationBeanPostProcessor 中的
postProcessAfterInitialization 方法。
代码:
这就很好解释了,bean 就是我们的消费类,
解析到了 标有注解的方法 @RabbitListener,然后进行处理。processAmqpListener
@Override
	public Object postProcessAfterInitialization(final Object bean, final String beanName) throws BeansException {
		Class<?> targetClass = AopUtils.getTargetClass(bean);
		final TypeMetadata metadata = this.typeCache.computeIfAbsent(targetClass, this::buildMetadata);
		for (ListenerMethod lm : metadata.listenerMethods) {
			for (RabbitListener rabbitListener : lm.annotations) {
				processAmqpListener(rabbitListener, lm.method, bean, beanName);
			}
		}
		if (metadata.handlerMethods.length > 0) {
			processMultiMethodListeners(metadata.classAnnotations, metadata.handlerMethods, bean, beanName);
		}
		return bean;
	}
protected void processAmqpListener(RabbitListener rabbitListener, Method method, Object bean, String beanName) {
// 对应的消费方法
Method methodToUse = checkProxy(method, bean);
//封装对象
MethodRabbitListenerEndpoint endpoint = new MethodRabbitListenerEndpoint();
endpoint.setMethod(methodToUse);
// 继续处理
processListener(endpoint, rabbitListener, bean, methodToUse, beanName);
}继续:
protected void processListener(MethodRabbitListenerEndpoint endpoint, RabbitListener rabbitListener, Object bean,
			Object adminTarget, String beanName) {
		endpoint.setBean(bean);
		endpoint.setMessageHandlerMethodFactory(this.messageHandlerMethodFactory);
		endpoint.setId(getEndpointId(rabbitListener));
		endpoint.setQueueNames(resolveQueues(rabbitListener));
		endpoint.setConcurrency(resolveExpressionAsStringOrInteger(rabbitListener.concurrency(), "concurrency"));
		endpoint.setBeanFactory(this.beanFactory);
		endpoint.setReturnExceptions(resolveExpressionAsBoolean(rabbitListener.returnExceptions()));
		Object errorHandler = resolveExpression(rabbitListener.errorHandler());
		if (errorHandler instanceof RabbitListenerErrorHandler) {
			endpoint.setErrorHandler((RabbitListenerErrorHandler) errorHandler);
		}
		else if (errorHandler instanceof String) {
			String errorHandlerBeanName = (String) errorHandler;
			if (StringUtils.hasText(errorHandlerBeanName)) {
				endpoint.setErrorHandler(this.beanFactory.getBean(errorHandlerBeanName, RabbitListenerErrorHandler.class));
			}
		}
		else {
			throw new IllegalStateException("error handler mut be a bean name or RabbitListenerErrorHandler, not a "
					+ errorHandler.getClass().toString());
		}
		String group = rabbitListener.group();
		if (StringUtils.hasText(group)) {
			Object resolvedGroup = resolveExpression(group);
			if (resolvedGroup instanceof String) {
				endpoint.setGroup((String) resolvedGroup);
			}
		}
		String autoStartup = rabbitListener.autoStartup();
		if (StringUtils.hasText(autoStartup)) {
			endpoint.setAutoStartup(resolveExpressionAsBoolean(autoStartup));
		}

		endpoint.setExclusive(rabbitListener.exclusive());
		String priority = resolve(rabbitListener.priority());
		if (StringUtils.hasText(priority)) {
			try {
				endpoint.setPriority(Integer.valueOf(priority));
			}
			catch (NumberFormatException ex) {
				throw new BeanInitializationException("Invalid priority value for " +
						rabbitListener + " (must be an integer)", ex);
			}
		}
        // 以上 前面都完成了对 MethodRabbitListenerEndpoint 对象的封装,封装的也都是注解中的属性
    //此方法内部实际没执行 跳过
		resolveAdmin(endpoint, rabbitListener, adminTarget);
    //跳过
		RabbitListenerContainerFactory<?> factory = resolveContainerFactory(rabbitListener, adminTarget, beanName);
    // 属性填充 放入List ,不重要

		this.registrar.registerEndpoint(endpoint, factory);
	}
程序回转:
这里面来到一个
public void afterSingletonsInstantiated() 方法,这是由于实现了接口SmartInitializingSingleton, 后续得到了处理。这里面会涉及到两个类:
1. RabbitListenerEndpointRegistrar
2. RabbitListenerEndpointRegistry
有没有长得很像,这里面是把 RabbitListenerEndpointRegistry 手工注册到了RabbitListenerEndpointRegistrar 里面,然后进行了一系列初始化,
这里面不再详细展开了,但这个RabbitListenerEndpointRegistry 很重要,后面还会涉及到它
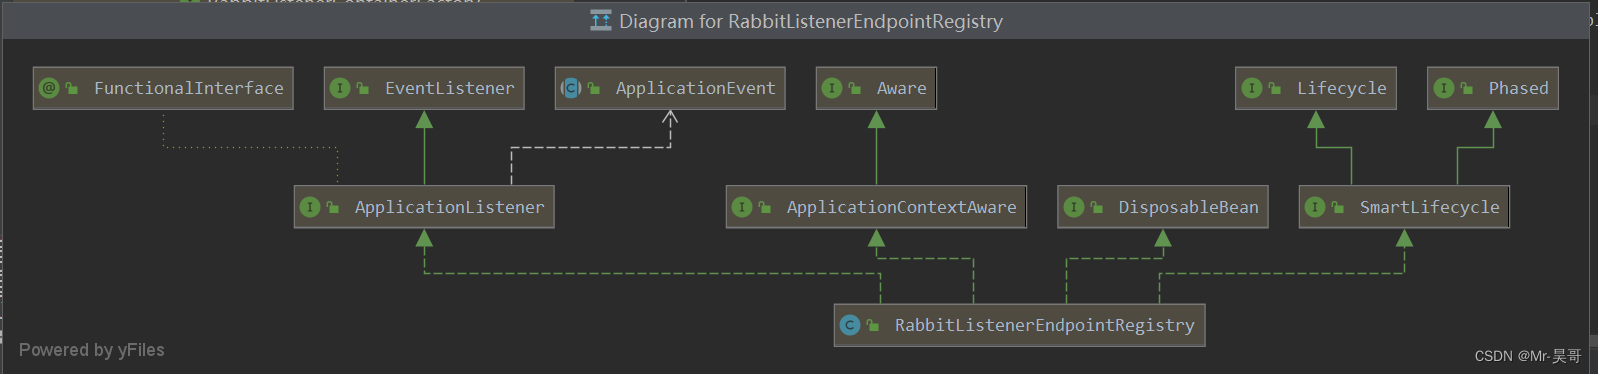
RabbitListenerEndpointRegistry 实现了一个Lifecycle接口,后续会调用到它的实现start()
将对应的消费Class 做好了封装 ,返回,继续Spring的初始化过程。
来到Spring核心流程
finishRefresh();
	/**
	 * Finish the refresh of this context, invoking the LifecycleProcessor's
	 * onRefresh() method and publishing the
	 * {@link org.springframework.context.event.ContextRefreshedEvent}.
	 */
	protected void finishRefresh() {
		// Clear context-level resource caches (such as ASM metadata from scanning).
		clearResourceCaches();

		// Initialize lifecycle processor for this context.
		initLifecycleProcessor();

		// Propagate refresh to lifecycle processor first.
		getLifecycleProcessor().onRefresh();

		// Publish the final event.
		publishEvent(new ContextRefreshedEvent(this));

		// Participate in LiveBeansView MBean, if active.
		LiveBeansView.registerApplicationContext(this);
	}
其中第三个方法
getLifecycleProcessor().onRefresh();
这个方法是获取 lifecycle的处理器,进行lifecycle接口实现类的处理,这就呼应到了上面的 RabbitListenerEndpointRegistry ,他实现了lifecycle的接口。
最终一番流转终于到了 这个Registry处理逻辑中:
	@Override
	public void start() {
		for (MessageListenerContainer listenerContainer : getListenerContainers()) {
			startIfNecessary(listenerContainer);
		}
	}
/**
* Start the specified {@link MessageListenerContainer} if it should be started
* on startup or when start is called explicitly after startup.
* @param listenerContainer the container.
* @see MessageListenerContainer#isAutoStartup()
*/
private void startIfNecessary(MessageListenerContainer listenerContainer) {
if (this.contextRefreshed || listenerContainer.isAutoStartup()) {
listenerContainer.start();
}
}MessageListenerContainer 也是在上面afterSingletonsInstantiated 处理好的,现在要启动这个监听者容器。
来到了 AbstractMessageListenerContainer 中的启动方法:
/**
	 * Start this container.
	 * @see #doStart
	 */
	@Override
	public void start() {
		if (isRunning()) {
			return;
		}
		if (!this.initialized) {
			synchronized (this.lifecycleMonitor) {
				if (!this.initialized) {
					afterPropertiesSet();
				}
			}
		}
		try {
			logger.debug("Starting Rabbit listener container.");
			configureAdminIfNeeded();
			checkMismatchedQueues();
			doStart();
		}
		catch (Exception ex) {
			throw convertRabbitAccessException(ex);
		}
		finally {
			this.lazyLoad = false;
		}
	}
configureAdminIfNeeded() 获取RabbitAdmin
checkMismatchedQueues() 这个方法就很关键了,运行到此时打开我们的抓包工具,这里面开始创建Connection了。
protected void checkMismatchedQueues() {
		if (this.mismatchedQueuesFatal && this.amqpAdmin != null) {
			try {
				this.amqpAdmin.initialize();
			}
			catch (AmqpConnectException e) {
				logger.info("Broker not available; cannot check queue declarations");
			}
			catch (AmqpIOException e) {
				if (RabbitUtils.isMismatchedQueueArgs(e)) {
					throw new FatalListenerStartupException("Mismatched queues", e);
				}
				else {
					logger.info("Failed to get connection during start(): " + e);
				}
			}
		}
		else {
			try {
                // 创建连接方法
				Connection connection = getConnectionFactory().createConnection(); // NOSONAR
				if (connection != null) {
					connection.close();
				}
			}
			catch (Exception e) {
				logger.info("Broker not available; cannot force queue declarations during start: " + e.getMessage());
			}
		}
	}
有没有很熟悉
Connection connection = getConnectionFactory().createConnection();
@Override
	public final Connection createConnection() throws AmqpException {
		if (this.stopped) {
			throw new AmqpApplicationContextClosedException(
					"The ApplicationContext is closed and the ConnectionFactory can no longer create connections.");
		}
		synchronized (this.connectionMonitor) {
			if (this.cacheMode == CacheMode.CHANNEL) {
				if (this.connection.target == null) {
					this.connection.target = super.createBareConnection();
					// invoke the listener *after* this.connection is assigned
					if (!this.checkoutPermits.containsKey(this.connection)) {
						this.checkoutPermits.put(this.connection, new Semaphore(this.channelCacheSize));
					}
					this.connection.closeNotified.set(false);
					getConnectionListener().onCreate(this.connection);
				}
				return this.connection;
			}
			else if (this.cacheMode == CacheMode.CONNECTION) {
				return connectionFromCache();
			}
		}
		return null; // NOSONAR - never reach here - exceptions
	}
运行完此步,如上的代码中,两个重要的点:
1. 此步直接就创建了Connection、
this.connection.target = super.createBareConnection();
看下抓包:

2. 继续这一步也很关键,创建完连接后,会把接下来的 Exchange、Queue、绑定关系根据注解配置中的内容,该创建的都创建一遍。
getConnectionListener().onCreate(this.connection);
直接运行到了
RabbitAdmin.initialize()
看方法头上的注释也很清晰
/**
	 * Declares all the exchanges, queues and bindings in the enclosing application context, if any. It should be safe
	 * (but unnecessary) to call this method more than once.
	 */
	@Override // NOSONAR complexity
	public void initialize() {

		if (this.applicationContext == null) {
			this.logger.debug("no ApplicationContext has been set, cannot auto-declare Exchanges, Queues, and Bindings");
			return;
		}

		this.logger.debug("Initializing declarations");
		Collection<Exchange> contextExchanges = new LinkedList<Exchange>(
				this.applicationContext.getBeansOfType(Exchange.class).values());
		Collection<Queue> contextQueues = new LinkedList<Queue>(
				this.applicationContext.getBeansOfType(Queue.class).values());
		Collection<Binding> contextBindings = new LinkedList<Binding>(
				this.applicationContext.getBeansOfType(Binding.class).values());

		processLegacyCollections(contextExchanges, contextQueues, contextBindings);
		processDeclarables(contextExchanges, contextQueues, contextBindings);

		final Collection<Exchange> exchanges = filterDeclarables(contextExchanges);
		final Collection<Queue> queues = filterDeclarables(contextQueues);
		final Collection<Binding> bindings = filterDeclarables(contextBindings);

		for (Exchange exchange : exchanges) {
			if ((!exchange.isDurable() || exchange.isAutoDelete())  && this.logger.isInfoEnabled()) {
				this.logger.info("Auto-declaring a non-durable or auto-delete Exchange ("
						+ exchange.getName()
						+ ") durable:" + exchange.isDurable() + ", auto-delete:" + exchange.isAutoDelete() + ". "
						+ "It will be deleted by the broker if it shuts down, and can be redeclared by closing and "
						+ "reopening the connection.");
			}
		}

		for (Queue queue : queues) {
			if ((!queue.isDurable() || queue.isAutoDelete() || queue.isExclusive()) && this.logger.isInfoEnabled()) {
				this.logger.info("Auto-declaring a non-durable, auto-delete, or exclusive Queue ("
						+ queue.getName()
						+ ") durable:" + queue.isDurable() + ", auto-delete:" + queue.isAutoDelete() + ", exclusive:"
						+ queue.isExclusive() + ". "
						+ "It will be redeclared if the broker stops and is restarted while the connection factory is "
						+ "alive, but all messages will be lost.");
			}
		}

		if (exchanges.size() == 0 && queues.size() == 0 && bindings.size() == 0) {
			this.logger.debug("Nothing to declare");
			return;
		}
		this.rabbitTemplate.execute(channel -> {
			declareExchanges(channel, exchanges.toArray(new Exchange[exchanges.size()]));
			declareQueues(channel, queues.toArray(new Queue[queues.size()]));
			declareBindings(channel, bindings.toArray(new Binding[bindings.size()]));
			return null;
		});
		this.logger.debug("Declarations finished");

	}
由于我们只创建了Queue,使用默认的Exchange,代码不贴太多了,只贴声明Queue的内容:
DeclareOk declareOk = channel.queueDeclare(queue.getName(), queue.isDurable(),
								queue.isExclusive(), queue.isAutoDelete(), queue.getArguments());
我们看下抓包情况:

到此呢,Queue也声明好了。下面呢,下面就该basic.Consume 了吧,把消费者注册到Broker中去。
好,我们继续:
继续代码又倒回去,倒到:
/**
	 * Start this container.
	 * @see #doStart
	 */
	@Override
	public void start() {
		if (isRunning()) {
			return;
		}
		if (!this.initialized) {
			synchronized (this.lifecycleMonitor) {
				if (!this.initialized) {
					afterPropertiesSet();
				}
			}
		}
		try {
			logger.debug("Starting Rabbit listener container.");
			configureAdminIfNeeded();
			checkMismatchedQueues();
			doStart();
		}
		catch (Exception ex) {
			throw convertRabbitAccessException(ex);
		}
		finally {
			this.lazyLoad = false;
		}
	}
doStart();
一看doxxx,那一定是要干实际的事情的,很重要对吧,
我们进入到
SimpleMessageListenerContainer
中的实现方法中:
/**
	 * Re-initializes this container's Rabbit message consumers, if not initialized already. Then submits each consumer
	 * to this container's task executor.
	 */
	@Override
	protected void doStart() {
		checkListenerContainerAware();
		super.doStart();
		synchronized (this.consumersMonitor) {
			if (this.consumers != null) {
				throw new IllegalStateException("A stopped container should not have consumers");
			}
			int newConsumers = initializeConsumers();
			if (this.consumers == null) {
				logger.info("Consumers were initialized and then cleared " +
						"(presumably the container was stopped concurrently)");
				return;
			}
			if (newConsumers <= 0) {
				if (logger.isInfoEnabled()) {
					logger.info("Consumers are already running");
				}
				return;
			}
			Set<AsyncMessageProcessingConsumer> processors = new HashSet<AsyncMessageProcessingConsumer>();
			for (BlockingQueueConsumer consumer : this.consumers) {
				AsyncMessageProcessingConsumer processor = new AsyncMessageProcessingConsumer(consumer);
				processors.add(processor);
				getTaskExecutor().execute(processor);
				if (getApplicationEventPublisher() != null) {
					getApplicationEventPublisher().publishEvent(new AsyncConsumerStartedEvent(this, consumer));
				}
			}
			waitForConsumersToStart(processors);
		}
	}
前面几步意义不大,走到
int newConsumers = initializeConsumers();
protected int initializeConsumers() {
		int count = 0;
		synchronized (this.consumersMonitor) {
			if (this.consumers == null) {
				this.cancellationLock.reset();
				this.consumers = new HashSet<BlockingQueueConsumer>(this.concurrentConsumers);
				for (int i = 0; i < this.concurrentConsumers; i++) {
					BlockingQueueConsumer consumer = createBlockingQueueConsumer();
					this.consumers.add(consumer);
					count++;
				}
			}
		}
		return count;
	}
重点来咯,
BlockingQueueConsumer consumer = createBlockingQueueConsumer();
这里把BlockingQueueConsumer做了一个初始化,相关的不再展开。
BlockingQueueConsumer -这将是后续我们非常重要的一个类
继续重点内容,回到我们上面代码块中的内容:
for (BlockingQueueConsumer consumer : this.consumers) {
				AsyncMessageProcessingConsumer processor = new AsyncMessageProcessingConsumer(consumer);
				processors.add(processor);
				getTaskExecutor().execute(processor);
				if (getApplicationEventPublisher() != null) {
					getApplicationEventPublisher().publishEvent(new AsyncConsumerStartedEvent(this, consumer));
				}
			}
这个for循环很重要了,由于我们是一个消费者,循环一次。
初始化一个
AsyncMessageProcessingConsumer
对象。这个对象点进去,大家看下这是个实现了Runnable接口的线程对象。哦哦,真正的核心哦。使用 SimpleAsyncTaskExecutor 来new的线程,这个执行器可不是线程池哦,来一个线程就会New一个,大家自行研究。
这里面我们可以得到一个结论,就是一个消费者,就会开启一个线程进行监听。
从此开启了新线程,【打断点记得Thread模式】
看线程的实现:
@Override // NOSONAR - complexity - many catch blocks
		public void run() { // NOSONAR - line count
			if (!isActive()) {
				return;
			}

			boolean aborted = false;

			this.consumer.setLocallyTransacted(isChannelLocallyTransacted());

			String routingLookupKey = getRoutingLookupKey();
			if (routingLookupKey != null) {
				SimpleResourceHolder.bind(getRoutingConnectionFactory(), routingLookupKey); // NOSONAR both never null
			}

			if (this.consumer.getQueueCount() < 1) {
				if (logger.isDebugEnabled()) {
					logger.debug("Consumer stopping; no queues for " + this.consumer);
				}
				SimpleMessageListenerContainer.this.cancellationLock.release(this.consumer);
				if (getApplicationEventPublisher() != null) {
					getApplicationEventPublisher().publishEvent(
							new AsyncConsumerStoppedEvent(SimpleMessageListenerContainer.this, this.consumer));
				}
				this.start.countDown();
				return;
			}

			try {
				initialize();
				while (isActive(this.consumer) || this.consumer.hasDelivery() || !this.consumer.cancelled()) {
					mainLoop();
				}
			}
摘出核心点:
1、initialize();
	private void initialize() throws Throwable { // NOSONAR
			try {
				redeclareElementsIfNecessary();
				this.consumer.start();
				this.start.countDown();
			}
初始化内容,
1. redeclareElementsIfNecessary - 这个是再进行检查进行Exchange 、Queue、Binding的声明与前面声明的方法实现的共用。
2.this.consumer.start();
public void start() throws AmqpException {
		if (logger.isDebugEnabled()) {
			logger.debug("Starting consumer " + this);
		}

		this.thread = Thread.currentThread();

		try {
			this.resourceHolder = ConnectionFactoryUtils.getTransactionalResourceHolder(this.connectionFactory,
					this.transactional);
			this.channel = this.resourceHolder.getChannel();
			ClosingRecoveryListener.addRecoveryListenerIfNecessary(this.channel); // NOSONAR never null here
		}
		catch (AmqpAuthenticationException e) {
			throw new FatalListenerStartupException("Authentication failure", e);
		}
		this.deliveryTags.clear();
		this.activeObjectCounter.add(this);

		passiveDeclarations();
		setQosAndreateConsumers();
	}
这里面我们看这个方法就行 setQosAndreateConsumers();
Qos是设定消费时每次抓取的数量
并CreadConsumers
private void setQosAndreateConsumers() {
		if (!this.acknowledgeMode.isAutoAck() && !cancelled()) {
			// Set basicQos before calling basicConsume (otherwise if we are not acking the broker
			// will send blocks of 100 messages)
			try {
				this.channel.basicQos(this.prefetchCount);
			}
			catch (IOException e) {
				this.activeObjectCounter.release(this);
				throw new AmqpIOException(e);
			}
		}

		try {
			if (!cancelled()) {
				for (String queueName : this.queues) {
					if (!this.missingQueues.contains(queueName)) {
						consumeFromQueue(queueName);
					}
				}
			}
		}
		catch (IOException e) {
			throw RabbitExceptionTranslator.convertRabbitAccessException(e);
		}
	}
有没有很熟悉:
this.channel.basicQos(this.prefetchCount);
抓包:

继续:
consumeFromQueue(queueName);
private void consumeFromQueue(String queue) throws IOException {
		InternalConsumer consumer = new InternalConsumer(this.channel, queue);
		String consumerTag = this.channel.basicConsume(queue, this.acknowledgeMode.isAutoAck(),
				(this.tagStrategy != null ? this.tagStrategy.createConsumerTag(queue) : ""), this.noLocal,
				this.exclusive, this.consumerArgs,
				consumer);

		if (consumerTag != null) {
			this.consumers.put(queue, consumer);
			if (logger.isDebugEnabled()) {
				logger.debug("Started on queue '" + queue + "' with tag " + consumerTag + ": " + this);
			}
		}
		else {
			logger.error("Null consumer tag received for queue " + queue);
		}
	}
有没有很熟悉:
String consumerTag = this.channel.basicConsume(queue, this.acknowledgeMode.isAutoAck(), (this.tagStrategy != null ? this.tagStrategy.createConsumerTag(queue) : ""), this.noLocal, this.exclusive, this.consumerArgs, consumer);那这里有有一个核心的类出现了。InternalConsumer
这里转向 3.2 Broker投递消息给客户端 解释
到这里呢,我们把消费者注册到了Broker中去了,看下抓包情况:

到这呢,所以Broker也就能给我们投递消息了。
2、mainLoop();
				initialize();
				while (isActive(this.consumer) || this.consumer.hasDelivery() || !this.consumer.cancelled()) {
					mainLoop();
				}
这里也有个mainLoop ,于是想到了,java 的amqp客户端也存在呢mainLoop ,这里的逻辑难道也和他的逻辑契合的?我们转向 3.3 客户端消费过程继续。
3.2 Broker投递消息给客户端过程
上面说到了,已经将消费者注册到了Broker中去了,但一定注意哦,注册到Broker 中的,可不是我们使用注解 RabbitListener 标注的实际消费方法哦,而是新创建了一个内部的消费者:InternalConsumer
我们看下他的一个实现
private final class InternalConsumer extends DefaultConsumer {

		private final String queueName;

		boolean canceled;

		InternalConsumer(Channel channel, String queue) {
			super(channel);
			this.queueName = queue;
		}

		@Override
		public void handleConsumeOk(String consumerTag) {
			super.handleConsumeOk(consumerTag);
			if (logger.isDebugEnabled()) {
				logger.debug("ConsumeOK: " + BlockingQueueConsumer.this);
			}
			if (BlockingQueueConsumer.this.applicationEventPublisher != null) {
				BlockingQueueConsumer.this.applicationEventPublisher
						.publishEvent(new ConsumeOkEvent(this, this.queueName, consumerTag));
			}
		}

		@Override
		public void handleShutdownSignal(String consumerTag, ShutdownSignalException sig) {
			if (logger.isDebugEnabled()) {
				if (RabbitUtils.isNormalShutdown(sig)) {
					logger.debug("Received shutdown signal for consumer tag=" + consumerTag + ": " + sig.getMessage());
				}
				else {
					logger.debug("Received shutdown signal for consumer tag=" + consumerTag, sig);
				}
			}
			BlockingQueueConsumer.this.shutdown = sig;
			// The delivery tags will be invalid if the channel shuts down
			BlockingQueueConsumer.this.deliveryTags.clear();
			BlockingQueueConsumer.this.activeObjectCounter.release(BlockingQueueConsumer.this);
		}

		@Override
		public void handleCancel(String consumerTag) throws IOException {
			if (logger.isWarnEnabled()) {
				logger.warn("Cancel received for " + consumerTag + " ("
						+ this.queueName
						+ "); " + BlockingQueueConsumer.this);
			}
			BlockingQueueConsumer.this.consumers.remove(this.queueName);
			if (!BlockingQueueConsumer.this.consumers.isEmpty()) {
				basicCancel(false);
			}
			else {
				BlockingQueueConsumer.this.cancelled.set(true);
			}
		}

		@Override
		public void handleCancelOk(String consumerTag) {
			if (logger.isDebugEnabled()) {
				logger.debug("Received cancelOk for tag " + consumerTag + " ("
						+ this.queueName
						+ "); " + BlockingQueueConsumer.this);
			}
			this.canceled = true;
		}

		@Override
		public void handleDelivery(String consumerTag, Envelope envelope, AMQP.BasicProperties properties,
				byte[] body) {
			if (logger.isDebugEnabled()) {
				logger.debug("Storing delivery for consumerTag: '"
						+ consumerTag + "' with deliveryTag: '" + envelope.getDeliveryTag() + "' in "
						+ BlockingQueueConsumer.this);
			}
			try {
				if (BlockingQueueConsumer.this.abortStarted > 0) {
					if (!BlockingQueueConsumer.this.queue.offer(
							new Delivery(consumerTag, envelope, properties, body, this.queueName),
							BlockingQueueConsumer.this.shutdownTimeout, TimeUnit.MILLISECONDS)) {

						Channel channelToClose = super.getChannel();
						RabbitUtils.setPhysicalCloseRequired(channelToClose, true);
						// Defensive - should never happen
						BlockingQueueConsumer.this.queue.clear();
						if (!this.canceled) {
							getChannel().basicCancel(consumerTag);
						}
						try {
							channelToClose.close();
						}
						catch (@SuppressWarnings("unused") TimeoutException e) {
							// no-op
						}
					}
				}
				else {
					BlockingQueueConsumer.this.queue
							.put(new Delivery(consumerTag, envelope, properties, body, this.queueName));
				}
			}
			catch (@SuppressWarnings("unused") InterruptedException e) {
				Thread.currentThread().interrupt();
			}
			catch (Exception e) {
				BlockingQueueConsumer.logger.warn("Unexpected exception during delivery", e);
			}
		}

		@Override
		public String toString() {
			return "InternalConsumer{" + "queue='" + this.queueName + '\'' +
					", consumerTag='" + getConsumerTag() + '\'' +
					'}';
		}

	}
哇,内部类,而且继承了 DefaultConsumer ,这和我们前面学习Rabbitmq工作模式的过程中,自己手动开发的代码一样了吧,那我找到 投递方法:
public void handleDelivery(String consumerTag, Envelope envelope, AMQP.BasicProperties properties,好亲切有木有,所以到这里真相大白咯。Broker将消息投递到了这里,我们看看他接收到消息搞什么动作?
BlockingQueueConsumer.this.queue
							.put(new Delivery(consumerTag, envelope, properties, body, this.queueName));
很明显,和java amqp client 实现一样,他这也用到了Queue,去存储了,
this.queue = new LinkedBlockingQueue<Delivery>(prefetchCount);也是个阻塞Queue哦,看来spring搞了一通,从客户端那边的queue里拿来,又放了一次queue。
那放进去了,就等着取呗,看谁来取咯。
3.3 客户端消费过程
接续上面的 mainLoop(),既然消息又存到了本地的queue中,那mainLoop 的目的岂不是很明确了,那就是死循环的去取消息消息,然后再转调到我们实际的 加入@RabbitListener 的方法中去呢。究竟是不是呢,验证下:
private void mainLoop() throws Exception { // NOSONAR Exception
			try {
				boolean receivedOk = receiveAndExecute(this.consumer); // At least one message received
				if (SimpleMessageListenerContainer.this.maxConcurrentConsumers != null) {
					checkAdjust(receivedOk);
				}
				long idleEventInterval = getIdleEventInterval();
				if (idleEventInterval > 0) {
					if (receivedOk) {
						updateLastReceive();
					}
					else {
						long now = System.currentTimeMillis();
						long lastAlertAt = SimpleMessageListenerContainer.this.lastNoMessageAlert.get();
						long lastReceive = getLastReceive();
						if (now > lastReceive + idleEventInterval
								&& now > lastAlertAt + idleEventInterval
								&& SimpleMessageListenerContainer.this.lastNoMessageAlert
								.compareAndSet(lastAlertAt, now)) {
							publishIdleContainerEvent(now - lastReceive);
						}
					}
				}
			}
			catch (ListenerExecutionFailedException ex) {
				// Continue to process, otherwise re-throw
				if (ex.getCause() instanceof NoSuchMethodException) {
					throw new FatalListenerExecutionException("Invalid listener", ex);
				}
			}
			catch (AmqpRejectAndDontRequeueException rejectEx) {
				/*
				 *  These will normally be wrapped by an LEFE if thrown by the
				 *  listener, but we will also honor it if thrown by an
				 *  error handler.
				 */
			}
		}
看下重点方法:
boolean receivedOk = receiveAndExecute(this.consumer);
private boolean receiveAndExecute(final BlockingQueueConsumer consumer) throws Exception { // NOSONAR

		PlatformTransactionManager transactionManager = getTransactionManager();
		if (transactionManager != null) {
			try {
				if (this.transactionTemplate == null) {
					this.transactionTemplate =
							new TransactionTemplate(transactionManager, getTransactionAttribute());
				}
				return this.transactionTemplate
						.execute(status -> { // NOSONAR null never returned
							RabbitResourceHolder resourceHolder = ConnectionFactoryUtils.bindResourceToTransaction(
									new RabbitResourceHolder(consumer.getChannel(), false),
									getConnectionFactory(), true);
							// unbound in ResourceHolderSynchronization.beforeCompletion()
							try {
								return doReceiveAndExecute(consumer);
							}
							catch (RuntimeException e1) {
								prepareHolderForRollback(resourceHolder, e1);
								throw e1;
							}
							catch (Exception e2) {
								throw new WrappedTransactionException(e2);
							}
						});
			}
			catch (WrappedTransactionException e) { // NOSONAR exception flow control
				throw (Exception) e.getCause();
			}
		}

		return doReceiveAndExecute(consumer);

	}
抛开事务,我们不关注。
return doReceiveAndExecute(consumer);private boolean doReceiveAndExecute(BlockingQueueConsumer consumer) throws Exception { //NOSONAR
Channel channel = consumer.getChannel();
for (int i = 0; i < this.txSize; i++) {
logger.trace("Waiting for message from consumer.");
Message message = consumer.nextMessage(this.receiveTimeout);
if (message == null) {
break;
}
try {
executeListener(channel, message);
}重点哦:
Message message = consumer.nextMessage(this.receiveTimeout);
从内部消费者取消息咯
public Message nextMessage(long timeout) throws InterruptedException, ShutdownSignalException {
		if (logger.isTraceEnabled()) {
			logger.trace("Retrieving delivery for " + this);
		}
		checkShutdown();
		if (this.missingQueues.size() > 0) {
			checkMissingQueues();
		}
		Message message = handle(this.queue.poll(timeout, TimeUnit.MILLISECONDS));
		if (message == null && this.cancelled.get()) {
			throw new ConsumerCancelledException();
		}
		return message;
	}
看到poll 我们就放心了,把消息取出来,包装成Message对象。
快调头回来,继续看:
try {
    executeListener(channel, message);
}
这就要真正处理这个消息了
protected void executeListener(Channel channel, Message messageIn) {
		if (!isRunning()) {
			if (logger.isWarnEnabled()) {
				logger.warn("Rejecting received message because the listener container has been stopped: " + messageIn);
			}
			throw new MessageRejectedWhileStoppingException();
		}
		try {
			doExecuteListener(channel, messageIn);
		}
		catch (RuntimeException ex) {
			if (messageIn.getMessageProperties().isFinalRetryForMessageWithNoId()) {
				if (this.statefulRetryFatalWithNullMessageId) {
					throw new FatalListenerExecutionException(
							"Illegal null id in message. Failed to manage retry for message: " + messageIn, ex);
				}
				else {
					throw new ListenerExecutionFailedException("Cannot retry message more than once without an ID",
							new AmqpRejectAndDontRequeueException("Not retryable; rejecting and not requeuing", ex),
							messageIn);
				}
			}
			handleListenerException(ex);
			throw ex;
		}
	}
代码不往下贴了,继续追就可以,最终还是找到了,打标@RabbitListener的那个方法上,得到了执行。真正让业务逻辑执行到了MQ推送过来的消息,
太不容易了,消息从发送-> Exchange->Queue -> java amqp client ->spring client - >consume 最终得到了消费。
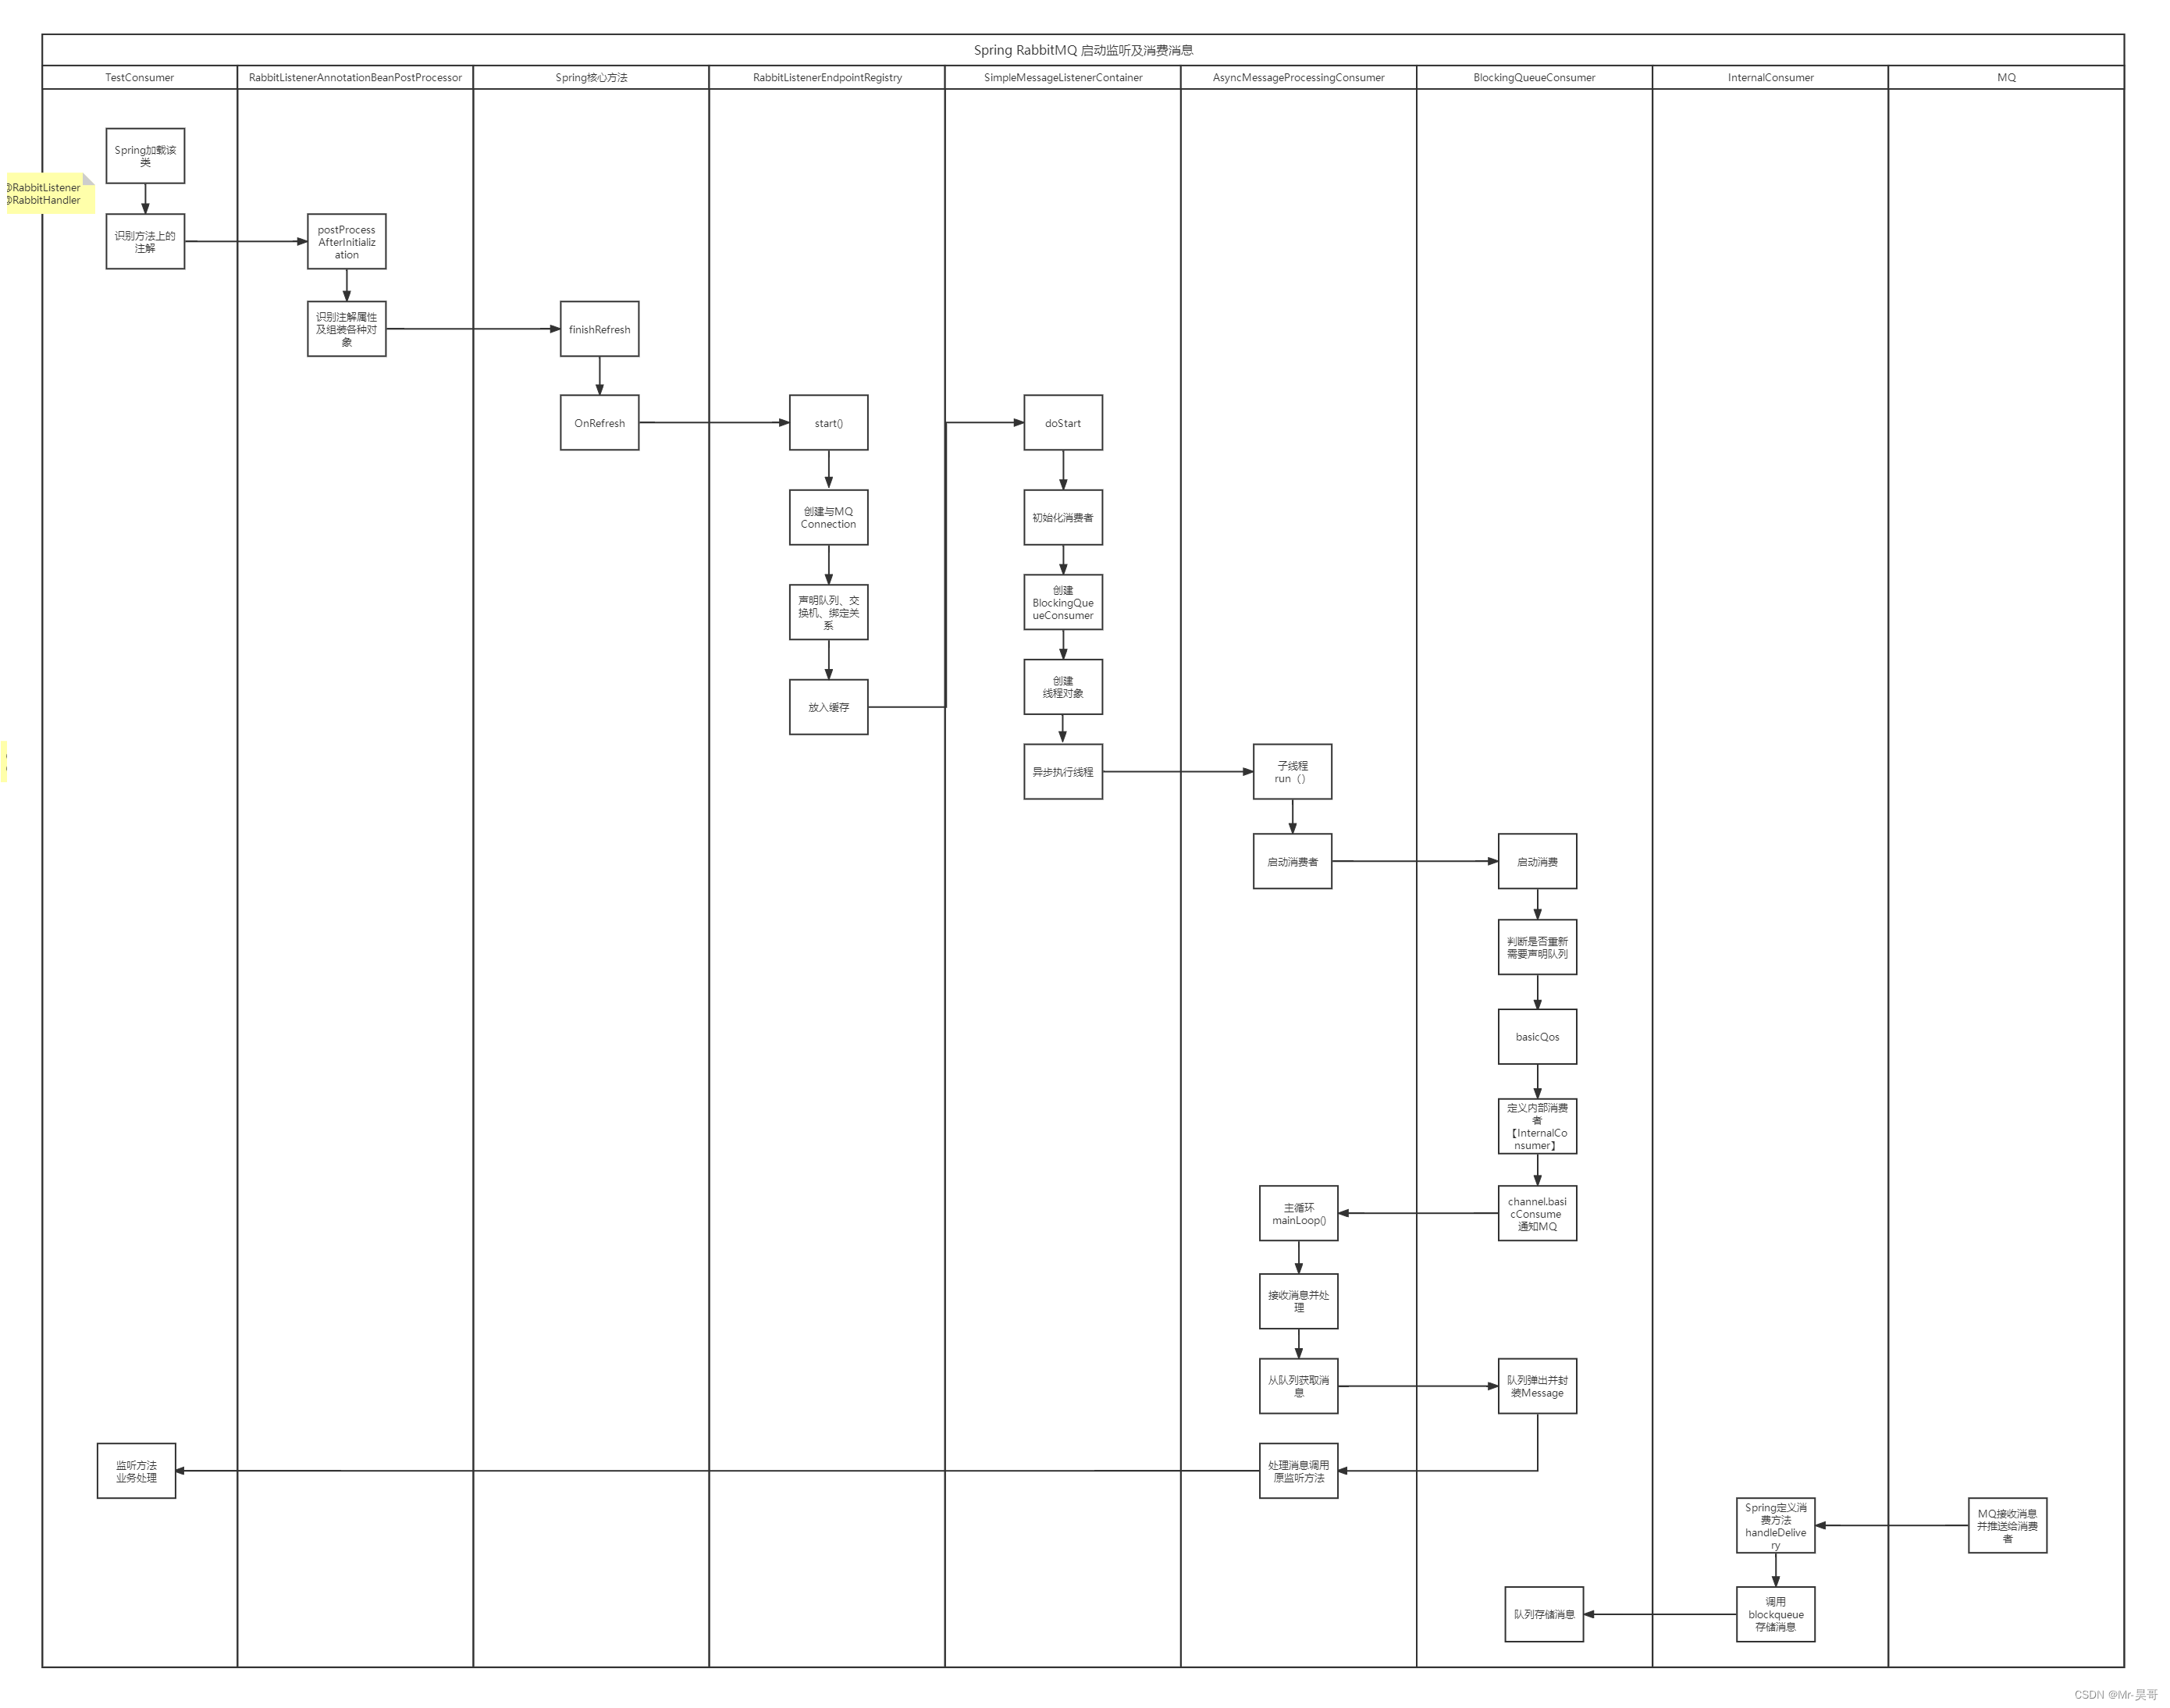
4. 总结
小结一下,我们从注解RabbitHandler RabbitListener 入手,一步步追踪到 与Broker链接的创建,Queue的声明,接着,启动新线程 注册一个内部的消费者到Broker中,Broker有消息的时候会推送到本地的BlockingQueue中去。
使用MainLoop 消费本地Blockinqueue的内容
贴个小图:


 712
712


 被折叠的 条评论
为什么被折叠?
被折叠的 条评论
为什么被折叠?
 到【灌水乐园】发言


