


这是之前一直说发,但老是鸽掉的我的css
me.css
/*----padding----*/
.m-padded-tb-mini {
    padding-top: 0.2em !important;
    padding-bottom: 0.2em !important;
}

.m-padded-mini {
    padding: 0.2em !important;
}

.m-padded-tiny {
    padding: 0.3em !important;
}
.m-padded {
    padding: 1em !important;
}
.m-padded-tb-mini {
    padding-top: 0.2em !important;
    padding-bottom: 0.2em !important;
}
.m-padded-tb-tiny {
    padding-top: 0.3em !important;
    padding-bottom: 0.3em !important;
}
.m-padded-tb-small {
    padding-top: 0.5em !important;
    padding-bottom: 0.5em !important;
}
.m-padded-tb {
    padding-top: 1em !important;
    padding-bottom: 1em !important;
}
.m-padded-tb-large {
    padding-top: 2em !important;
    padding-bottom: 2em !important;
}
.m-padded-tb-big {
    padding-top: 3em !important;
    padding-bottom: 3em !important;
}
.m-padded-tb-huge {
    padding-top: 4em !important;
    padding-bottom: 4em !important;
}
.m-padded-tb-massive {
    padding-top: 5em !important;
    padding-bottom: 5em !important;
}
.m-padded-lr-responsive{
    padding-left: 4em !important;
    padding-right: 4em !important;
}


/*-----margin------*/

.m-margin-top-small {
    margin-top:0.5em !important;
}
.m-margin-top {
    margin-top: 1em !important;
}
.m-margin-top-large {
    margin-top: 2em !important;
}

.m-margin-tb-tiny {
    margin-top: 0.3em !important;
    margin-bottom: 0.3em !important;
}

.m-margin-bottom-small {
    margin-bottom: 0.5em !important;

}


/* -- text-- */

.m-text{
    font-weight: 300 !important;
    letter-spacing: 1px !important;
    line-height: 1.8 !important;
    font-family: "宋体";
}
.m-text-thin{
    font-weight: 300 !important;
}
.m-text-spaced{
    letter-spacing: 1px !important;
}
.m-text-lined{
    line-height: 1.8 !important;
}

.m-black{
    color: #333;
}
/* 字体透明度 */
.m-opacity-mini{
    opacity: 0.8 !important;
}
/*导航栏阴影 */
.m-shadow-small{
    -webkit-box-shadow:0 4px 8px rgba(0, 0, 0, 0.2) !important;
    box-shadow: 0 4px 8px rgba(0, 0, 0, 0.2) !important;
}


/*display */
.m-inline-block{
    display: inline-block !important;
}
.m-container{
    max-width: 72em !important;
    margin: auto !important;
}
.m-container-small{
    max-width: 60em !important;
    margin: auto !important;
}

/*--position--*/
.m-right-top{
    position: absolute;
    top: 0;
    right: 0;
}

.m-mobile-show{
    display: none !important;
}
@media screen and (max-width:800px){
    .m-mobile-hide{
        display: none !important;
    }
    .m-mobile-show{
        display: block !important;
    }
    .m-padded-lr-responsive{
        padding-left: 0 !important;
        padding-right: 0 !important;
    }
    .m-mobile-lr-clear{
        padding-left: 0 !important;
        padding-right: 0 !important;
    }
    .m-mobile-wide{
        width: 100% !important;
    }
}
body{
    background: url(../images/demo.jpg);
}
异常处理嘛
在IDEA中创建项目,主要是之前创项目忘记截图了。。。。
我已经创建好了,所以最后一步完成我就不点了。之前的前端页面如果你们是在IDEA中制作的,那可能要换个项目哦。

maven的group随便输入
artifact就相当于项目名小写哦。
我就按自己的来的
其他的随意
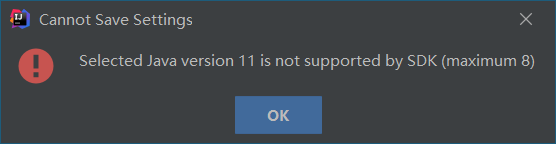
Java版本选8(我想选11也不行啊。)
引入SpringBoot模块

单击下一步
设置项目名
点完成等待加载完毕就好了。
加载好了后
在resources目录下
修改原application后缀为yml
在其中配置
thymeleaf
数据库等
spring:
  thymeleaf:
    mode: HTML
  datasource:
    driver-class-name: com.mysql.cj.jdbc.Driver
    url: jdbc:mysql://localhost:3306/blog?useUnicode=true&characterEncoding=utf-8//此处为你的数据库名
    username: root//用户名
    password: 123456//密码
  jpa:
    hibernate:
      ddl-auto: update
    show-sql: true

logging:
  level:
    root: info
    net.yq.springbootblog: debug//此处为你的包名
  file:
    name: log/blog.log
配置完后创建
修改原application-dev.yml和application-pro.yml
内容分别为
dev
spring:
  thymeleaf:
    mode: HTML
  datasource:
    driver-class-name: com.mysql.cj.jdbc.Driver
    url: jdbc:mysql://localhost:3306/blog?useUnicode=true&characterEncoding=utf-8
    username: root
    password: 123456
  jpa:
    hibernate:
      ddl-auto: update
    show-sql: true

logging:
  level:
    root: info
    net.yq.springbootblog: debug
  file:
    name: log/blog-dev.log
pro
spring:
  datasource:
    driver-class-name: com.mysql.cj.jdbc.Driver
    url: jdbc:mysql://localhost:3306/blog?useUnicode=true&characterEncoding=utf-8
    username: root
    password: 123456
  jpa:
    hibernate:
      ddl-auto: none
    show-sql: true

logging:
  level:
    root: warn
    net.yq.springbootblog: info
  file:
    name: log/blog-pro.log

server:
  port: 8081
然后修改application.yml
spring:
  thymeleaf:
    mode: HTML
  profiles:
    active: dev//指定环境为开发环境,pro为生产环境。如果指定为生产环境,那么访问的端口应该是8081.
建议弄完后启动下,启动后,要是报错就是对的。
127.0.0.1:8080
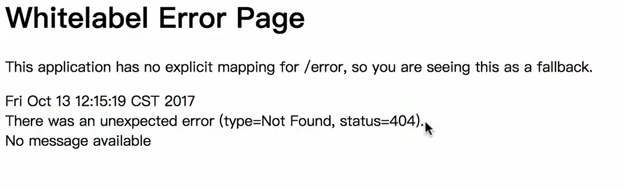
因为还没有配置别的
接下来就是异常处理了。


 301
301


 被折叠的 条评论
为什么被折叠?
被折叠的 条评论
为什么被折叠?
 到【灌水乐园】发言


