


1.项目简介
从给定的低分辨率(LR)图像中恢复高分辨率(HR)图像的过程,是计算机视觉的一个经典应用。SR是指通过软件或硬件的方法,从观测到的低分辨率图像重建出相应的高分辨率图像,在监控设备、卫星图像遥感、数字高清、显微成像、视频编码通信、视频复原和医学影像等领域都有重要的应用价值。
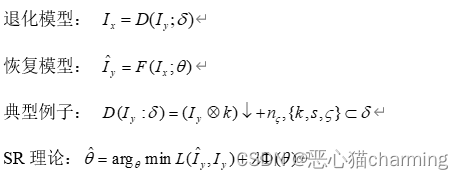
SR基本原理:
|
|
本实验所用方法:ESPCN
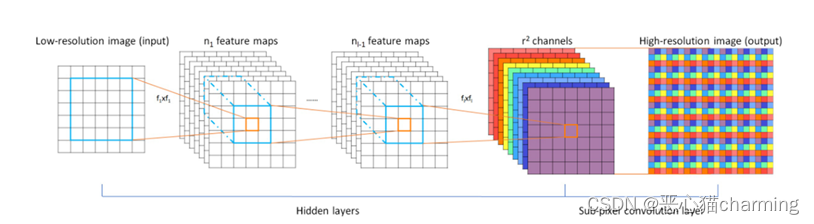
ESPCN 的核心思想是通过深度卷积神经网络学习到一个映射函数,该函数将低分辨率图像的特征转换为高分辨率图像的特征。具体而言,ESPCN 使用多个卷积层进行特征提取,并使用像素重组技术(sub-pixel convolution)来增加图像的分辨率
数据集:
BSDS300 481*321(321*481) jpg
训练框架:
torch(2.0.1+cu117)
2.工程文件
| super_resolution --dataset --BSDS300 --images --test -- --train -- --iids_test.txt --iids-train.txt --data.py --dataset.py --main.py --super_resolve.py --test_CUDA.py --test.jpg |
3.模型代码分布及作用介绍
-
- data.py
3.1.1源代码:
| from os.path import exists, join, basename from os import makedirs, remove from six.moves import urllib import tarfile from torchvision.transforms import Compose, CenterCrop, ToTensor, Resize from dataset import DatasetFromFolder def download_bsd300(dest="dataset"): output_image_dir = join(dest, "BSDS300/images") if not exists(output_image_dir): makedirs(dest) url = "http://www2.eecs.berkeley.edu/Research/Projects/CS/vision/bsds/BSDS300-images.tgz" print("downloading url ", url) data = urllib.request.urlopen(url) file_path = join(dest, basename(url)) with open(file_path, 'wb') as f: f.write(data.read()) print("Extracting data") with tarfile.open(file_path) as tar: for item in tar: tar.extract(item, dest) remove(file_path) return output_image_dir def calculate_valid_crop_size(crop_size, upscale_factor): return crop_size - (crop_size % upscale_factor) def input_transform(crop_size, upscale_factor): return Compose([ CenterCrop(crop_size), Resize(crop_size // upscale_factor), ToTensor(), ]) def target_transform(crop_size): return Compose([ CenterCrop(crop_size), ToTensor(), ]) def get_training_set(upscale_factor): root_dir = download_bsd300() train_dir = join(root_dir, "train") crop_size = calculate_valid_crop_size(256, upscale_factor) return DatasetFromFolder(train_dir, input_transform=input_transform(crop_size, upscale_factor), target_transform=target_transform(crop_size)) def get_test_set(upscale_factor): root_dir = download_bsd300() test_dir = join(root_dir, "test") crop_size = calculate_valid_crop_size(256, upscale_factor) return DatasetFromFolder(test_dir, input_transform=input_transform(crop_size, upscale_factor), target_transform=target_transform(crop_size)) |
3.1.2作用:
- 数据集下载
该代码会自动下载 BSDS300 数据集,并将其解压到指定目录中。
- 数据预处理
对图像进行中心裁剪(CenterCrop),将图像大小调整为可以被 upscale_factor 整除的大小,然后将其缩小 upscale_factor 倍(Resize)。
将预处理后的图像转换为Tensor对象。
- 数据集生成
该代码通过调用 DatasetFromFolder 类生成训练数据集和测试数据集。其中,DatasetFromFolder 类会从指定目录中读取图像文件,并对其进行预处理。
- 数据集返回
最后,该代码会返回训练数据集和测试数据集。
-
- dataset.py
3.2.1源代码:
| import torch.utils.data as data from os import listdir from os.path import join from PIL import Image def is_image_file(filename): return any(filename.endswith(extension) for extension in [".png", ".jpg", ".jpeg"]) def load_img(filepath): img = Image.open(filepath).convert('YCbCr') y, _, _ = img.split() return y class DatasetFromFolder(data.Dataset): def __init__(self, image_dir, input_transform=None, target_transform=None): super(DatasetFromFolder, self).__init__() self.image_filenames = [join(image_dir, x) for x in listdir(image_dir) if is_image_file(x)] self.input_transform = input_transform self.target_transform = target_transform def __getitem__(self, index): input = load_img(self.image_filenames[index]) target = input.copy() if self.input_transform: input = self.input_transform(input) if self.target_transform: target = self.target_transform(target) return input, target def __len__(self): return len(self.image_filenames) |
3.2.2作用:
这段代码是一个使用PyTorch库定义的数据集类,用于从文件夹中加载图像数据
- is_image_file 函数检查一个文件名是否以常见的图片格式(png, jpg,jpeg……)结尾。
- load_img 函数使用PIL库打开图像,并将其转换为YCbCr格式,然后只提取Y通道(亮度)。
- DatasetFromFolder 类继承了data.Dataset,并实现了__init__, __getitem__, 和 __len__ 方法。
3.3 main.py
3.3.1源代码:
| from __future__ import print_function import argparse from math import log10 import multiprocessing import torch import torch.nn as nn import torch.optim as optim from torch.utils.data import DataLoader from model import Net from data import get_training_set, get_test_set # Training settings parser = argparse.ArgumentParser(description='PyTorch Super Res Example') parser.add_argument('--upscale_factor', type=int, required=True, help="super resolution upscale factor") parser.add_argument('--batchSize', type=int, default=64, help='training batch size') parser.add_argument('--testBatchSize', type=int, default=10, help='testing batch size') parser.add_argument('--nEpochs', type=int, default=2, help='number of epochs to train for') parser.add_argument('--lr', type=float, default=0.01, help='Learning Rate. Default=0.01') parser.add_argument('--cuda', action='store_true', help='use cuda?') parser.add_argument('--threads', type=int, default=4, help='number of threads for data loader to use') parser.add_argument('--seed', type=int, default=123, help='random seed to use. Default=123') opt = parser.parse_args() print(opt) if opt.cuda and not torch.cuda.is_available(): raise Exception("No GPU found, please run without --cuda") torch.manual_seed(opt.seed) device = torch.device("cuda" if opt.cuda else "cpu") print('===> Loading datasets') train_set = get_training_set(opt.upscale_factor) test_set = get_test_set(opt.upscale_factor) training_data_loader = DataLoader(dataset=train_set, num_workers=opt.threads, batch_size=opt.batchSize, shuffle=True) testing_data_loader = DataLoader(dataset=test_set, num_workers=opt.threads, batch_size=opt.testBatchSize, shuffle=False) print('===> Building model') model = Net(upscale_factor=opt.upscale_factor).to(device) criterion = nn.MSELoss() optimizer = optim.Adam(model.parameters(), lr=opt.lr) def train(epoch): epoch_loss = 0 for iteration, batch in enumerate(training_data_loader, 1): input, target = batch[0].to(device), batch[1].to(device) optimizer.zero_grad() loss = criterion(model(input), target) epoch_loss += loss.item() loss.backward() optimizer.step() print("===> Epoch[{}]({}/{}): Loss: {:.4f}".format(epoch, iteration, len(training_data_loader), loss.item())) print("===> Epoch {} Complete: Avg. Loss: {:.4f}".format(epoch, epoch_loss / len(training_data_loader))) def test(): avg_psnr = 0 with torch.no_grad(): for batch in testing_data_loader: input, target = batch[0].to(device), batch[1].to(device) prediction = model(input) mse = criterion(prediction, target) psnr = 10 * log10(1 / mse.item()) avg_psnr += psnr print("===> Avg. PSNR: {:.4f} dB".format(avg_psnr / len(testing_data_loader))) def checkpoint(epoch): model_out_path = "model_epoch_{}.pth".format(epoch) torch.save(model, model_out_path) print("Checkpoint saved to {}".format(model_out_path)) if __name__ == '__main__': for epoch in range(1, opt.nEpochs + 1): train(epoch) test() checkpoint(epoch) |
3.3.2作用:
- 参数调整:
--upscale_factor super resolution upscale factor
--batchSize training batch size
--testBatchSize testing batch size
--nEpochs number of epochs to train for
--lr Learning Rate. Default=0.01
--cuda use cuda
--threads number of threads for data loader to use Default=4
--seed random seed to use. Default=123
- 训练模型
loss = criterion(model(input), target)
- 评价指标
均方误差(MSE)和峰值信噪比(PSNR)作为损失和评价指标
- 保存模型
选择最优模型进行保存(一般情况下为最后一轮训练的模型)
-
- model.py
3.4.1源代码:
| import torch import torch.nn as nn import torch.nn.init as init class Net(nn.Module): def __init__(self, upscale_factor): super(Net, self).__init__() self.relu = nn.ReLU() self.conv1 = nn.Conv2d(1, 64, (5, 5), (1, 1), (2, 2)) self.conv2 = nn.Conv2d(64, 64, (3, 3), (1, 1), (1, 1)) self.conv3 = nn.Conv2d(64, 32, (3, 3), (1, 1), (1, 1)) self.conv4 = nn.Conv2d(32, upscale_factor ** 2, (3, 3), (1, 1), (1, 1)) self.pixel_shuffle = nn.PixelShuffle(upscale_factor) self._initialize_weights() def forward(self, x): x = self.relu(self.conv1(x)) x = self.relu(self.conv2(x)) x = self.relu(self.conv3(x)) x = self.pixel_shuffle(self.conv4(x)) return x def _initialize_weights(self): init.orthogonal_(self.conv1.weight, init.calculate_gain('relu')) init.orthogonal_(self.conv2.weight, init.calculate_gain('relu')) init.orthogonal_(self.conv3.weight, init.calculate_gain('relu')) init.orthogonal_(self.conv4.weight) |
3.4.2作用:
定义网络模型SRCNN (Super-Resolution Convolutional Neural Network)
- 4个卷积层:
self.conv1[5*5], self.conv2[3*3], self.conv3[3*3], self.conv4[3*3]
- 激活函数:
self.relu
ReLU
- 上采样层
self.pixel_shuffle
upscale_factor(上采样因子)
- 前向传播 (forward方法):
输入数据首先通过第一个卷积层,然后经过ReLU激活函数,再依次通过后续的卷积层和ReLU激活函数。最后,通过上采样层得到最终的输出结果。
Figure 1 SRCNN结构图
3.5 super_resolve.py
3.5.1源代码:
| from __future__ import print_function import argparse import torch from PIL import Image from torchvision.transforms import ToTensor import numpy as np # Training settings parser = argparse.ArgumentParser(description='PyTorch Super Res Example') parser.add_argument('--input_image', type=str, required=True, help='input image to use') parser.add_argument('--model', type=str, required=True, help='model file to use') parser.add_argument('--output_filename', type=str, help='where to save the output image') parser.add_argument('--cuda', action='store_true', help='use cuda') opt = parser.parse_args() print(opt) img = Image.open(opt.input_image).convert('YCbCr') y, cb, cr = img.split() model = torch.load(opt.model) img_to_tensor = ToTensor() input = img_to_tensor(y).view(1, -1, y.size[1], y.size[0]) device = torch.device('cuda' if torch.cuda.is_available() else 'cpu') model.to(device) input = input.to(device) if opt.cuda: model = model.cuda() input = input.cuda() out = model(input) out = out.cpu() out_img_y = out[0].detach().numpy() out_img_y *= 255.0 out_img_y = out_img_y.clip(0, 255) out_img_y = Image.fromarray(np.uint8(out_img_y[0]), mode='L') out_img_cb = cb.resize(out_img_y.size, Image.BICUBIC) out_img_cr = cr.resize(out_img_y.size, Image.BICUBIC) out_img = Image.merge('YCbCr', [out_img_y, out_img_cb, out_img_cr]).convert('RGB') out_img.save(opt.output_filename) print('output image saved to ', opt.output_filename) |
3.5.2作用:
- 输入图片预处理,
- 使用PIL库(Python Imaging Library)打开输入图像,并将其转换为'YCbCr'色彩空间(一种用于数字图像的色彩编码方法)。
- 图像被分割成Y(亮度)、Cb(蓝色色度)和Cr(红色色度)三个通道。
- 加载模型:
使用torch.load()加载预训练的模型。
- 模型推理:
将准备好的输入数据传递给模型,并获得输出。
- 输出图片后处理
- 将模型的输出转换回numpy数组,并进行适当的缩放和裁剪操作,以确保像素值在有效范围内(0-255)。
- 将处理后的输出转换回图像格式。同时,使用双三次插值(BICUBIC)对色度通道Cb和Cr进行上采样,以匹配输出图像的尺寸。
- 合并处理后的Y、Cb和Cr通道,并将结果图像从'YCbCr'色彩空间转换回'RGB'色彩空间
4.测试调参和结果分析
-
- 程序运行及结果
4.1.1训练模型:
| 新建终端,键入以下python命令: python main.py --upscale_factor 3 --batchSize 4 --testBatchSize 100 --nEpochs 30 --lr 0.001 |
(参数可以自行修改)
| 在给定的训练epoch轮后,存储最后一次训练的模型: |
4.1.2预测模型
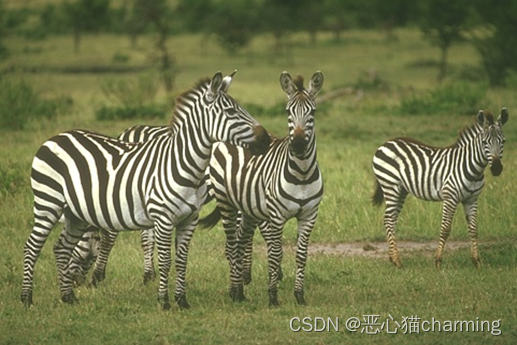
预测图片(481*321):
test figure 1
| 在终端输入以下命令: python super_resolve.py --input_image dataset/BSDS300/images/test/16077.jpg --model model_epoch_50.pth --output_filename out.png |
(选择输入图片,测试模型,输出位置)
结果(1443*963):
result figure 1

**注意**:
可以不用打开终端,直接在源代码里面改参数,然后run即可。
4.2对比调参测试
(采用峰值信噪比 PSNR定义的误差函数)
(对比时采用单变量对比,其他参数保持默认数值)
test figure 2

三张测试图(481*321)
4.2.1测试上采样因子(upscale_factor)
表 1不同采样因子下的模型性能
| upscale_factor | 2 | 3 | 4 |
| Avg_loss | 0.0022 | 0.0048 | 0.0064 |
result figure 2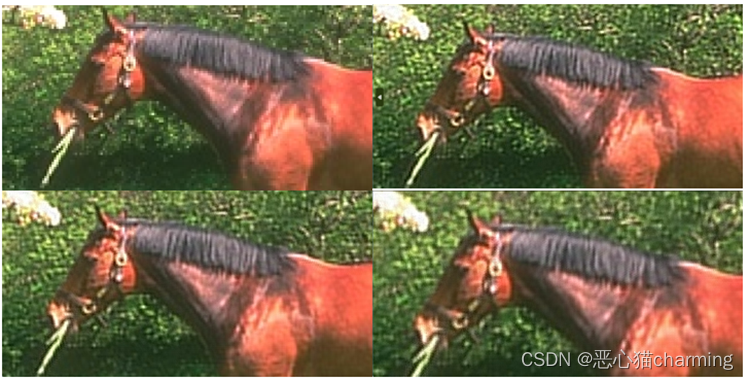
(从上到下从左到右,依次为原图,采样因子为2,3,4)
result figure 3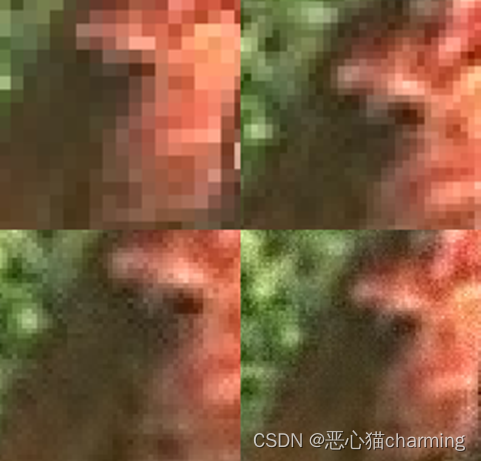
(从上到下从左到右,依次为原图,采样因子为2,3,4)
分析:
上采样因子大于1时,进行上采样,图像分辨率会变大,有助于提高图像的清晰度和细节,然而,上采样因子过大也可能导致图像失真或产生伪影。上表和上图可以看出,上采样因子2的效果要大于3,4.
4.2.2测试batchsize
表 2不同batchsize下的模型性能
| batchsize大小 | 32 | 64 |
| Avg_loss | 0.0039 | 0.0048 |
result figure 4
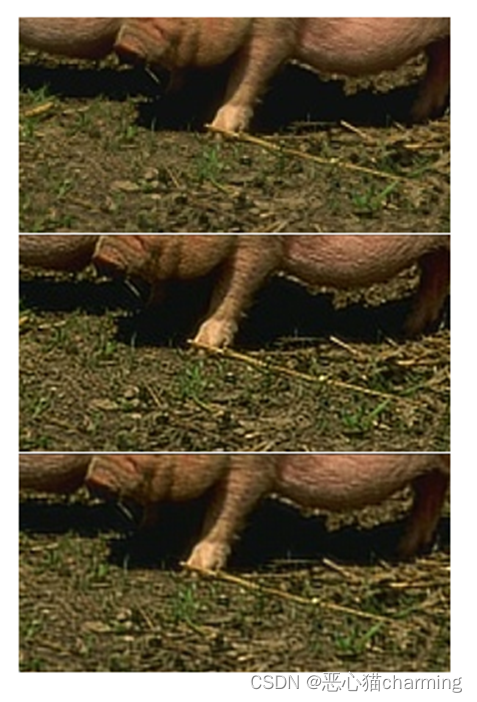
(从上到下,依次为原图,batchsize为32,64)
result figure 5

(从上到下,依次为原图,batchsize为32,64)
分析:
当Batch size较大时,每次迭代可以处理更多的数据,更充分地利用硬件资源,如GPU的并行计算能力,从而提高计算效率。
Batch size可以影响模型收敛速度和模型最终性能。当batch size较小时,每次迭代使用的样本少,训练过程中的梯度更新方向可能会比较嘈杂,这样可以帮助模型跳出局部最优,有助于提高模型的泛化性能。而当batch size较大时,梯度的方向通常会比较准确,训练收敛速度快,但可能会陷入局部最优
4.2.3测试epoch num
表 3不同epoch下的模型性能
| epoch num | 30 | 50 | 100 |
| Avg_loss | 0.0048 | 0.0036 | 0.0034 |
result figure 6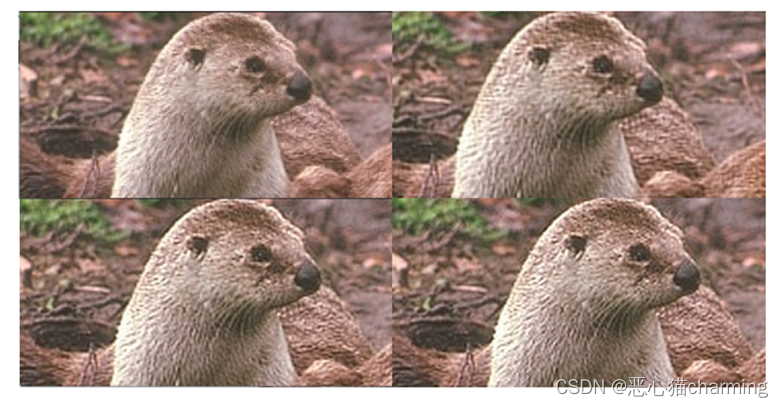
(从上到下从左到右,依次为原图,epoch=30,50,100)
result figure 7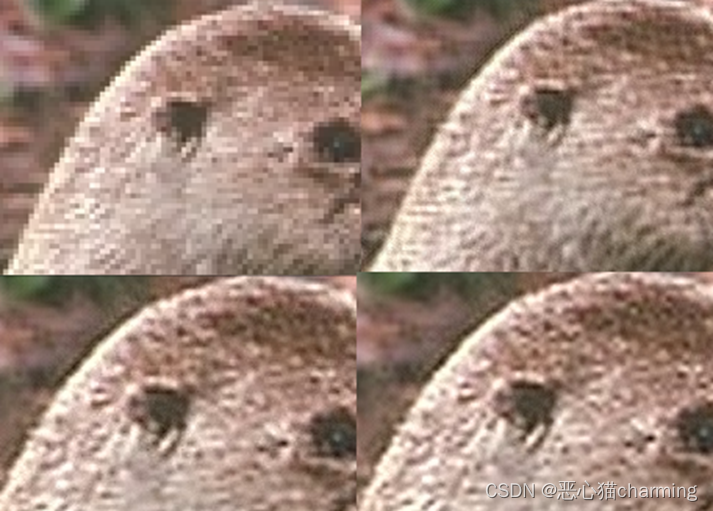
(从上到下从左到右,依次为原图,epoch=30,50,100)
result figure 8

(从上到下从左到右,依次为原图,epoch=30,50,100)
分析:
epoch越多,模型的准确性就越高,但是同时训练时间也会增加。过多的epoch会导致过拟合,所以选择正确的epoch数量非常重要。
Epoch的选择是一个关键的训练参数,它会影响模型的训练效果和收敛速度。如果选择的Epoch数量太小,模型可能无法充分学习数据集的特征,导致欠拟合。
4.2.4测试学习率
表 4不同learning_rate下的模型性能
| Learning_rate | 1e-3 | 2e-3 | 3e-3 | 5e-3 |
| Avg_loss | 0.0048 | 0.0047 | 0.0047 | 0.0073 |
result figure 9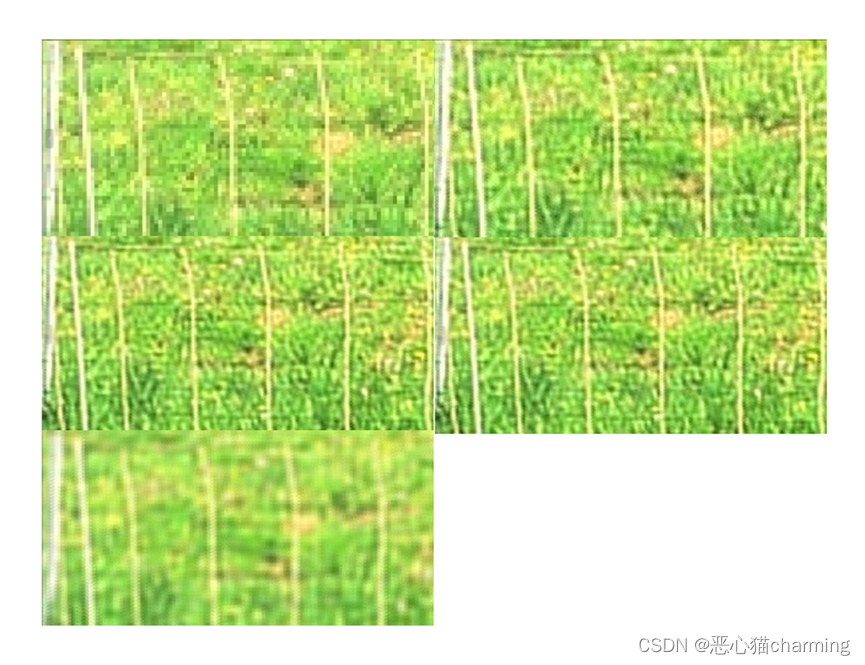
(从上到下从左到右,依次为原图, lr=0.001,0.002,0.003,0.005)
result figure 10

(从上到下从左到右,依次为原图, lr=0.001,0.002,0.005)
分析:
学习率的大小也会影响模型的最终性能。如果学习率过大,会导致模型在最小值附近震荡,无法收敛到最优解,从而影响模型的性能;而如果学习率过小,会导致模型收敛速度慢,需要更多的训练时间,同样会影响模型的性能。
5.出现问题和解决方法:
5.1进程错误:
原因:使用了多进程模块(multiprocessing)而导致程序报错
解决方法:把主程序放入该模块下:
if __name__ == '__main__':
5.2参数传递错误
原因:模型和输入张量不在同一设备上
解决方法:将模型和输入张量移动到 GPU 上
| device = torch.device('cuda' if torch.cuda.is_available() else 'cpu') model.to(device) input = input.to(device) |
5.3模型存储赘余
原因:每轮训练都要存储一次模型
解决方法:修改程序选取loss最小(一般在最后一轮)的一次模型存储
| for epoch in range(1, opt.nEpochs + 1): train(epoch) test() checkpoint(epoch) |
6.总结思考
本项目采用ESPCN ,是通过深度卷积神经网络学习到一个映射函数,该函数将低分辨率图像的特征转换为高分辨率图像的特征。
网络模型采用4层卷积为基础,采用上采样对图像进行扩大处理,定义了PSNR最为模型的评价指标,即为每轮训练计算出来的误差值,但是模型训练的损失函数为均方误差(MSE)。
实验使用了GPU对训练模型进行加速,提高了实验效率。


 1292
1292


 被折叠的 条评论
为什么被折叠?
被折叠的 条评论
为什么被折叠?
 到【灌水乐园】发言


