


Multiple Lights
到目前为止,所有的effect中都只使用了一种光源(不算ambient light)。但没有理由说明不能在同一种effect中结合使用directinal,point和spotlights,或者多个相同类型的光源。同时使用多个光源主要瓶颈在于性能问题以及一个shader模型中可用的指令数量。列表7.4和7.5列出了支持多种光源的effect的代码。这段代码没什么新的构造,因此首先讨论更新后的Common.fxh文件,该文件中增加了一些新的结构体和通用函数。然后再深入讲解effect部分的代码。
列表7.4 Common.fxh 用于Multiple Point Lights中的通用函数
列表7.4 Common.fxh 用于Multiple Point Lights中的通用函数
#ifndef _COMMON_FXH
#define _COMMON_FXH

/************* Constants *************/

#define FLIP_TEXTURE_Y 1

/************* Data Structures *************/

struct POINT_LIGHT
{
    float3 Position;
    float LightRadius;
    float4 Color;
};

struct LIGHT_CONTRIBUTION_DATA
{
    float4 Color;
    float3 Normal;
    float3 ViewDirection;
    float4 LightColor;
    float4 LightDirection;
    float4 SpecularColor;
    float SpecularPower;
};

/************* Utility Functions *************/

float2 get_corrected_texture_coordinate(float2 textureCoordinate)
{
    #if FLIP_TEXTURE_Y
        return float2(textureCoordinate.x, 1.0 - textureCoordinate.y);
    #else
        return textureCoordinate;
    #endif
}

float3 get_vector_color_contribution(float4 light, float3 color)
{
    // Color (.rgb) * Intensity (.a)
    return light.rgb * light.a * color;
}

float3 get_scalar_color_contribution(float4 light, float color)
{
    // Color (.rgb) * Intensity (.a)
    return light.rgb * light.a * color;
}

float4 get_light_data(float3 lightPosition, float3 worldPosition, float lightRadius)
{
    float4 lightData;
    float3 lightDirection = lightPosition - worldPosition;

    lightData.xyz = normalize(lightDirection);
    lightData.w = saturate(1.0f - length(lightDirection) / lightRadius); // Attenuation

    return lightData;
}

float3 get_light_contribution(LIGHT_CONTRIBUTION_DATA IN)
{
    float3 lightDirection = IN.LightDirection.xyz;
    float n_dot_l = dot(IN.Normal, lightDirection);
    float3 halfVector = normalize(lightDirection + IN.ViewDirection);
    float n_dot_h = dot(IN.Normal, halfVector);

    float4 lightCoefficients = lit(n_dot_l, n_dot_h, IN.SpecularPower);
    float3 diffuse = get_vector_color_contribution(IN.LightColor, lightCoefficients.y * IN.Color.rgb) * IN.LightDirection.w;
    float3 specular = get_scalar_color_contribution(IN.SpecularColor, min(lightCoefficients.z, IN.Color.w)) * IN.LightDirection.w * IN.LightColor.w;

    return (diffuse + specular);
}

#endif /* _COMMON_FXH */
Support Structures and Utility Functions
每一个point light都需要一个position,一个color以及一个radius。因此,如果要同时使用4个point lights,需要4组position,color和radius。通过POINT_LIGHT结构体把这三个成员组织在一起,就可以使用一个简单的声明创建一个point lights的数组,比如POINT_LIGHT PointLights[NUM_LIGHTS]。注意POINT_LIGHT的数据成员都没有指定annotations(semantics)。当使用一个结构体数组的时候,无法对结构体的成员设定annotations,而且annotations无法用于结构体成员。
另一个新加的结构体是LIGHT_CONTRIBUTION_DATA。该结构体的成员包括表面的color和normal,以及view direction,light color,light direction,specular color,和specular power,这些成员用于实现单个光源的diffuse和specular运算。通用函数get_light_contribution()的参数就是LIGHT_CONTRIBUTEION_DTA数据类型,该函数使用了与之前相同的步骤来计算diffuse和specular,并返回一个结合了diffuse和specular的float3类型的颜色值。另一个通用函数get_light_data()用于计算LIGHT_CONTRIBUTION_DATA结构体中的light directiont和attenuation成员。列表7.5列出了multiple point light effect的代码,该代码中使用了Common.fxh中的结构和通用函数。
列表7.5 MultiplePointLights.fx
#include "include\\Common.fxh"

/************* Resources *************/

#define NUM_LIGHTS 4

cbuffer CBufferPerFrame
{
    POINT_LIGHT PointLights[NUM_LIGHTS];

    float4 AmbientColor : AMBIENT <
        string UIName =  "Ambient Light";
        string UIWidget = "Color";
    > = {1.0f, 1.0f, 1.0f, 0.0f};

    float3 CameraPosition : CAMERAPOSITION < string UIWidget="None"; >;
}

cbuffer CBufferPerObject
{
    float4x4 WorldViewProjection : WORLDVIEWPROJECTION < string UIWidget="None"; >;
    float4x4 World : WORLD < string UIWidget="None"; >;

    float4 SpecularColor : SPECULAR <
        string UIName =  "Specular Color";
        string UIWidget = "Color";
    > = {1.0f, 1.0f, 1.0f, 1.0f};

    float SpecularPower : SPECULARPOWER <
        string UIName =  "Specular Power";
        string UIWidget = "slider";
        float UIMin = 1.0;
        float UIMax = 255.0;
        float UIStep = 1.0;
    > = {25.0f};
}

Texture2D ColorTexture <
    string ResourceName = "default_color.dds";
    string UIName =  "Color Texture";
    string ResourceType = "2D";
>;

SamplerState ColorSampler
{
    Filter = MIN_MAG_MIP_LINEAR;
    AddressU = WRAP;
    AddressV = WRAP;
};

RasterizerState DisableCulling
{
    CullMode = NONE;
};

/************* Data Structures *************/

struct VS_INPUT
{
    float4 ObjectPosition : POSITION;
    float2 TextureCoordinate : TEXCOORD;
    float3 Normal : NORMAL;
};

struct VS_OUTPUT
{
    float4 Position : SV_Position;
    float3 WorldPosition : POSITION;
    float3 Normal : NORMAL;
    float2 TextureCoordinate : TEXCOORD0;
};

/************* Vertex Shader *************/

VS_OUTPUT vertex_shader(VS_INPUT IN)
{
    VS_OUTPUT OUT = (VS_OUTPUT)0;

    OUT.Position = mul(IN.ObjectPosition, WorldViewProjection);
    OUT.WorldPosition = mul(IN.ObjectPosition, World).xyz;
    OUT.TextureCoordinate = get_corrected_texture_coordinate(IN.TextureCoordinate);
    OUT.Normal = normalize(mul(float4(IN.Normal, 0), World).xyz);

    return OUT;
}

/************* Pixel Shader *************/

float4 pixel_shader(VS_OUTPUT IN, uniform int lightCount) : SV_Target
{
    float4 OUT = (float4)0;

    float3 normal = normalize(IN.Normal);
    float3 viewDirection = normalize(CameraPosition - IN.WorldPosition);
    float4 color = ColorTexture.Sample(ColorSampler, IN.TextureCoordinate);
    float3 ambient = get_vector_color_contribution(AmbientColor, color.rgb);

    LIGHT_CONTRIBUTION_DATA lightContributionData;
    lightContributionData.Color = color;
    lightContributionData.Normal = normal;
    lightContributionData.ViewDirection = viewDirection;
    lightContributionData.SpecularColor = SpecularColor;
    lightContributionData.SpecularPower = SpecularPower;

    float3 totalLightContribution = (float3)0;

    [unroll]
    for (int i = 0; i < lightCount; i++)
    {
        lightContributionData.LightDirection = get_light_data(PointLights[i].Position, IN.WorldPosition, PointLights[i].LightRadius);
        lightContributionData.LightColor = PointLights[i].Color;
        totalLightContribution += get_light_contribution(lightContributionData);
    }

    OUT.rgb = ambient + totalLightContribution;
    OUT.a = 1.0f;

    return OUT;
}

/************* Techniques *************/

technique10 Lights1
{
    pass p0
    {
        SetVertexShader(CompileShader(vs_4_0, vertex_shader()));
        SetGeometryShader(NULL);
        SetPixelShader(CompileShader(ps_4_0, pixel_shader(1)));

        SetRasterizerState(DisableCulling);
    }
}

technique10 Lights2
{
    pass p0
    {
        SetVertexShader(CompileShader(vs_4_0, vertex_shader()));
        SetGeometryShader(NULL);
        SetPixelShader(CompileShader(ps_4_0, pixel_shader(2)));

        SetRasterizerState(DisableCulling);
    }
}

technique10 Lights3
{
    pass p0
    {
        SetVertexShader(CompileShader(vs_4_0, vertex_shader()));
        SetGeometryShader(NULL);
        SetPixelShader(CompileShader(ps_4_0, pixel_shader(3)));

        SetRasterizerState(DisableCulling);
    }
}

technique10 Lights4
{
    pass p0
    {
        SetVertexShader(CompileShader(vs_4_0, vertex_shader()));
        SetGeometryShader(NULL);
        SetPixelShader(CompileShader(ps_4_0, pixel_shader(4)));

        SetRasterizerState(DisableCulling);
    }
}
Multiple Point Lights Preamble
代码中首先定义了宏NUM_LIGHTS,用于指定PointLights数组中元素的数量。只需要简单的修改这个宏,就可以增加或减少场景中的lights数量,以及对应的techniques(马上就会讲解多个techniques)。CBufferPerFrame中的ambient color和camera position与之前的一样。实际上,代码的前置部分与单个point light effect中的对应代码也保持一样,除了在VS_OUTPUT结构体中去掉了Attention成员。每一个light的衰减因子都在pixel shader中计算。
Multiple Point Lights Vertex and Pixel Shader
Vertex shader部分的代码非常简单,没有计算针对单个光源的任何数据。单个光源的计算完全由pixel shader完成。在pixel shader中,首先进行texture sample,再计算ambient值。然后构造一个LIGHT_CONTRIBUTION_DATA类型的变量,首先使用各个光源之间共同不变的值来赋值给该变量的成员,具体的包括,纹理采样的color,表面的法向量,view direction,以及specular的color和指数。
接下来,根据光源的数量执行一个循环,光源的数量由uniform shader参数lightColor指定。这个参数并不是由rasterizer阶段传递过来的,也不会随着每一个pixel变化,而是在shader编译时由一种technique指定的。因此lightColor在编译期间是常量,但是又能像一个普通变量那样赋值。由于使用了uniform参数,HLSL编译器会创建多个版本的pixel shader,每一个版本都根据technique提供的lightColor参数值不同而不同。然后HLSL编译器就可以unroll循环,并消除由动态流量控制导致的任何性能损失。
在循环中,先lightContribution的成员变量进行赋值,再调用函数get_light_contribution()计算light的diffuse和specular值。每一种光的计算结果都相加到totalLightContribution变量中,最后再把ambient值与该变量结合产生最终的pixel color。
Multiple Point Lights Techniques
这是第一个使用多种techniques的effect,而且不同techniques中的pixel shader使用不同的lightCount参数。具体地说,该effect中有4种techniques,分别为Lights1,Lights2,Lights3和Lights4;techniques的名称与effect中可用的lights数量一一对应。在调用CompilerShader()函数时指定了lightCount参数,CompilerShader()函数会忽略nonuniform shader输入,并把提供的参数值赋给第一个uniform参数。
CPU端的应用程序从4种techniques中选择一个执行。例如,如果在object附近有3个可用的point lights,CPU端的应用程序应该选择Lights3 technique。在NVIDIA FX Composer中,展开multiple point lights material(在Assets panel中),并选择某个特定technique(如图7.6所示)
CPU端的应用程序从4种techniques中选择一个执行。例如,如果在object附近有3个可用的point lights,CPU端的应用程序应该选择Lights3 technique。在NVIDIA FX Composer中,展开multiple point lights material(在Assets panel中),并选择某个特定technique(如图7.6所示)

图7.6 Options for selecting multiple techniques within the Assets panel of NVIDIA FX Composer.
你也可以在不使用uniform参数的情况下,实现多种techniques。比如,根据显卡的功能,可能有低,中,高三个级别的vertex和pixel shader。又或者使用多个uniform参数和多种technique序列。和所有编程方式一样,可以使用多种方法达到同样的结果,建议尝试使用多种方法来实现。
Multiple Point Lights Output
图7.7显示了在multiple point lights effect中使用4个光源的输出结果。
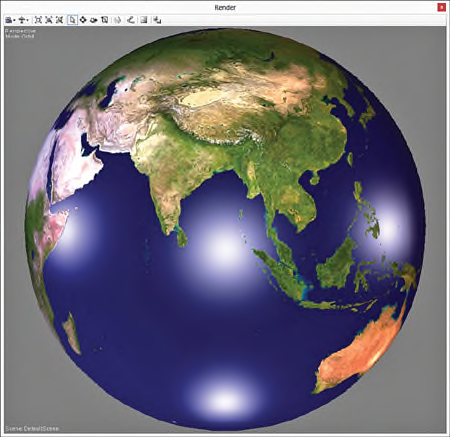
图7.7 MultiplePointLights.fx, with four lights enabled, applied to a sphere with a texture of Earth.
(Texture from Reto Stöckli, NASA Earth Observatory.)
每一个光源都相对原点,沿着x,y和z轴偏移10个单位坐标位置。在地图中,Austrilia区域呈现出红色调,Africa带有一点bluish-purple(蓝紫色)。照射到这片区域的光是纯红色和纯蓝色,而照射到底部和中心位置的光则是纯白色。图7.8中列出了具体的坐标,颜色和半径。另外需要注意的是,由于结构成员无法绑定annotations,所以需要手动指定每个光源的positions和colors。
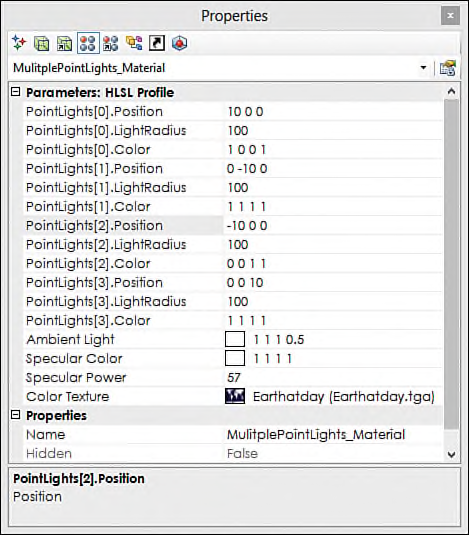
图7.8 The Properties panel of NVIDIA FX Composer, showing the data supplied to the multiple point lights effect.
总结
本章主要讲解了在场景中使用point lights,spotlights以及multiple lights。实现了每一种光照系统模型的effects,并进入学习了HLSL。增加了一些常用结构体和通用函数,用于支持功能越来越多的effects,并讲解了shader中的uniform参数以及在多种HLSL techniques中用法。到现在为止,已经讲完了HLSL的基础部分,下一章将开始讲解中级和高级部分。
Exercises
1. Experiment with the point light effect. Create a point light in NVIDIA FX Composer’s Render panel, and then bind it to your material. Change the light’s position, rotation, color, and intensity, and observe the results.
2. Implement the modification to the point light effect, which performs the light direction calculation in the pixel shader. Compare the output to the original point light effect.
3. Explore the spotlight effect. Create a plane in NVIDIA FX Composer’s Render panel, and assign it your spotlight material. Then create and bind a spotlight. Change the light’s position, rotation, color, and intensity, and observe the results.
4. Experiment with the multiple point lights effect. Select different techniques to enable one, two, three, and four lights. Vary the data for each of the lights, and observe the results.
5. Extend the multiple point lights effect to support up to eight lights.
6. Write an effect that supports directional, point, and spotlights—one of each type. Ensure that the specular highlight is modulated by the intensity of each light.
1.测试point light effect。在NVIDIA FX Composer的Render panel中创建一个point light,然后与material绑定。改变light的position,rotation,color以及intensity,并观察输出结果。
2.修改point light effect,把计算light direction的操作放到pixel shader中,完成PointLightModification effect。比较PointLightModification effect和PointLight effect的输出结果。
3.测试spotlight effect。在NVIDIA FX Composer的Render panel中创建一个plane,并把spotlight material指定给该plane。然后创建一个spotlight并绑定到spotlight material中。改变light的position,rotation,color以及intensity,并观察输出结果。
4.测试multiple point lights effect。在MultiplePointLights_Material中选择不同的techniques,分别表示使用1个,2个,3个以及4个光源,并观察输出结果。
5.扩展multiple point lights effect,增加到同时支持8个lights。
6.编写一种effect,同时支持directional,point以及spotlights。要确保specular highlight由每一种light的强度计算得出。
本章配套学习代码:


 365
365

 被折叠的 条评论
为什么被折叠?
被折叠的 条评论
为什么被折叠?
 到【灌水乐园】发言


