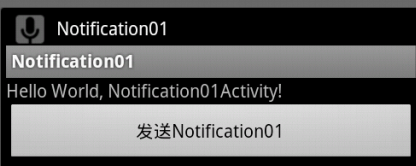
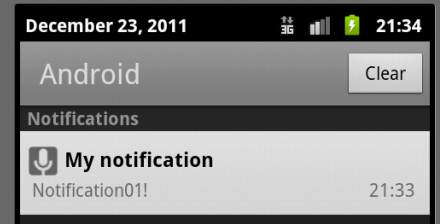
status bar notification添加一个图标(和一条可选的ticker-text消息)到系统的status bar(状态条),并且显示一个notification message(通知消息)在系统的notifications window(消息窗口)中。当用户选择了消息窗口中的一条消息,Android系统就发出一个通过Notification定义的Intent(通常是用于启动一个activity)。你也可以通过配置notification以通过声音、震动或者是设备上的flashing lights(闪光灯)来告知用户。
status bar notification用于后台运行的服务需要告知用于一些事件并且得到用户的响应的情况下。后台运行的服务为了及时得到用户的相应不应该自己启动一个activity。而应该创建一个用户选择后可以启动activity的status bar notification。
图一显示了一个左边包含一个nitification的图片。
图二显示了在notifications window中有的notifications。
基本
一个Activity 或者是Service可以初始化一个status bar notification。由于一个通常只有在处于前台运行并且和用户交互的时候才能执行操作,因此,我们通常是通过一个service来创建notifications。这时,即使用户在运行其他的程序或者是设备进入休眠状态的时候,我们依然可以在后台创建notifications。要创建一个notification,我们必须要用到两个类:Notification和NotificationManage。
用Notification类的实例来定义status bar notification的属性,例如:status bar notification的图标、显示的message(信息)以及额外的设置,例如播放的声音。NotificationManager是Android的一项系统服务,通过它可以执行和管理所有的status bar notifications。你不能直接实例化NotificationManager这个类。为了实现自己的Notification,你必须通过getSystemService()方法获得NotificationManager,然后,当你想通知用户的时候,将Notification传递给notify()这个方法,这样就实现了自己的status bar notification。
通过如下步骤来创建一个status bar notification:
1.获得NotificationManager:
String ns = Context.NOTIFICATION_SERVICE;
NotificationManager mNotificationManager = (NotificationManager) getSystemService(ns);
2.实例化Notification:
int icon = R.drawable.notification_icon;
CharSequence tickerText = "Hello";
long when = System.currentTimeMillis();
Notification notification = new Notification(icon, tickerText, when);
3.定义notification要显示的message和PendingIntent:
Context context = getApplicationContext();
CharSequence contentTitle = "My notification";
CharSequence contentText = "Hello World!";
Intent notificationIntent = new Intent(this, MyClass.class);
PendingIntent contentIntent = PendingIntent.getActivity(this, 0, notificationIntent, 0);
notification.setLatestEventInfo(context, contentTitle, contentText, contentIntent);
到这里,我们就实现了一个notification,用户应该可以收到这个notification了。
这里我们举一个实例,方便大家清楚的了解,要实现的效果就是在主Mactivity上显示一个Button,当按下这个Button时,就发出我们自定义的一个notification,具体步骤如下:
第一步:新建一个工程,命名为:Notification01;
第二步:修改布局文件main.xml,添加一个Button;
第三步:修改java源文件,代码如下:
public class Notification01Activity extends Activity {
	private Button sendBtn;
	private static final int HELLO_ID = 1;
    /** Called when the activity is first created. */
    @Override
    public void onCreate(Bundle savedInstanceState) {
        super.onCreate(savedInstanceState);
        setContentView(R.layout.main);

        sendBtn = (Button)findViewById(R.id.sendBtn);

		String ns = Context.NOTIFICATION_SERVICE;
        final NotificationManager mNotificationManager = (NotificationManager) getSystemService(ns);
        int icon = R.drawable.notification_icon;
        CharSequence tickerText = "Notification01";
        long when = System.currentTimeMillis();

        final Notification notification = new Notification(icon, tickerText, when);

        final Context context = getApplicationContext();
        final CharSequence contentTitle = "My notification";
        final CharSequence contentText = "Notification01!";

        sendBtn.setOnClickListener(new View.OnClickListener() {

			@Override
			public void onClick(View v) {
				// TODO Auto-generated method stub

		        Intent notificationIntent = new Intent(Notification01Activity.this, Notification01Activity.class);
		        PendingIntent contentIntent = PendingIntent.getActivity(Notification01Activity.this, 0, notificationIntent, 0);

		        notification.setLatestEventInfo(context, contentTitle, contentText, contentIntent);

		        mNotificationManager.notify(HELLO_ID, notification);
			}
		});

    }
}第四步:运行程序可以看到这个效果:
首先再status bar上看到我们的notification,如下图:

然后打开notifications window,可以看到我们的notification,如下图:

Managing your Notification
NotificationManager是一个用来管理所有notifications的系统服务。你必须通过getSystemService()方法来获得对它的一个引用。例如:
String ns = Context.NOTIFICATION_SERVICE;
NotificationManager mNotificationManager = (NotificationManager) getSystemService(ns);
当你想发出你的status bar notification的时候,就将Notificatiion传递给NotificationManager的notify(int, Notification)。第一个参数是这个notification的唯一的ID,第二个参数是一个Notification的对象。第一个参数(ID)在你的应用中必须是惟一的。对于你更新自己的notification或者是要对不同的notification采取不同的动作,这个时候这个ID号就是必须的,他就是用来识别特定的那个要更新的或者是要采取特定动作的那个notification。
当用户在notification window中选中了一个notification后,我们就希望这个notification得到用户相应了,就应该被清除了,这个怎么达到呢?我们可以通过在Notification的flag域中设置“FLAG_AUTO_CANCEL”标志即可。例如:
Notification n;
n.flag |= FLAG_AUTO_CANCEL;
这样就可以达到效果了,如果你不进行清除,那么这个status bar notification就会一直显示在status bar上面。当然,你也可以通过cancel(int)方法来清除特定的notification,这个方法参数就是之前的特定的那个ID,或者是使用cancelAll()方法清除你应用程序中的所有的nitifications.
创建自定义的Notification布局
默认的情况下,出现在notifications window中的notification包含一个标题和一条信息,就像上面示例的截图那样。显示的标题和信息的内容都是通过setLatesEventInfo()方法中的contentTitle和contentText参数来指定的。然而,你也可以利用RemoteViews来实现自定义的notification的布局。
要为notification定义自己的布局,就需要实例化一个TemoteViews对象来解析自定义的布局文件,然后将RemoteViews传递到你自己的Notification的contentView参数域。
下面用实例来说明:
1.为notification创建自定义的XML文件,例如下面的custom_notification.xml:
<RelativeLayout xmlns:android="http://schemas.android.com/apk/res/android"
android:id="@+id/layout"
android:layout_width="fill_parent"
android:layout_height="fill_parent"
android:padding="10dp" >
<ImageView android:id="@+id/image"
android:layout_width="wrap_content"
android:layout_height="fill_parent"
android:layout_alignParentLeft="true"
android:layout_marginRight="10dp" />
<TextView android:id="@+id/title"
android:layout_width="wrap_content"
android:layout_height="wrap_content"
android:layout_toRightOf="@id/image"
style="@style/NotificationTitle" />
<TextView android:id="@+id/text"
android:layout_width="wrap_content"
android:layout_height="wrap_content"
android:layout_toRightOf="@id/image"
android:layout_below="@id/title"
style="@style/NotificationText" />
</RelativeLayout>
注意:以上的两个TextView元素都是包含再style属性中的。在你自己的notifications中为text使用style资源是非常重要的,因为notification的背景色会因为不同的设备和不同的系统版本而变化。从Android2.3(API Level9)开始,系统给默认的notification布局的text定义了style,因此,当你使用2.3或更高版本时,你应该使用这个style来确保你的text再系统背景下是可见的。
例如:当使用低于2.3版本系统时,要使用标准的text colors,就必须使用如下的styles,此示例为:/res/values/styles.xml:
<?xml version="1.0" encoding="utf-8"?>
<resources>
<style name="NotificationText">
<item name="android:textColor">?android:attr/textColorPrimary</item>
</style>
<style name="NotificationTitle">
<item name="android:textColor">?android:attr/textColorPrimary</item>
<item name="android:textStyle">bold</item>
</style>
<!-- If you want a slightly different color for some text,
consider using ?android:attr/textColorSecondary -->
</resources>
当要使用2.3或更高本版的默认的notification colors时,我们必须使用如下的styles,此示例为:res/values-v9/styles.xml:
<?xml version="1.0" encoding="utf-8"?>
<resources>
<style name="NotificationText" parent="android:TextAppearance.StatusBar.EventContent" />
<style name="NotificationTitle" parent="android:TextAppearance.StatusBar.EventContent.Title" />
</resources>
当你运行再2.3或者更高版本系统上时,你的notification中的text将会使用一样的系统的默认定义的。这是十分重要的,因为Android的后续版本将notification的背景颜色改变为dark。继承系统默认的定义将确保你的text在这种情况下会显示正常,并且如果背景颜色被盖为其他的颜色,你的text也可以适应这种变化而正常显示。
2.在代码中,用RemoveViews方法来定义notification显示的图像和消息。然后将RemoteViews对象传递给Notification的contentView参数,如下所示:
RemoteViews contentView = new RemoteViews(getPackageName(), R.layout.custom_notification_layout);
contentView.setImageViewResource(R.id.image, R.drawable.notification_image);
contentView.setTextViewText(R.id.title, "Custom notification");
contentView.setTextViewText(R.id.text, "This is a custom layout");
notification.contentView = contentView;
正如这里所看到的一样,把应用程序的包名以及布局文件的ID传递给RemoteViews构造器。然后用setImageResource()方法和setTextViewText()方法为InageView和TextView组件定义显示内容。最后将RemoteViews对象传递给Notification的contentView即可。
3.由于在使用自定义的view时不必使用setLastEventInfo()方法,所以你必须为Notification的contentIntent域定义一个Intent,如下所示:
Intent notificationIntent = new Intent(this, MyClass.class);
PendingIntent contentIntent = PendingIntent.getActivity(this, 0, notificationIntent, 0);
notification.contentIntent = contentIntent;
4.可以通过如下方法发送notification:
mNotificationManager.notify(CUSTOM_VIEW_ID, notification);
RemoteViews类同样包含一些方法使得你可以很容易的为notification的布局中添加Chronome和ProgressBar组件。详细的关于为notification创建自定义的布局,可以查看RemoteViews类。
注意:当为notification创建自定义的布局时,你必须确保它能够再不同的设备方向以及分辨率下都正常工作。这对于所有的布局工作都是十分重要的,所以,不要定义过于复杂的布局,而且要在多种情况下进行测试。


 451
451


 被折叠的 条评论
为什么被折叠?


