AOP简介
AOP的概念
AOP, Aspect Oriented Programming,面向切面编程,是对面向对象编程OOP的升华。OOP是纵向对一个事物的抽象,一个对象包括静态的属性信息,包括动态的方法信息等。而AOP是横向的对不同事物的抽象,属性与属性、方法与方法、对象与对象都可以组成一个切面,而用这种思维去设计编程的方式叫做面向切面编程。

AOP思想的实现方案
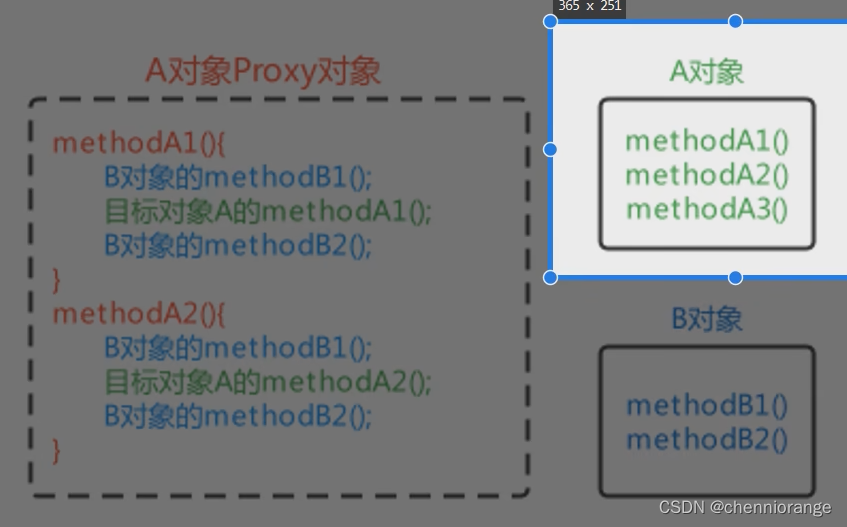
动态代理技术,在运行期间,对目标对象的方法进行增强,代理对象同名方法内可以执行原有逻辑的同时嵌入执行其他增强逻辑或其他对象的方法。
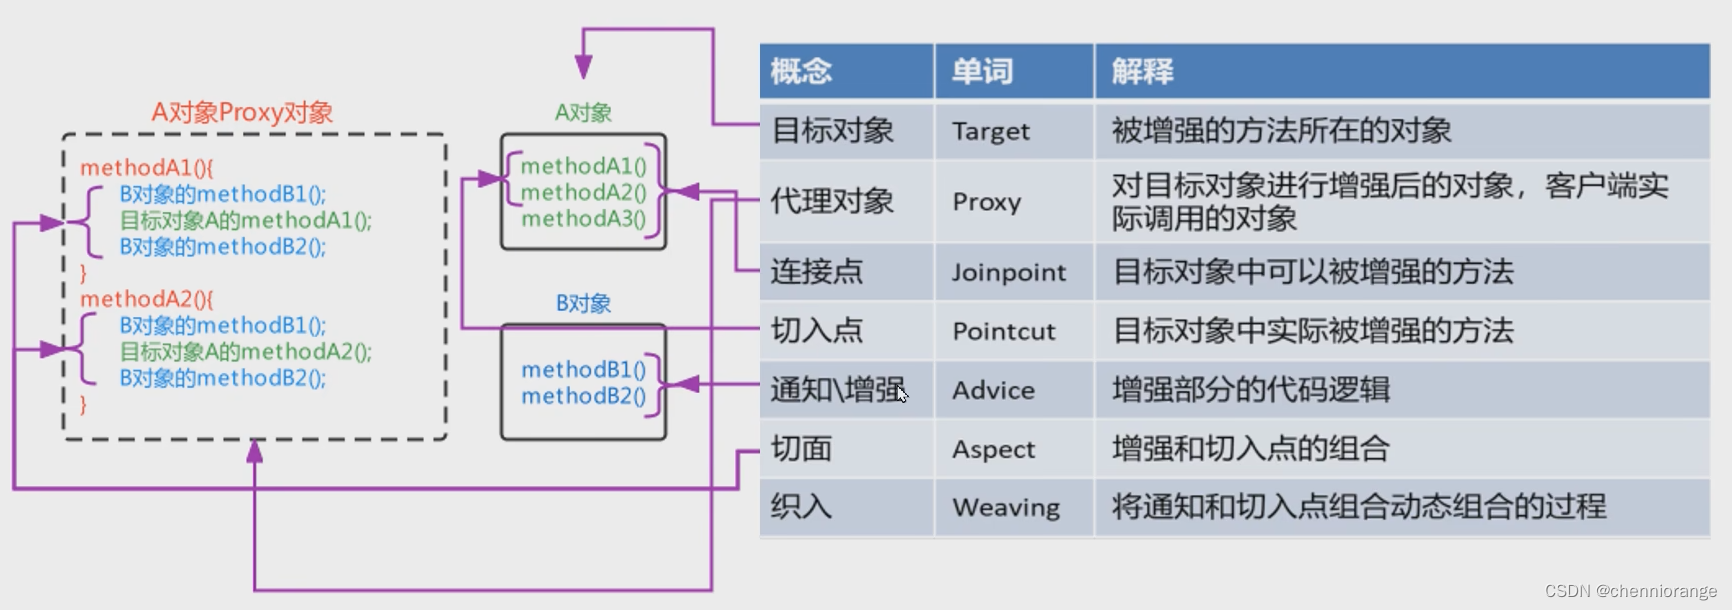
如下,A对象就被称为目标对象,A1A2方法就被称为目标方法,B对象就被称为增强对象,B1B2方法被称为增强方法。
模拟AOP的基本代码
-
首先我们要准备目标对象(UserServiceImpl)和增强对象(通知类MyAdvice)
准备目标对象:

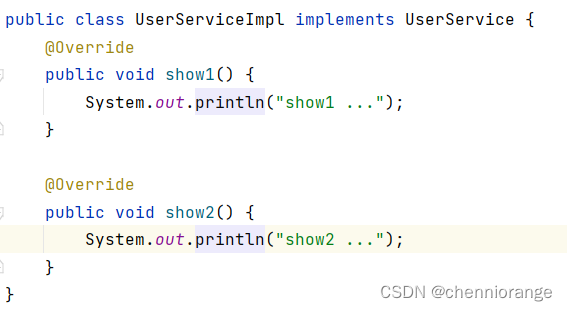
准备增强对象


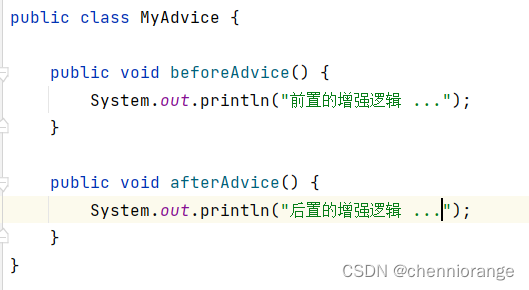
全部交给Spring容器管理

-
准备后处理器类,利用Bean后处理器和Java的Proxy代理对目标对象进行代理增强
这里有几个需要解决的问题
-
为什么使用Bean后处理器来对目标对象进行增强
-
如何筛选出目标对象,即如何只针对需要的对象或包中对象进行AOP的功能增强
- 利用BeanPostProcessor接口的postProcessAfterImitialization方法的第一个参数就可以了,bean.getClass().getName(),如果不知道bean.getClass().getName()会得到什么,在idea上打断点然后选中内容,就可以知道了
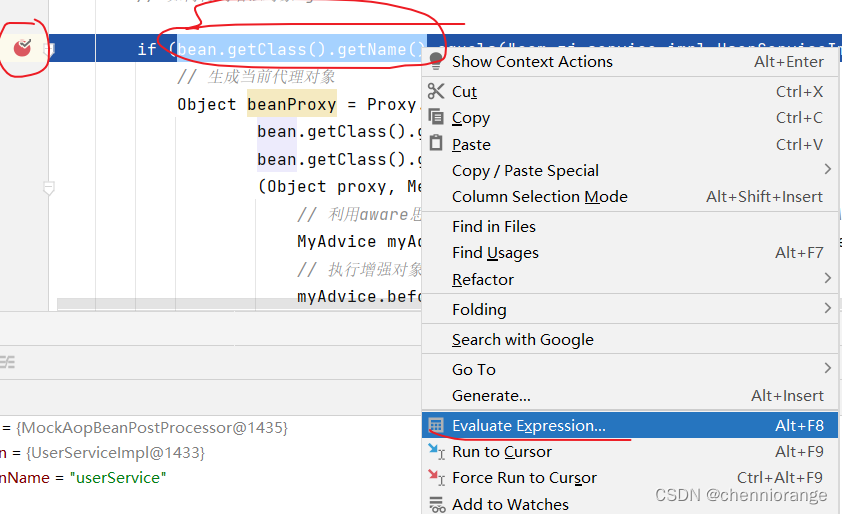
- 利用BeanPostProcessor接口的postProcessAfterImitialization方法的第一个参数就可以了,bean.getClass().getName(),如果不知道bean.getClass().getName()会得到什么,在idea上打断点然后选中内容,就可以知道了
-
如何从IoC容器中拿到增强对象MyAdvice?
- 利用Aware思想,实现ApplicationContextAware接口,接口提供有setApplicationContext方法可以拿到ApplicationContext。
public class MockAopBeanPostProcessor implements BeanPostProcessor, ApplicationContextAware { private ApplicationContext applicationContext; @Override public Object postProcessAfterInitialization(Object bean, String beanName) throws BeansException { // 对UserServiceImpl中的show1、show2方法进行增强 // 如何筛选出UserServiceImpl? // 如何得到增强对象MyAdvice? if (bean.getClass().getName().equals("com.zj.service.impl.UserServiceImpl")) { // 生成当前代理对象 Object beanProxy = Proxy.newProxyInstance( bean.getClass().getClassLoader(), bean.getClass().getInterfaces(), (Object proxy, Method method, Object[] args) -> { // 利用aware思想,通过注入的applicationContext拿到增强对象MyAdvice MyAdvice myAdvice = applicationContext.getBean(MyAdvice.class); // 执行增强对象的before方法 myAdvice.beforeAdvice(); // 执行目标对象的目标方法 Object result = method.invoke(bean, args); // 执行增强对象的after方法 myAdvice.afterAdvice(); return result; } ); return beanProxy; } return bean; } @Override public void setApplicationContext(ApplicationContext applicationContext) throws BeansException { this.applicationContext = applicationContext; } } -
-
别忘了将后处理器类加入到Spring的配置文件
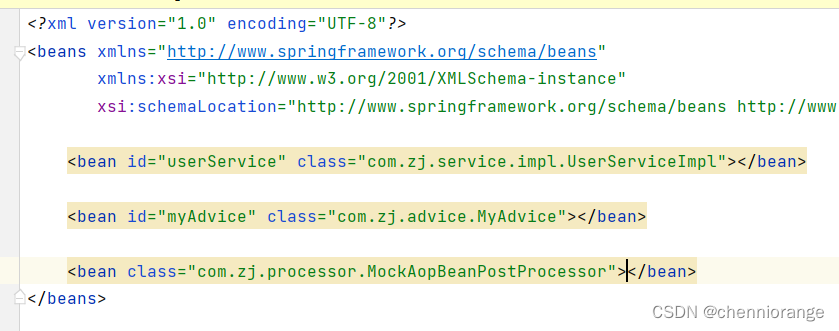
-
运行结果

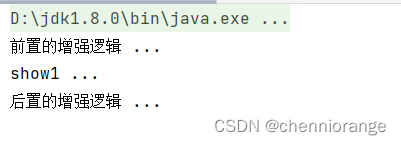
-
项目目录
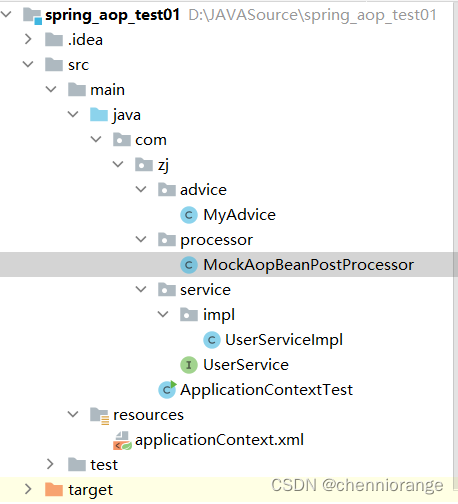
AOP相关概念
| 概念 | 单词 | 解释 |
|---|---|---|
| 目标对象 | Target | 被增强的方法所在的对象 |
| 代理对象 | Proxy | 对目标对象进行增强后的对象,客户端实际调用的对象 |
| 连接点 | Joinpoint | 目标对象中可以被增强的方法 |
| 切入点 | Pointcut | 目标对象中实际被增强的方法 |
| 通知\增强 | Advice | 增强部分的代码逻辑 |
| 切面 | Aspect | 增强和切入点的组合 |
| 织入 | Weaving | 将通知和切入点组合动态组合的过程 |
基于xml配置的AOP
xml方式AOP快速入门
通过配置文件的方式解决:
- 配置哪些包、哪些类、哪些方法需要被增强
- 配置目标方法要被哪些通知方法所增强,在目标方法执行之前还是之后执行增强
配置方式的设计、配置文件(注解)的解析通知,Spring已经封装好了
快速入门
-
导入AOP相关坐标
<dependency>
    <groupId>org.aspectj</groupId>
    <artifactId>aspectjweaver</artifactId>
    <version>1.9.6</version>
</dependency>
看起来这个依赖坐标和Spring搭不上边,查看spring-context依赖也可以看到有spring-aop,那为什么我们还要另外导入其他依赖呢?
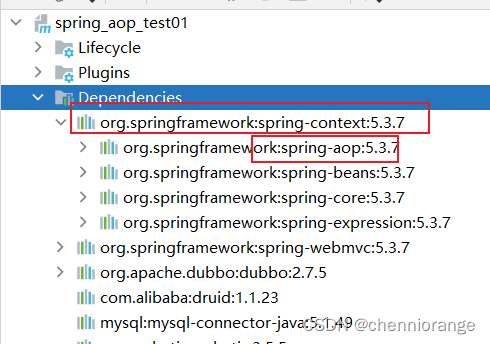
这是因为整合是Spring的老传统了,Spring将aop整合进来,就想jbdc为orm框架提供接口一样(mybatis之类的),所以真正提供服务的是我们引入的aspectjweaver。
-
准备目标类、准备增强类,并配置给Spring管理
还是和上面的一样
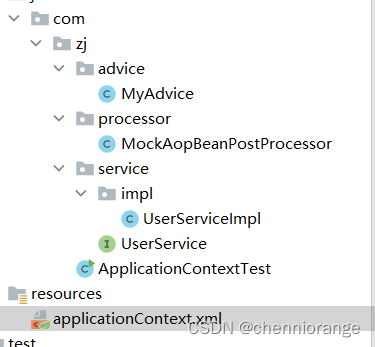

-
配置切入表达式(哪些方法被增强)
配置切入表达式之前,我们需要引入aop的命名空间: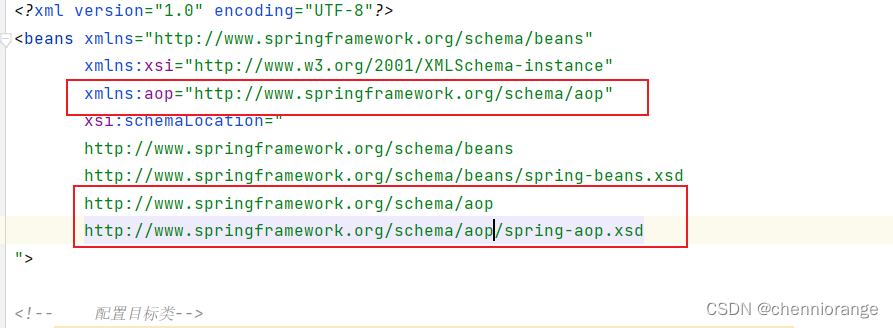

-
配置织入(切点被哪些通知方法增强,是前置增强还是后置增强)
<?xml version="1.0" encoding="UTF-8"?> <beans xmlns="http://www.springframework.org/schema/beans" xmlns:xsi="http://www.w3.org/2001/XMLSchema-instance" xmlns:aop="http://www.springframework.org/schema/aop" xsi:schemaLocation=" http://www.springframework.org/schema/beans http://www.springframework.org/schema/beans/spring-beans.xsd http://www.springframework.org/schema/aop http://www.springframework.org/schema/aop/spring-aop.xsd "> <!-- 配置目标类--> <bean id="userService" class="com.zj.service.impl.UserServiceImpl"></bean> <!-- 配置通知类--> <bean id="myAdvice" class="com.zj.advice.MyAdvice"></bean> <!-- aop配置--> <aop:config> <!--配置切点表达式,目的是指定要增强的方法,这里就标识指定类的show1方法增强--> <aop:pointcut id="myPointcut" expression="execution(void com.zj.service.impl.UserServiceImpl.show1())"/> <!--配置织入,目的是指定哪些切点要与哪些通知进行结合--> <aop:aspect ref="myAdvice"> <!--ref属性指定通知类--> <!--aop:before就是切点前增强,method属性指定通知方法(就是在切点前执行的方法), pointcut-ref指定切点(这里是xml文件配置的切点的id)--> <aop:before method="beforeAdvice" pointcut-ref="myPointcut"/> <aop:after method="afterAdvice" pointcut-ref="myPointcut"/> </aop:aspect> </aop:config> </beans> -
运行结果

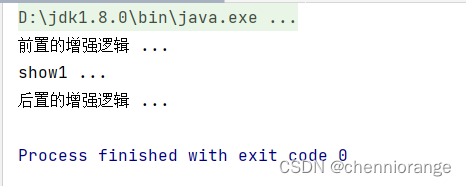
xml方式AOP配置详解
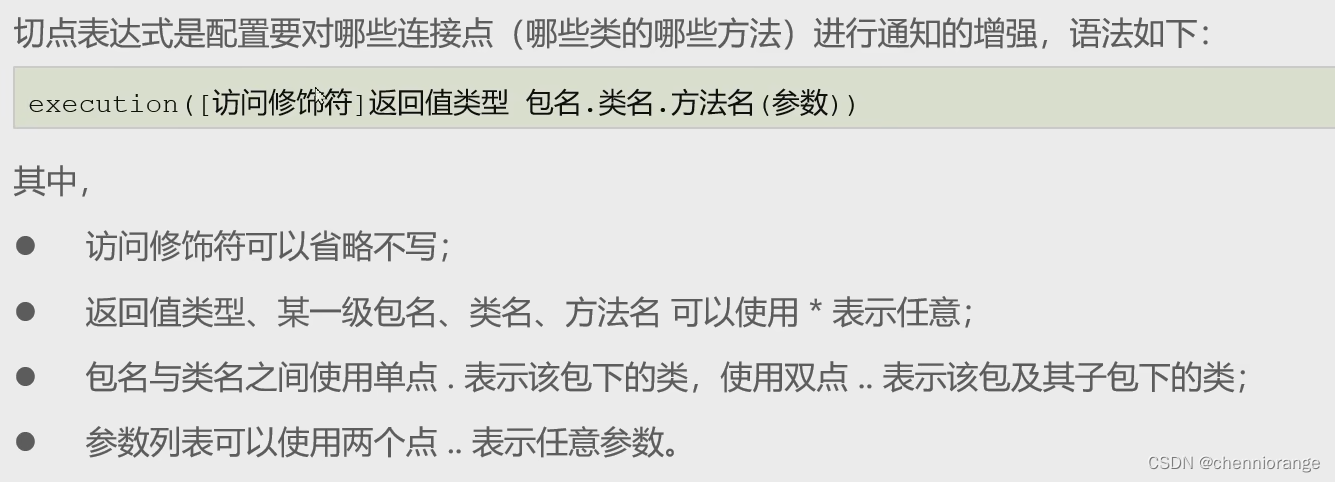
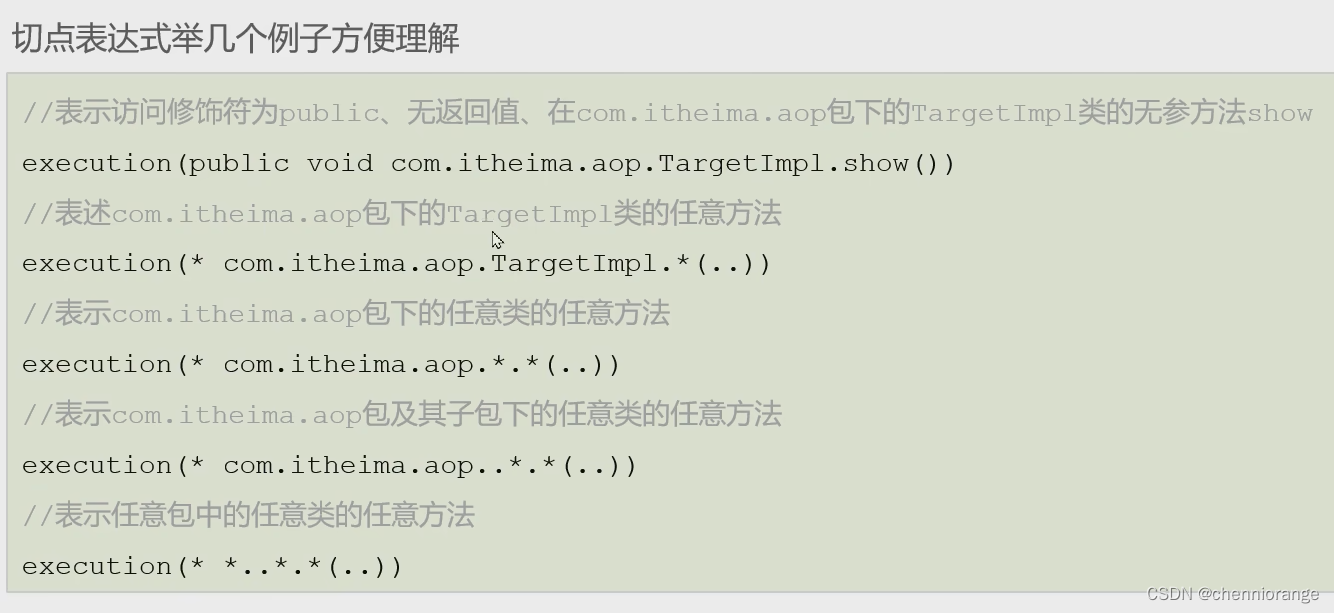
切点表达式的配置方式
<!--    aop配置-->
    <aop:config>
        <!--配置切点表达式,目的是指定要增强的方法,这里就标识指定类的show1方法增强-->
        <aop:pointcut id="myPointcut" expression="execution(void com.zj.service.impl.UserServiceImpl.show1())"/>
        <aop:pointcut id="myPointcut2" expression="execution(void com.zj.service.impl.UserServiceImpl.show2())"/>
        <!--配置织入,目的是指定哪些切点要与哪些通知进行结合-->
        <aop:aspect ref="myAdvice"> <!--ref属性指定通知类-->
            <!--aop:before就是切点前增强,method属性指定通知方法(就是在切点前执行的方法), pointcut-ref指定切点(这里是xml文件配置的切点的id)-->
            <aop:before method="beforeAdvice" pointcut-ref="myPointcut"/>
            <aop:after method="afterAdvice" pointcut-ref="myPointcut"/>
            <aop:before method="beforeAdvice" pointcut="execution(void com.zj.service.impl.UserServiceImpl.show2())"/>
        </aop:aspect>
    </aop:config>
通知的类型
AspectJ的五种通知类型
| 通知名称 | 配置方式 | 执行时机 |
|---|---|---|
| 前置通知 | <aop:before> | 目标方法执行之前执行 |
| 后置通知 | <aop:after-returing> | 目标方法执行之后执行,目标方法异常时,不再执行 |
| 环绕通知 | <aop:around> | 目标方法执行前后执行,目标方法异常时,环绕后方法不再执行 |
| 异常通知 | <aop:after-throwing> | 目标方法抛出异常时执行 |
| 最终通知 | <aop:after> | 不管目标方法是否有异常,最终都会执行 |
下面演示部分通知的配置:
SpringXml配置:
<!--    aop配置-->
    <aop:config>
        <!--配置切点表达式,目的是指定要增强的方法,这里就标识指定类的show1方法增强-->
        <aop:pointcut id="myPointcut" expression="execution(void com.zj.service.impl.UserServiceImpl.show1())"/>
        <aop:pointcut id="myPointcut2" expression="execution(void com.zj.service.impl.UserServiceImpl.show2())"/>
        <aop:pointcut id="myPointcut3" expression="execution(void com.zj.service.impl.UserServiceImpl.show3())"/>
        <!--配置织入,目的是指定哪些切点要与哪些通知进行结合-->
        <aop:aspect ref="myAdvice"> <!--ref属性指定通知类-->
            <!--aop:before就是切点前增强,method属性指定通知方法(就是在切点前执行的方法), pointcut-ref指定切点(这里是xml文件配置的切点的id)-->
            <aop:before method="beforeAdvice" pointcut-ref="myPointcut"/>
            <!--后置通知-->
            <aop:after-returning method="afterReturningAdvice" pointcut-ref="myPointcut"/>
            <!--环绕通知-->
            <aop:around method="aroundAdvice" pointcut-ref="myPointcut3"/>
        </aop:aspect>
    </aop:config>
UserServiceImpl:
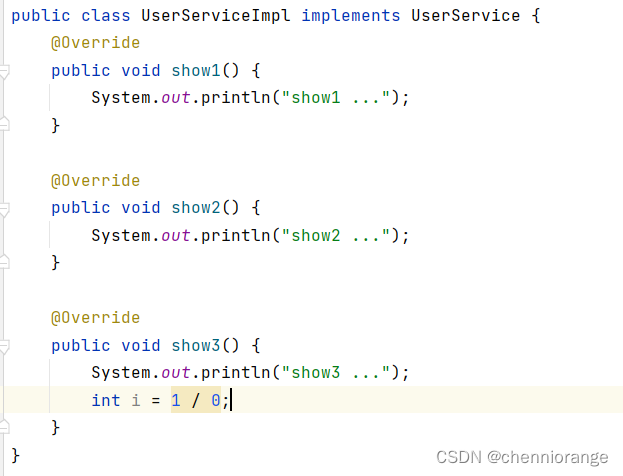
MyAdvice:
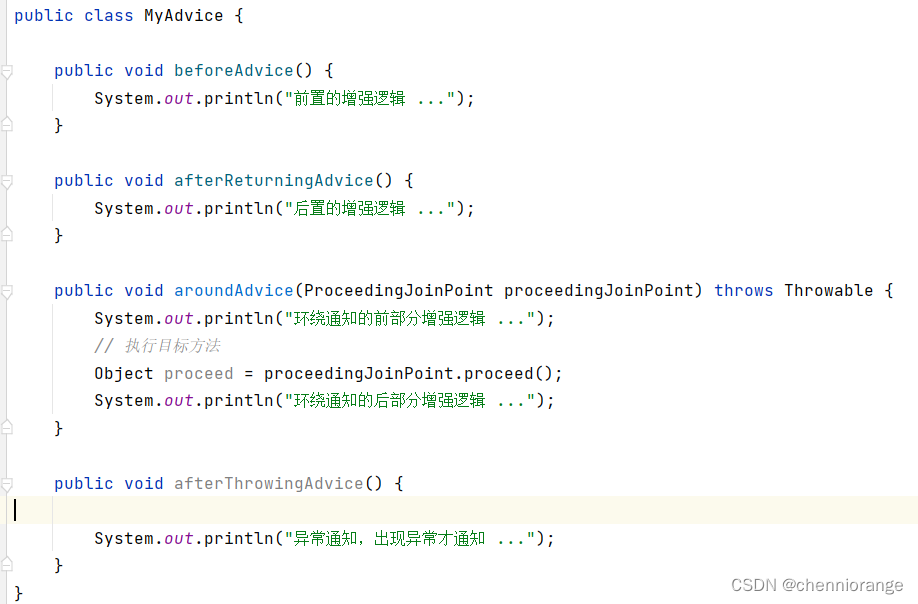

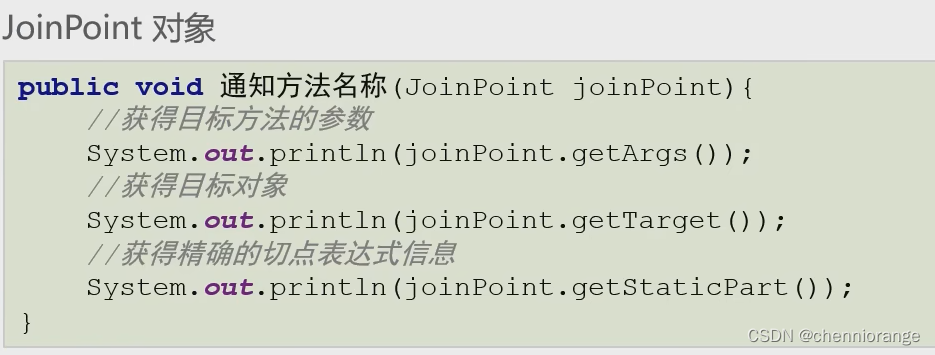
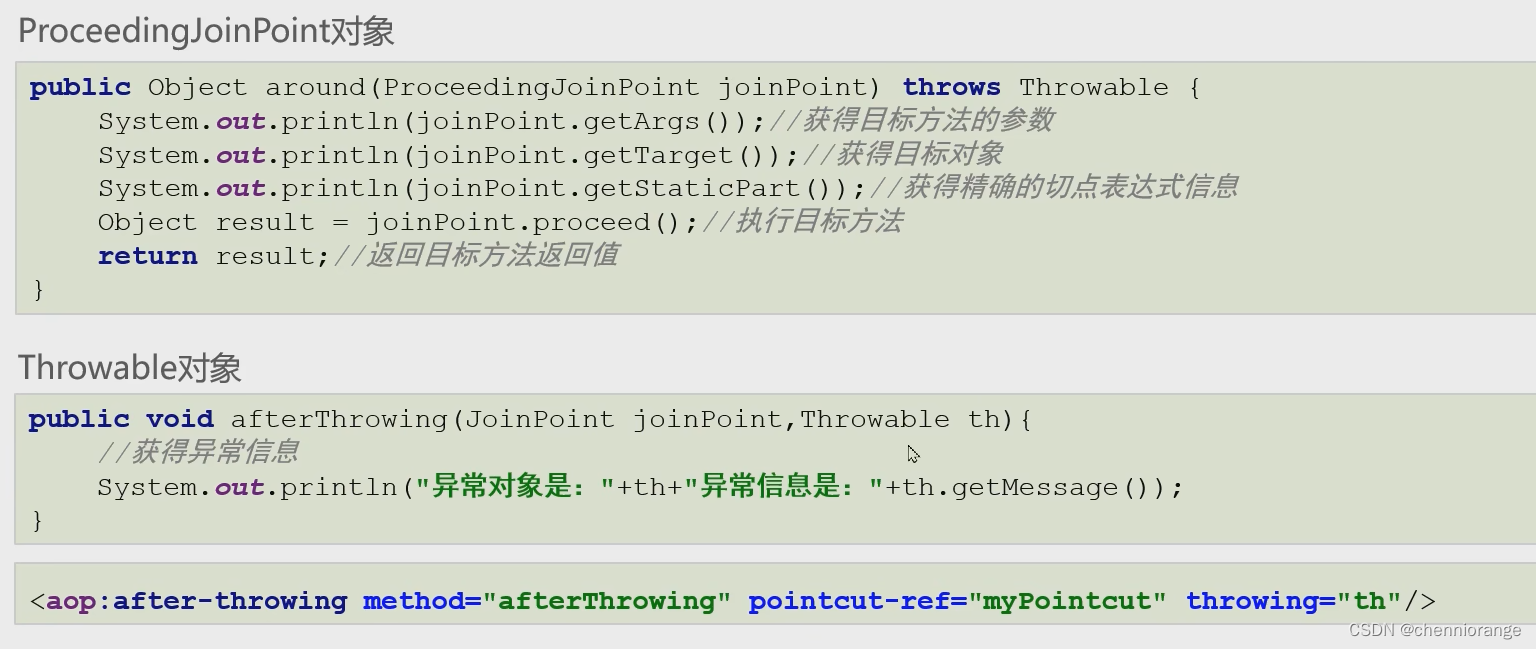
在上面的环绕通知中,我们通过ProceedingJoinPoint取得正在执行的切点方法,除此之外,还有其他的方法可以获取
| 参数类型 | 作用 |
|---|---|
| JoinPoint | 连接点对象,任何通知都可使用,可以获得当前目标对象、目标方法参数等信息 |
| ProceedingJoinPoint | JoinPoint子类对象,主要是在环绕通知中执行proceed(),进而执行目标方法 |
| Throwable | 异常对象,使用在异常通知中,需要在配置文件中指出异常对象名称 |
AOP的配置的两种方法
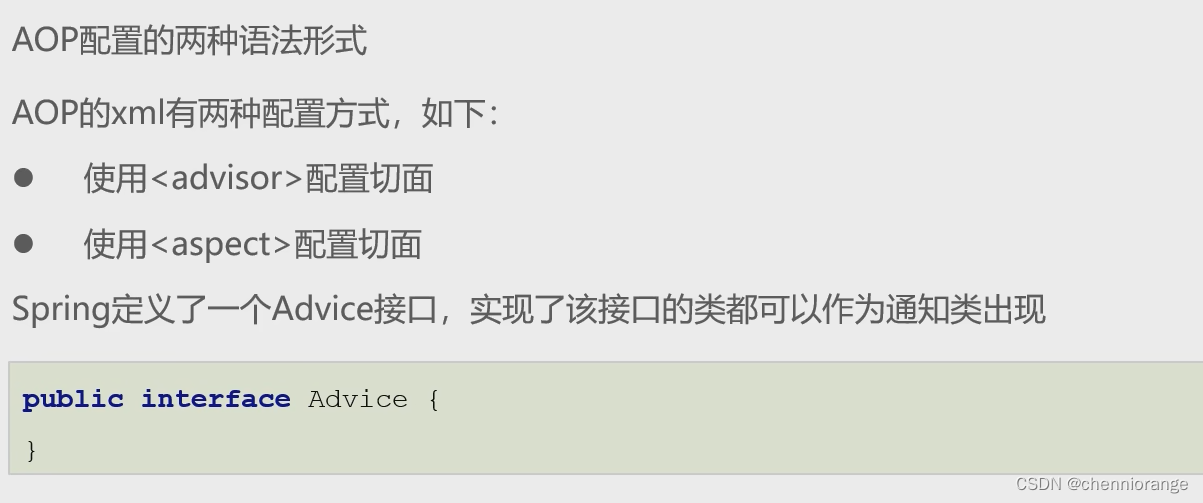
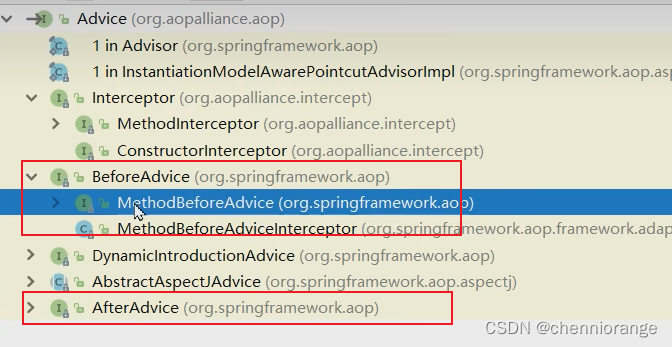
aspect配置切面就是上面介绍的方式,而advisor配置要求通知类实现对应接口
简单演示:
通知类:
public class MyAdvice2 implements MethodBeforeAdvice, AfterReturningAdvice {

    @Override
    public void afterReturning(Object o, Method method, Object[] objects, Object o1) throws Throwable {
        System.out.println("前置通知 ...");
    }

    @Override
    public void before(Method method, Object[] objects, Object o) throws Throwable {
        System.out.println("后置通知 ...");
    }
}
Spring配置
<?xml version="1.0" encoding="UTF-8"?>
<beans xmlns="http://www.springframework.org/schema/beans"
       xmlns:xsi="http://www.w3.org/2001/XMLSchema-instance"
       xmlns:aop="http://www.springframework.org/schema/aop"
       xsi:schemaLocation="
       http://www.springframework.org/schema/beans
       http://www.springframework.org/schema/beans/spring-beans.xsd
       http://www.springframework.org/schema/aop
       http://www.springframework.org/schema/aop/spring-aop.xsd
">

<!--    配置目标类-->
    <bean id="userService" class="com.zj.service.impl.UserServiceImpl"></bean>
<!--    配置通知类-->
    <bean id="myAdvice2" class="com.zj.advice.MyAdvice2"></bean>

<!--    aop配置-->
    <aop:config>
        <aop:pointcut id="myPointcut2" expression="execution(* com.zj.service.impl.UserServiceImpl.show2())"/>
        <aop:advisor advice-ref="myAdvice2" pointcut-ref="myPointcut2"/>
    </aop:config>
</beans>
运行:


环绕通知配置:
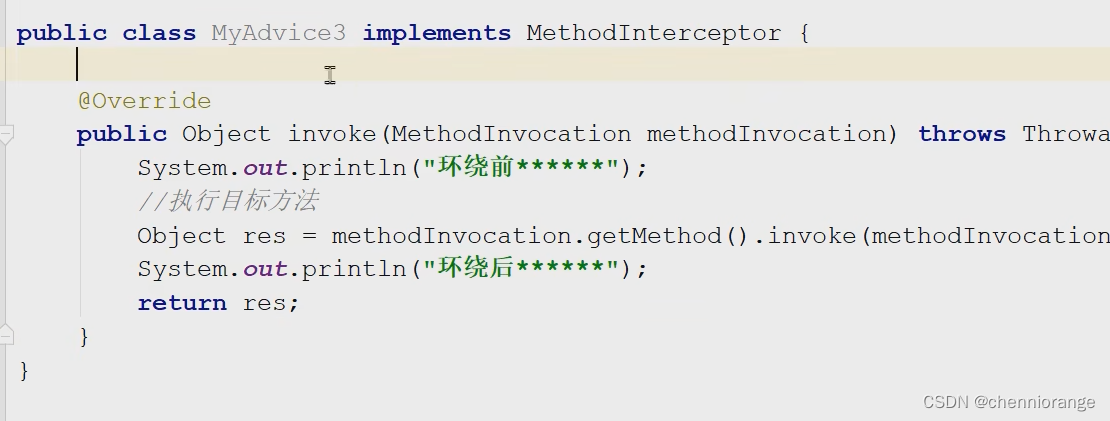
AOP配置的两种语法形式不同点
语法形式不同:
- advisor是通过实现接口来确认通知的类型
- aspect是通过配置确认通知的类型,更加灵活
可配置的切面数量不同:
- 一个advisor只能配置一个固定通知和一个切点表达式
- 一个aspect可以配置多个通知和多个切点表达式任意组合
使用场景不同:
- 允许随意搭配情况下可以使用aspect进行配置
- 如果通知类型单一、切面单一的情况下可以使用advisor进行配置
- 在通知类型已经固定,不用人为指定通知类型时(如第三方jar包,我们无法直接修改代码),可以使用advisor进行配置,例如Spring事务控制的配置
xml方式AOP原理剖析
通过xml方式配置AOP时,我们引入了AOP的命名空间,需要去spring-aop包下的META-INF找spring.handlers文件
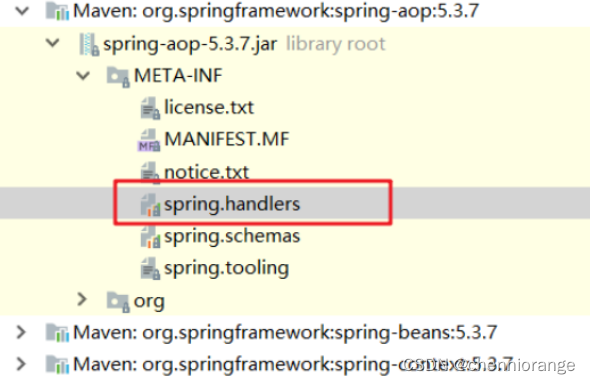
在文件内可以看到:
http\://www.springframework.org/schema/aop=org.springframework.aop.config.AopNamespaceHandler
即最终加载的是AopNamespaceHandler,该Handler的init方法中注册了config标签对应的解析器(ConfigBeanDefinitionPaser)

以ConfigBeanDefinitionPaser作为入口进行源码剖析,最终会注册一个AspectJAwareAdvisorAutoProxyCreator进入Spring容器中,下面是该类的继承体系图
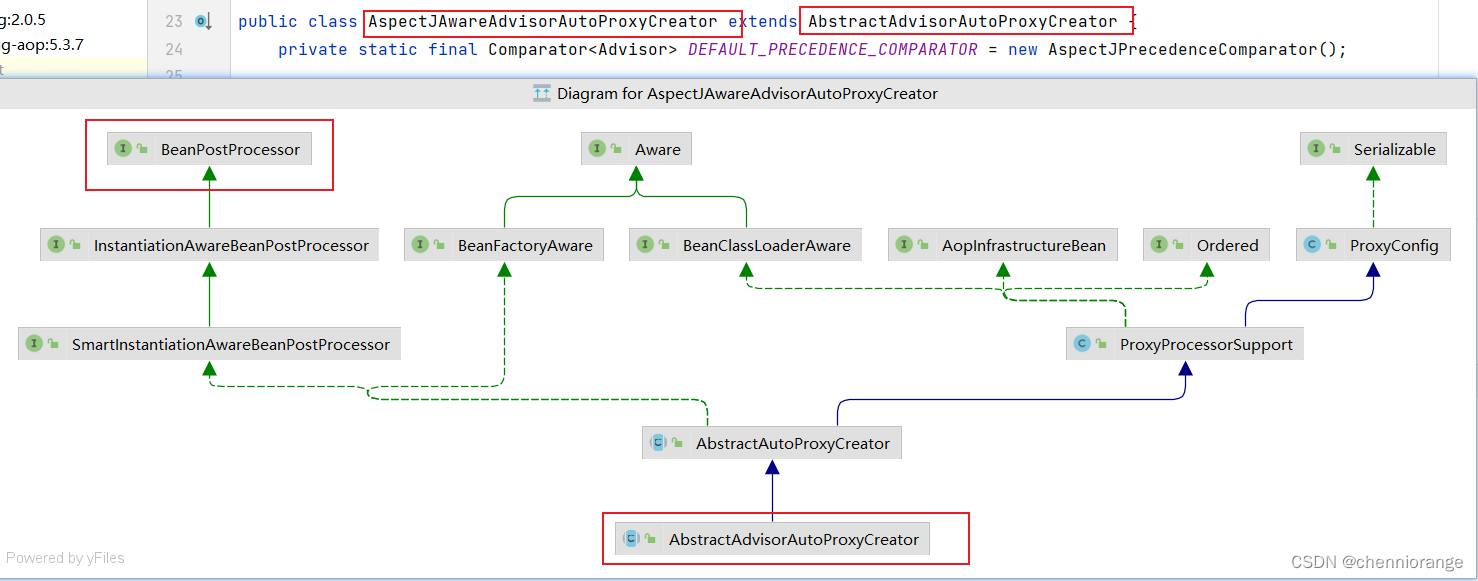
AspectJAwareAdvisorAutoProxyCreator 的上上级父类AbstractAutoProxyCreator中的 postProcessAfterInitialization方法

通过断点方式观察,当bean是匹配切点表达式时,this.wrapIfNecessary(bean, beanName, cacheKey)返回的是一个JDKDynamicAopProxy
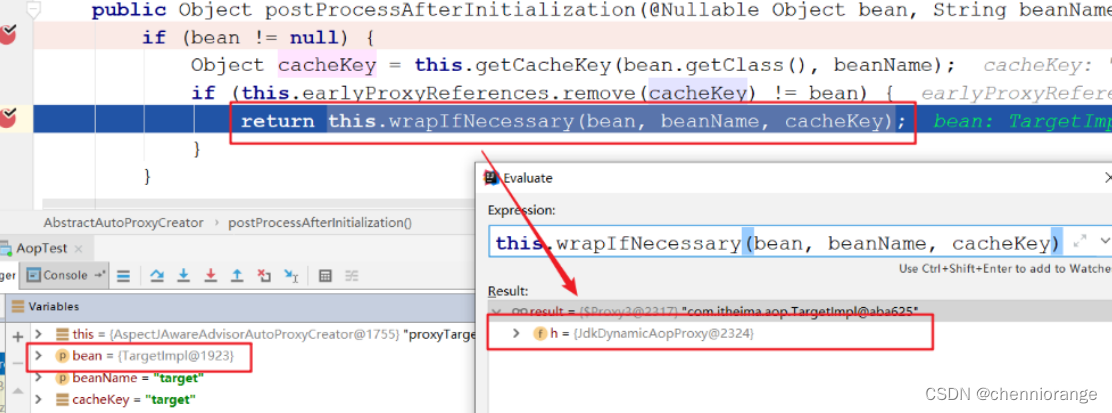
可以在深入一点,对wrapIfNecessary在剖析一下,看看是不是我们熟知的通过JDK的Proxy.newProxyInstance(ClassLoader loader, Class[] interfaces,InvocationHandler h) 的方式创建的代理对象呢?经过如下一系列源码跟踪

动态代理的实现的选择,在调用getProxy() 方法时,我们可选用的 AopProxy接口有两个实现类,如上图,这两种 都是动态生成代理对象的方式,一种就是基于JDK的,一种是基于Cglib的


JDK的动态代理代码,之前已经写过了,下面看一下Cglib基于超类的动态代理
Target target = new Target();//目标对象
Advices advices = new Advices();//通知对象
Enhancer enhancer = new Enhancer();//增强器对象
enhancer.setSuperclass(Target.class);//增强器设置父类
//增强器设置回调
enhancer.setCallback((MethodInterceptor )(o, method, objects, methodProxy) -> {
advices.before();
Object result = method.invoke(target, objects);
advices.afterReturning();
return result;
});

//创建代理对象
Target targetProxy = (Target) enhancer.create();

//测试
String result = targetProxy.show("haohao");
基于注解配置的AOP
注解方式AOP基本使用
Spring的AOP也提供了注解方式配置,使用相应的注解替代之前的xml配置,xml配置AOP时,我们主要配置了三 部分:目标类被Spring容器管理、通知类被Spring管理、通知与切点的织入(切面),如下:

通知类:
配置aop,其实配置aop主要就是配置通知类中的哪个方法(通知类型)对应的切点表达式是什么

目标类:
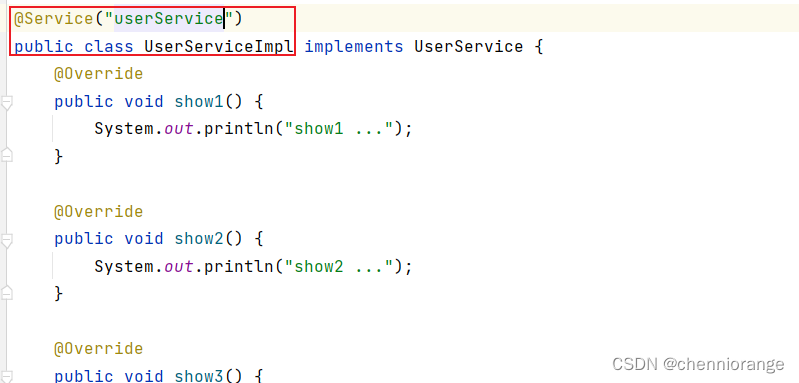
Spring配置文件:
注解@Aspect、@Around需要被Spring解析,所以在Spring核心配置文件中需要配置aspectj的自动代理
<?xml version="1.0" encoding="UTF-8"?>
<beans xmlns="http://www.springframework.org/schema/beans"
       xmlns:xsi="http://www.w3.org/2001/XMLSchema-instance"
       xmlns:aop="http://www.springframework.org/schema/aop"
       xmlns:context="http://www.springframework.org/schema/context"
       xsi:schemaLocation="
       http://www.springframework.org/schema/beans
       http://www.springframework.org/schema/beans/spring-beans.xsd
       http://www.springframework.org/schema/aop
       http://www.springframework.org/schema/aop/spring-aop.xsd
       http://www.springframework.org/schema/context
       http://www.springframework.org/schema/context/spring-context.xsd
">

    <!--组件扫描-->
    <context:component-scan base-package="com.zj"/>

    <!--使用注释配置AOP,需要开启AOP自动代理-->
    <aop:aspectj-autoproxy/>

</beans>
如果核心配置使用的是配置类的话,需要配置注解方式的aop自动代理
@Configuration
@ComponentScan("com.itheima.aop")
@EnableAspectJAutoProxy //第三步

public class ApplicationContextConfig {
}
运行:
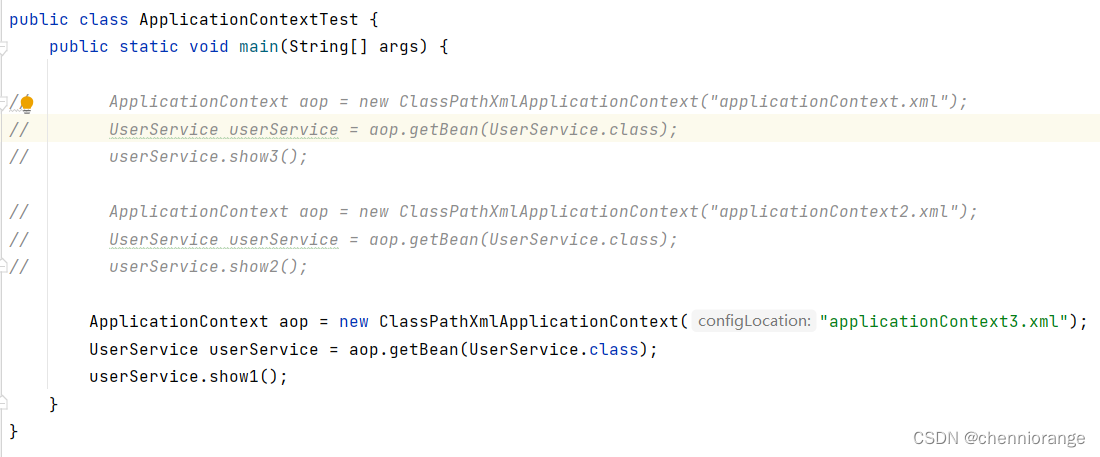
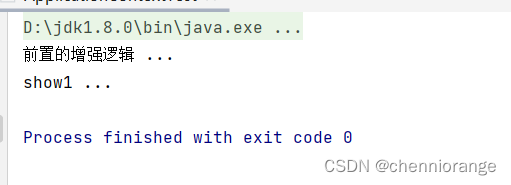
注解方式AOP配置详解
各种注解方式通知类型
/前置通知
@Before("execution(* com.itheima.aop.*.*(..))")
public void before(JoinPoint joinPoint){}

//后置通知
@AfterReturning("execution(* com.itheima.aop.*.*(..))")
public void AfterReturning(JoinPoint joinPoint){}

//环绕通知
@Around("execution(* com.itheima.aop.*.*(..))")
public void around(ProceedingJoinPoint joinPoint) throws Throwable {}

//异常通知
@AfterThrowing(pointcut = "execution(* com.itheima.aop.*.*(..))", throwing = "e")
public void AfterThrowing(JoinPoint joinPoint){}

//最终通知
@After("execution(* com.itheima.aop.*.*(..))")
public void After(JoinPoint joinPoint){}
切点表达式的抽取
使用一个空方法,将切点表达式标注在空方法上,其他通知方法引用即可
@Component
@Aspect
public class AnnoAdvice {

//切点表达式抽取
@Pointcut("execution(* com.itheima.aop.*.*(..))")
public void pointcut(){}

//前置通知
@Before("pointcut()")
public void before(JoinPoint joinPoint){}

//后置通知
@AfterReturning("AnnoAdvice.pointcut()")
public void AfterReturning(JoinPoint joinPoint){}

// ... 省略其他代码 ...
}
全注解开发AOP
将Spring配置文件替换为配置类
import org.springframework.context.annotation.ComponentScan;
import org.springframework.context.annotation.Configuration;
import org.springframework.context.annotation.EnableAspectJAutoProxy;

@Configuration
@ComponentScan("com.zj") // <context:component-scan base-package="com.zj"/>
@EnableAspectJAutoProxy // <aop:aspectj-autoproxy/>
public class SpringConfig {
}
运行:
public class ApplicationContextTest {
    public static void main(String[] args) {
        ApplicationContext app = new AnnotationConfigApplicationContext(SpringConfig.class);
        UserService userService = app.getBean(UserService.class);
        userService.show1();
    }
}
基于AOP的声明式事务控制
Spring事务编程概述
事务是开发中必不可少的东西,使用JDBC开发时,我们使用connnection对事务进行控制,使用MyBatis时,我们使用SqlSession对事务进行控制,缺点显而易见,当我们切换数据库访问技术时,事务控制的方式总会变化, Spring就将这些技术基础上,提供了统一的控制事务的接口。Spring的事务分为:编程式事务控制和声明式事务控制
| 事务控制方式 | 解释 |
|---|---|
| 编程式事务控制 | Spring提供了事务控制的类和方法,使用编码的方式对业务代码进行事务控制,事务控制代码和业务操作代码耦合到了一起,开发中不使用 |
| 声明式事务控制 | Spring将事务控制的代码封装,对外提供了Xml和注解配置方式,通过配置的方式完成事务的控制,可以达到事务控制与业务操作代码解耦合,开发中推荐使用 |
Spring事务编程相关的类主要有如下三个
| 事务控制相关类 | 解释 |
|---|---|
| 平台事务管理器 PlatformTransactionManager | 是一个接口标准,实现类都具备事务提交、回滚和获得事务对象的功能,不同持 久层框架可能会有不同实现方案 |
| 事务定义 TransactionDefinition | 封装事务的隔离级别、传播行为、过期时间等属性信息 |
| 事务状态 TransactionStatus | 存储当前事务的状态信息,如果事务是否提交、是否回滚、是否有回滚点等 |
搭建测试环境
搭建一个转账的环境,dao层一个转出钱的方法,一个转入钱的方法,service层一个转账业务方法,内部分别调 用dao层转出钱和转入钱的方法,准备工作如下:
- 数据库准备一个账户表tb_account;
- dao层准备一个AccountMapper,包括incrMoney和decrMoney两个方法;
- service层准备一个transferMoney方法,分别调用incrMoney和decrMoney方法;
- 在applicationContext文件中进行Bean的管理配置;
- 测试正常转账与异常转账。
1、项目目录:
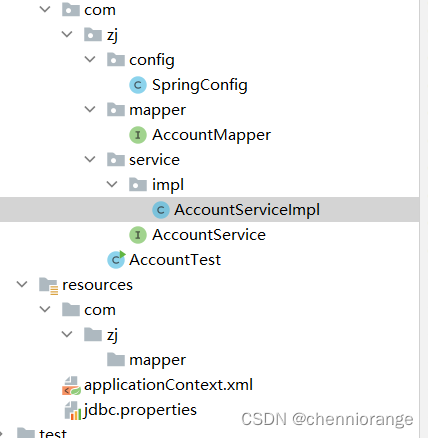
2、项目依赖环境:
<dependencies>
        <dependency>
            <groupId>org.springframework</groupId>
            <artifactId>spring-context</artifactId>
            <version>5.3.7</version>
        </dependency>
        <dependency>
            <groupId>com.alibaba</groupId>
            <artifactId>druid</artifactId>
            <version>1.1.23</version>
        </dependency>
        <dependency>
            <groupId>mysql</groupId>
            <artifactId>mysql-connector-java</artifactId>
            <version>5.1.49</version>
        </dependency>
        <dependency>
            <groupId>org.mybatis</groupId>
            <artifactId>mybatis</artifactId>
            <version>3.5.5</version>
        </dependency>
        <dependency>
            <groupId>org.springframework</groupId>
            <artifactId>spring-jdbc</artifactId>
            <version>5.2.13.RELEASE</version>
        </dependency>
        <dependency>
            <groupId>org.mybatis</groupId>
            <artifactId>mybatis-spring</artifactId>
            <version>2.0.5</version>
        </dependency>
        <dependency>
            <groupId>javax.servlet</groupId>
            <artifactId>javax.servlet-api</artifactId>
            <version>4.0.1</version>
        </dependency>
        <dependency>
            <groupId>org.aspectj</groupId>
            <artifactId>aspectjweaver</artifactId>
            <version>1.9.6</version>
        </dependency>

    </dependencies>
3、数据源配置(jdbc.properties):
jdbc.driver=com.mysql.jdbc.Driver
jdbc.url=jdbc:mysql://localhost:3306/jdbctext
jdbc.username=
jdbc.password=
4、mapper:
public interface AccountMapper {

    @Update("update tb_account set money=money+#{money} where account_name=#{accountName}")
    public void incrMoney(@Param("accountName") String accountName, @Param("money") Integer money);

    @Update("update tb_account set money=money-#{money} where account_name=#{accountName}")
    public void decrMoney(@Param("accountName") String accountName, @Param("money") Integer money);
}
5、service实现类:
@Service("accountService")
public class AccountServiceImpl implements AccountService {

    @Autowired
    private AccountMapper accountMapper;

    @Override
    public void transferMoney(String outAccount, String inAccount, Integer money) {
        accountMapper.decrMoney(outAccount, money);
        accountMapper.incrMoney(inAccount, money);
    }
}
6、Spring配置文件:
<?xml version="1.0" encoding="UTF-8"?>
<beans xmlns="http://www.springframework.org/schema/beans"
       xmlns:xsi="http://www.w3.org/2001/XMLSchema-instance"
       xmlns:context="http://www.springframework.org/schema/context"
       xmlns:aop="http://www.springframework.org/schema/aop"
       xmlns:tx="http://www.springframework.org/schema/tx"
       xsi:schemaLocation="
       http://www.springframework.org/schema/beans
       http://www.springframework.org/schema/beans/spring-beans.xsd
       http://www.springframework.org/schema/context
       http://www.springframework.org/schema/context/spring-context.xsd
       http://www.springframework.org/schema/aop
       http://www.springframework.org/schema/aop/spring-aop.xsd
       http://www.springframework.org/schema/tx
       http://www.springframework.org/schema/tx/spring-tx.xsd
       ">

    <!--组件扫描-->
    <context:component-scan base-package="com.zj"/>

    <!--加载properties文件-->
    <context:property-placeholder location="classpath:jdbc.properties"/>

    <!--配置数据源信息-->
    <bean id="dataSource" class="com.alibaba.druid.pool.DruidDataSource">
        <property name="driverClassName" value="${jdbc.driver}"></property>
        <property name="url" value="${jdbc.url}"></property>
        <property name="username" value="${jdbc.username}"></property>
        <property name="password" value="${jdbc.password}"></property>
    </bean>

    <!--配置SqlSessionFactoryBean,作用将SqlSessionFactory存储到Spring容器-->
    <bean class="org.mybatis.spring.SqlSessionFactoryBean">
        <property name="dataSource" ref="dataSource"></property>
    </bean>

    <!--MapperScannerConfigurer,作用扫描指定的包,产生Mapper对象存储到Spring容器-->
    <bean class="org.mybatis.spring.mapper.MapperScannerConfigurer">
        <property name="basePackage" value="com.zj.mapper"></property>
    </bean>

</beans>
7、测试:

基于xml声明式事务控制
很容易就可以想到,可以使用AOP对Service的方法进行事务的增强。
- 目标类:AccountServiceImpl
- 切点:service业务类中的所有业务方法
- 通知类:Spring提供的,通知方法已经定义好,只需要配置即可
我们分析:
- 通知类是Spring提供的,需要导入Spring事务的相关的坐标;
- 配置目标类AccountServiceImpl;
- 使用advisor标签配置切面。
1、导入Spring事务的相关的坐标
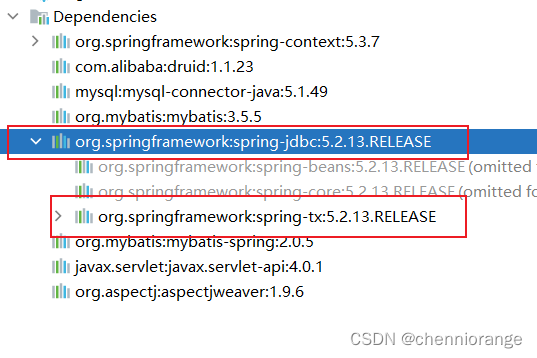
spring-jdbc坐标已经引入的spring-tx坐标
2、配置目标类AccountServiceImpl
因为上面我们是用@Service、@Autowired对AccountServiceImpl实现了控制反转和依赖注入了,而且Spring配置文件中**<context:component-scan base-package=“com.zj”/>**已经扫描过了,这里就不配置了。
3、使用advisor标签配置切面
这里使用advisor而不是aspect,因为通知类不在我们自己手上,Spring都已经规定好通知了。
<!--事务增强的aop-->
    <aop:config>
        <!--配置切点表达式-->
        <aop:pointcut id="txPointcut" expression="execution(* com.zj.service.impl.*.*(..))"/>
        <!--配置织入关系,这里的advice-ref用Spring提供的-->
        <aop:advisor advice-ref="txAdvice" pointcut-ref="txPointcut"/>
    </aop:config>
4、引入tx命名空间:
因为要配置Spring提供的通知,所以得在Spring配置文件中引入tx命名空间

5、配置Spring提供的通知
-
这里的平台事务管理器,不同的orm框架是不同的,如mybatis底层用的就是jdbc的DataSourceTransactionManager
例如,MyBatis作为持久层框架时,使用的平台事务管理器实现是DataSourceTransactionManager。 Hibernate作为持久层框架时,使用的平台事务管理器是HibernateTransactionManager。
-
tx:advice配置通知,transcation-manager属性要求配置平台事务管理器
<!--配置平台事务管理器-->
    <bean id="transactionManager" class="org.springframework.jdbc.datasource.DataSourceTransactionManager">
        <property name="dataSource" ref="dataSource"/>
    </bean>

    <!--配置Spring提供的Advice-->
    <tx:advice id="txAdvice" transaction-manager="transactionManager">
        <tx:attributes>
            <tx:method name="*"/>
        </tx:attributes>
    </tx:advice>
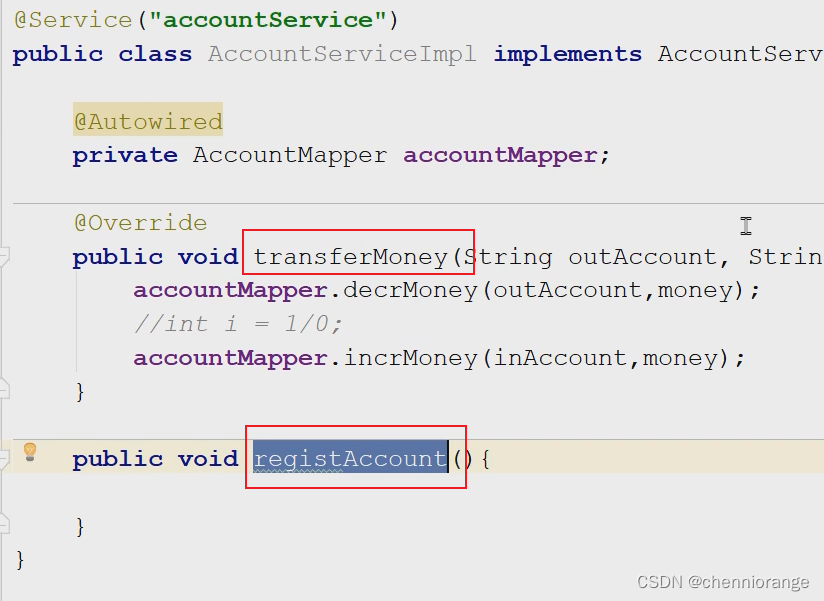
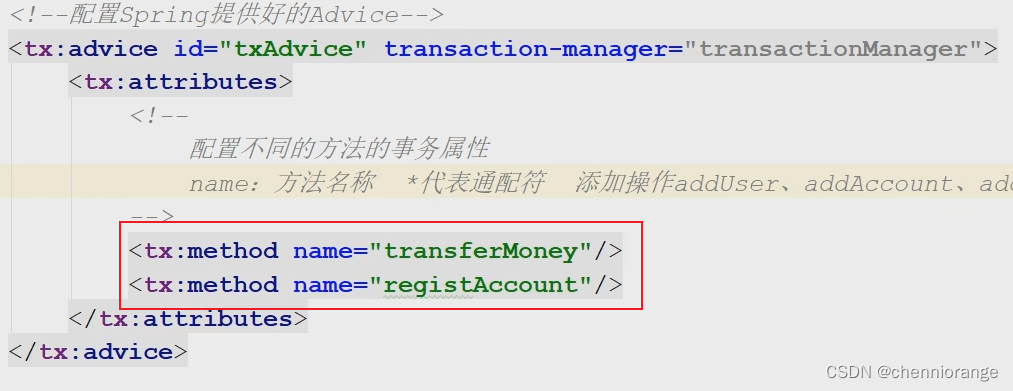
tx:method的name属性其实就是切点的方法,这样配置就是为了给具体的方法提供具体的隔离级别,如果不配置isolation属性,就是默认的隔离级别

6、测试
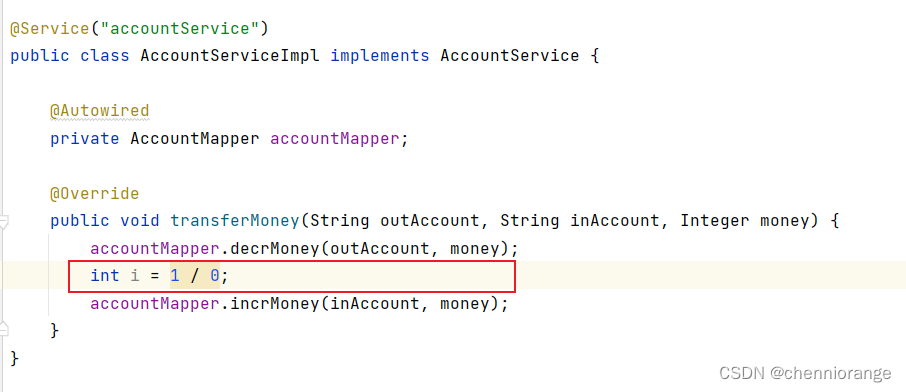
手动插入异常
重启测试检查数据库可以看到account未改变
tx:attributes详解
事务定义信息配置,每个事务有很多特性,例如:隔离级别、只读状态、超时时间等,这些信息在开发时 可以通过connection进行指定,而此处要通过配置文件进行配置
<tx:attributes>
<tx:method name="方法名称"
           isolation="隔离级别"
           propagation="传播行为"
           read-only="只读状态"
           timeout="超时时间"/>
</tx:attributes>
name属性:
名称,指定哪个方法要进行哪些事务的属性配置,此处需要区分的是切点表达式指定的方法与此处指定的方法的区别?切点表达式,是过滤哪些方法可以进行事务增强;事务属性信息的name,是指定哪个方法要进行哪些事务属性的配置
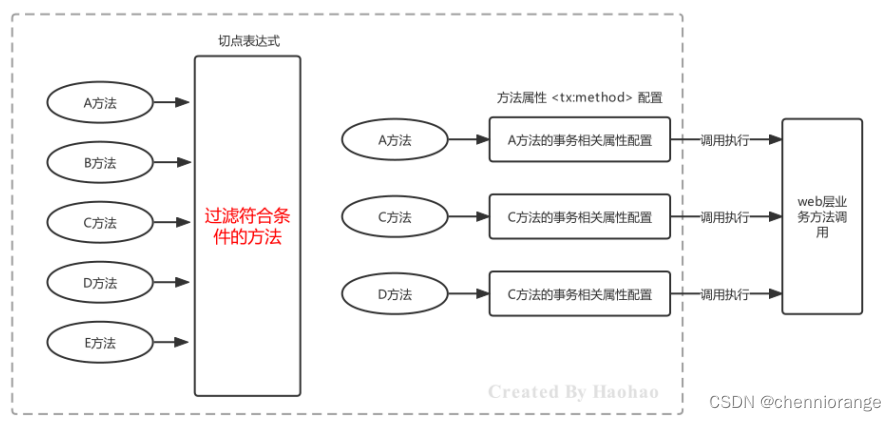
方法名在配置时,也可以使用 * 进行模糊匹配,例如:
<tx:advice id="myAdvice" transaction-manager="transactionManager">
<tx:attributes>
    <!--精确匹配transferMoney方法-->
    <tx:method name="transferMoney"/>
    <!--模糊匹配以Service结尾的方法-->
    <tx:method name="*Service"/>
    <!--模糊匹配以insert开头的方法-->
    <tx:method name="insert*"/>
    <!--模糊匹配以update开头的方法-->
    <tx:method name="update*"/>
    <!--模糊匹配任意方法,一般放到最后作为保底匹配-->
    <tx:method name="*"/>
    </tx:attributes>
</tx:advice>
isolation属性:
指定事务的隔离级别,事务并发存在三大问题:脏读、不可重复读、幻读/虚读。可以通过设置事 务的隔离级别来保证并发问题的出现,常用的是READ_COMMITTED 和 REPEATABLE_READ
| isolation属性 | 解释 |
|---|---|
| DEFAULT | 默认隔离级别,取决于当前数据库隔离级别,例如MySQL默认隔离级别是REPEATABLE_READ |
| READ_UNCOMMITTED | A事务可以读取到B事务尚未提交的事务记录,不能解决任何并发问题,安全性最低,性能最高 |
| READ_COMMITTED | A事务只能读取到其他事务已经提交的记录,不能读取到未提交的记录。可以解决脏读问题,但是不能解决不可重复读和幻读 |
| REPEATABLE_READ | A事务多次从数据库读取某条记录结果一致,可以解决不可重复读,不可以解决幻读 |
| SERIALIZABLE | 串行化,可以解决任何并发问题,安全性最高,但是性能最低 |
read-only属性:
设置当前的只读状态,如果是查询则设置为true,可以提高查询性能,如果是更新(增删改)操作则设置为false
<!-- 一般查询相关的业务操作都会设置为只读模式 -->
<tx:method name="select*" read-only="true"/>
<tx:method name="find*" read-only="true"/>
timeout属性:
设置事务执行的超时时间,单位是秒,如果超过该时间限制但事务还没有完成,则自动回滚事务 ,不在继续执行。默认值是-1,即没有超时时间限制
<!-- 设置查询操作的超时时间是3秒 -->
<tx:method name="select*" read-only="true" timeout="3"/>
propagation属性:
设置事务的传播行为,主要解决是A方法调用B方法时,事务的传播方式问题的,例如:使用 单方的事务,还是A和B都使用自己的事务等。事务的传播行为有如下七种属性值可配置
| 事务传播行为 | 解释 |
|---|---|
| REQUIRED(默认值) | A调用B,B需要事务,如果A有事务B就加入A的事务中,如果A没有事务,B就自己创建一个事务 |
| REQUIRED_NEW | A调用B,B需要新事务,如果A有事务就挂起,B自己创建一个新的事务 |
| SUPPORTS | A调用B,B有无事务无所谓,A有事务就加入到A事务中,A无事务B就以非事务方式执行 |
| NOT_SUPPORTS | A调用B,B以无事务方式执行,A如有事务则挂起 |
| NEVER | A调用B,B以无事务方式执行,A如有事务则抛出异常 |
| MANDATORY | A调用B,B要加入A的事务中,如果A无事务就抛出异常 |
| NESTED | A调用B,B创建一个新事务,A有事务就作为嵌套事务存在,A没事务就以创建的新事务执行 |
基于注解声明式事务控制
@Transactional注解,属性同ts:attributes下一样,可以声明在类处,也可以声明在方法处,遵循就近原则。
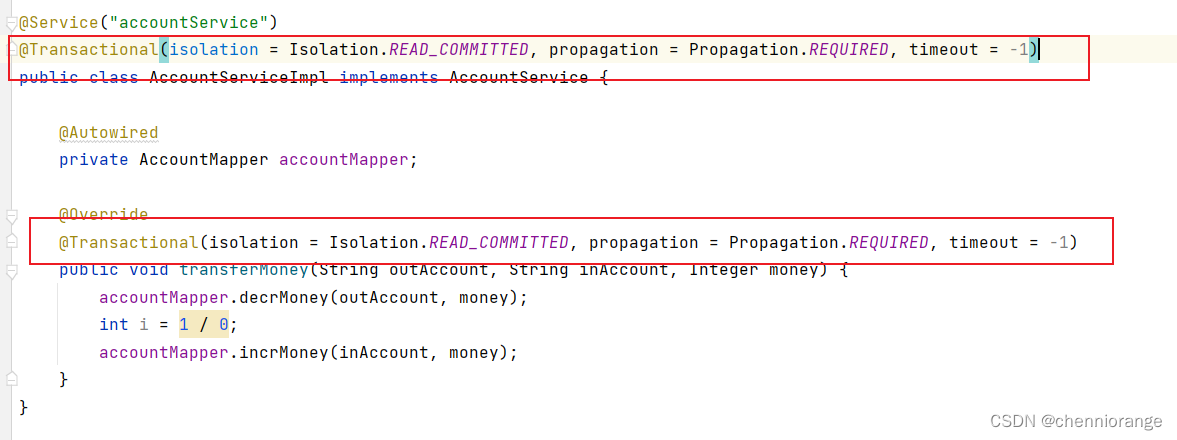
然后Spring配置文件

然后就完成半注解的配置了。
全注解:
定义Spring配置类
import com.alibaba.druid.pool.DruidDataSource;
import org.mybatis.spring.SqlSessionFactoryBean;
import org.mybatis.spring.annotation.MapperScan;
import org.springframework.beans.factory.annotation.Value;
import org.springframework.context.annotation.Bean;
import org.springframework.context.annotation.ComponentScan;
import org.springframework.context.annotation.Configuration;
import org.springframework.context.annotation.PropertySource;
import org.springframework.jdbc.datasource.DataSourceTransactionManager;
import org.springframework.transaction.annotation.EnableTransactionManagement;

import javax.sql.DataSource;

@Configuration
@ComponentScan("com.zj") // <context:component-scan base-package="com.zj"/>
@PropertySource("classpath:jdbc.properties")  // <context:property-placeholder location="classpath:jdbc.properties"/>
@MapperScan("com.zj.mapper") // MapperScannerConfigurer,作用扫描指定的包,产生Mapper对象存储到Spring容器
@EnableTransactionManagement // <tx:annotation-driven transaction-manager="transactionManager"/>
public class SpringConfig {

    @Bean("dataSource")
    public DataSource dataSource(
            @Value("${jdbc.driver}") String driver,
            @Value("${jdbc.url}") String url,
            @Value("${jdbc.username}") String username,
            @Value("${jdbc.password}") String password
    ) {
        DruidDataSource dataSource = new DruidDataSource();
        dataSource.setDriverClassName(driver);
        dataSource.setUrl(url);
        dataSource.setUsername(username);
        dataSource.setPassword(password);

        return dataSource;
    }

    @Bean
    public SqlSessionFactoryBean sqlSessionFactoryBean(DataSource dataSource) {
        SqlSessionFactoryBean sqlSessionFactoryBean = new SqlSessionFactoryBean();
        sqlSessionFactoryBean.setDataSource(dataSource);
        return sqlSessionFactoryBean;
    }

    @Bean("transactionManager")
    public DataSourceTransactionManager dataSourceTransactionManager(DataSource dataSource) {
        DataSourceTransactionManager dataSourceTransactionManager = new DataSourceTransactionManager();
        dataSourceTransactionManager.setDataSource(dataSource);
        return dataSourceTransactionManager;
    }

}
测试:


 5万+
5万+


 被折叠的 条评论
为什么被折叠?


