


一:Redis 主从复制
1.Redis 复制特性
使用异步复制。
一个主服务器可以有多个从服务器。
从服务器也可以有自己的从服务器。
复制功能不会阻塞主服务器。
可以通过复制功能来让主服务器免于执行持久化操作,由从服务器去执行持久化
操作即可。
关闭主服务器持久化时,复制功能的数据是安全的
当配置Redis复制功能时,强烈建议打开主服务器的持久化功能。 否则的话,
由于延迟等问题应该要避免部署的服务自动拉起。
2.Redis 主从复制原理
redis 主从同步有两种方式(或者所两个阶段):全同步和部分同步。
主从刚刚连接的时候,进行全同步;全同步结束后,进行部分同步。当然,如果
有需要,slave 在任何时候都可以发起全同步。
redis 策略是,无论如何,首先会尝试进行部分同步,如不成功,要求从机进行
全同步,并启动 BGSAVE……BGSAVE 结束后,传输 RDB 文件;如果成功,允许从
机进行部分同步,并传输积压空间中的数据。
主从同步的机制:
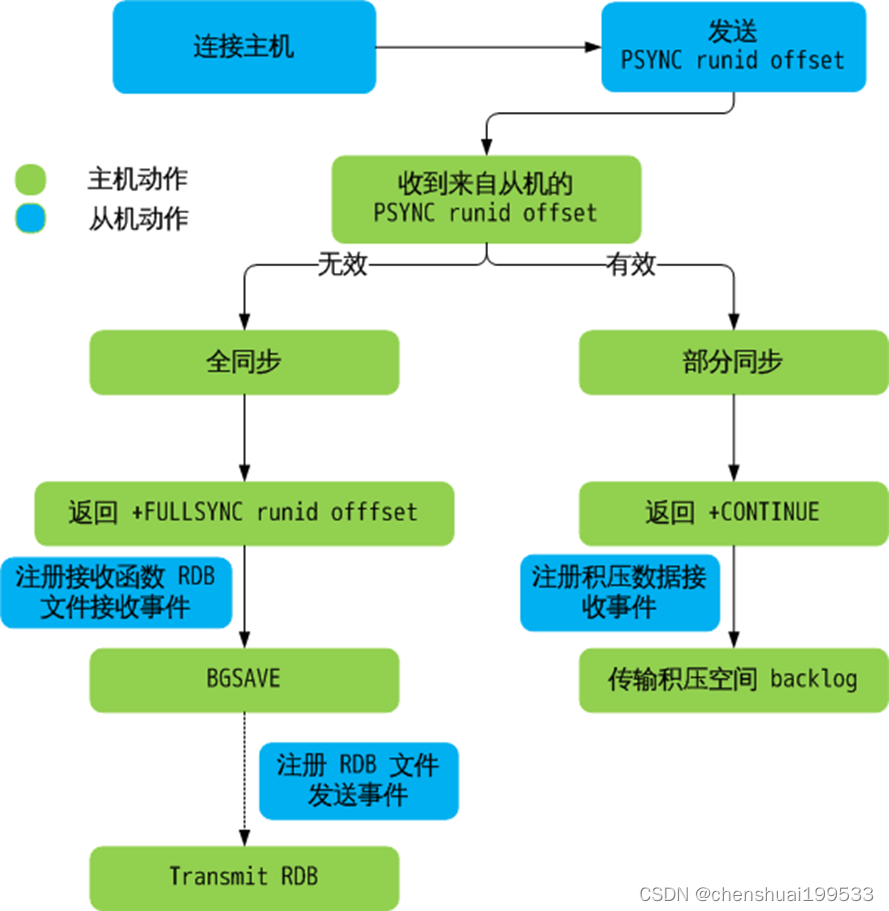
从服务器向主服务器发送 SYNC 命令。
接到 SYNC 命令的主服务器会调用BGSAVE 命令,创建一个 RDB 文件,并使用
缓冲区记录接下来执行的所有写命令。
当主服务器执行完 BGSAVE 命令时,它会向从服务器发送 RDB 文件,而从服务器
则会接收并载入这个文件。
主服务器将缓冲区储存的所有写命令发送给从服务器执行。
3.Redis 命令的传播
在主从服务器完成同步之后,主服务器每执行一个写命令,它都会将被执行的
写命令发送给从服务器执行,这个操作被称为“命令传播”

命令传播是一个持续的过程:只要复制仍在继续,命令传播就会一直进行,使得
主从服务器的状态可以一直保持一致
4.Redis 复制的一致性问题
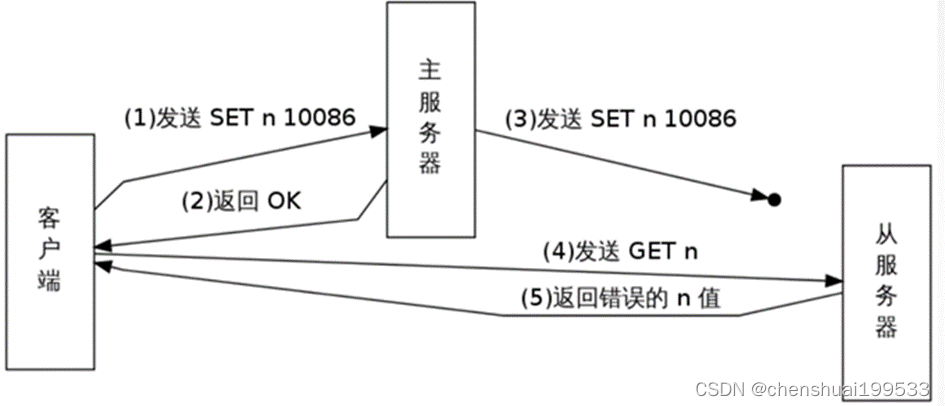
在读写分离环境下,客户端向主服务器发送写命令 SET n 10086,主服务器在
执行这个写命令之后,向客户端返回回复,并将这个写命令传播给从服务器。
接到回复的客户端继续向从服务器发送读命令 GET n ,并且因为网络状态的
原因,客户端的 GET命令比主服务器传播的SET 命令更快到达了从服务器。
因为从服务器键 n 的值还未被更新,所以客户端在从服务器读取到的将是一个
错误(过期)的 n值。
5.Redis 复制安全性提升
主服务器只在有至少 N 个从服务器的情况下,才执行写操作从 Redis 2.8 开始,
 为了保证数据的安全性, 可以通过配置, 让主服务器只在有至少 N 个当前已
 连接从服务器的情况下, 才执行写命令。
不过, 因为 Redis 使用异步复制, 所以主服务器发送的写数据并不一定会被
从服务器接收到, 因此, 数据丢失的可能性仍然是存在的。
通过以下两个参数保证数据的安全:
min-slaves-to-write <number of slaves>
min-slaves-max-lag <number of seconds>
解释:
要求至少有1个slave,数据复制和同步的延迟不能超过10秒,如果说一旦所有的
slave,数据复制和同步的延迟都超过了10秒钟,那么这个时候,master就不会
再接收任何请求了
减少异步复制的数据丢失
有了min-slaves-max-lag这个配置,就可以确保说,一旦slave复制数据和ack
延时太长,就认为可能master宕机后损失的数据太多了,那么就拒绝写请求,
这样可以把master宕机时由于部分数据未同步到slave导致的数据丢失降低的
可控范围内
减少脑裂的数据丢失
如果一个master出现了脑裂,跟其他slave丢了连接,那么上面两个配置可以
确保说,如果不能继续给指定数量的slave发送数据,而且slave超过10秒没有
给自己ack消息,那么就直接拒绝客户端的写请求,这样脑裂后的旧master就
不会接受client的新数据,也就避免了数据丢失
上面的配置就确保了,如果跟任何一个slave丢了连接,在10秒后发现没有
slave给自己ack,那么就拒绝新的写请求。因此在脑裂场景下,最多就丢失
10秒的数据
6.Redis 主从复制实践
二.环境说明
三台服务器,一台master,两台slave
2.安装(三台都安装)
[root@redis-master ~]#yum -y install http://rpms.famillecollet.com/enterprise/remi-release-7.rpm
[root@redis-master ~]#yum -y --enablerepo=remi install redis
[root@redis-master ~]#systemctl start redis
[root@redis-master ~]#systemctl enable redis
3,修改配置文件
注意:主服务器修改本机IP和登录密码
vim /etc/redis.conf
bind 172.17.0.5 127.0.0.1   #第一个IP修改为本机IP,第二个不变
protected-mode yes
port 6379
tcp-backlog 511
timeout 0
tcp-keepalive 300
daemonize no
supervised no
pidfile /var/run/redis_6379.pid
loglevel notice
logfile /var/log/redis/redis.log
databases 16
always-show-logo yes
save 900 1
save 300 10
save 60 10000
stop-writes-on-bgsave-error yes
rdbcompression yes
rdbchecksum yes
dbfilename dump.rdb
rdb-del-sync-files no
dir /var/lib/redis
replica-serve-stale-data yes
replica-read-only yes
repl-diskless-sync no
repl-diskless-sync-delay 5
repl-diskless-load disabled
repl-disable-tcp-nodelay no
replica-priority 100
acllog-max-len 128
requirepass redis                #修改密码自定义
lazyfree-lazy-eviction no
lazyfree-lazy-expire no
lazyfree-lazy-server-del no
replica-lazy-flush no
lazyfree-lazy-user-del no
oom-score-adj no
oom-score-adj-values 0 200 800
appendonly no
appendfilename "appendonly.aof"
appendfsync everysec
no-appendfsync-on-rewrite no
auto-aof-rewrite-percentage 100
auto-aof-rewrite-min-size 64mb
aof-load-truncated yes
aof-use-rdb-preamble yes
lua-time-limit 5000
slowlog-log-slower-than 10000
slowlog-max-len 128
latency-monitor-threshold 0
notify-keyspace-events ""
hash-max-ziplist-entries 512
hash-max-ziplist-value 64
list-max-ziplist-size -2
list-compress-depth 0
set-max-intset-entries 512
zset-max-ziplist-entries 128
zset-max-ziplist-value 64
hll-sparse-max-bytes 3000
stream-node-max-bytes 4096
stream-node-max-entries 100
activerehashing yes
client-output-buffer-limit normal 0 0 0
client-output-buffer-limit replica 256mb 64mb 60
client-output-buffer-limit pubsub 32mb 8mb 60
hz 10
dynamic-hz yes
aof-rewrite-incremental-fsync yes
rdb-save-incremental-fsync yes
jemalloc-bg-thread yes
4,从服务器slave1配置
注意:从服务器修改本机IP,主服务器的连接IP,连接密码
[root@redis-slave1 ~]# vim /etc/redi.conf
slave-1配置文件:
[root@redis-slave1 ~]# grep -Ev "^$|#" /etc/redis.conf
bind 172.17.0.7      #修改为本机IP
protected-mode yes
port 6379
tcp-backlog 511
timeout 0
tcp-keepalive 300
daemonize no
supervised no
pidfile /var/run/redis_6379.pid
loglevel notice
logfile /var/log/redis/redis.log
databases 16
always-show-logo yes
save 900 1
save 300 10
save 60 10000
stop-writes-on-bgsave-error yes
rdbcompression yes
rdbchecksum yes
dbfilename dump.rdb
rdb-del-sync-files no
dir /var/lib/redis
replicaof 172.17.0.5 6379     #主服务器IP
masterauth redis              #主服务器密码
replica-serve-stale-data yes
replica-read-only yes
repl-diskless-sync no
repl-diskless-sync-delay 5
repl-diskless-load disabled
repl-disable-tcp-nodelay no
replica-priority 100
acllog-max-len 128
requirepass redis
lazyfree-lazy-eviction no
lazyfree-lazy-expire no
lazyfree-lazy-server-del no
replica-lazy-flush no
lazyfree-lazy-user-del no
oom-score-adj no
oom-score-adj-values 0 200 800
appendonly no
appendfilename "appendonly.aof"
appendfsync everysec
no-appendfsync-on-rewrite no
auto-aof-rewrite-percentage 100
auto-aof-rewrite-min-size 64mb
aof-load-truncated yes
aof-use-rdb-preamble yes
lua-time-limit 5000
slowlog-log-slower-than 10000
slowlog-max-len 128
latency-monitor-threshold 0
notify-keyspace-events ""
hash-max-ziplist-entries 512
hash-max-ziplist-value 64
list-max-ziplist-size -2
list-compress-depth 0
set-max-intset-entries 512
zset-max-ziplist-entries 128
zset-max-ziplist-value 64
hll-sparse-max-bytes 3000
stream-node-max-bytes 4096
stream-node-max-entries 100
activerehashing yes
client-output-buffer-limit normal 0 0 0
client-output-buffer-limit replica 256mb 64mb 60
client-output-buffer-limit pubsub 32mb 8mb 60
hz 10
dynamic-hz yes
aof-rewrite-incremental-fsync yes
rdb-save-incremental-fsync yes
jemalloc-bg-thread yes
5,从服务器slave2配置
注意:从服务器修改本机IP,主服务器的连接IP,连接密码
[root@redis-slave2 ~]#vim /etc/redi.conf
slave-2配置文件:
[root@redis-slave2 ~]# grep -Ev "^$|#" /etc/redis.conf
bind 172.17.0.7      #修改为本机IP
protected-mode yes
port 6379
tcp-backlog 511
timeout 0
tcp-keepalive 300
daemonize no
supervised no
pidfile /var/run/redis_6379.pid
loglevel notice
logfile /var/log/redis/redis.log
databases 16
always-show-logo yes
save 900 1
save 300 10
save 60 10000
stop-writes-on-bgsave-error yes
rdbcompression yes
rdbchecksum yes
dbfilename dump.rdb
rdb-del-sync-files no
dir /var/lib/redis
replicaof 172.17.0.5 6379     #主服务器IP
masterauth redis              #主服务器密码
replica-serve-stale-data yes
replica-read-only yes
repl-diskless-sync no
repl-diskless-sync-delay 5
repl-diskless-load disabled
repl-disable-tcp-nodelay no
replica-priority 100
acllog-max-len 128
requirepass redis
lazyfree-lazy-eviction no
lazyfree-lazy-expire no
lazyfree-lazy-server-del no
replica-lazy-flush no
lazyfree-lazy-user-del no
oom-score-adj no
oom-score-adj-values 0 200 800
appendonly no
appendfilename "appendonly.aof"
appendfsync everysec
no-appendfsync-on-rewrite no
auto-aof-rewrite-percentage 100
auto-aof-rewrite-min-size 64mb
aof-load-truncated yes
aof-use-rdb-preamble yes
lua-time-limit 5000
slowlog-log-slower-than 10000
slowlog-max-len 128
latency-monitor-threshold 0
notify-keyspace-events ""
hash-max-ziplist-entries 512
hash-max-ziplist-value 64
list-max-ziplist-size -2
list-compress-depth 0
set-max-intset-entries 512
zset-max-ziplist-entries 128
zset-max-ziplist-value 64
hll-sparse-max-bytes 3000
stream-node-max-bytes 4096
stream-node-max-entries 100
activerehashing yes
client-output-buffer-limit normal 0 0 0
client-output-buffer-limit replica 256mb 64mb 60
client-output-buffer-limit pubsub 32mb 8mb 60
hz 10
dynamic-hz yes
aof-rewrite-incremental-fsync yes
rdb-save-incremental-fsync yes
jemalloc-bg-thread yes
6,重新启动服务(三台服务都做)
systemctl restart redis
7,验证服务
[root@redis-master ~]#redis-cli -a redis  -h 10.0.0.3  -p 6379
Warning: Using a password with '-a' or '-u' option on the command line interface may not be safe.
127.0.0.1:6379> info replication
# Replication
role:master
connected_slaves:2     出现两台从服务器就没问题
slave0:ip=172.17.0.6,port=6379,state=online,offset=70,lag=0
slave1:ip=172.17.0.7,port=6379,state=online,offset=70,lag=0
master_replid:12e24fe583640c88aff07733c7bcd1acb32c4dd2
master_replid2:0000000000000000000000000000000000000000
master_repl_offset:70
second_repl_offset:-1
repl_backlog_active:1
repl_backlog_size:1048576
repl_backlog_first_byte_offset:1
repl_backlog_histlen:70
127.0.0.1:6379> set t1 aa
OK
127.0.0.1:6379> quit
slave端:
[root@redis-slave1 ~]# redis-cli -h 172.17.0.6 -a redis
Warning: Using a password with '-a' or '-u' option on the command line interface may not be safe.
172.17.0.6:6379> get t1
"aa"
三,Redis HA Sentinel(哨兵) 集群
注意:真正的HA:除了可以自动故障转移,还提供统一的IP地址。redis的HA高可用只能自动故障转移,LB负载均衡集群,keepalived是高可用
Redis-Sentinel 是 Redis 官方推荐的高可用性(HA)解决方案,当用Redis
做Master-slave的高可用方案时,假如master宕机了,Redis本身(包括它的
很多客户端)都没有实现自动进行主备切换,而Redis-sentinel本身也是一个
独立运行的进程,它能监控多个master-slave集群,发现master宕机后能进行
自动切换。
Sentinel 是一个监视器,它可以根据被监视实例的身份和状态来判断应该执行
何种动作。
1.Redis Sentinel 功能
Sentinel的主要功能包括主节点存活检测、主从运行情况检测、自动故障转移
(failover)、主从切换。Redis的Sentinel最小配置是一主一从。 Redis的
Sentinel系统可以用来管理多个Redis服务器,该系统可以执行以下四个任务:
监控
Sentinel会不断的检查主服务器和从服务器是否正常运行。
通知
当被监控的某个Redis服务器出现问题,Sentinel通过API脚本向管理员
或者其他的应用程序发送通知。
自动故障转移
当主节点不能正常工作时,Sentinel会开始一次自动的故障转移操作,它会
将与失效主节点是主从关系的其中一个从节点升级为新的主节点, 并且将其他
的从节点指向新的主节点。
配置提供者
在Redis Sentinel模式下,客户端应用在初始化时连接的是Sentinel
节点集合,从中获取主节点的信息。
2.Redis Sentinel的工作流程
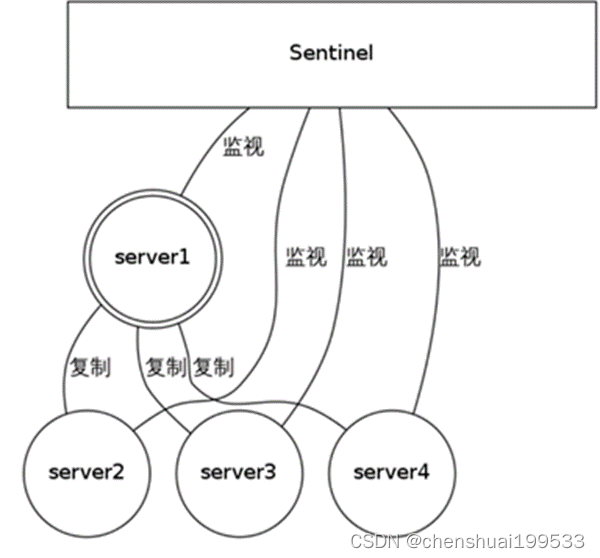
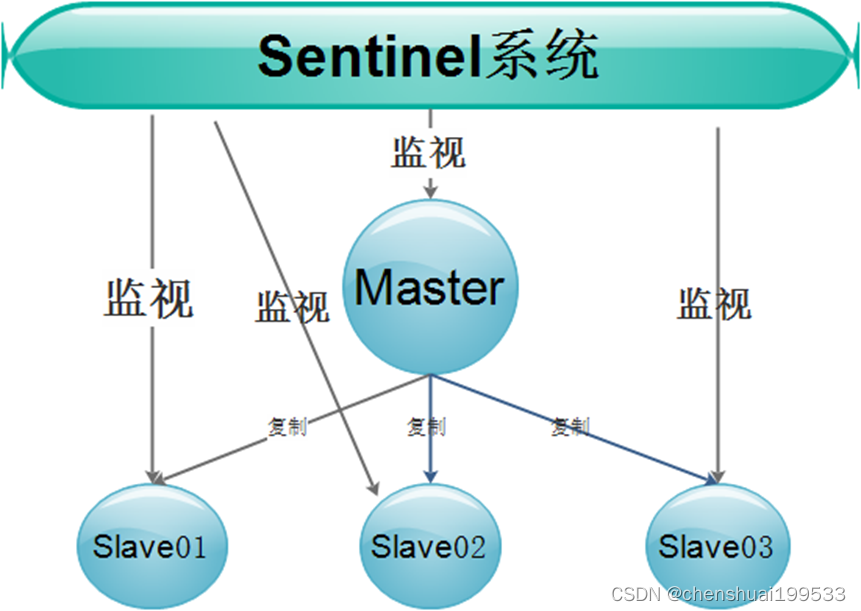
由一个或多个Sentinel实例组成的Sentinel系统可以监视任意多个主服务器,
以及所有从服务器,并在被监视的主服务器进入下线状态时,自动将下线
主服务器属下的某个从服务器升级为新的主服务器,然后由新的主服务器代替
已下线的主服务器继续处理命令请求 。
Sentinel负责监控集群中的所有主、从Redis,当发现主故障时,Sentinel会在
所有的从中选一个成为新的主。并且会把其余的从变为新主的从。同时那台有
问题的旧主也会变为新主的从,也就是说当旧的主即使恢复时,并不会恢复原来
的主身份,而是作为新主的一个从。
在Redis高可用架构中,Sentinel往往不是只有一个,而是有3个或者以上。目的
是为了让其更加可靠,毕竟主和从切换角色这个过程还是蛮复杂的。
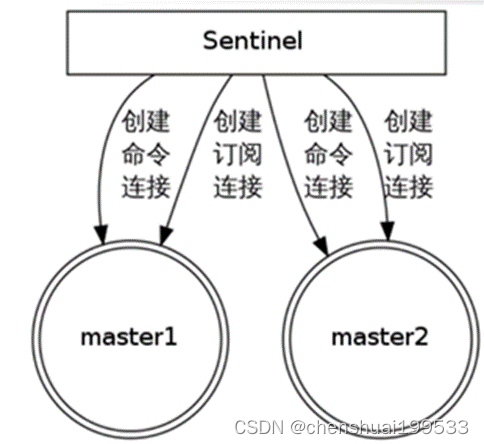
3.Redis Sentinel 服务器连接
1,发现并连接主服务器
Sentinel 通过用户给定的配置文件来发现主服务器。
Sentinel 会与被监视的主服务器创建两个网络连接:
命令连接用于向主服务器发送命令。
订阅连接用于订阅指定的频道,从而发现
监视同一主服务器的其他 Sentinel。
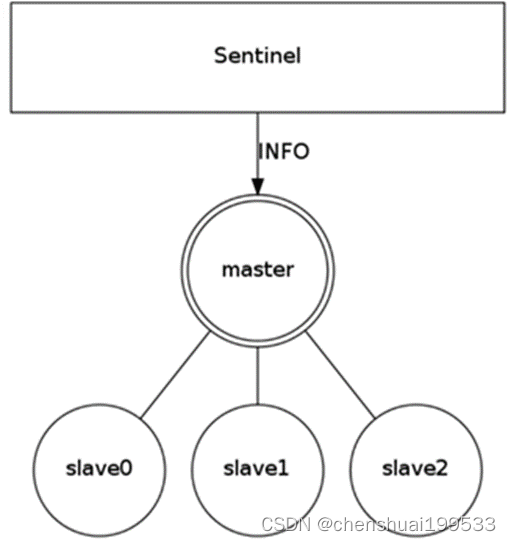
2,发现并连接从服务器
Sentinel 通过向主服务器发送 INFO 命令来自动获得所有从服务器的地址。
跟主服务器一样,Sentinel 会与每个被发现的从服务器创建命令连接和订阅连接。
4.Redis Sentinel 命令操作
命令	               描述
PING	返回 PONG
SENTINEL masters	列出所有被监视的主服务器
SENTINEL slaves <master name>	列出所有被监视的从服务器
SENTINEL get-master-addr-by-name <master name>	返回给定名字的
主服务器的 IP 地址和端口号。
SENTINEL reset <pattern>	重置所有名字和给定模式 pattern 相匹配的
主服务器
SENTINEL failover <master name>	当主服务器失效时,在不询问其他Sentinel
意见的情况下,强制开始一次自动故障迁移。
5,Redis Sentinel(哨兵)实现 Redis 的高可用性
1.环境说明
主机名称 IP地址 redis版本和角色说明
redis-master 192.168.222.131:6379 redis 6.0.5(主)
redis-slave01 192.168.222.129:6379 redis 6.0.5(从1)
redis-slave02 192.168.222.130:6379 redis 6.0.5(从2)
2.安装(三台都要安装)
yum -y install http://rpms.famillecollet.com/enterprise/remi-release-7.rpm
yum -y --enablerepo=remi install redis
3.部署主从(略)
4.部署Sentinel
/etc/redis-sentinel.conf 释义如下:
# 端口
port 26379
# 是否后台启动
daemonize yes
保护模式如果开启只接受回环地址的ipv4和ipv6地址链接,拒绝外部链接,
而且正常应该配置多个哨兵,避免一个哨兵出现独裁情况,如果配置多个哨兵
那如果开启也会拒绝其他sentinel的连接。导致哨兵配置无法生效。
protected-mode no
# pid文件路径
pidfile /var/run/redis-sentinel.pid
# 日志文件路径
logfile "/var/log/redis/sentinel.log"
# 定义工作目录
dir /tmp
定义Redis主的别名, IP, 端口,这里的2指的是需要至少2个Sentinel认为
主Redis挂了才最终会采取下一步行为
sentinel monitor mymaster 127.0.0.1 6379 2
#如果redis配置了密码,那这里必须配置认证,否则不能自动切换
sentinel auth-pass mymaster redispass
# 如果mymaster 30秒内没有响应,则认为其主观失效
sentinel down-after-milliseconds mymaster 30000
如果master重新选出来后,其它slave节点能同时并行从新master同步数据的
台数有多少个,显然该值越大,所有slave节点完成同步切换的整体速度越快,
但如果此时正好有人在访问这些slave,可能造成读取失败,影响面会更广。
最保守的设置为1,同一时间,只能有一台干这件事,这样其它slave还能继续
服务,但是所有slave全部完成缓存更新同步的进程将变慢。
sentinel parallel-syncs mymaster 1
该参数指定一个时间段,在该时间段内没有实现故障转移成功,则会再一次发起
故障转移的操作,单位毫秒
sentinel failover-timeout mymaster 180000
# 不允许使用SENTINEL SET设置notification-script和client-reconfig-script。
sentinel deny-scripts-reconfig yes
主配置文件修改
root@redis-master ~]# vim /etc/redis-sentinel.conf
port 26379                      #哨兵端口号
daemonize no
pidfile /var/run/redis-sentinel.pid
logfile /var/log/redis/sentinel.log
dir /tmp
sentinel monitor mymaster 192.168.222.131 6379 2  #ip地址为主服务器的
sentinel auth-pass mymaster redis         #密码要和主redis.conf一致
sentinel down-after-milliseconds mymaster 30000
sentinel parallel-syncs mymaster 1
sentinel failover-timeout mymaster 180000
sentinel deny-scripts-reconfig yes

#其中mymaster是自定义的
从1配置文件修改
[root@redis-slave1 ~]#vim /etc/redis-sentinel.conf
port 26379                      #哨兵端口号
daemonize no
pidfile /var/run/redis-sentinel.pid
logfile /var/log/redis/sentinel.log
dir /tmp
sentinel monitor mymaster 192.168.222.131 6379 2  #ip地址为主服务器的
sentinel auth-pass mymaster redis         #密码要和主redis.conf一致
sentinel down-after-milliseconds mymaster 30000
sentinel parallel-syncs mymaster 1
sentinel failover-timeout mymaster 180000
sentinel deny-scripts-reconfig yes

#其中mymaster是自定义的
从2配置文件修改
[root@redis-slave2 ~]#vim /etc/redis-sentinel.conf
port 26379                      #哨兵端口号
daemonize no
pidfile /var/run/redis-sentinel.pid
logfile /var/log/redis/sentinel.log
dir /tmp
sentinel monitor mymaster 192.168.222.131 6379 2  #ip地址为主服务器的
sentinel auth-pass mymaster redis         #密码要和主redis.conf一致
sentinel down-after-milliseconds mymaster 30000
sentinel parallel-syncs mymaster 1
sentinel failover-timeout mymaster 180000
sentinel deny-scripts-reconfig yes

#其中mymaster是自定义的
5.启动服务顺序:主Redis --> 从Redis --> Sentinel1/2/3
[root@redis-master ~]# systemctl restart redis-sentinel.service
[root@redis-master ~]# systemctl status redis-sentinel.service
● redis-sentinel.service - Redis Sentinel
   Loaded: loaded (/usr/lib/systemd/system/redis-sentinel.service; disabled; vendor preset: disabled)
  Drop-In: /etc/systemd/system/redis-sentinel.service.d
           └─limit.conf
   Active: active (running) since 四 2022-05-19 19:59:18 CST; 24s ago
 Main PID: 124059 (redis-sentinel)
   Status: "Ready to accept connections"
   CGroup: /system.slice/redis-sentinel.service
           └─124059 /usr/bin/redis-sentinel *:26379 [sentinel]

5月 19 19:59:18 redis-master systemd[1]: Starting Redis Sentinel...
5月 19 19:59:18 redis-master systemd[1]: Started Redis Sentinel.
Hint: Some lines were ellipsized, use -l to show in full.

[root@redis-slave1 ~]# systemctl restart redis-sentinel.service
[root@redis-slave2 ~]# systemctl restart redis-sentinel.service
6,Sentinel操作
主redis登录
[root@redis-master ~]# redis-cli -p 26379
127.0.0.1:26379> SENTINEL master mymaster
 1) "name"
 2) "mymaster"
 3) "ip"
 4) "192.168.222.131"
 5) "port"
 6) "6379"
....
39) "parallel-syncs"
40) "1"

从1登录
[root@redis-slave1 ~]# redis-cli -a redis -h 192.168.222.129
Warning: Using a password with '-a' or '-u' option on the command line interface may not be safe.
192.168.222.129:6379>

从2登录
[root@redis-slave2 ~]# redis-cli -a redis -h 192.168.222.130
Warning: Using a password with '-a' or '-u' option on the command line interface may not be safe.
192.168.222.130:6379>
7.哨兵模式下的主从测试
模拟停止master上的Redis,查看Redis的主从变化,如下:
主服务器:
[root@redis-master ~]# systemctl stop redis
[root@redis-master ~]# redis-cli -p 26379
127.0.0.1:26379> sentinel master mymaster
 1) "name"
 2) "mymaster"
 3) "ip"
 4) "192.168.222.129"
 5) "port"
 6) "6379"
 ...

从1服务器查看哨兵日志,得知从1为新的master
[root@redis-slave1 ~]# tailf /var/log/redis/sentinel.log

[root@redis-slave1 ~]# redis-cli -a redis -h 192.168.222.129
Warning: Using a password with '-a' or '-u' option on the command line interface may not be safe.
192.168.222.129:6379> INFO replication
# Replication
role:master           #新的master
connected_slaves:1
.....

## 注意

```bash
注意:
如果旧主重新加入后数据不同步解决方案:
可能之前是主节点,没有配置从节点的连接信息
如:masterauth 连接密码,当master转变为slave后,由于他没有密码,
所以他不能从新的master同步数据,随之导致 info replication 的时候,
同步状态为 down ,所以只需要修改 redis.conf 中的 masterauth为
对应的密码。


 4045
4045


 被折叠的 条评论
为什么被折叠?
被折叠的 条评论
为什么被折叠?
 到【灌水乐园】发言


