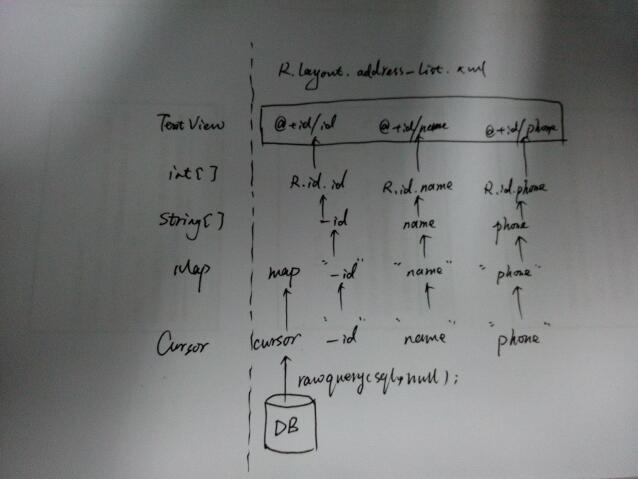
Cursor记录集游标、ListView和SimpleCursorAdapter、ListView数据动态更新
Email:chentravelling@163.com
为什么要把Cursor、ListView、SimpleCursorAdapter这三个放在一起来讲呢?实在是因为在使用的时候,这三个太紧密相关了。
环境:
IDE:Android Studio
JDK:1.8
系统:win7 64位
一、Cursor
在android系统中使用SQLite数据库,那么Cursor就会经常使用,使用方式大概如下:
SQLiteDatabase db;
//...
String sql = "select * from 表";
Cursor cursor = db.rawQuery(sql,null);
即我们查询数据返回得到的是一个封装成Cursor的对象,这就是一个记录集,包含了所有查询得到的记录。那么关于Cursor类简单介绍一下几种关键方法:
首先,我们要使用Cursor记录集游标,就必须知道查询语句中表的字段名、数据类型。
- moveToFirst()游标移动到第一行,一般用这个方法判断查询结果是否为空
使用方法:
if(cursor.moveToFirst()==false)
     return;
- moveToLast()游标移动到最后一行
- moveToPosition(int position)游标移动到指定行
- moveToPrevious()游标移动到前一行
- moveToNext()游标移动到下一行,主要用于遍历获取数据
使用方法:
List<Map<String,Object>> list = new ArrayList<Map<String,Object>>();
        Map<String,Object> map;

        while (cursor.moveToNext())
        {
            map = new HashMap<String, Object>();
            map.put("name",cursor.getString(cursor.getColumnIndex("name")));
            map.put("phone",cursor.getString(cursor.getColumnIndex("phone")));
            map.put("_id",cursor.getString(cursor.getColumnIndex("_id")));
            list.add(map);
        }
- getColumnIndex(String columnName)获取指定列在cursor记录集中的位置
- getString(int position)获取指定位置的数据
- getColumnName(int columnIndex)获取指定列的字段名
- getColumnCount()获得列的总数
- getCount()获取cursor记录集的行数
- close()关闭游标,释放资源
- isBeforeFirst()游标是否指向第一行
- isAfterLast()游标是否指向最后一行
使用方法:
结合isBeforeFirst()、isAfterLast()、moveToNext()三个方法,我们将可以通过for循环来遍历整个记录集
for(cursor.moveToFirst();!cursor.isAfterLast();cursor.moveToNext())
{
//获取数据,和while()循环一样;
}- isClosed()是否关闭游标
还有一些其他方法吧,暂时没有用过,所以就不罗列了,上面已经把非常常用的方法列举了。
二、ListView和SimpleCursorAdapter
当我们从数据库中查到了数据以后,一般就会用作界面显示,那么ListView就会经常用到。那么我分三部分讲:1)用于显示数据适配器;2)数据库中数据更新后,ListView也更新。首先我们需要三个元素:ListView、adapter即适配器,用于将数据映射到ListView中、数据。
1)常用方法,根据适配器不一样,或者数据不一样,我们要选择的方法也不一样。一般分为三种:ArrayAdapter、SimpleAdapter和SimpleCursorAdapter。第一种最简单 ,只能用于显示一行文字,第二种扩展性更好,支持自定义,第三种主要适用于Cursor记录集游标。对于第一种适配器,本人没有上代码测试过,所以就不讲了。
- SimpleAdapter
public class ShowAddressActivity extends ListActivity {
    private AddressDAO addressDAO;
    private SimpleAdapter adapter;
    private Cursor cursor;
    @Override
    protected void onCreate(Bundle savedInstanceState) {
        super.onCreate(savedInstanceState);
        //查数据库返回所有联系人
        addressDAO = new AddressDAO(this);
        cursor = addressDAO.query();
        List<Map<String,Object>> list = new ArrayList<Map<String,Object>>();
        Map<String,Object> map;
//遍历数据
        while (cursor.moveToNext())
        {
            map = new HashMap<String, Object>();
            map.put("name",cursor.getString(cursor.getColumnIndex("name")));
            map.put("phone",cursor.getString(cursor.getColumnIndex("phone")));
            map.put("_id",cursor.getString(cursor.getColumnIndex("_id")));
            list.add(map);
        }
        adapter = new SimpleAdapter(this,list,R.layout.address_list,new String[]{"_id","name","phone"},new int[]{R.id.id,R.id.name,R.id.phone});
        setAdapter(adapter);
- SimpleCursorAdapter
public class ShowAddressActivity extends ListActivity {
    private AddressDAO addressDAO;
    private SimpleCursorAdapter adapter;
    private Cursor cursor;
    @Override
    protected void onCreate(Bundle savedInstanceState) {
        super.onCreate(savedInstanceState);
        setContentView(R.layout.show_address);
        //查数据库返回所有联系人
        addressDAO = new AddressDAO(this);
        cursor = addressDAO.query();

        adapter = new SimpleCursorAdapter(this,R.layout.address_list,cursor,new String[]{"_id","name","phone"},new int[]{R.id.id,R.id.name,R.id.phone});
        ListView listView = (ListView)findViewById(android.R.id.list);
        listView.setAdapter(adapter);
//..
}
其中涉及到了两个xml文件:show_address.xml和address_list.xml,布局代码如下:
(1)show_address.xml:包含一个搜索框、一个增加按钮和一个ListView<?xml version="1.0" encoding="utf-8"?>
<LinearLayout xmlns:android="http://schemas.android.com/apk/res/android"
xmlns:tools="http://schemas.android.com/tools"
android:layout_width="match_parent"
android:layout_height="wrap_content"
android:orientation="vertical"
tools:context="com.s201525015.chen.addresslist.ShowAddressActivity">
<LinearLayout
android:orientation="horizontal"
android:layout_width="match_parent"
android:layout_height="match_parent"
android:weightSum="1">
<EditText
android:layout_width="279dp"
android:layout_height="60dp"
android:hint="搜索联系人"
android:id="@+id/search"
android:layout_weight="0.65" />
<Button
android:layout_width="55dp"
android:layout_height="45dp"
android:text="增加"
android:id="@+id/addButton" />
</LinearLayout>
<ListView
android:layout_width="match_parent"
android:layout_height="wrap_content"
android:id="@android:id/list">
</ListView>
</LinearLayout>
(2)address_list.xml:主要包含一个隐藏域id、分别显示name和phone的TextView
<?xml version="1.0" encoding="utf-8"?>
<LinearLayout xmlns:android="http://schemas.android.com/apk/res/android"
    android:layout_width="match_parent" android:layout_height="match_parent">
    <LinearLayout
        android:orientation="horizontal"
        android:layout_width="match_parent"
        android:layout_height="match_parent">
        <TextView
            android:layout_width="wrap_content"
            android:layout_height="wrap_content"
            android:id="@+id/id"
            android:layout_weight="1"
            android:visibility="gone"/>
        <TextView
            android:layout_width="wrap_content"
            android:layout_height="wrap_content"
            android:id="@+id/name"
            android:layout_weight="1" />

        <TextView
            android:layout_width="wrap_content"
            android:layout_height="wrap_content"
            android:id="@+id/phone" />
    </LinearLayout>
</LinearLayout>
其中这两个xml文件结合activity中的代码可以看出其中的关系:首先是将数据通过适配器映射到address_list.xml文件上,然后在show_address.xml中的ListView中加入完成映射后的adapter用于显示数据。
这里也要提醒一个问题:findViewById(R.id.list)默认的是在当前页面中寻找id为list的控件,也就是说在setContentView(XXX),那么只会在XXX.xml文件中查找id为list的控件。如果我们setContentView(A),却需要获取B.xml中的控件就需要先指定页面,再查找:
指定页面为show_address.xml:
ListView listAddress = (ListView) View.inflate(this,R.layout.show_address,null).findViewById(android.R.id.list);三、使用SimpleCursorAdapter,ListView数据更新
private class RefresList extends AsyncTask<Void,Void,Cursor>
    {
        protected Cursor doInBackground(Void... params) {
            Cursor newCursor =  addressDAO.query();
            return newCursor;
        }
        protected void onPostExecute(Cursor newCursor) {
            adapter.changeCursor(newCursor);
            cursor.close();
            cursor = newCursor;
        }
    }
在数据发生变化的时候,调用new RefreshList().execute()即可。比如在一个点击事件中,添加一个数据后,写入数据库表中,然后执行new RefreshList().execute();即可更新ListView。还有其他一些方式,暂时不会~
四、提示
在这里重点提示一下SimpleAdapter和SimpleCursorAdapter,这两个适配器的重要区别:
1)如果使用后者,数据库表中的字段必须有_id,是否一定要为主键,我不敢确定。
2)前者映射时数据类型是map构成的list,后者是cursor。


 2992
2992

 被折叠的 条评论
为什么被折叠?


