


应用于数据库
Spring可以应用于数据库,当然,这里指的应用是通过依赖注入的方式来创建数据库对象(如Jdbc,或者Druid)
我们需要完成两个步骤,一个是在Spring的XML文件中配置Druid连接池,一个是在其中配置JdbcTemplate
当然,如果需要你导入jar包(或者Maven的pom中对Jar包进行依赖管理)
步骤一:依赖注入Druid连接池
我们可以在XML中通过依赖注入的方式来创建一个Druid连接池.
所谓依赖注入,就是通过set方法或者构造方法来.很显然,我们此处通过set方法来对Druid进行依赖注入.
其中name键对应的值’driverClassName’,‘url’,‘username’,‘password’分别是DruidDataSource源码类中的’setDriverClassName’,‘setUrl’,‘setUsername’,'setPassword’这五个方法.
在applicationContext.xml中实现
方式一:直接在依赖注入中定义连接池配置信息
格式:
 <bean id="自定义连接池的BeanId" class="com.alibaba.druid.pool.DruidDataSource">


        <property name="driverClassName" value="com.mysql.jdbc.Driver"></property>
        <property name="url" value="jdbc:mysql://数据库IP地址:数据库端口/数据库名"></property>
        <property name="username" value="数据库账号"></property>
        <property name="password" value="数据库密码"></property>

    </bean>
列如:
 <bean id="dataSourceInfo" class="com.alibaba.druid.pool.DruidDataSource">
        <!-- 通过依赖注入来定义数据连接池的配置信息.同样是set方式 -->
        <property name="driverClassName" value="com.mysql.jdbc.Driver"></property> <!-- 对应'setDriverClassName'方法 -->
        <property name="url" value="jdbc:mysql://127.0.0.1:3306/tarveltest"></property> <!-- 对应'setUrl'方法 -->
        <property name="username" value="root"></property> <!-- 对应'setUsername'方法 -->
        <property name="password" value="root"></property> <!-- 对应'setPassword'方法 -->

    </bean>
方式二:在依赖注入中通过Properties来读取连接池配置信息

步骤一:定义一个properties文件
注意:你也许发现了这与往常的配置文件不同,那就是加了’jdbc.’
为什么呢?其实driver,url可以省略’jdbc.’
但是’username’绝对不能省略’jdbc.’,因为如果仅仅是’username’的话,XML中的EL表达式会自动把’username’识别为windows系统的用户名,而非是jdbc的数据库用户名.所以需要加上’jdbc.’来进行区分.也就是’jdbc.username’.
但为了格式好看,索性就把’driver’,’url’,’password’也加上’jdbc.’
格式:
jdbc.driver=com.mysql.jdbc.Driver
jdbc.url=jdbc:mysql://数据库IP地址:数据库端口/数据库名
jdbc.username=数据库账号
jdbc.password=数据库密码
列如:
jdbc.driver=com.mysql.jdbc.Driver
jdbc.url=jdbc:mysql://127.0.0.1:3306/tarveltest
jdbc.username=root
jdbc.password=root
步骤二:在XML文件中锁定Properties
在applicationContext.xml中实现
此处需要定义context标签库.并且指向Properties文件在目录下(Src目录或resources目录)的文件名 .
有个细节要注意,那就是前面必须是’context’,而property-placeholder的约束路径也必须是’context’,
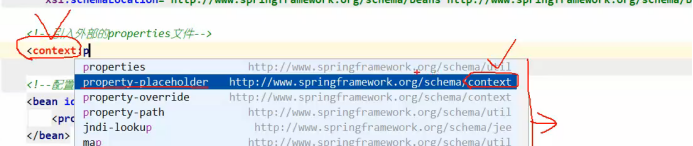
格式:<context:property-placeholder location="classpath:自定义配置文件名.properties"
列如:
<context:property-placeholder location="classpath:jdbcInfo.properties"></context:property-placeholder>
步骤三:在依赖注入中,从Properties配置文件中读取并定义配置参数
固定格式:
 <bean id="自定义连接池的BeanId" class="com.alibaba.druid.pool.DruidDataSource">


        <property name="driverClassName" value="${jdbc.driver}"></property>
        <property name="url" value="${jdbc.url}"></property>
        <property name="username" value="${jdbc.username}"></property>
        <property name="password" value="${jdbc.password}"></property>

    </bean>
步骤二:依赖注入Template
将此前在XML配置中定义好的连接池,再以依赖注入的方式,注入到Template中.
通过依赖注入的方式,为JdbcTemplate提供DruidDataSource(数据连接池)对象,以便能够通过该对象来获取连接
既然要对JdbcTemplate进行依赖注入,而且还是set方式,那么set方法就是在JdbcTemplate源码类里头的,名字叫’setDataSource"
因此,name属性的对应值就是源码类中的’setDataSource’方法
格式:
    <bean id="jdbcTempl的BeanId" class="org.springframework.jdbc.core.JdbcTemplate">
        <property name="dataSource" ref="自定义连接池的BeanId"></property>
    </bean>
列如:
   <bean id="jdbcTempl" class="org.springframework.jdbc.core.JdbcTemplate">
        <property name="dataSource" ref="dataSourceInfo"></property>
    </bean>
Spring注解开发
概念
是的,不光是XML配置文件,Spring也可以用注解表示.通过要实现的功能,和之前通过xml文件实现的功能一摸一样.
但是这不意味着今后开发中就全部用注解,而丝毫不用配置文件
那么注解配置和XML配置,到底该用哪个?
在以后的实际开发中,有个共识,
那就是”当你要把Spring应用到别人写的类时,那要使用XML来配置(如控制反转,依赖注入);
当你要把Spring应用到自己写的类时,那要用注解来配置”

准备-定义组件扫描
若要通过注解方式来使用Spring,还需要在applicationContext.xml中配置组件扫描,作用是指定哪个包及其子包下的Bean需要进行扫描以便识别使用注解配置的类、字段和方法。
(如果你要使用springmvc,那么你还需要在springmvc.xml下也定义这样的扫描,但是指定的包路径必须为"controller")

格式:<context:component-scan base-package="包路径名"></context:component-scan>
常用注解介绍

以上几个注解中,我只列举几个常用的注解
Repository注解
Repository注解用于定义Dao层的实例化Bean,但其实它和’Component’没有区别.
只不过按照约定成俗的规矩,在用于Dao层的实例化Bean对象时,我们用"Repository"
格式:@Repository("自定义Bean实例化ID")
列如:
@Repository("userDaoBean")
public class UserDaoImpl implements UserDao {
    @Override
    public void save() {
    	System.out.println("save running... ...");
    }
}
Component注解
Component可以替代所有用于定义Bean实例化对象ID的注解,所以,除了Dao层以外,建议都是用Component来注解
格式:@Component("自定义Bean实例化ID")
列如:
@Component("serviceBeanId")
public class ServiceImpl implements Service{
    @Autowired
    private Dao daoObj;
    public void setDaoObj(Dao daoObj) {
        this.daoObj = daoObj;
    }
    @Override
        public List<UserInfo> findAll() {
            return daoObj.run();
        }
}
Autowired依赖注解
Autowired注解是用于依赖注入的注解之一,它根据数据类型(如例子中成员变量处的数据类型’Dao’)来依赖注入,如果找到多个相同的数据类型,,则会根据变量名依赖注入.
该注解要定义在一个成员变量上面,且不需要set方法
列如:
    @Autowired
    private Dao daoObj;
Value依赖注解
使用@Value进行字符串的注入
该注解要定义在一个字符串类型的成员变量上面
格式:@Value("要注入的字符串内容")
@Repository("userDao")
public class UserDaoImpl implements UserDao {
    @Value("注入普通数据")	  //注入普通数据
    private String str;
    @Value("${jdbc.driver}")  //获取已经加载到容器中的properties中的指定的键,并注入
    private String driver;

    @Override
    public void save() {
        System.out.println(str);
        System.out.println(driver);
    }
}
作用范围的注解
@Scope两个取值:“prototype” -> 多例的,“singleton” -> 单例的(默认)
@Scope("singleton")
public class UserDaoImpl implements UserDao {
   //此处省略代码
}
其他注解

Spring全注解(了解)
概念
所谓’全注解’,就是丝毫不用xml配置文件,完全通过注解来实现和XML配置方式相同效果.但是这样会非常麻烦,效率甚至还不如xml文件.因此比较鸡肋,在日后的开发中,这种方案根本用的不会多.
所以了解即可.
全注解列表

Configuration注解
意义:表示该类是一个Spring的配置类,用来存放spring的配置信息
@Configuration
public class SpringConfiguration {

}
ComponentScan注解
意义:用于指定 Spring 在初始化容器时要扫描的包。
相当于xml配置时的<context:component-scan base-package="com.itheima"/>
@Configuration
@ComponentScan("com.itheima")
public class SpringConfiguration {

}
Import注解
意义:用于导入其他的配置类
相当于xml配置时的<import resource="classpath:applicationContext-dao.xml"/>
@Configuration
@ComponentScan("com.itheima")
@Import({DataSourceConfiguration.class})
public class SpringConfiguration {
}
PropertySource注解
意义:用于properties配置文件
相当于xml配置时的<context:property-placeholder location="classpath:jdbc.properties"/>
@PropertySource("classpath:jdbc.properties")
public class DataSourceConfiguration {
    @Value("${jdbc.driver}")
    private String driver;

    @Value("${jdbc.url}")
    private String url;

    @Value("${jdbc.username}")
    private String username;

    @Value("${jdbc.password}")
    private String password;
}
Bean注解
意义:使用在方法上,Spring会自动执行该方法,并把方法返回的对象,存储在spring容器中
@Bean("dataSource")
public DataSource getDataSource() throws PropertyVetoException {
    ComboPooledDataSource ds = new ComboPooledDataSource();
    ds.setDriverClass(driver);
    ds.setJdbcUrl(url);
    ds.setUser(username);
    ds.setPassword(password);
    return ds;
}
测试全注解(配置类)
@Test
public void testAnnoConfiguration() throws Exception {
    //根据配置类SpringConfiguration.class,获取Spring的核心容器
	ApplicationContext ac =
        	new AnnotationConfigApplicationContext(SpringConfiguration.class);

    //获取userService对象
    UserService userService = (UserService)ac.getBean("userService");
    userService.save();

    //获取dataSource对象
    DataSource dataSource = (DataSource)ac.getBean("dataSource");
    Connection connection = dataSource.getConnection();
    System.out.println(connection);
}
Spring整合Junit
概念
不管是在Maven下的test目录下,还是使用Test的注解来进行测试,这种情况下是不能使用依赖注入的。
如果想要在测试类中也能使用依赖注入,则需要Spring整合Junit
大致步骤如下:
①导入spring集成Junit的坐标
②使用@Runwith注解替换原来的运行期
③使用@ContextConfiguration指定配置文件或配置类
④使用@Autowired注入需要测试的对象
⑤创建测试方法进行测试
应用步骤
步骤一:在Maven中导入spring集成Junit的坐标
<!--此处需要注意的是,spring5 及以上版本要求 junit 的版本必须是 4.12 及以上-->
<dependency>
    <groupId>org.springframework</groupId>
    <artifactId>spring-test</artifactId>
    <version>5.0.2.RELEASE</version>
</dependency>
<dependency>
    <groupId>junit</groupId>
    <artifactId>junit</artifactId>
    <version>4.12</version>
    <scope>test</scope>
</dependency>
步骤二:使用Runwith注解替换原来的运行期
@RunWith(SpringJUnit4ClassRunner.class)
public class SpringJunitTest {
}
步骤三:使用ContextConfiguration注解来指定配置文件或配置类
注意:
1.如果在全注解的情况下,那么意味着你把用类文件写Spring的配置信息.
此时的格式为:@ContextConfiguration(classes = {全注解配置类的类名.class})
2.如果你使用xml配置,那么格式如下
格式:@ContextConfiguration(value = {"classpath:配置文件名.xml"})
以下以全注解的情况下作为引用配置信息的例子.
@RunWith(SpringJUnit4ClassRunner.class)
//加载spring核心配置文件
//@ContextConfiguration(value = {"classpath:applicationContext.xml"})
//加载spring核心配置类
@ContextConfiguration(classes = {SpringConfiguration.class})
public class SpringJunitTest {
}
步骤四:使用Autowired注解来注入需要测试的对象
@RunWith(SpringJUnit4ClassRunner.class)
@ContextConfiguration(classes = {SpringConfiguration.class})
public class SpringJunitTest {
    @Autowired
    private UserService userService;
}
步骤五:创建测试方法进行测试
@RunWith(SpringJUnit4ClassRunner.class)
@ContextConfiguration(classes = {SpringConfiguration.class})
public class SpringJunitTest {
    @Autowired
    private UserService userService;
    @Test
    public void testUserService(){
   	 userService.save();
    }
}


 507
507


 被折叠的 条评论
为什么被折叠?
被折叠的 条评论
为什么被折叠?
 到【灌水乐园】发言


