


http://download.csdn.net/detail/cjh_android/9538068###本章内容
对于SVG,只能说熟悉,能画一些简单的图,但是复杂的就真的不行了,比如Android的小机器人,望尘莫及,只记得看到那一段段的path,真的是震惊了。本章会带一点对于SVG的一些简单的命令的知识,而这也只是为了方便对代码的理解,主要的还是对于在网上看到的许多SearchBar的Path动画,但是却没有一个简单详细具体的Demo。
SVG简介
总之,先从对SVG的介绍开始:
svg是目前十分流行的图像文件格式了,svg严格来说应该是一种开放标准的矢量图形语言,使用svg格式我们可以直接用代码来描绘图像。
简而言之:你可以把SVG看成是Android里面Path、Cavans、Paint的XML形式,有填充,有描边(Stroke),包括颜色,尺寸这些元素都是在XML中定义的,所有的这些组成了一种图像格式,SVG可以被ImageView等各种控件作为背景、资源。
优点:可以任意放大图形显示,但绝不会以牺牲图像质量为代价;可在svg图像中保留可编辑和可搜寻的状态;平均来讲,svg文件比其它格式的图像文件要小很多,因而下载也很快。
缺点:这里的缺点也是对于Android开发而言的,那就是适配。其实这应该是Android的一致问题,SVG也是无可奈何,就拿本章的例子而言,一个搜索的SVG本意应该是 width=match_parent ,但是问题来了,对于在画SVG的时候宽高都必须是一个明确的值,那么问题就来了,不同的Android手机屏宽都是不同的。
解决办法:
适配主流机型,画出不同的SVG,这个工作量相当大,但是不失为一个办法
另一个办法比如使用hongyang大神的Android AutoLayout全新的适配方式 堪称适配终结者,使用一些百分比布局之类的。
Search bar by SVG

先看下SVG的指令
M: move to 移动绘制点
L:line to 直线
Z:close 闭合
C:cubic bezier 三次贝塞尔曲线
Q:quatratic bezier 二次贝塞尔曲线
A:ellipse 圆弧
关于这些指令我会另外开一篇博客专门用于讲述这些SVG的指令,先有个印象,这样看下面的XML方便一点。
上图SVG的XML的显示效果,详细解释下:
<?xml version="1.0" encoding="utf-8"?>
<vector xmlns:android="http://schemas.android.com/apk/res/android"
    android:width="150dp"
    android:height="24dp"
    android:viewportHeight="24"
    android:viewportWidth="150">

    <path
        android:name="search"
        android:pathData="M139.5,17.5 A7,7 0 1,1 140,17 L145,24"
        android:strokeColor="#ffffff"
        android:strokeLineCap="round"
        android:strokeWidth="1" />

    <path
        android:pathData="M145,24 L0,24z"
        android:strokeWidth="2"
        android:strokeColor="#ffffff"
        />
</vector>
width和height
这两个值规定了这个Vector的资源文件的大小,如果你使用ImageView引入这个资源,并且宽高都是 wrap_content,那么这个控件显示出来的宽高就是 Vector 自身的宽高。
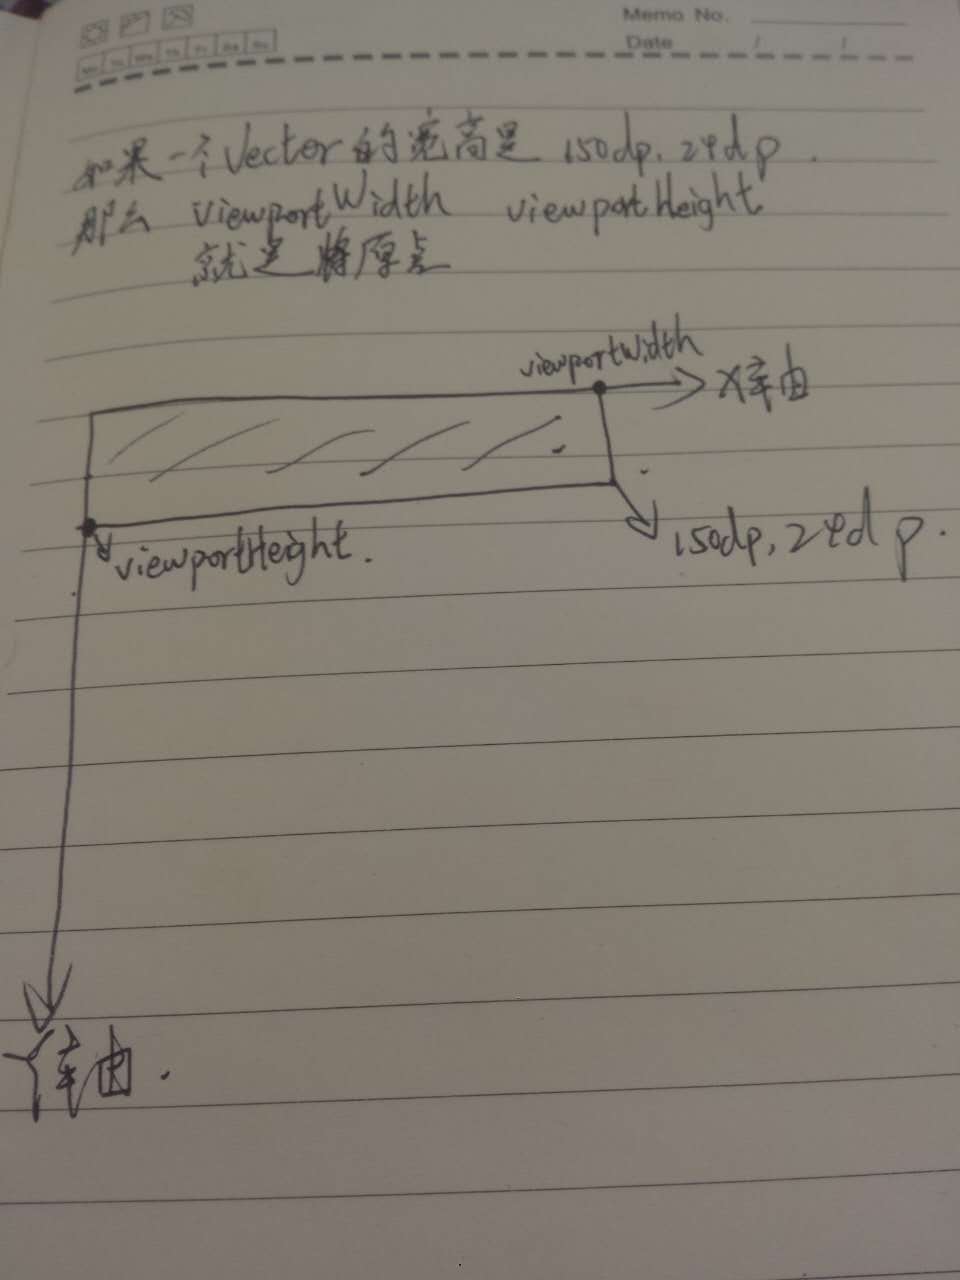
viewportWidth和viewportHeight
在Demo的XML中我定义成了 150,24,首先,这个不是固定的,需要知道的,两个值其实与 width 和 height 是没有任何关系的,这两个值相当于规定了X轴和Y轴的坐标范围,哪怕我定义成了 300,48 都是一样的,就是 pathData需要 翻一倍而已。
以我拙劣的文学功底做个总结:viewportWidth和viewportHeight其实就是将Vector的起始点作为原点,画出了一个 XY的坐标轴,而你能操作的值就是 viewportWidth和viewportHeight的参数的范围。
pathData 就是路径
XML中我想要的效果是,从 139.5,17.5 这个点 横轴竖轴都以7为半径画一个圆,结束在140,17这个点,再以出发点为直线一点,另一点过145,24,画一个直线,这样就画出了一个 搜索的图。
第二个Path,就是一条直线了,这个很简单,只要从 145 ,24 到 0,24,可以作为输入框 EditText的背景看。
Demo

其实这个效果还是有些瑕疵的,比如两个path的转换动画的时间并有配合好,这里只是做个示范,那么要实现这个动画我们一步一步来:
第一步:
从图中就可以看到这个效果非常非常的Cool,恨不得把所有的动画东改过来,但是,其实可以发现国内的APP里面这种动画也非常少,甚至几乎是没有,当然如果有也坑定不是 SVG 的path动画,因为这个动画至少需要 5.0 才能支持的,而国内的手机版本比如最畅销的米四,华为荣耀系列,现在都还是4.4的Android系统。
第二部:
画出Vector资源
<?xml version="1.0" encoding="utf-8"?>
<vector xmlns:android="http://schemas.android.com/apk/res/android"
    android:width="150dp"
    android:height="24dp"
    android:viewportHeight="24"
    android:viewportWidth="150">

    <path
        android:name="search_bar"
        android:pathData="M140,17 A7,7 0 1,1 140.5,16.5 L145,24z"
        android:strokeColor="#ffffff"
        android:strokeLineCap="round"
        android:strokeWidth="1" />

    <path
        android:name="search_line"
        android:pathData="M145,24 L0,24z"
        android:strokeColor="#ffffff"
        android:strokeLineCap="round"
        android:strokeWidth="2" />
</vector>
还有一个仅仅是搜索的vector
<?xml version="1.0" encoding="utf-8"?>
<vector xmlns:android="http://schemas.android.com/apk/res/android"
    android:width="900dp"
    android:height="144dp"
    android:viewportHeight="24"
    android:viewportWidth="150">

    <path
        android:name="search"
        android:pathData="M139.5,17.5 A7,7 0 1,1 140,17 L145,24"
        android:strokeColor="#ffffff"
        android:strokeLineCap="round"
        android:strokeWidth="1" />
</vector>
第三步:
定义一个 search_bar to search_line 的动画xml
res/drawable/animator_path:
<?xml version="1.0" encoding="utf-8"?>
<animated-vector xmlns:android="http://schemas.android.com/apk/res/android"
    android:drawable="@drawable/search_drawable">

    <target
        android:name="search_bar"
        android:animation="@animator/anim_empty" />

    <target
        android:name="search_line"
        android:animation="@animator/anim_fill" />
</animated-vector>
定义一个 search_lineto search_bar 的动画xml
res/drawable/animator_back
<?xml version="1.0" encoding="utf-8"?>
<animated-vector xmlns:android="http://schemas.android.com/apk/res/android"
    android:drawable="@drawable/search_drawable">

    <target
        android:name="search_bar"
        android:animation="@animator/anim_fill" />

    <target
        android:name="search_line"
        android:animation="@animator/anim_empty" />

</animated-vector>
定义消失的动画 res/animator/anim_empty
<objectAnimator xmlns:android="http://schemas.android.com/apk/res/android"
    android:duration="600"
    android:interpolator="@android:interpolator/fast_out_slow_in"
    android:propertyName="trimPathStart"
    android:valueFrom="0"
    android:valueTo="1"
    android:valueType="floatType" />
定义显示的动画 res/animator/anim_fill
<objectAnimator xmlns:android="http://schemas.android.com/apk/res/android"
    android:duration="800"
    android:interpolator="@android:interpolator/fast_out_slow_in"
    android:propertyName="trimPathStart"
    android:valueFrom="1"
    android:valueTo="0"
    android:valueType="floatType" />
activity_main.xml
<?xml version="1.0" encoding="utf-8"?>
<RelativeLayout xmlns:android="http://schemas.android.com/apk/res/android"
    xmlns:tools="http://schemas.android.com/tools"
    android:layout_width="match_parent"
    android:layout_height="match_parent"
    android:background="@color/colorPrimary"
    android:gravity="center"
    tools:context="cjh.vector.MainActivity">

    <ImageView
        android:id="@+id/imageView"
        android:layout_width="150dp"
        android:layout_height="24dp"
        android:src="@drawable/search_bar" />

    <ImageView
        android:id="@+id/imageView2"
        android:layout_width="150dp"
        android:layout_height="24dp"
        android:src="@drawable/search_drawable"
        android:visibility="gone" />

    <EditText
        android:id="@+id/editText"
        android:layout_width="150dp"
        android:layout_height="23dp"
        android:background="@null"
        android:hint=""
        android:paddingLeft="5dp"
        android:paddingTop="1dp" />

    <Button
        android:layout_width="wrap_content"
        android:layout_height="wrap_content"
        android:layout_below="@id/editText"
        android:layout_marginTop="12dp"
        android:onClick="animation"
        android:text="animation" />

</RelativeLayout>
第一个ImageView 是为了显示刚刚创建的默认情况,第二个才是真正的动画的控件。
MainActivity
public class MainActivity extends AppCompatActivity {

    private AnimatedVectorDrawable searchToLine, searchToBar;
    private ImageView imageView, imageView2;

    private boolean is_input = false;

    @Override
    protected void onCreate(Bundle savedInstanceState) {
        super.onCreate(savedInstanceState);
        setContentView(R.layout.activity_main);
        searchToLine = (AnimatedVectorDrawable) getResources().getDrawable(R.drawable.animator_path);
        searchToBar = (AnimatedVectorDrawable) getResources().getDrawable(R.drawable.animator_back);
        imageView = (ImageView) findViewById(R.id.imageView);
        imageView2 = (ImageView) findViewById(R.id.imageView2);
    }

    public void animation(View view) {
        imageView.setVisibility(View.GONE);
        imageView2.setVisibility(View.VISIBLE);
        if (!is_input) {
            imageView2.setImageDrawable(searchToLine);
            searchToLine.start();
            is_input = true;
        } else {
            imageView2.setImageDrawable(searchToBar);
            searchToBar.start();
            is_input = false;
        }
    }
}
至此,对于 Vector Animation 的基本使用就到这里了,事实上对于复杂图像的SVG还是要下很多功夫的。


 3201
3201


 被折叠的 条评论
为什么被折叠?
被折叠的 条评论
为什么被折叠?
 到【灌水乐园】发言


