


yolov5 应用整理
适用于0基础人员与有一定yolov5了解的人员食用.
关于yolov5参考:
yolov5 github源码链接
目前参与过yolov5的应用:
| 平台 | 库 |
|---|---|
| x86/arm cpu | ncnn |
| x86 | libtorch/pytorch |
| BM1684 | 算能标准库(需要进行模型转换) |
| 昇腾 | cann(ascend api) |
https://gitee.com/Tencent/ncnn
https://github.com/alibaba/MNN
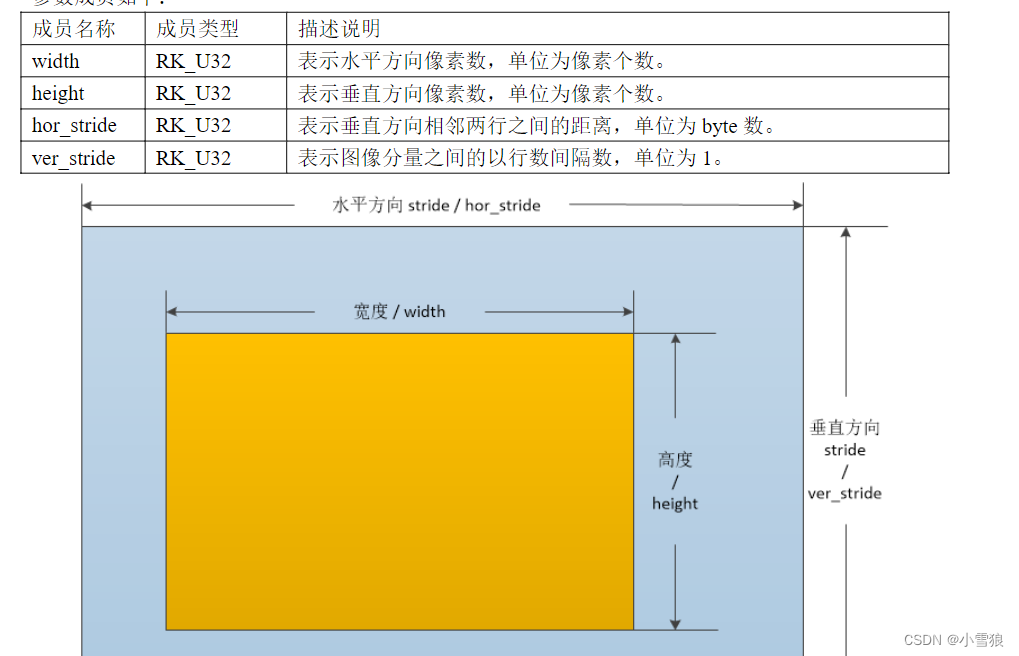
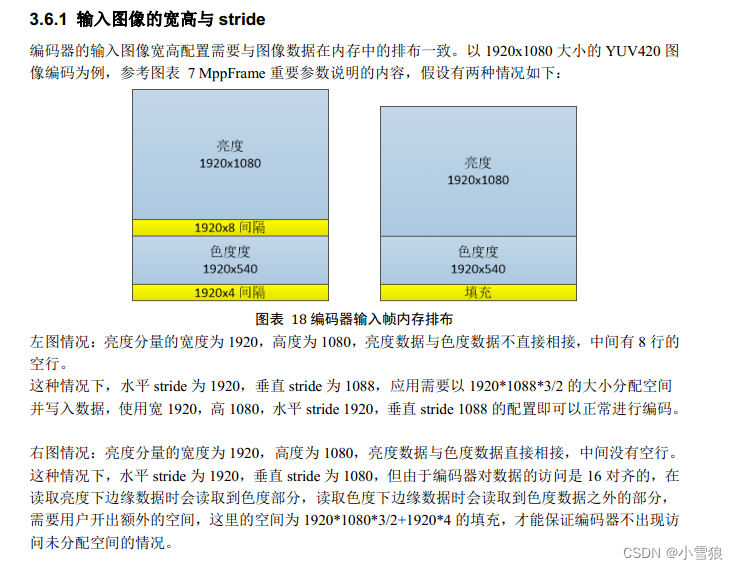
图像解码的延申
在所有嵌入式CPU平台进行图像的解码后都会有宽和高的对其,一般16|64位对其处理.
所有的硬件解码后的格式几乎都是NV12格式.
参考: ffmpeg的功能:
#include <libavutil/macros.h>
#define FFALIGN(x, a) (((x)+(a)-1)&~((a)-1))

FFALIGN(1080, 16)  #进行16位对其
笔者经历过的设备:
- 瑞芯微RK3399: mpp编解码时宽和高的对其均为
stride=16, 使用时需要硬件的rga功能进行缩放,截图,转换格式处理, 即: MppFrame,
https://github.com/rockchip-linux/mpp
- 笔者在算能BM1684中,依据API只需要进行宽度64对齐.
前处理
batch:数量
channel:通道
height, width: 高宽
常见输入格式 BCHW, BHWC
而数据类型有: int8, float, float16,每个数据类型有不同的内存占用情况,libtorch时需要进行转换
#rgb颜色改变, FP32数据
cv::cvtColor(img_input, img_input, cv::COLOR_BGR2RGB);  // BGR -> RGB
img_input.convertTo(img_input, CV_32FC3, 1.0f / 255.0f);  // normalization 1/255

#BHWC转BCHW格式转换
tensor_img = tensor_img.permute({ 0, 3, 1, 2 }).contiguous();  // BHWC -> BCHW (Batch, Channel, Height, Width)
后处理数据
可以用 netron 去查看模型信息
如得到yolov5模型的输出为: float32[1,25200,85]

如何得到目标的坐标呢? 可以理解为一个三维数组 out[1][25200][85]
25200: 有25200个目标,需要进行过滤处理.
85: [0] [1]为中心点xy坐标;
[2] [3] 为wh;
[4]为置信度,
后面的80个为80个分类的置信度,取最大值的位置为分类目标, 值*[4]=最终置信度.
然后进行nms处理, 过滤掉目标多余的坐标框.
BM1684
参考: 算能demon https://github.com/sophgo/sophon-demo
官方的Demon对图片转换有些不足,你需要进行对其处理的完善.
算能官方将ffmpeg与opencv两个库进行了改编,增加了自己的编解码,入门难度简单很多.
对于ffmpeg只需要进行AVFrame与bm_image的相互转换即可.
目前bm1684官方说明为64对其.
	AVFrame *dst = av_frame_alloc();
	dst->width = src->width;
	dst->height = src->height;
	dst->format = AV_PIX_FMT_YUV420P;
	av_frame_get_buffer(dst, 64);
昇腾
见昇腾社区:
https://www.hiascend.com/document/detail/zh/canncommercial/63RC2/inferapplicationdev/aclcppdevg/aclcppdevg_0000.html
目前已经研究出 昇腾310 上的yolov5的转换, 昇腾在yolov5的前处理进行AIPP功能增加,使其能进行yuv数据的输入.
目前经过研究:在鲲鹏atlas800-3000中,纯使用cpu进行ffmpeg拉流解码可以达到80路视频
atc转换om模型说明
需要先将pt模型转换成onnx模型
# 将yolov5s.onnx模型转换为om模型
# 使用aipp时,输入格式为多种,这里是使用int8数据的NV12图片640大小输入
atc --model=yolov5s.onnx --framework=5 --output=yolov5s_aipp --input_format=NCHW --input_shape="input_image:1,3,640,640" --log=info --soc_version=Ascend310B1 --insert_op_conf=./aipp_YOLOv5.config
aipp_YOLOv5.config参考 昇腾CANN => 色域转换配置说明
aipp_op {
    aipp_mode:static
    input_format : YUV420SP_U8
    src_image_size_w : 640
    src_image_size_h : 640
    crop: false
    load_start_pos_h : 0
    load_start_pos_w : 0
    crop_size_w : 640
    crop_size_h: 640
    csc_switch : true
    rbuv_swap_switch : false
    # 色域转换
    matrix_r0c0: 256
    matrix_r0c1: 0
    matrix_r0c2: 359
    matrix_r1c0: 256
    matrix_r1c1: -88
    matrix_r1c2: -183
    matrix_r2c0: 256
    matrix_r2c1: 454
    matrix_r2c2: 0
    input_bias_0: 0
    input_bias_1: 128
    input_bias_2: 128
    # 均值归一化
    min_chn_0 : 0
    min_chn_1 : 0
    min_chn_2 : 0
    var_reci_chn_0: 0.003921568627451
    var_reci_chn_1: 0.003921568627451
    var_reci_chn_2: 0.003921568627451
    }
通过其API来获取模型的信息:
#使用RGB输入格式时(可以用opencv读取图片/视频缩放后直接输入)
input[0] size:4915200 fmt:0(ACL_FORMAT_NCHW) dtype:0(ACL_FLOAT) dims(4):input_image= 1,3,640,640
#其中输入数据长度计算方式: 数据大小见 `sizeof(FLOAT)=4`
#1*640*640*3*4=4,915,200

#使用AIPP的NV12格式时(需要dvpp进行解码成NV12并进行缩放)
input num:1
input[0] size:614400 fmt:1(ACL_FORMAT_NHWC) dtype:4(ACL_UINT8) dims(4):input_image
1,640,640,3,
out num:1
output[0] fmt:2(ACL_FORMAT_ND) dtype:0(ACL_FLOAT) dims(3):Concat_309:0:output0
1,25200,85,
# 其中: 1*640*640*1.5=614400
一个调用模型并检测视频的例子
import cv2
import torch
import numpy as np
import time
import datetime

from models.experimental import attempt_load
from utils.general import non_max_suppression, scale_coords, xyxy2xywh, check_img_size, xywh2xyxy
from utils.torch_utils import select_device
from utils.augmentations import letterbox

video_path = "Y:\\220411150420220411_150441.mp4"

if __name__ == '__main__':

    # 指定你的Yolov5权重文件的路径
    model_weights = "../yolov5s.pt"
    model_weights = "E:\\src\\yolov5\\lxmodels\\202204\\best.pt"

    device = select_device('cuda:0')  # 使用GPU,如果没有GPU,可以使用'cpu'

    # 加载Yolov5模型
    model = attempt_load(model_weights, map_location=device)

    # 设置模型为评估模式
    # model.eval()

    stride = int(model.stride.max())  # model stride
    names = model.module.names if hasattr(model, 'module') else model.names  # get class names
    imgsz = check_img_size([640, 640], s=stride)  # check image size
    model(torch.zeros(1, 3, *imgsz).to(device).type_as(next(model.parameters())))  # run once

    print(names)

    # 打开视频文件
    cap = cv2.VideoCapture(video_path)
    print(f"打开视频{video_path}")
    frame_index = 0

    cv2.namedWindow("Yolov5 Object Detection", cv2.WINDOW_NORMAL)

    while cap.isOpened():
        ret, frame = cap.read()
        if not ret:
            break
        frame_index = frame_index + 1

        #frame = cv2.imread("test.jpg")

        bkimage = cv2.copyTo(frame, None)

        # 使用Yolov5进行目标检测
        img = letterbox(frame)[0]

        # Convert
        img = img.transpose((2, 0, 1))[::-1]  # HWC to CHW, BGR to RGB
        img = np.ascontiguousarray(img)

        img = torch.from_numpy(img).to(device)
        img = img.float()  # uint8 to fp16/32
        img = img / 255.0  # 0 - 255 to 0.0 - 1.0
        if len(img.shape) == 3:
            img = img[None]  # expand for batch dim

        pred = model(img)[0]
        pred = non_max_suppression(pred, conf_thres=0.3, iou_thres=0.5)

        for i, det in enumerate(pred):  # per image
            gn = torch.tensor(frame.shape)[[1, 0, 1, 0]]  # normalization gain whwh
            # s = '%gx%g ' % img.shape[2:]  # print string

            if len(det):
                det[:, :4] = scale_coords(img.shape[2:], det[:, :4], frame.shape).round()

                # Print results
                for c in det[:, -1].unique():
                    n = (det[:, -1] == c).sum()  # detections per class
                    # s += f"{n} {names[int(c)]}{'s' * (n > 1)}, "  # add to string

                # Write results
                for *xyxy, conf, cls in reversed(det):
                    if conf < 0.88:
                        continue
                    # [x1, y1, x2, y2]
                    # xywh = xyxy2xywh(torch.tensor(xyxy).view(1, 4)).view(-1).tolist()

                    # label format
                    # line = (cls, *xywh, conf)
                    label = f'{names[int(cls)]} {conf:.2f}'
                    # 截图
                    # try:
                    # >>> 814-306 854-331 conf:0.8818694949150085
                    # 834.0 318.5 40.0 25.0
                    # print(f">>> {int(xyxy[0])}-{int(xyxy[1])} {int(xyxy[2])}-{int(xyxy[3])} conf:{conf}")
                    # print(f"{xywh[0]} {xywh[1]} {xywh[2]} {xywh[3]}")

                    # crop = frame[int(xyxy[1]):int(xyxy[3]), int(xyxy[0]):int(xyxy[2])]
                    # date_time = datetime.datetime.fromtimestamp(int(time.time() * 1000) / 1000.0).strftime(
                    #     "%Y%m%d%H%M%S-%f")
                    # cv2.imwrite(f"crop/{date_time}-{conf}.jpg", crop)
                    # # except Exception as e:
                    # #    print(f"异常: {int(xyxy[0])}-{int(xyxy[1])} {int(xyxy[2])}-{int(xyxy[3])} conf:{conf}")
                    #
                    # y2 = int(xyxy[3])
                    # if y2 > (frame.shape[0] - 100):
                    #     continue

                    # 绘图
                    frame = cv2.rectangle(frame, (int(xyxy[0]), int(xyxy[1])), (int(xyxy[2]), int(xyxy[3])),
                                          (0, 255, 0), 2)
                    frame = cv2.putText(frame, label, (int(xyxy[0]), int(xyxy[1]) - 10), cv2.FONT_HERSHEY_SIMPLEX, 0.5,
                                        (0, 255, 0), 2)

            cv2.imshow('Yolov5 Object Detection', frame)
            key = cv2.waitKey(10) & 0xFF
            #key = 0
            print(f"frame_index={frame_index}")

            if key == ord('w'):
                # 获取当前时间戳(到毫秒级)
                timestamp = int(time.time() * 1000)

                # 将时间戳转换为易于阅读的日期和时间格式,包括毫秒
                date_time = datetime.datetime.fromtimestamp(timestamp / 1000.0).strftime("%Y-%m-%d_%H-%M-%S-%f")
                output_filename = f"snap/{date_time}.jpg"
                cv2.imwrite(output_filename, bkimage)
                # 保存图片
                print(f"保存图片{output_filename}")

            if key == ord('q'):
                break

    # cap.release()
    # cv2.destroyAllWindows()


 452
452


 被折叠的 条评论
为什么被折叠?
被折叠的 条评论
为什么被折叠?
 到【灌水乐园】发言


