


上篇是动画入门一重点讲的是用xml生成动画以及一些属性怎么使用,发现访问量还可以,感谢大家的观看,这篇博客主要是讲上篇使用xml生成的动画改成它对应的类来使用,请看下图:

而这四个类都是继承Animtion,

我们看下父类Animtion都有什么方法:
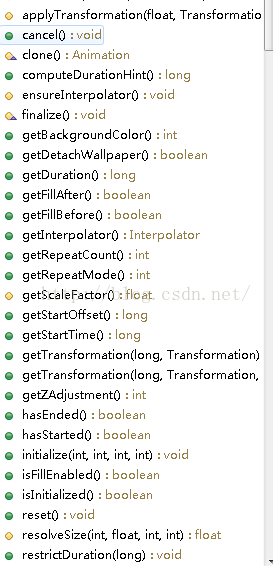
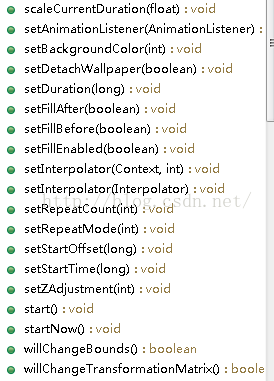
这里很多方法都比较容易看懂,到时候会把上面的几个重要的方法讲解下,现在把上面四个类说明下:
AlphaAnimation
它有二个构造函数如下:
public AlphaAnimation(Context context, AttributeSet attrs) {}
参数说明:
第一个是上下文
第二个参数属性集合,等下我会通过查看源代码知道它是怎么回事
public AlphaAnimation(float fromAlpha, float toAlpha) {}
参数说明:
fromAlpha:起始透明度,它的值范围为[0,1]
toAlpha:动画结束时透明度,它的值范围为[0,1]
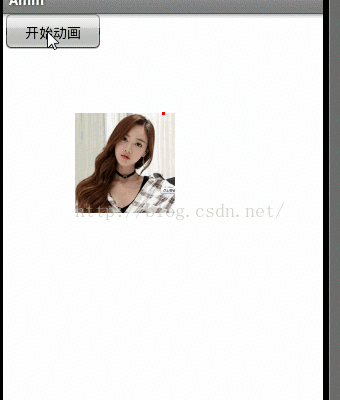
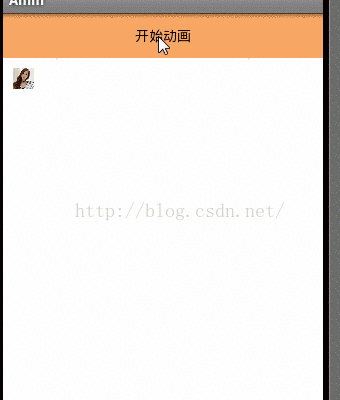
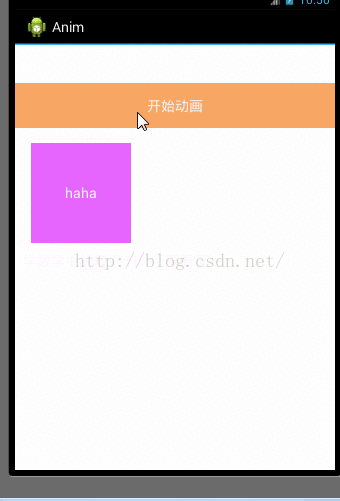
一般使用代码都是使用第二个构造函数,如果你看过AlphaAnimtion类的源代码发现没几行代码,因为所有的逻辑都在它父类Animtion类中,现在写个例子完下,
final AlphaAnimation alphaAnimation = new AlphaAnimation(0.0f, 1.0f);
alphaAnimation.setDuration(5000);
alphaAnimation.setFillAfter(true);
btn_start_anim.setOnClickListener(new OnClickListener() {
@Override
public void onClick(View v) {
iv_anim.startAnimation(alphaAnimation);
}
});
效果:

终于等到周末了,可以双休了,这二天要把这篇博客写完,进入真题,上面讲了最简单的动画就是透明度,
TranslateAnimation
这是个平移动画,它有三个构造函数,
public TranslateAnimation(Context context, AttributeSet attrs) {} 这个不讲
public TranslateAnimation(float fromXDelta, float toXDelta, float fromYDelta, float toYDelta) {}
参数说明:
fromXDelta:x轴起点坐标
toXDelta:x终点坐标
fromYDelta:y轴起点坐标
toYDelta:y轴终点坐标
例子:
final TranslateAnimation translateAnimation = new TranslateAnimation(0, 200, 0, 0);
translateAnimation.setDuration(5000);
translateAnimation.setFillAfter(false);
btn_start_anim.setOnClickListener(new OnClickListener() {
@Override
public void onClick(View v) {
iv_anim.startAnimation(translateAnimation);
}
});
上面的动画是从imageview的0坐标位置(也就是从view的左上角开始)到坐标为200的位置,效果如下:

public TranslateAnimation(int fromXType, float fromXValue, int toXType, float toXValue,
int fromYType, float fromYValue, int toYType, float toYValue) {}
参数说明:
fromXType:x轴起点坐标相对谁
fromXValue:x轴起点坐标
toXType:动画结束时x轴相对谁
toXValue:x轴结束动画坐标点
fromYType,fromYValue,toYType,toYValue同上面的一样,只是换成了y轴而已,意义一样
像fromXType,toXType,fromYType,toYType这些int值我咋知道怎么传呢?其实看下它的源码,源码中的注释就写的很清楚了,
@param fromXType Specifies how fromXValue should be interpreted. One of
* Animation.ABSOLUTE, Animation.RELATIVE_TO_SELF, or
* Animation.RELATIVE_TO_PARENT
这个只是构造函数中第一个形参的说明,再把这三个变量在Antimion类中也找出来
/**
* The specified dimension is an absolute number of pixels.
*/
public static final int ABSOLUTE = 0;
/**
* The specified dimension holds a float and should be multiplied by the
* height or width of the object being animated.
*/
public static final int RELATIVE_TO_SELF = 1;
/**
* The specified dimension holds a float and should be multiplied by the
* height or width of the parent of the object being animated.
*/
public static final int RELATIVE_TO_PARENT = 2;
ABSOLUTE 是一个整数值,以自身view左上角为坐标原点可以是正数也可以是负数,如果是x轴 正数就是向右,负数就是向左,如果是y轴 正数就是向下,负数就是向上
例子:
final TranslateAnimation translateAnimation = new TranslateAnimation(Animation.ABSOLUTE, 0, Animation.ABSOLUTE, -60, Animation.ABSOLUTE, 0, Animation.ABSOLUTE, 0);
translateAnimation.setDuration(5000);
translateAnimation.setFillAfter(false);
btn_start_anim.setOnClickListener(new OnClickListener() {
@Override
public void onClick(View v) {
iv_anim.startAnimation(translateAnimation);
}
});
效果:

RELATIVE_TO_SELF:这个还是以自身view左上角为坐标原点(也就是参考点),而值可以是负数,正数,小数然后乘以它的高或者宽,
final TranslateAnimation translateAnimation = new TranslateAnimation(Animation.ABSOLUTE, 0, Animation.RELATIVE_TO_SELF, 1.5f, Animation.ABSOLUTE, 0, Animation.ABSOLUTE, 0);
translateAnimation.setDuration(2000);
translateAnimation.setFillAfter(false);
btn_start_anim.setOnClickListener(new OnClickListener() {
@Override
public void onClick(View v) {
iv_anim.startAnimation(translateAnimation);
}
});
这个x轴的起点坐标是0,结束点坐标为1.5f*view的宽度(100)=150,
效果:
RELATIVE_TO_PARENT:以作用于动画上的view的父view为参考点,
final TranslateAnimation translateAnimation = new TranslateAnimation(Animation.ABSOLUTE, 0, Animation.RELATIVE_TO_PARENT, 0.8f, Animation.ABSOLUTE, 0, Animation.ABSOLUTE, 0);
translateAnimation.setDuration(2000);
translateAnimation.setFillAfter(false);
btn_start_anim.setOnClickListener(new OnClickListener() {
@Override
public void onClick(View v) {
iv_anim.startAnimation(translateAnimation);
}
});
这个x轴结束动画的坐标就是以父view为参考点,
<RelativeLayout xmlns:android="http://schemas.android.com/apk/res/android"
android:layout_width="match_parent"
android:layout_height="match_parent"
android:orientation="vertical"
android:background="#ffffff"
>
<Button
android:id="@+id/btn_start_anim"
android:layout_width="100px"
android:layout_height="40px"
android:padding="10px"
android:text="开始动画" />
<ImageView
android:id="@+id/iv_anim"
android:layout_width="100px"
android:layout_height="100px"
android:background="@drawable/aa"
android:layout_below="@id/btn_start_anim"
android:layout_marginTop="60px"
android:layout_marginLeft="10px"
/>
<com.example.anim.MyPointView
android:id="@+id/mypointview"
android:layout_width="wrap_content"
android:layout_height="wrap_content"
></com.example.anim.MyPointView>
</RelativeLayout>
从这个布局文件中可以看出imageview的父view是RelativeLayout ,也就是以整个屏幕,
结束点动画x轴坐标=0.8*(父view的宽也就是屏幕的宽,屏幕是320)=0.8*320=256
效果:

下面做一个就是线移动的例子,
xml文件:
<RelativeLayout xmlns:android="http://schemas.android.com/apk/res/android"
android:layout_width="match_parent"
android:layout_height="match_parent"
android:orientation="vertical"
android:background="#ffffff"
>
<LinearLayout
android:id="@+id/ll_root"
android:layout_width="match_parent"
android:layout_height="50dp"
android:orientation="horizontal"
android:background="#7FFFD4"
>
<Button
android:id="@+id/btn_news"
android:layout_width="0dp"
android:layout_height="50dp"
android:layout_weight="1"
android:text="新闻"
android:gravity="center"
android:background="#00000000"
/>
<Button
android:id="@+id/btn_military"
android:layout_width="0dp"
android:layout_height="50dp"
android:layout_weight="1"
android:gravity="center"
android:text="军事"
android:background="#00000000"
/>
<Button
android:id="@+id/btn_amusement"
android:layout_width="0dp"
android:layout_height="50dp"
android:layout_weight="1"
android:text="娱乐"
android:gravity="center"
android:background="#00000000"
/>
</LinearLayout>
<View
android:id="@+id/v_under_line"
android:layout_width="60px"
android:layout_height="4px"
android:layout_marginLeft="20dp"
android:layout_below="@id/ll_root"
android:background="#CD6090"
/>
</RelativeLayout>
代码:
package com.example.anim;
import android.annotation.SuppressLint;
import android.app.Activity;
import android.os.Bundle;
import android.util.Log;
import android.view.View;
import android.view.View.OnClickListener;
import android.view.WindowManager;
import android.view.animation.TranslateAnimation;
import android.widget.Button;
import android.widget.Toast;
@SuppressLint("NewApi")
public class MainActivity extends Activity implements OnClickListener {
private static final String TAG = "MainActivity";
private Button btn_news;
private Button btn_military;
private Button btn_amusement;
private int screenWidth;
private int startX = 0;
private View v_under_line;
private int frameTagId = R.id.btn_news;//记录上一次滑动框的位置
@Override
protected void onCreate(Bundle savedInstanceState) {
super.onCreate(savedInstanceState);
setContentView(R.layout.activity_main);
getSreenWidth();
v_under_line = findViewById(R.id.v_under_line);
btn_news = (Button) findViewById(R.id.btn_news);
btn_military = (Button) findViewById(R.id.btn_military);
btn_amusement = (Button) findViewById(R.id.btn_amusement);
btn_news.setOnClickListener(this);
btn_military.setOnClickListener(this);
btn_amusement.setOnClickListener(this);
}
/**
* 获取屏幕的宽 高
*/
private void getSreenWidth() {
WindowManager wm = getWindowManager();
screenWidth = wm.getDefaultDisplay().getWidth();
}
@Override
public void onClick(View v) {
switch (v.getId()) {
case R.id.btn_news:
if(frameTagId!=R.id.btn_news){
frameTagId=R.id.btn_news;
int endX = 0;
translate(startX,endX);
startX = endX;
}
break;
case R.id.btn_military://军事
if(frameTagId!= R.id.btn_military){
frameTagId= R.id.btn_military;
int endX = screenWidth/3;
translate(startX,endX);
startX = endX;
}
break;
case R.id.btn_amusement://娱乐
if(frameTagId!= R.id.btn_amusement){
frameTagId= R.id.btn_amusement;
int endX = screenWidth/3*2;
translate(startX,endX);
startX=endX;
}
break;
}
}
public void translate(int startX,int endX){
TranslateAnimation translateAnimation = new TranslateAnimation(startX,endX,0,0);
translateAnimation.setDuration(800);
translateAnimation.setFillAfter(true);
v_under_line.startAnimation(translateAnimation);
}
}
效果:

ScaleAnimation:渐变缩放尺寸效果
它有四个构造函数:
public ScaleAnimation(Context context, AttributeSet attrs) {} 第一个不讲
public ScaleAnimation(float fromX, float toX, float fromY, float toY) {}
参数说明:
fromX:x轴开始缩放的比例,是float值
toX:x轴结束缩放的比例 是float值
fromY:y轴开始缩放的比例,是float值
toY:y轴结束是缩放的比例 是float值
例子代码:
final ScaleAnimation scaleAnimation = new ScaleAnimation(0f, 2.0f, 0, 2.0f);
scaleAnimation.setDuration(8000);
btn_start_anim.setOnClickListener(new OnClickListener() {
@Override
public void onClick(View v) {
iv.startAnimation(scaleAnimation);
}
});
效果:
、
public ScaleAnimation(float fromX, float toX, float fromY, float toY,float pivotX, float pivotY) {}
fromX:x轴开始缩放的比例,是float值
toX:x轴结束缩放的比例 是float值
fromY:y轴开始缩放的比例,是float值
toY:y轴结束是缩放的比例 是float值
pivotX:x轴伸缩值 是整数值,可以是正数也可以是负数pivotY:y轴伸缩值 是整数值,可以是正数也可以是负数
例子:
final ScaleAnimation scaleAnimation = new ScaleAnimation(0, 1.0f, 0, 1.0f,30, 30);
scaleAnimation.setDuration(8000);
btn_start_anim.setOnClickListener(new OnClickListener() {
@Override
public void onClick(View v) {
iv.startAnimation(scaleAnimation);
}
});
效果:

备注:计算x轴缩放的坐标点=0*(imageview的宽度)+30,y轴缩放的坐标点=0*(imageview的高度)+30
所以它的起点缩放坐标为(30,30)
public ScaleAnimation(float fromX, float toX, float fromY, float toY,
int pivotXType, float pivotXValue, int pivotYType, float pivotYValue) {}
fromX:x轴开始缩放的比例,是float值
toX:x轴结束缩放的比例 是float值
fromY:y轴开始缩放的比例,是float值
toY:y轴结束是缩放的比例 是float值
pivotXType 缩放比例模式,这个和前面的平移动画是一样的,
pivotXValue 相对模式的值
pivotYType 同上
pivotYValue 同上
这个就不讲了,下面讲一个例子玩下,
package com.example.anim;
import android.content.Context;
import android.graphics.Canvas;
import android.graphics.Color;
import android.graphics.Paint;
import android.util.AttributeSet;
import android.view.View;
public class MyPointView extends View {
public MyPointView(Context context, AttributeSet attrs, int defStyleAttr) {
super(context, attrs, defStyleAttr);
}
public MyPointView(Context context, AttributeSet attrs) {
super(context, attrs);
}
public MyPointView(Context context) {
super(context);
}
@Override
protected void onDraw(Canvas canvas) {
super.onDraw(canvas);
Paint paint = new Paint();
paint.setColor(Color.RED);
paint.setStrokeWidth(3);
paint.setStyle(Paint.Style.STROKE);
canvas.drawCircle(160, 300, 80, paint);
canvas.drawPoint(160, 300, paint);
}
}
public class MainActivity extends Activity{
private static final String TAG = "MainActivity";
private Button btn_start_anim;
private ImageView iv;
private MyPointView mypointview;
@Override
protected void onCreate(Bundle savedInstanceState) {
super.onCreate(savedInstanceState);
setContentView(R.layout.activity_main);
iv = (ImageView) findViewById(R.id.iv);
mypointview = (MyPointView) findViewById(R.id.mypointview);
btn_start_anim = (Button) findViewById(R.id.btn_start_anim);
final ScaleAnimation scaleAnimation = new ScaleAnimation(0, 1.0f, 0, 1.0f,160, 300);
scaleAnimation.setRepeatCount(100);
scaleAnimation.setRepeatMode(Animation.REVERSE);
scaleAnimation.setDuration(100);
btn_start_anim.setOnClickListener(new OnClickListener() {
@Override
public void onClick(View v) {
mypointview.startAnimation(scaleAnimation);
}
});
}
}
效果:
RotateAnimation view旋转效果
它的构造函数如下:
public RotateAnimation(Context context, AttributeSet attrs) {} 第一个不讲
public RotateAnimation(float fromDegrees, float toDegrees) {}
参数说明:
fromDegrees 开始旋转的角度
toDegrees:动画所执行的角度
public RotateAnimation(float fromDegrees, float toDegrees, float pivotX, float pivotY) {}
参数说明:
fromDegrees: 开始旋转的角度
toDegrees:动画所执行的角度
pivotX:x轴缩放模式,具体的数值,参考的是view本身pivotY:y轴缩放模式,具体的数值,参考的是view本身
public RotateAnimation(float fromDegrees, float toDegrees, int pivotXType, float pivotXValue,
int pivotYType, float pivotYValue) {}
这个同上讲的一样,不讲
现在讲一个例子,
布局文件:
<RelativeLayout xmlns:android="http://schemas.android.com/apk/res/android"
android:layout_width="match_parent"
android:layout_height="match_parent"
android:orientation="vertical"
android:background="#ffffff"
>
<Button
android:id="@+id/btn_start_anim"
android:layout_width="match_parent"
android:layout_height="45px"
android:text="开始动画"
android:gravity="center"
android:background="#F4A460"
/>
<ImageView
android:id="@+id/iv"
android:layout_width="100px"
android:layout_height="100px"
android:background="@drawable/aa"
android:layout_below="@id/btn_start_anim"
android:layout_marginTop="15px"
android:layout_marginLeft="10px"
android:visibility="visible"
/>
<com.example.anim.MyCircleView
android:id="@+id/mycircleview"
android:layout_width="200px"
android:layout_height="200px"
android:layout_marginLeft="60px"
android:layout_below="@id/iv"
/>
<com.example.anim.MyPointView
android:id="@+id/mypointview"
android:layout_width="200px"
android:layout_height="200px"
android:layout_marginLeft="60px"
android:layout_below="@id/iv"
></com.example.anim.MyPointView>
</RelativeLayout>
自定义View圆:
package com.example.anim;
import android.content.Context;
import android.graphics.Canvas;
import android.graphics.Color;
import android.graphics.Paint;
import android.util.AttributeSet;
import android.view.View;
public class MyCircleView extends View {
public MyCircleView(Context context, AttributeSet attrs, int defStyleAttr) {
super(context, attrs, defStyleAttr);
}
public MyCircleView(Context context, AttributeSet attrs) {
super(context, attrs);
}
public MyCircleView(Context context) {
super(context);
}
@Override
protected void onDraw(Canvas canvas) {
super.onDraw(canvas);
Paint paint = new Paint();
paint.setStrokeWidth(2);
paint.setAntiAlias(true);
paint.setStyle(Paint.Style.STROKE);
paint.setColor(Color.BLUE);
canvas.drawCircle(100, 100, 78, paint);
paint.setColor(Color.GREEN);
canvas.drawCircle(100, 100, 98, paint);
}
}
自定义2个小圆和线的view:
package com.example.anim;
import android.content.Context;
import android.graphics.Canvas;
import android.graphics.Color;
import android.graphics.Paint;
import android.util.AttributeSet;
import android.view.View;
public class MyPointView extends View{
public MyPointView(Context context, AttributeSet attrs, int defStyleAttr) {
super(context, attrs, defStyleAttr);
}
public MyPointView(Context context, AttributeSet attrs) {
super(context, attrs);
}
public MyPointView(Context context) {
super(context);
}
@Override
public void onDraw(Canvas canvas) {
Paint paint = new Paint();
paint.setColor(Color.RED);
paint.setStrokeWidth(2);
paint.setAntiAlias(true);
paint.setStyle(Paint.Style.STROKE);
canvas.drawCircle(100, 11, 9, paint);
paint.setColor(Color.DKGRAY);
canvas.drawCircle(100, 188, 9, paint);
paint.setColor(Color.RED);
canvas.drawLine(100, 11, 100, 188, paint);
}
}
逻辑代码:
mypointview = (MyPointView) findViewById(R.id.mypointview);
mycircleview = (MyCircleView) findViewById(R.id.mycircleview);
btn_start_anim = (Button) findViewById(R.id.btn_start_anim);
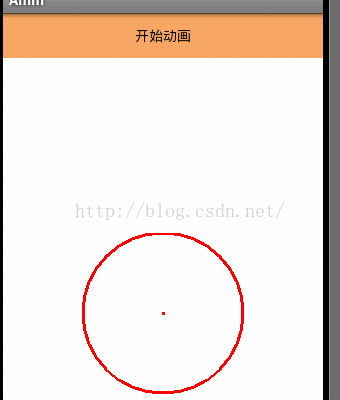
final RotateAnimation rotateAnimation = new RotateAnimation(0, 360,100,100);
rotateAnimation.setRepeatCount(100);
rotateAnimation.setRepeatMode(Animation.RESTART);
rotateAnimation.setDuration(500);
btn_start_anim.setOnClickListener(new OnClickListener() {
@Override
public void onClick(View v) {
mypointview.startAnimation(rotateAnimation);
}
});
效果:

分析图:
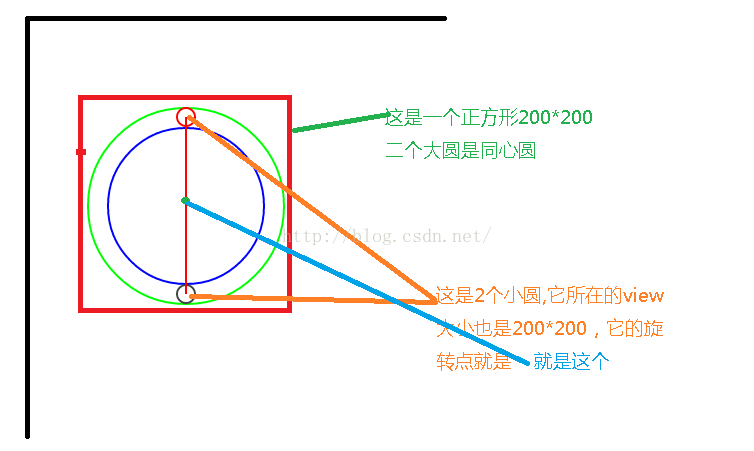
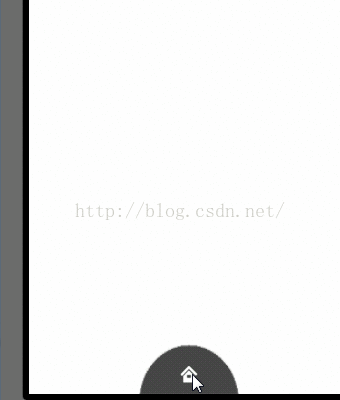
记得很早之前优酷客户端有个效果,就是另外旋转动画实现的,今天就实现玩下,首先看下布局效果:

这些图片都是从网上找的,其实这个动画只要明白2点就可以做出来,
1:顺时针和逆时针问题,这个和我们的钟表走的是一样的
2:旋转点问题,
布局文件:
<?xml version="1.0" encoding="utf-8"?>
<RelativeLayout xmlns:android="http://schemas.android.com/apk/res/android"
android:layout_width="fill_parent"
android:layout_height="fill_parent"
android:background="#ffffff" >
<RelativeLayout
android:id="@+id/relate_level3"
android:layout_width="280dp"
android:layout_height="140dp"
android:layout_alignParentBottom="true"
android:layout_centerHorizontal="true"
android:background="@drawable/level3" >
<ImageButton
android:id="@+id/c1"
android:layout_width="wrap_content"
android:layout_height="wrap_content"
android:layout_alignParentBottom="true"
android:layout_marginBottom="6dip"
android:layout_marginLeft="12dip"
android:background="@drawable/channel1" />
<ImageButton
android:id="@+id/c2"
android:layout_width="wrap_content"
android:layout_height="wrap_content"
android:layout_above="@+id/c1"
android:layout_marginBottom="12dip"
android:layout_marginLeft="28dip"
android:background="@drawable/channel2" />
<ImageButton
android:id="@+id/c3"
android:layout_width="wrap_content"
android:layout_height="wrap_content"
android:layout_above="@+id/c2"
android:layout_marginBottom="8dip"
android:layout_marginLeft="6dip"
android:layout_toRightOf="@+id/c2"
android:background="@drawable/channel3" />
<ImageButton
android:id="@+id/c4"
android:layout_width="wrap_content"
android:layout_height="wrap_content"
android:layout_centerHorizontal="true"
android:layout_margin="6dip"
android:background="@drawable/channel4" />
<ImageButton
android:id="@+id/c5"
android:layout_width="wrap_content"
android:layout_height="wrap_content"
android:layout_above="@+id/c6"
android:layout_marginBottom="8dip"
android:layout_marginRight="6dip"
android:layout_toLeftOf="@+id/c6"
android:background="@drawable/channel5" />
<ImageButton
android:id="@+id/c6"
android:layout_width="wrap_content"
android:layout_height="wrap_content"
android:layout_above="@+id/c7"
android:layout_alignParentRight="true"
android:layout_marginBottom="12dip"
android:layout_marginRight="28dip"
android:background="@drawable/channel6" />
<ImageButton
android:id="@+id/c7"
android:layout_width="wrap_content"
android:layout_height="wrap_content"
android:layout_alignParentBottom="true"
android:layout_alignParentRight="true"
android:layout_marginBottom="6dip"
android:layout_marginRight="12dip"
android:background="@drawable/channel7" />
</RelativeLayout>
<RelativeLayout
android:id="@+id/relate_level2"
android:layout_width="180dp"
android:layout_height="90dp"
android:layout_alignParentBottom="true"
android:layout_centerHorizontal="true"
android:background="@drawable/level2" >
<ImageButton
android:id="@+id/ib_level_menu"
android:layout_width="wrap_content"
android:layout_height="wrap_content"
android:layout_centerHorizontal="true"
android:layout_margin="6dip"
android:background="@drawable/icon_menu" />
<ImageButton
android:id="@+id/search"
android:layout_width="wrap_content"
android:layout_height="wrap_content"
android:layout_alignParentBottom="true"
android:layout_margin="10dip"
android:background="@drawable/icon_search" />
<ImageButton
android:id="@+id/myyouku"
android:layout_width="wrap_content"
android:layout_height="wrap_content"
android:layout_alignParentBottom="true"
android:layout_alignParentRight="true"
android:layout_margin="10dip"
android:background="@drawable/icon_myyouku" />
</RelativeLayout>
<RelativeLayout
android:id="@+id/relate_level1"
android:layout_width="100dp"
android:layout_height="50dp"
android:layout_alignParentBottom="true"
android:layout_centerHorizontal="true"
android:background="@drawable/level1" >
<ImageButton
android:id="@+id/ib_level_home"
android:layout_width="wrap_content"
android:layout_height="wrap_content"
android:layout_centerInParent="true"
android:background="@drawable/icon_home" />
</RelativeLayout>
</RelativeLayout>
封装的动画工具类MyAnimationUtils.java
package com.example.anim;
import android.view.ViewGroup;
import android.view.animation.Animation;
import android.view.animation.RotateAnimation;
public class MyAnimationUtils {
/**
* @param viewGroup 动画作用的view对象
* @param durationMillis 动画执行的时间
*/
public static void startAnimationsIn(ViewGroup viewGroup,long durationMillis){
viewGroup.setVisibility(0);
RotateAnimation animation = new RotateAnimation(-180, 0, Animation.RELATIVE_TO_SELF,
0.5f, Animation.RELATIVE_TO_SELF, 1.0f);
animation.setFillAfter(true);
animation.setDuration(durationMillis);
viewGroup.startAnimation(animation);
}
/**
* 逆向旋转
* @param viewgroup 动画作用的view对象
* @param durationMillis 动画执行的时间
* @param startOffset 延迟执行动画
*/
public static void startAnimationsOut(final ViewGroup viewgroup,
long durationMillis, long startOffset) {
Animation animation;
animation = new RotateAnimation(0, -180, Animation.RELATIVE_TO_SELF,
0.5f, Animation.RELATIVE_TO_SELF, 1.0f);
animation.setFillAfter(true);
animation.setDuration(durationMillis);
animation.setStartOffset(startOffset);
viewgroup.startAnimation(animation);
}
}
逻辑控制代码:
public class MyYoukuTestActivity extends Activity implements OnClickListener {
private RelativeLayout relate_level3;//最外层布局
private RelativeLayout relate_level2;//中间层布局
private RelativeLayout relate_level1;//最底层布局
private ImageButton ib_level_home;
private ImageButton ib_level_menu;
private boolean isLevel2Out = false;
private boolean isLevel1Out = false;
private long durationMillis = 1000;
@Override
protected void onCreate(Bundle savedInstanceState) {
super.onCreate(savedInstanceState);
setContentView(R.layout.activity_youku_test);
initView();
initListener();
}
private void initListener() {
ib_level_home.setOnClickListener(this);
ib_level_menu.setOnClickListener(this);
}
private void initView() {
relate_level3 = (RelativeLayout) findViewById(R.id.relate_level3);
relate_level2 = (RelativeLayout) findViewById(R.id.relate_level2);
relate_level1 = (RelativeLayout) findViewById(R.id.relate_level1);
ib_level_home = (ImageButton) findViewById(R.id.ib_level_home);
ib_level_menu = (ImageButton) findViewById(R.id.ib_level_menu);
}
@Override
public void onClick(View v) {
switch (v.getId()) {
case R.id.ib_level_home:
if(!isLevel2Out&&!isLevel1Out){
MyAnimationUtils.startAnimationsOut(relate_level2, durationMillis, durationMillis);
MyAnimationUtils.startAnimationsOut(relate_level3, durationMillis, 0);
isLevel2Out = true;
isLevel1Out = true;
}else{
if(isLevel1Out){
isLevel1Out = false;
MyAnimationUtils.startAnimationsIn(relate_level2, durationMillis);
}else{
isLevel1Out = true;
MyAnimationUtils.startAnimationsOut(relate_level2, durationMillis,0);
}
}
break;
case R.id.ib_level_menu:
if(!isLevel2Out){
isLevel2Out = true;
MyAnimationUtils.startAnimationsOut(relate_level3, 500,0);
}else{
isLevel2Out = false;
MyAnimationUtils.startAnimationsIn(relate_level3, 500);
}
break;
}
}
}
效果:
现在演示tween动画一个不能交互的缺点,写一个平移动画就ok
TranslateAnimation translateAnimation = new TranslateAnimation(0, 100, 0, 0);
translateAnimation.setDuration(5000);
btn_start_anim.setOnClickListener(new OnClickListener() {
@Override
public void onClick(View v) {
}
});
iv.setOnClickListener(new OnClickListener() {
@Override
public void onClick(View v) {
Toast.makeText(getApplicationContext(), "imageview被点击了", Toast.LENGTH_LONG).show();
}
});
效果:

从上面的效果上看imageview动画执行完后,再次点击它没反应,而点击imageview在未被平移的位置反而有效,这就是为什么tween要被属性动画替代的一个很大的原因,它不能交互只能实现效果,
我们知道凡是和界面有关的都是通过view的draw绘制上去的,现在分析下动画的实现过程,
iv.startAnimation(translateAnimation);我们一般是这样设置一个动画给view对象的,现在看下startAnimation()源码:
/**
* Start the specified animation now.
*
* @param animation the animation to start now
*/
public void startAnimation(Animation animation) {
animation.setStartTime(Animation.START_ON_FIRST_FRAME);//设置动画的其实时间为-1
setAnimation(animation);//给view类的变量mCurrentAnimation赋值
invalidateParentCaches();
invalidate(true);//重新绘制
}
下面是invalidate(true)的方法源码:
void invalidate(boolean invalidateCache) {
if (skipInvalidate()) {
return;
}
if ((mPrivateFlags & (PFLAG_DRAWN | PFLAG_HAS_BOUNDS)) == (PFLAG_DRAWN | PFLAG_HAS_BOUNDS) ||
(invalidateCache && (mPrivateFlags & PFLAG_DRAWING_CACHE_VALID) == PFLAG_DRAWING_CACHE_VALID) ||
(mPrivateFlags & PFLAG_INVALIDATED) != PFLAG_INVALIDATED || isOpaque() != mLastIsOpaque) {
mLastIsOpaque = isOpaque();
mPrivateFlags &= ~PFLAG_DRAWN;
mPrivateFlags |= PFLAG_DIRTY;
if (invalidateCache) {
mPrivateFlags |= PFLAG_INVALIDATED;
mPrivateFlags &= ~PFLAG_DRAWING_CACHE_VALID;
}
final AttachInfo ai = mAttachInfo;
final ViewParent p = mParent;
//noinspection PointlessBooleanExpression,ConstantConditions
if (!HardwareRenderer.RENDER_DIRTY_REGIONS) {
if (p != null && ai != null && ai.mHardwareAccelerated) {
// fast-track for GL-enabled applications; just invalidate the whole hierarchy
// with a null dirty rect, which tells the ViewAncestor to redraw everything
p.invalidateChild(this, null);
return;
}
}
if (p != null && ai != null) {
final Rect r = ai.mTmpInvalRect;
r.set(0, 0, mRight - mLeft, mBottom - mTop);
// Don't call invalidate -- we don't want to internally scroll
// our own bounds
p.invalidateChild(this, r);//这是调用viewgroup的invalidateChild()方法
}
}
}
ViewGroup中的invalidateChild(View child, final Rect dirty)方法,再调用ViewGroup中的invalidateChildInParent(final int[] location, final Rect dirty)方法,然后调用ViewGroup中的dispatchDraw()方法绘制其子view,下面是ViewGroup中的部分dispatchDraw()源码:
@Override
protected void dispatchDraw(Canvas canvas) {
final int count = mChildrenCount;
final View[] children = mChildren;
int flags = mGroupFlags;
..........
if ((flags & FLAG_USE_CHILD_DRAWING_ORDER) == 0) {
for (int i = 0; i < count; i++) {
final View child = children[i];
if ((child.mViewFlags & VISIBILITY_MASK) == VISIBLE || child.getAnimation() != null) {
more |= drawChild(canvas, child, drawingTime);
}
}
} else {
for (int i = 0; i < count; i++) {
final View child = children[getChildDrawingOrder(count, i)];
if ((child.mViewFlags & VISIBILITY_MASK) == VISIBLE || child.getAnimation() != null) {
more |= drawChild(canvas, child, drawingTime);
}
}
}
..............省略部分源码
// Draw any disappearing views that have animations
if (mDisappearingChildren != null) {
final ArrayList<View> disappearingChildren = mDisappearingChildren;
final int disappearingCount = disappearingChildren.size() - 1;
// Go backwards -- we may delete as animations finish
for (int i = disappearingCount; i >= 0; i--) {
final View child = disappearingChildren.get(i);
more |= drawChild(canvas, child, drawingTime);
}
}
........................ 省略部分源码
}
红色的代码是主要的,drawChild()源码如下:
protected boolean drawChild(Canvas canvas, View child, long drawingTime) {
return child.draw(canvas, this, drawingTime);
}
这是调用view的draw(Canvas canvas, ViewGroup parent, long drawingTime)方法:
boolean draw(Canvas canvas, ViewGroup parent, long drawingTime) {
boolean useDisplayListProperties = mAttachInfo != null && mAttachInfo.mHardwareAccelerated;
boolean more = false;
final boolean childHasIdentityMatrix = hasIdentityMatrix();
final int flags = parent.mGroupFlags;
.......
final Animation a = getAnimation(); //这个就是setAnimation()方法中的动画赋值给mCurrentAnimation,
if (a != null) {
more = drawAnimation(parent, drawingTime, a, scalingRequired);
concatMatrix = a.willChangeTransformationMatrix();
if (concatMatrix) {
mPrivateFlags3 |= PFLAG3_VIEW_IS_ANIMATING_TRANSFORM;
}
transformToApply = parent.getChildTransformation();
} else {
if ((mPrivateFlags3 & PFLAG3_VIEW_IS_ANIMATING_TRANSFORM) ==
PFLAG3_VIEW_IS_ANIMATING_TRANSFORM && mDisplayList != null) {
// No longer animating: clear out old animation matrix
mDisplayList.setAnimationMatrix(null);
mPrivateFlags3 &= ~PFLAG3_VIEW_IS_ANIMATING_TRANSFORM;
}
if (!useDisplayListProperties &&
(flags & ViewGroup.FLAG_SUPPORT_STATIC_TRANSFORMATIONS) != 0) {
final Transformation t = parent.getChildTransformation();
final boolean hasTransform = parent.getChildStaticTransformation(this, t);
if (hasTransform) {
final int transformType = t.getTransformationType();
transformToApply = transformType != Transformation.TYPE_IDENTITY ? t : null;
concatMatrix = (transformType & Transformation.TYPE_MATRIX) != 0;
}
}
}
...........
concatMatrix |= !childHasIdentityMatrix;
.................
// Sets the flag as early as possible to allow draw() implementations
// to call invalidate() successfully when doing animations
mPrivateFlags |= PFLAG_DRAWN;
}
}
...............
int sx = 0;
int sy = 0;
if (!hasDisplayList) {
computeScroll();
sx = mScrollX;
sy = mScrollY;
}
final boolean hasNoCache = cache == null || hasDisplayList;
final boolean offsetForScroll = cache == null && !hasDisplayList &&
layerType != LAYER_TYPE_HARDWARE;
..................
int restoreTo = -1;
if (!useDisplayListProperties || transformToApply != null) {
restoreTo = canvas.save();
}
float alpha = useDisplayListProperties ? 1 : (getAlpha() * getTransitionAlpha());
.................
if (!useDisplayListProperties && hasDisplayList) {
displayList = getDisplayList();
if (!displayList.isValid()) {
// Uncommon, but possible. If a view is removed from the hierarchy during the call
// to getDisplayList(), the display list will be marked invalid and we should not
// try to use it again.
displayList = null;
hasDisplayList = false;
}
}
..................
mRecreateDisplayList = false;
.............
return more;
}
看下drawAnimation源码:
private boolean drawAnimation(ViewGroup parent, long drawingTime,
Animation a, boolean scalingRequired) {
Transformation invalidationTransform;
final int flags = parent.mGroupFlags;
final boolean initialized = a.isInitialized();//判断是否初始化了
if (!initialized) {//没有初始化的话
a.initialize(mRight - mLeft, mBottom - mTop, parent.getWidth(), parent.getHeight());//调用Animation的initialize()进行初始化,把view的绘制正方形绘制出来
a.initializeInvalidateRegion(0, 0, mRight - mLeft, mBottom - mTop);//绘制view的可行区域
if (mAttachInfo != null) a.setListenerHandler(mAttachInfo.mHandler);
onAnimationStart();//动画开始回调
}
final Transformation t = parent.getChildTransformation();
boolean more = a.getTransformation(drawingTime, t, 1f);
if (scalingRequired && mAttachInfo.mApplicationScale != 1f) {
if (parent.mInvalidationTransformation == null) {
parent.mInvalidationTransformation = new Transformation();
}
invalidationTransform = parent.mInvalidationTransformation;
a.getTransformation(drawingTime, invalidationTransform, 1f);这是重点,前面逻辑是判断是否需要缩放以及是否需要渐变透明,a是Animation变量,查看下Animation的getTransformation()方法
} else {
invalidationTransform = t;
}
if (more) {
if (!a.willChangeBounds()) {
if ((flags & (ViewGroup.FLAG_OPTIMIZE_INVALIDATE | ViewGroup.FLAG_ANIMATION_DONE)) ==
ViewGroup.FLAG_OPTIMIZE_INVALIDATE) {
parent.mGroupFlags |= ViewGroup.FLAG_INVALIDATE_REQUIRED;
} else if ((flags & ViewGroup.FLAG_INVALIDATE_REQUIRED) == 0) {
// The child need to draw an animation, potentially offscreen, so
// make sure we do not cancel invalidate requests
parent.mPrivateFlags |= PFLAG_DRAW_ANIMATION;
parent.invalidate(mLeft, mTop, mRight, mBottom);
}
} else {
if (parent.mInvalidateRegion == null) {
parent.mInvalidateRegion = new RectF();
}
final RectF region = parent.mInvalidateRegion;
a.getInvalidateRegion(0, 0, mRight - mLeft, mBottom - mTop, region,
invalidationTransform);
// The child need to draw an animation, potentially offscreen, so
// make sure we do not cancel invalidate requests
parent.mPrivateFlags |= PFLAG_DRAW_ANIMATION;
final int left = mLeft + (int) region.left;
final int top = mTop + (int) region.top;
parent.invalidate(left, top, left + (int) (region.width() + .5f),
top + (int) (region.height() + .5f));
}
}
return more;
}
public boolean getTransformation(long currentTime, Transformation outTransformation,
float scale) {
mScaleFactor = scale;
return getTransformation(currentTime, outTransformation);
}
getTransformation(currentTime, outTransformation);方法源码:
public boolean getTransformation(long currentTime, Transformation outTransformation) {
if (mStartTime == -1) {
mStartTime = currentTime;
}
final long startOffset = getStartOffset();
final long duration = mDuration;
float normalizedTime;
if (duration != 0) {
normalizedTime = ((float) (currentTime - (mStartTime + startOffset))) /
(float) duration;
} else {
// time is a step-change with a zero duration
normalizedTime = currentTime < mStartTime ? 0.0f : 1.0f;
}
final boolean expired = normalizedTime >= 1.0f;
mMore = !expired;
if (!mFillEnabled) normalizedTime = Math.max(Math.min(normalizedTime, 1.0f), 0.0f);
if ((normalizedTime >= 0.0f || mFillBefore) && (normalizedTime <= 1.0f || mFillAfter)) {
if (!mStarted) {
fireAnimationStart();
mStarted = true;
if (USE_CLOSEGUARD) {
guard.open("cancel or detach or getTransformation");
}
if (mFillEnabled) normalizedTime = Math.max(Math.min(normalizedTime, 1.0f), 0.0f);
if (mCycleFlip) {
normalizedTime = 1.0f - normalizedTime;
}
final float interpolatedTime = mInterpolator.getInterpolation(normalizedTime);//获取动画执行的时间
applyTransformation(interpolatedTime, outTransformation);//这是动画执行的完整逻辑,可以看下平移或者其他动画都实现了这方法,
}
if (expired) {
if (mRepeatCount == mRepeated) {
if (!mEnded) {
mEnded = true;
guard.close();
fireAnimationEnd();
}
} else {
if (mRepeatCount > 0) {
mRepeated++;
}
if (mRepeatMode == REVERSE) {
mCycleFlip = !mCycleFlip;
}
mStartTime = -1;
mMore = true;
fireAnimationRepeat();
}
}
if (!mMore && mOneMoreTime) {
mOneMoreTime = false;
return true;
}
return mMore;
}
现在动画分析完成了,画图整理下,
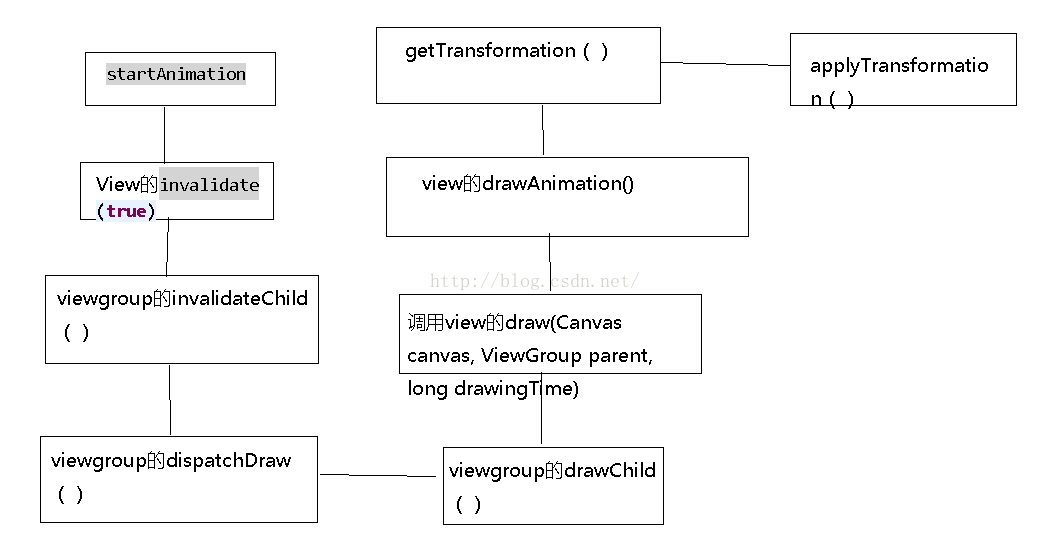
这就是整个执行过程,现在主要研究下applyTransformation()方法,发现很多效果实现这个方法,
@Override
protected void applyTransformation(float interpolatedTime, Transformation t) {
super.applyTransformation(interpolatedTime, t);
}
参数说明:
float interpolatedTime:动画执行的时间度 范围为0~1
Transformation t:动画执行的逻辑就是封装在Transformation 类中
看看TranslateAnimation类中的applyTransformation()方法源码:
@Override
protected void applyTransformation(float interpolatedTime, Transformation t) {
float dx = mFromXDelta;
float dy = mFromYDelta;
if (mFromXDelta != mToXDelta) {
dx = mFromXDelta + ((mToXDelta - mFromXDelta) * interpolatedTime);
}
if (mFromYDelta != mToYDelta) {
dy = mFromYDelta + ((mToYDelta - mFromYDelta) * interpolatedTime);
}
//前面都是一些赋值操作,真正操作动画的是下面这句话,是通过矩阵进行平移的
t.getMatrix().setTranslate(dx, dy);
}
这个类Transformation的源码比较少,可以贴出来看下,
public class Transformation {
/**
* Indicates a transformation that has no effect (alpha = 1 and identity matrix.)
*/
public static final int TYPE_IDENTITY = 0x0;
/**
* Indicates a transformation that applies an alpha only (uses an identity matrix.)
*/
public static final int TYPE_ALPHA = 0x1;
/**
* Indicates a transformation that applies a matrix only (alpha = 1.)
*/
public static final int TYPE_MATRIX = 0x2;
/**
* Indicates a transformation that applies an alpha and a matrix.
*/
public static final int TYPE_BOTH = TYPE_ALPHA | TYPE_MATRIX;
protected Matrix mMatrix;
protected float mAlpha;
protected int mTransformationType
/**
* Creates a new transformation with alpha = 1 and the identity matrix.
*/
public Transformation() {
clear();
}
/**
* Reset the transformation to a state that leaves the object
* being animated in an unmodified state. The transformation type is
* {@link #TYPE_BOTH} by default.
*/
public void clear() {
if (mMatrix == null) {
mMatrix = new Matrix();
} else {
mMatrix.reset();
}
mAlpha = 1.0f;
mTransformationType = TYPE_BOTH;
}
/**
* Indicates the nature of this transformation.
*
* @return {@link #TYPE_ALPHA}, {@link #TYPE_MATRIX},
* {@link #TYPE_BOTH} or {@link #TYPE_IDENTITY}.
*/
public int getTransformationType() {
return mTransformationType;
}
/**
* Sets the transformation type.
*
* @param transformationType One of {@link #TYPE_ALPHA},
* {@link #TYPE_MATRIX}, {@link #TYPE_BOTH} or
* {@link #TYPE_IDENTITY}.
*/
public void setTransformationType(int transformationType) {
mTransformationType = transformationType;
}
/**
* Clones the specified transformation.
* @param t The transformation to clone.
*/
public void set(Transformation t) {
mAlpha = t.getAlpha();
mMatrix.set(t.getMatrix());
mTransformationType = t.getTransformationType();
}
/**
* Apply this Transformation to an existing Transformation, e.g. apply
* a scale effect to something that has already been rotated.
* @param t
*/
public void compose(Transformation t) {
mAlpha *= t.getAlpha();
mMatrix.preConcat(t.getMatrix());
}
/**
* Like {@link #compose(Transformation)} but does this.postConcat(t) of
* the transformation matrix.
* @hide
*/
public void postCompose(Transformation t) {
mAlpha *= t.getAlpha();
mMatrix.postConcat(t.getMatrix());
}
/**
* @return The 3x3 Matrix representing the trnasformation to apply to the
* coordinates of the object being animated
*/
public Matrix getMatrix() {
return mMatrix;
}
/**
* Sets the degree of transparency
* @param alpha 1.0 means fully opaqe and 0.0 means fully transparent
*/
public void setAlpha(float alpha) {
mAlpha = alpha;
}
/**
* @return The degree of transparency
*/
public float getAlpha() {
return mAlpha;
}
@Override
public String toString() {
StringBuilder sb = new StringBuilder(64);
sb.append("Transformation");
toShortString(sb);
return sb.toString();
}
/**
* Return a string representation of the transformation in a compact form.
*/
public String toShortString() {
StringBuilder sb = new StringBuilder(64);
toShortString(sb);
return sb.toString();
}
/**
* @hide
*/
public void toShortString(StringBuilder sb) {
sb.append("{alpha="); sb.append(mAlpha);
sb.append(" matrix="); mMatrix.toShortString(sb);
sb.append('}');
}
/**
* Print short string, to optimize dumping.
* @hide
*/
public void printShortString(PrintWriter pw) {
pw.print("{alpha="); pw.print(mAlpha);
pw.print(" matrix=");
mMatrix.printShortString(pw);
pw.print('}');
}
}
先从构造函数讲起,
public Transformation() {
clear();
}
clear()方法:
public void clear() {
if (mMatrix == null) {//判断矩阵是否为null
mMatrix = new Matrix();直接new
} else {
mMatrix.reset();//重置
}
mAlpha = 1.0f;//透明度设置为1
mTransformationType = TYPE_BOTH;
}
set(Transformation t)方法:
public void set(Transformation t) {
mAlpha = t.getAlpha();//获取透明度值
mMatrix.set(t.getMatrix());//重新设置矩阵
mTransformationType = t.getTransformationType();
}
//获取矩阵的方法
public Matrix getMatrix() {
return mMatrix;
}
//设置动画透明度
public void setAlpha(float alpha) {
mAlpha = alpha;
}
发现动画都是封装在Matrix矩阵中,这个好像是大学数学中的知识,有时间要看下,
现在自定义动画实现一个简单的效果,算是对applyTransformation()方法简单的了解下,
public class MyTranslateAnimation extends TranslateAnimation {
private View view;//textview显示文字渐变的动画
public void setView(View view) {
this.view = view;
}
public MyTranslateAnimation(Context context, AttributeSet attrs) {
super(context, attrs);
}
public MyTranslateAnimation(float fromXDelta, float toXDelta, float fromYDelta, float toYDelta) {
super(fromXDelta, toXDelta, fromYDelta, toYDelta);
}
public MyTranslateAnimation(int fromXType, float fromXValue, int toXType, float toXValue, int fromYType,
float fromYValue, int toYType, float toYValue) {
super(fromXType, fromXValue, toXType, toXValue, fromYType, fromYValue, toYType, toYValue);
// TODO Auto-generated constructor stub
}
@Override
protected void applyTransformation(float interpolatedTime, Transformation t) {
super.applyTransformation(interpolatedTime, t);
view.setAlpha(interpolatedTime*0.8f);
}
}
------------------------------------------------------------------------
btn_start_anim = (Button) findViewById(R.id.btn_start_anim);
final MyTranslateAnimation translateAnimation = new MyTranslateAnimation(0, 60, 0, 0);
translateAnimation.setView(tv_content);
translateAnimation.setDuration(8000);
translateAnimation.setFillAfter(true);
btn_start_anim.setOnClickListener(new OnClickListener() {
@Override
public void onClick(View v) {
button.startAnimation(translateAnimation);
}
});
效果:
好了这篇博客总算写完了!


 1660
1660

 被折叠的 条评论
为什么被折叠?
被折叠的 条评论
为什么被折叠?
 到【灌水乐园】发言


