


 本文通过一个具体的案例——使用YOLOv5进行扑克牌识别,详细介绍了软件产品化的全过程,包括硬件选择、软件环境配置、素材获取与标注、模型训练、窗口截图技术、图片推理、逻辑处理、UI编写、模型加密、软件授权、软件加密和安装包制作等关键步骤。旨在帮助读者了解如何将技术项目转化为可部署的产品。
文章目录
介绍
在工作和学习过程中,我们往往能完成一个项目的重点模块,比如如何操作数据库、如何写ui、如何写一些有价值的技术等,但我们却无法将其产品化(制作成安装包),或者在制作成安装包后,在客户电脑上出现无法运行的情况,还有出现代码被逆向导致成果被抄袭等等问题。这篇文章通过yolov5识别扑克牌作为入口,带你了解如何进行软件的产品化过程。文章从我个人角度从零到出安装包整个过程进行详细讲解,当然也有一些知识是我个人认知以外的,说的不正确,请多包涵。文章大致分几个模块:
- 硬件准备
- 软件环境
- 素材获取
- 图片标注
- 模型训练
- 窗口截图
- 图片推理
- 扑克牌逻辑
- ui编写
- 模型加密
- 软件授权
- 软件加密
- 软件打包
- 制作安装包
项目下载
在文章末尾
整体软件的效果视频,b站视频
硬件准备
硬件每个都有自己的看法,我只是从我个人角度来描述如何选择硬件:
- 选择组装机,由于要上显卡,所以选择不带核显的cpu
- 现在cpu性能都很过剩,没必要追求最新款,我选的是淘宝板u套件 amd r5 2600
- 内存要大,推荐32G,靠谱的闲鱼也可以
- 选ssd硬盘
- 显卡只选英伟达(深度学习需要基于cuda,虽然amd也有rocm,但还不成熟),个人购买闲鱼二手显卡经历
显卡选择,高显存优先;追求高显存可购买2080ti改22G显存版,或选择P40显卡。
软件环境
- 安装win10系统,没有用过win11
- 安装cuda11.8
下载好cuda后,首先卸载原先的nvidia显卡驱动,然后安装cuda11.8,这个安装包本身携带驱动。由于pytorch还没有适配到最新的cuda版本,所以我们选择cuda11.8
- 桌面右键’–‘nvidia 控制面板’-----‘系统信息’—‘组件’,查看 ‘nvcuda64.dll’ 产品名称,显示为‘NVIDIA CUDA 11.8 driver’
- 安装miniconda
1、选择安装python3.9 版本的miniconda,不选择最新版本是由于有些github的开源项目还没适配python3.10语法, 从而导致一些奇怪错误,自己修复需要花费不少时间。
2、windows下python3.9自带的ctypes加载dll有问题,参考[win python LoadLibrary 加载多个路径的dll库](https://blog.csdn.net/corrupt/article/details/125928788),修改
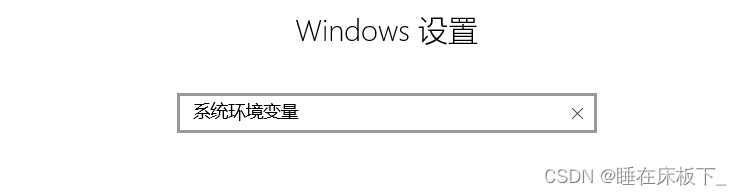
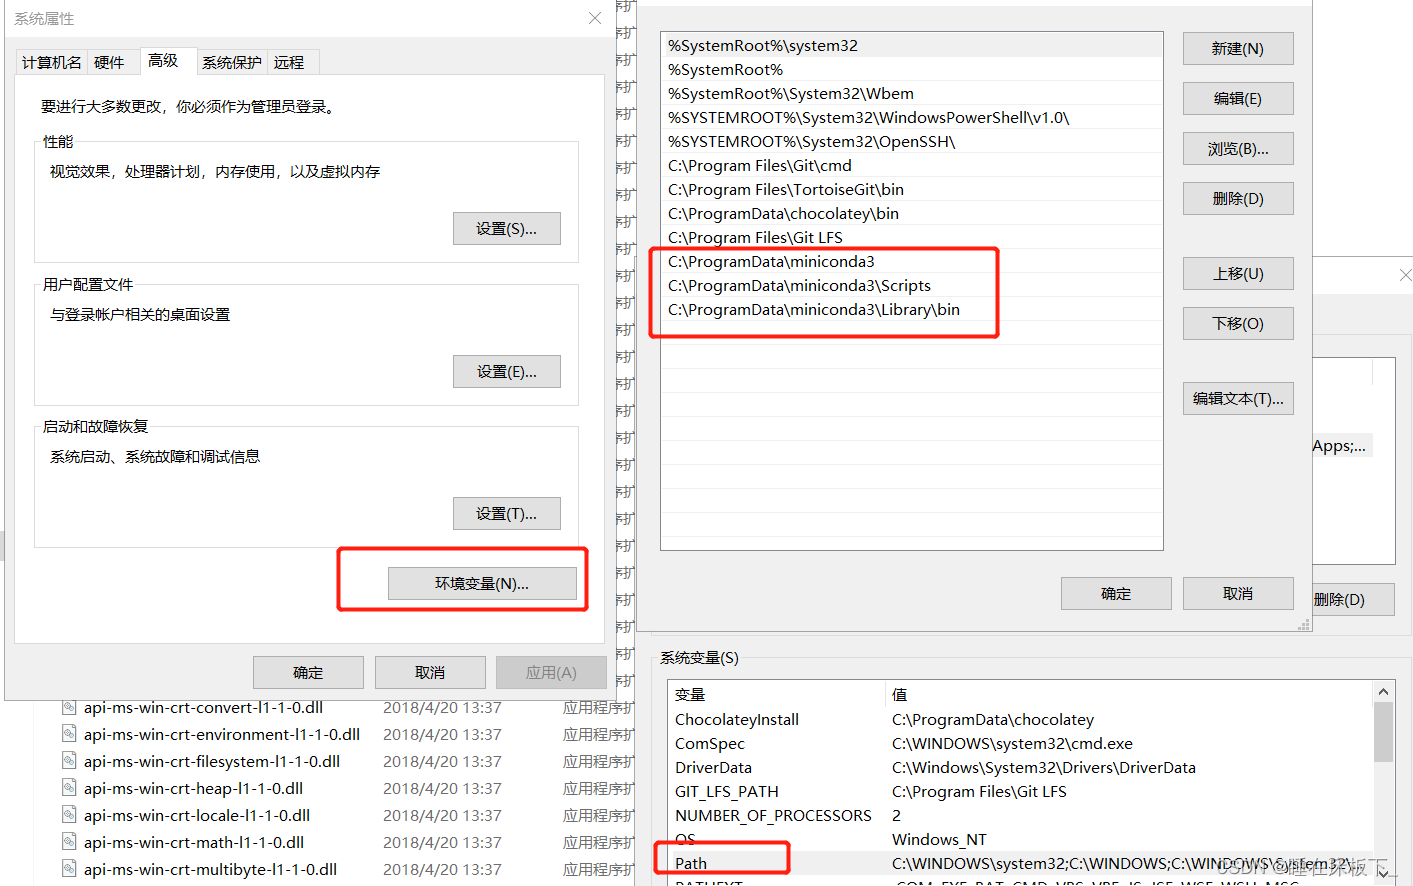
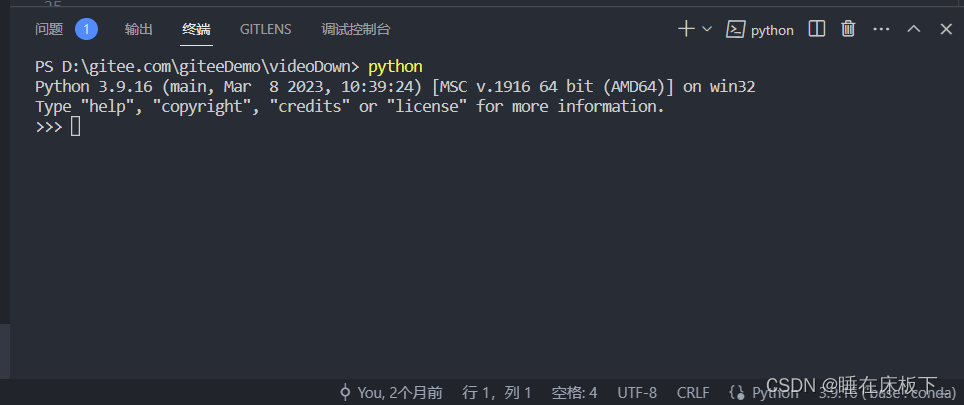
- 安装好miniconda后,验证下在命令行中是否可以执行python,如果无法运行python,则需要手动设置系统环境变量
- 安装vscode 或者pycharm,看个人喜好
- 设置全局pip源 ,使用国内清华源,下载快
pip config set global.index-url https://pypi.tuna.tsinghua.edu.cn/simple
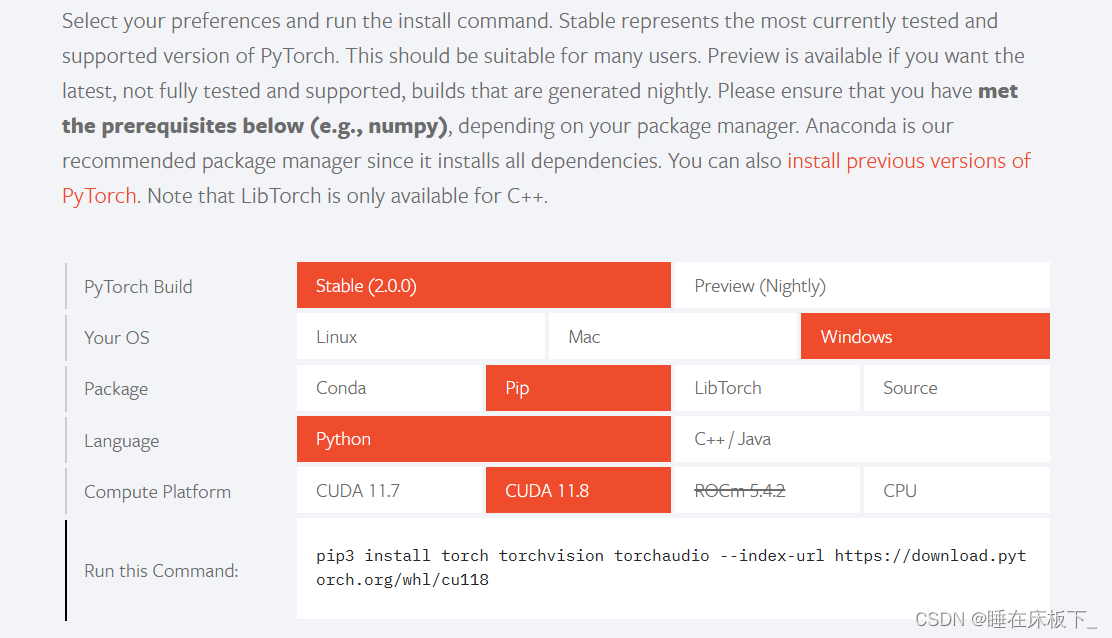
- 安装pytorch gpu。在pytorch 官网,选择正确的gpu pip命令并开始安装,下载有点大需要一点时间。
pip3 install torch torchvision torchaudio --index-url https://download.pytorch.org/whl/cu118
至此软件的环境安装完成!!!!!!
素材获取
我们的目标是实现qq欢乐斗地主的扑克牌识别,素材的获取可以自己从零收集,也可以通过我的网盘分享获取。
自行获取素材
- PC端下载腾讯手游助手
- 安装斗地主,并注册账号
- 定时桌面截图保存图片。对于如何进行桌面截图,后面有说明。
网盘获取
链接:https://pan.baidu.com/s/1jjYwZqMy02qhBmAIer8_fw
提取码:mr0r
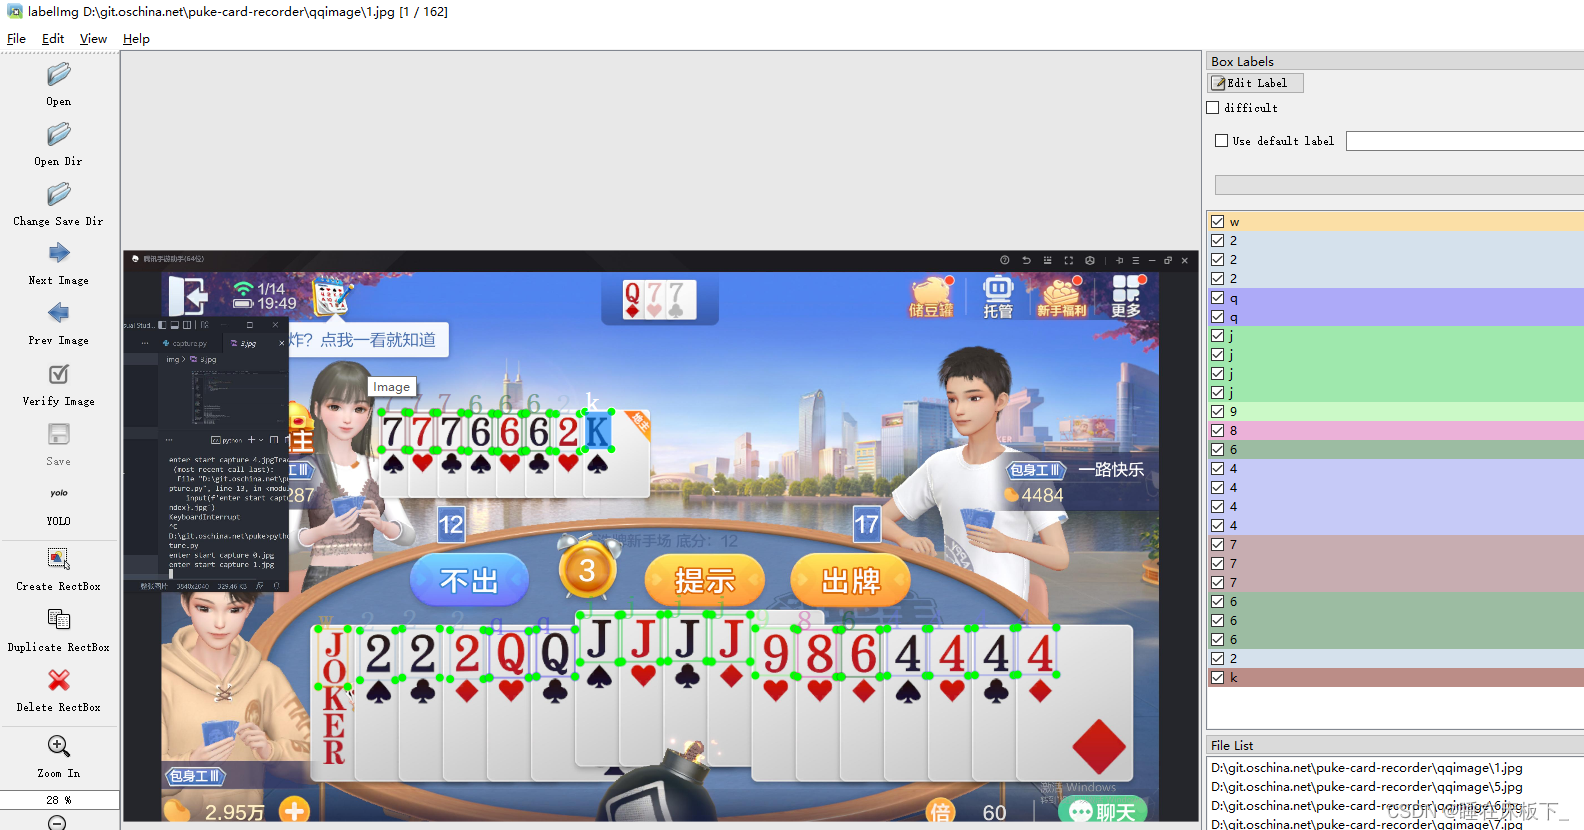
图片标注
- 图片标注采用工具labelImg,安装方法
pip install labelImg
- 在图片素材目录创建classes.txt,并输出标签信息,A=1,2=2,…,小鬼=w,大鬼=w
1
2
3
4
5
6
7
8
9
10
j
q
k
w
- 在图片素材目录输入命令行,使用我们定义的标签文件
labelimg class_file classes.txt
然后open dir ----> 图片素材目录
模型训练
前面的准备工作完成后,我们开始简单学习如何使用yolov5进行图片检测。
yolov5是目前比较受欢迎的视觉ai项目,是一种单阶段目标检测算法,该算法在YOLOv4的基础上添加了一些新的改进思路,使其速度与精度都得到了极大的性能提升。YOLOv5融合了数千小时研发过程中学到的经验教训和最佳实践。
- 官方仓库
- yolov5官方文档
- 我们使用的是 yolol5-7.0
- 下载代码到本地后,安装依赖:
pip install -r requirements.txt
- 下载weight文件 ,我选择的是yolov5s.pt,下载好后放置在yolov5-7.0 根目录下。
- 测试效果,在runs\detect\exp下我们可以看到输出的目标物体中包含了目标框和置信度的值。
python detect.py
......
Results saved to runs\detect\exp
- detect.py 里面的参数都采用了默认值
def parse_opt():
    parser = argparse.ArgumentParser()
    parser.add_argument('--weights', nargs='+', type=str, default=ROOT / 'yolov5s.pt', help='model path or triton URL')
    parser.add_argument('--source', type=str, default=ROOT / 'data/images', help='file/dir/URL/glob/screen/0(webcam)')
    parser.add_argument('--data', type=str, default=ROOT / 'data/coco128.yaml', help='(optional) dataset.yaml path')
    parser.add_argument('--imgsz', '--img', '--img-size', nargs='+', type=int, default=[640], help='inference size h,w')
    parser.add_argument('--conf-thres', type=float, default=0.25, help='confidence threshold')
    parser.add_argument('--iou-thres', type=float, default=0.45, help='NMS IoU threshold')
    parser.add_argument('--max-det', type=int, default=1000, help='maximum detections per image')
    parser.add_argument('--device', default='0', help='cuda device, i.e. 0 or 0,1,2,3 or cpu')
    parser.add_argument('--view-img', action='store_true', help='show results')
    parser.add_argument('--save-txt', action='store_true', help='save results to *.txt')
    parser.add_argument('--save-conf', action='store_true', help='save confidences in --save-txt labels')
    parser.add_argument('--save-crop', action='store_true', help='save cropped prediction boxes')
    parser.add_argument('--nosave', action='store_true', help='do not save images/videos')
    parser.add_argument('--classes', nargs='+', type=int, help='filter by class: --classes 0, or --classes 0 2 3')
    parser.add_argument('--agnostic-nms', action='store_true', help='class-agnostic NMS')
    parser.add_argument('--augment', action='store_true', help='augmented inference')
    parser.add_argument('--visualize', action='store_true', help='visualize features')
    parser.add_argument('--update', action='store_true', help='update all models')
    parser.add_argument('--project', default=ROOT / 'runs/detect', help='save results to project/name')
    parser.add_argument('--name', default='exp', help='save results to project/name')
    parser.add_argument('--exist-ok', action='store_true', help='existing project/name ok, do not increment')
    parser.add_argument('--line-thickness', default=3, type=int, help='bounding box thickness (pixels)')
    parser.add_argument('--hide-labels', default=False, action='store_true', help='hide labels')
    parser.add_argument('--hide-conf', default=False, action='store_true', help='hide confidences')
    parser.add_argument('--half', action='store_true', help='use FP16 half-precision inference')
    parser.add_argument('--dnn', action='store_true', help='use OpenCV DNN for ONNX inference')
    parser.add_argument('--vid-stride', type=int, default=1, help='video frame-rate stride')
- yolov5 推理正常,我们开始进行训练
- 模型训练的代码为train.py,其主要参数为:
parser.add_argument('--weights', type=str, default=ROOT / 'yolov5s.pt', help='initial weights path') \\ 我们默认使用的模型
parser.add_argument('--data', type=str, default=ROOT / 'data/coco128.yaml', help='dataset.yaml path')  \\训练的yaml文件
parser.add_argument('--batch-size', type=int, default=16, help='total batch size for all GPUs, -1 for autobatch') \\每次训练的图片数量,显存大小决定,训练速度,建议为-1
parser.add_argument('--epochs', type=int, default=100, help='total training epochs') \\ 训练迭代轮次,不同场景需要观察具体的训练效果,达到合适的迭代次数
- 以上,我们主要是创建 puke-qq.yaml
# YOLOv5 🚀 by Ultralytics, GPL-3.0 license
# parent
# ├── yolov5
# └── datasets
#     └── qq
#         └── images(.jpg)
#         └── labels(.txt)

# Train/val/test sets as 1) dir: path/to/imgs, 2) file: path/to/imgs.txt, or 3) list: [path/to/imgs1, path/to/imgs2, ..]
path: ../datasets/qq  # dataset root dir
train: images  # train images (relative to 'path') 128 images
val: images  # val images (relative to 'path') 128 images
test:  # test images (optional)

# Classes
names:
  0: a
  1: 2
  2: 3
  3: 4
  4: 5
  5: 6
  6: 7
  7: 8
  8: 9
  9: 10
  10: j
  11: q
  12: k
  13: w
- 将素材目录qqimage中的已标注的图片,copy到datasets/qq/images目录下,注意:必须是已标注的
- 将素材目录qqimage中的已标注txt,copy到datasets/qq/labels目录下,注意:必须是已标注的,且同标注图片文件名一致,不需要classes.txt
- 开始训练新的模型,等待结果
python train.py --weights yolov5s.pt --data ./data/puke-qq.yaml --batch-size -1  --epochs 400

1、指定预训练模型为yolov5s.pt
2、指定训练文件 puku-qq.yaml
3、自动根据显卡显存计算batch-size
4、训练轮次400
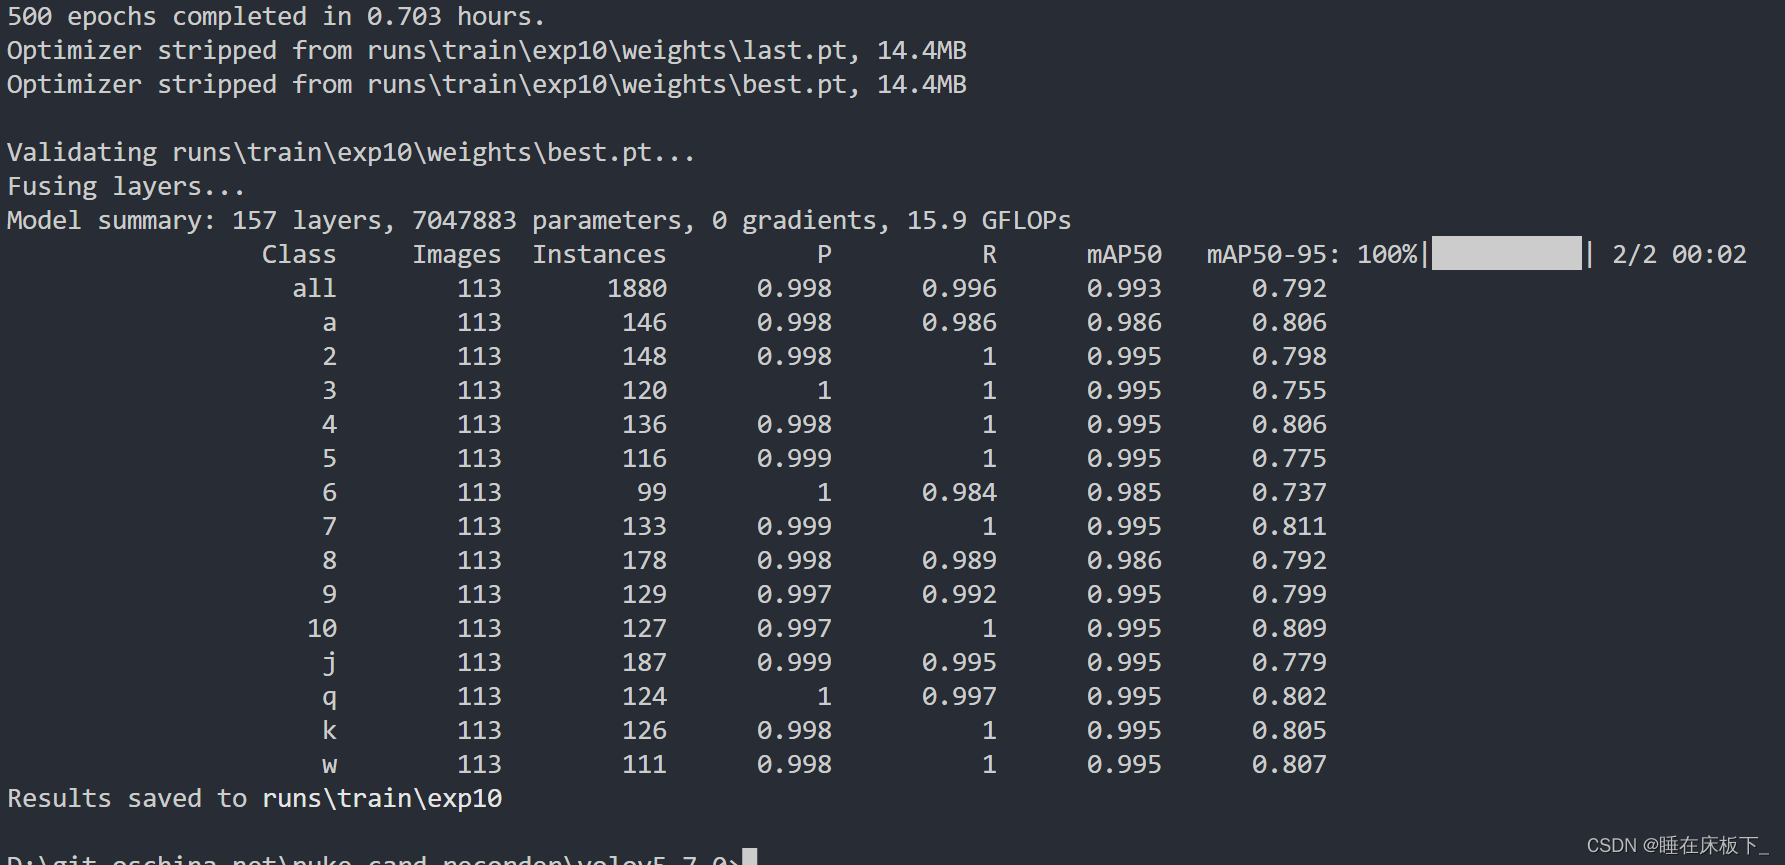
查看数据: P\R 的指标都不错,mAP50-95 也都接近0.8。
- 小提示:我们的目标并不需要彩色信息,所以可以先对图片进行预处理,提升batch-size
import cv2
import numpy as np
import os

def _scanDir(dirPath: str) -> list:
    """扫描目录, 不包含xxx.json的图片"""
    fileList = []
    for top, dirs, nonDirs in os.walk(dirPath):
        for item in nonDirs:
            (filePath, ext) = os.path.splitext(item)
            if ext == '.jpg' or ext == '.bmp':
                fileList.append(os.path.join(top, item))
    return fileList


def rgb2gray(src, dest):
    img = cv2.imread(src)
    #将图片转为灰度图
    # 缩放图片
    width = int(img.shape[0] / 2)
    height = int(img.shape[1] / 2)
    image = cv2.resize(img, (height, width), interpolation=cv2.INTER_AREA)
    img_gray = cv2.cvtColor(image,cv2.COLOR_RGB2GRAY)
    cv2.imwrite(dest,img_gray,[int(cv2.IMWRITE_JPEG_QUALITY),80])


if __name__ == "__main__":
    img_list = _scanDir('./qqimage')
    for one_file in img_list:
        file_name = os.path.basename(one_file)
        rgb2gray(one_file,f'./qq_gray/{file_name}')
        print(f'end {file_name}')
窗口截图
该章节介绍窗口、屏幕的截图方法。窗口、屏幕截图的难点在于性能和遮挡效果:
- 性能:需要评估软件的目的,比如视频会议软件需要共享窗口或屏幕,那么性能是非常重要的;如果采集达不到25帧/s,基本就无法使用;而我们的扑克牌识别是低频操作,1帧/s的速度已经满足。
- 遮挡效果:当游戏窗口被其他软件遮挡时,图片截图会存在很多干扰,甚至无法识别。
- 因此结合以上原因,目前最合理的方式是采用wgc技术
- 以下是详细说明:
窗口截图(HWND)
-
PrintWindow 参考代码
-
QT的grabWindow 参考代码
-
winapi.BitBlt 参考代码
以上方法都无法抓取以下程序的图片:
-
chrome
-
Mozilla
-
XLMAIN /*excel */
-
PPTFrameClass /* powerpoint* /
-
OpusApp /* word */
-
ApplicationFrameWindow
-
windows.UI.Core.CoreWindow
-
模拟器(如游戏助手)
桌面截图
- pyautogui.screenshot
- ImageGrab.grab
桌面截图会有遮挡干扰。
以上方法要么性能差,要么效果差。
wgc方法
Windows Graphics Capture 是WinRT 提供的接口,obs 中提供了 c++ 调用的实现(libwinrt) 大家可以自行查看。
从 Windows 10 版本 1803 开始,Windows.Graphics.Capture 命名空间提供 API 以从显示或应用程序窗口获取帧,以创建视频流或快照以构建协作和交互体验。
- 优点:性能优异;窗口遮挡无影响
- 缺点:win10 1903以上
最终采用的方式
wgc方法,如果不支持,建议用户升级操作系统。
WGC使用方法
Windows Graphics Capture(wgc)窗口采集的dll库 链接封装了使用dll库。
只需要设置抓图的窗口即可回调数据。
struct ST_IMAGE
{
	int width;  //图片宽
	int height; //图片高
	int bits;   //单像素bits数,这里固定图像格式为 B8G8R8A8(bgra = 32bits)
	int rowPitch; //每行像素的bytes数 = width*bits/8
	int slicePitch; //整幅图像的bytes数 = rowPitch*height
	unsigned char* pixels; //Pointer to the system memory buffer for the pixel data
};

/**
 * @brief 图像回调。
 *
 * 注意: stImage.pixels 的内存数据只读,不可修改。如要特殊处理,请copy
 */
typedef void (STDCALL *image_CallBack_PF)(ST_IMAGE stImage,void* pUser);

/*
* @brief 初始化,必须,不可重复调用 ,win_hwnd=NULL 内部创建显示窗口,!=NULL 使用外部窗口
* auth 授权码,未授权受限0.25帧/s;授权后可达60帧/s。 获取授权码,可email: 86122114@qq.com
*/
EXPORT_API int STDCALL wgclib_init(void* win_hwnd,char* auth);

/*
* @brief 设置抓拍的窗口句柄
*/
EXPORT_API void STDCALL wgclib_capture_hwnd(void* hwnd,image_CallBack_PF pFunc,void *pUser);
如何保存灰度图片
在代码SimpleCapture.cpp 中增加成员函数:
static uint8_t *s_pix = nullptr;
static int s_slicePitch = 0;
void TakeSnapshot(ST_IMAGE stImage,void* pUser)
{
	ST_IMAGE	copy_im = {0};
	// 图片格式BGRA8,变灰度图
	{
		int pix = stImage.bits;
        copy_im.rowPitch = stImage.width*pix;
        copy_im.slicePitch = stImage.rowPitch*stImage.height;

        if(s_slicePitch != copy_im.slicePitch)
        {
            if(s_pix)
            {
                delete []s_pix;
                s_pix = nullptr;
            }
            s_pix = new uint8_t[copy_im.slicePitch];
            s_slicePitch = copy_im.slicePitch;
        }
        copy_im.pixels = s_pix;
        for(int i = 0,j = 0;i < copy_im.slicePitch;i++)
        {
            uint8_t b = stImage.pixels[j];
            uint8_t g = stImage.pixels[j+1];
            uint8_t r = stImage.pixels[j+2];
            copy_im.pixels[i] = b;
            j = j+4;
        }

        static int file_index = 0;
        wchar_t buff[260] = {0};
        swprintf(buff,260,L"output_%d.jpg",file_index);
		//save2jpg(copy_im );
        file_index++;
	}
}
python 如何加载dll库
from tkinter import *
from tkinter import ttk
from ctypes import *
import pywintypes
import json
import numpy as np
from PIL import Image
import os
import sys
import datetime as dt
from ttkbootstrap import Style

_libwgc = cdll.LoadLibrary(r'./wgclib_x64.dll')

winfun_ctype = WINFUNCTYPE

_save_jpg = False


def get_exe_path():
    return os.path.split(os.path.realpath(sys.argv[0]))[0]


os.makedirs('snap',exist_ok=True)

def localdate():
    """返回local的文件名时间格式 10-10 12-00-00"""
    return (dt.datetime.now()).strftime('%m-%d %H-%M-%S')

"""
c 回调函数声明
"""
class _wgc_image_(Structure):
    _fields_ = [
        ('width',c_int32),
        ('height',c_int32),
        ('bits',c_int32),
        ('rowPitch',c_int32),
        ('slicePitch',c_int32),
        ('pixels',POINTER(c_ubyte))
    ]

ImageCallBackDef = winfun_ctype(None, _wgc_image_, c_void_p)

def image_callback(st_image,pUser):
    if _save_jpg:
        bgra = np.ctypeslib.as_array(st_image.pixels,shape=(st_image.height,st_image.width,4))
        im = Image.fromarray(bgra)
        b,g,r,a = im.split()
        im = Image.merge('RGB',(r,g,b))
        file_name = f'./snap/{localdate()}.jpg'
        im.save(file_name)
    else:
        print("recv frame:",st_image.width,st_image.height,st_image.bits,st_image.slicePitch,pUser)

IMAGE_CALL_BACK_FUNC = ImageCallBackDef(image_callback)

def wgclib_init(win_hwnd,auth)->int:
    b_auth = auth.encode('gbk')
    _libwgc.wgclib_init.restype = c_int32
    _libwgc.wgclib_init.argtypes = (c_void_p,c_char_p)
    return _libwgc.wgclib_init(win_hwnd,b_auth)

def wgclib_capture_hwnd(hwnd,call_back_func,pUser):
    _libwgc.wgclib_capture_hwnd.argtypes = (c_void_p,c_void_p,c_void_p)
    _libwgc.wgclib_capture_hwnd(hwnd,call_back_func,pUser)

def wgclib_enum_windows()->str:
    _libwgc.wgclib_enum_windows.restype = c_char_p
    _libwgc.wgclib_enum_windows.argtypes = ()
    return bytes.decode(_libwgc.wgclib_enum_windows())

def wgclib_capture_monitor(hmon,call_back_func,pUser):
    _libwgc.wgclib_capture_monitor.argtypes = (c_void_p,c_void_p,c_void_p)
    _libwgc.wgclib_capture_monitor(hmon,call_back_func,pUser)

def wgclib_enum_monitor()->str:
    _libwgc.wgclib_enum_monitor.restype = c_char_p
    _libwgc.wgclib_enum_monitor.argtypes = ()
    return bytes.decode(_libwgc.wgclib_enum_monitor())

def wgclib_get_hard_info():
    _libwgc.wgclib_get_hard_info.restype = c_char_p
    _libwgc.wgclib_get_hard_info.argtypes = ()
    return bytes.decode(_libwgc.wgclib_get_hard_info())

def wgclib_get_auth_expire_time(auth)->str:
    b_auth = auth.encode('gbk')
    _libwgc.wgclib_get_auth_expire_time.restype = c_char_p
    _libwgc.wgclib_get_auth_expire_time.argtypes = (c_char_p,)
    return bytes.decode(_libwgc.wgclib_get_auth_expire_time(b_auth))

hwnd_title = []
monitor_display = []

def get_all_window():
    global hwnd_title
    hwnd_title = json.loads(wgclib_enum_windows())

def get_all_monitor():
    global monitor_display
    monitor_display = json.loads(wgclib_enum_monitor())

# def get_all_hwnd(hwnd,mouse):
#     if win32gui.IsWindow(hwnd) and win32gui.IsWindowEnabled(hwnd) and win32gui.IsWindowVisible(hwnd):
#         title = win32gui.GetWindowText(hwnd)
#         if title != "":
#             hwnd_title.update({hwnd:title})

# def print_win_hwnd():
#     win32gui.EnumWindows(get_all_hwnd,0)
#     for h,t in hwnd_title.items():
#         print(h,t)

def get_win_hwnd_title()->list:
    titles = []
    for item in hwnd_title:
        titles.append(item['title'])

    return titles

def get_monitor_displayname()->list:
    titles = []
    for item in monitor_display:
        titles.append(item['display'])

    return titles

def find_win_hwnd(title):
    for item in hwnd_title:
        if item['title'] == title:
            return item['hwnd']
    return 0

def find_monitor_hmon(display):
    for item in monitor_display:
        if item['display'] == display:
            return item['hmon']
    return 0

class MY_GUI():
    def __init__(self,root):
        self.m_root_win = root

    #设置窗口
    def init_window(self):
        screenwidth = self.m_root_win.winfo_screenwidth()
        screenheight = self.m_root_win.winfo_screenheight()
        win_width = 600
        win_height = 400
        size = '%dx%d+%d+%d' % (win_width, win_height, (screenwidth - win_width) / 2, (screenheight - win_height) / 2)

        self.m_root_win.wm_attributes('-topmost',1) # 窗口置顶
        # self.m_root_win.attributes("-toolwindow", 2) # 去掉最大最小框
        self.m_root_win.title("wgc")    #窗口名
        self.m_root_win.geometry(size) #
        self.init_ui()

    def init_ui(self):
        self.ddl_var = StringVar()
        self.ddl = ttk.Combobox(self.m_root_win,textvariable=self.ddl_var)
        self.ddl.grid(row=0, column=0, columnspan=4,sticky='NW')
        self.btn_refrush = Button(self.m_root_win, text="刷新", bg="lightblue", width=10,command=self.btn_click_refush)  # 调用内部方法  加()为直接调用
        self.btn_refrush.grid(row=0, column=5)
        self.btn_save = Button(self.m_root_win, text="开始保存图片", bg="lightblue", width=10,command=self.btn_click_save)  # 调用内部方法  加()为直接调用
        self.btn_save.grid(row=0, column=6)
        self.btn_stop = Button(self.m_root_win, text="停止保存图片", bg="lightblue", width=10,command=self.btn_click_stop)  # 调用内部方法  加()为直接调用
        self.btn_stop.grid(row=0, column=7)
        self.labes_wgc = Label(self.m_root_win)
        self.labes_wgc.grid()

        self.btn_click_refush()
        #bind a event
        self.ddl.bind("<<ComboboxSelected>>", self.combox_select)

    def btn_click_refush(self):
        get_all_monitor()
        get_all_window()
        self.ddl_var.set("")
        all_ = []
        all_ += get_win_hwnd_title()
        all_.append('     ---------[桌面]-------    ')
        all_ += get_monitor_displayname()
        self.ddl["values"] = all_

    def btn_click_save(self):
        global _save_jpg
        _save_jpg = True

    def btn_click_stop(self):
        global _save_jpg
        _save_jpg = False

    def combox_select(self,event):
        title = self.ddl_var.get()
        handle = find_monitor_hmon(title)
        if handle:
            wgclib_capture_monitor(handle,IMAGE_CALL_BACK_FUNC,100)
        else:
            handle = find_win_hwnd(title)
            if handle:
                wgclib_capture_hwnd(handle,IMAGE_CALL_BACK_FUNC,100)

    def get_win_hwnd(self):
        return pywintypes.HANDLE(int(self.m_root_win.frame(), 16))

if __name__ == "__main__":
    # print_win_hwnd()
    style = Style(theme='minty')
    root_win = style.master             #实例化出一个父窗口
    JIPAI_GUI = MY_GUI(root_win)
     # 设置根窗口默认属性
    JIPAI_GUI.init_window()
    auth = 'T1Rnd0=='
    hwnd = int(JIPAI_GUI.get_win_hwnd())
    # print("初始化:",wgclib_init(0,auth)) # 无窗口句柄,dll创建显示窗口
    print("初始化:",wgclib_init(hwnd,auth))
    print("硬件信息:",wgclib_get_hard_info())
    print("过期时间:",wgclib_get_auth_expire_time(auth))
    #
    root_win.mainloop()
图片推理
模型训练好之后,保存好我们的weight文件。
我们需要通过detect.py 将推理的代码作为模块集成到自己的软件中,我把推理模块封装成一个class:
import torch
from utils.dataloaders import  LoadImages,LoadPilImage
from utils.general import (LOGGER, Profile, check_img_size,  cv2,
                           non_max_suppression, scale_boxes, xyxy2xywh)
from models.common import DetectMultiBackend
from utils.torch_utils import select_device
from utils.plots import Annotator, colors


class yolov5_infer:
    def __init__(self, weights:str, data, device:str,key:str) -> None:
    	"""_summary_

        Args:
            weights (str): 模型路径
            data (_type_): yaml文件
            device (str): cpu or gpu
            key (str): 模型加密key
        """
        self.m_model = None

        device = select_device(device)
        self.m_model = DetectMultiBackend(weights, device=device, dnn=False, data=data, fp16=False,key=key)   #加载模型
        self.m_stride, self.m_names, self.m_pt = self.m_model.stride, self.m_model.names, self.m_model.pt
        imgsz=(640, 640)
        self.m_imgsz = check_img_size(imgsz, s=self.m_stride)  # check image size
        self.m_bs = 1
        self.m_vid_stride = 1

    def infer(self, source,conf_thres,file_mode=False)->list:
        """_summary_

        Args:
            img_path (str): 图片路径
            conf_thres (_type_): 置信度,float
        """
         dataset = LoadPilImage(source, img_size=self.m_imgsz, stride=self.m_stride, auto=self.m_pt, vid_stride=self.m_vid_stride)

          # Run inference
        self.m_model.warmup(imgsz=(1 if self.m_pt or self.m_model.triton else self.m_bs, 3, *self.m_imgsz))  # warmup
        seen, windows, dt = 0, [], (Profile(), Profile(), Profile())

        for path, im, im0s, vid_cap, s in dataset:
            with dt[0]:
                im = torch.from_numpy(im).to(self.m_model.device)
                im = im.half() if self.m_model.fp16 else im.float()  # uint8 to fp16/32
                im /= 255  # 0 - 255 to 0.0 - 1.0
                if len(im.shape) == 3:
                    im = im[None]  # expand for batch dim

            # Inference
            with dt[1]:
                visualize = False
                # visualize = increment_path(save_dir / Path(path).stem, mkdir=True) if visualize else False
                pred = self.m_model(im, augment=False, visualize=visualize)

            # NMS
            with dt[2]:
                iou_thres = 0.45
                classes = None
                agnostic_nms = False
                max_det = 1000
                pred = non_max_suppression(pred, conf_thres, iou_thres, classes, agnostic_nms, max_det=max_det)


            for i, det in enumerate(pred):  # per image
                seen += 1
                p, im0, frame = path, im0s.copy(), getattr(dataset, 'frame', 0)

                gn = torch.tensor(im0.shape)[[1, 0, 1, 0]]  # normalization gain whwh
                imc = im0.copy() if False else im0  # for save_crop
                annotator = Annotator(im0, line_width=3, example=str(self.m_names))
                ret_labels = []
                if len(det):
                    # Rescale boxes from img_size to im0 size
                    det[:, :4] = scale_boxes(im.shape[2:], det[:, :4], im0.shape).round()

                    # Print results
                    for c in det[:, 5].unique():
                        n = (det[:, 5] == c).sum()  # detections per class
                        s += f"{n} {self.m_names[int(c)]}{'s' * (n > 1)}, " # add to string

                    # Write results
                    for *xyxy, conf, cls in reversed(det):
                        xywh = (xyxy2xywh(torch.tensor(xyxy).view(1, 4)) / gn).view(-1).tolist()  # normalized xywh

                        line = (cls, *xywh, conf)  # label format
                        # with open(f'{txt_path}.txt', 'a') as f:
                        #     f.write(('%g ' * len(line)).rstrip() % line + '\n')

                        c = int(cls)  # integer class
                        str_line = "{} {:.4f} {:.4f} {:.4f} {:.4f} {:.4f} {}".format(c,line[1],line[2],line[3],line[4],conf,self.m_names[c])
                        # print(('%g ' * len(line)).rstrip() % line,self.m_names[c])

                        # print(str_line)
                        ret_labels.append(str_line)

                        # Add bbox to image
                        hide_labels = False
                        hide_conf   = False
                        label = None if hide_labels else (self.m_names[c] if hide_conf else f'{self.m_names[c]} {conf:.2f}')
                        annotator.box_label(xyxy, label, color=colors(c, True))

                return ret_labels


if __name__ == "__main__":
    obj = yolov5_infer(r'./runs/train/exp2/weights/best.pt',r'./data/puke.yaml','0')

    print(obj.infer(r'../gray-resize/1.jpg',0.40))
扑克牌逻辑
模型、推理、窗口采图都已经完成了,现在开始研究如何进行编写逻辑部分,大致的原理图:
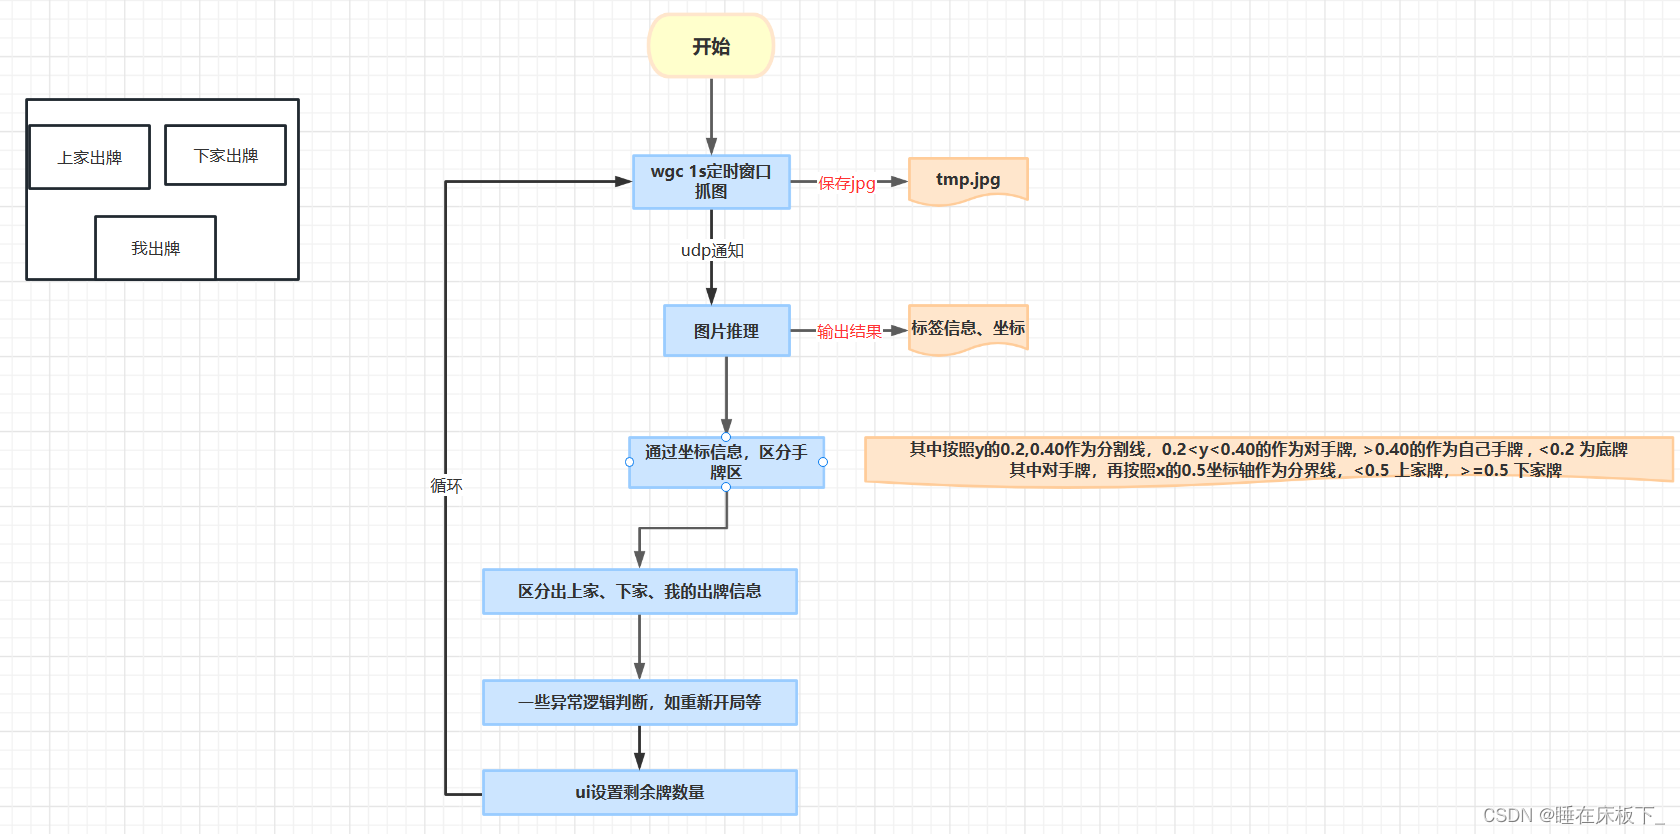
- 软件由两个进程组成,wgc负责抓图,扑克牌程序做识别。
- wgc 进程定时抓拍,可能会有很多重复图片,但逻辑判断里面会做重复过滤(如果同时出两张一样的单牌,会存在漏检)
- wgc保存图片成功后,通过udp消息通知扑克牌程序进行图片识别
- 扑克牌程序识别出图片中的信息后,对坐标信息进行排序,识别出上家、下架、自家出牌信息
- 根据历史记录的信息、是否2s未识别出标签来判断是否为新的一局还是重复出牌
- 更新ui的扑克牌数量
ui编写
python 编写ui可以选择pyqt、tkinter等,我们的界面非常简单,直接使用tkinter就可以了。整个UI比较简单,

第一排是按钮:输入账号信息
第二排是显示:剩余扑克的数量
第三排是提示:记录识别的耗时和异常提示
模型加密
原始模型都是非常重要的,如果不开源,那么需要将模型进行加密,这样软件发布之后,即使对方拿到模型文件,如果没有密钥也无法使用。模型的加密使用cryptography.fernet :
# pt 模型加密
from cryptography.fernet import Fernet

_key = 'pP5a8bC5CXRq324dfer334gef8RYhvyZcJyp7w=' #

def encode_pt(weight,key,out_weight):
    """

    Args:
        weight (_type_): in pt 文件
        key (_type_): _description_
        out_weight (_type_): out pt 文件
    """
    with open(weight,'rb') as f:
        pt_bytes = f.read()

    encrypted_data = Fernet(key).encrypt(pt_bytes)

    with open(out_weight,'wb') as f:
        f.write(encrypted_data)

encode_pt('./weights/qq.pt',_key,'./weights/encryqq.pt')
在推理模块需要修改加载模型的方式:
def attempt_load(weights, device=None, inplace=True, fuse=True,key=''):
    # Loads an ensemble of models weights=[a,b,c] or a single model weights=[a] or weights=a
    from models.yolo import Detect, Model

    model = Ensemble()
    for w in weights if isinstance(weights, list) else [weights]:
        # 有key则进行解密
        if len(key) != 0:
            with open(w,'rb') as f:
                encrypted_data = f.read()

            decrypted_data = Fernet(key).decrypt(encrypted_data)

            b = io.BytesIO(decrypted_data)
            b.seek(0)

            ckpt = torch.load(b, map_location='cpu')  #
        else:
            ckpt = torch.load(attempt_download(w), map_location='cpu')  #
        ckpt = (ckpt.get('ema') or ckpt['model']).to(device).float()  # FP32 model

        # Model compatibility updates
        if not hasattr(ckpt, 'stride'):
            ckpt.stride = torch.tensor([32.])
        if hasattr(ckpt, 'names') and isinstance(ckpt.names, (list, tuple)):
            ckpt.names = dict(enumerate(ckpt.names))  # convert to dict

        model.append(ckpt.fuse().eval() if fuse and hasattr(ckpt, 'fuse') else ckpt.eval())  # model in eval mode
软件授权
如果不是开源软件,我们希望软件能够付费使用,那就需要思考如何进行授权:
- 离线方式:通过获取硬件指纹,然后信息发送给开发者,开发者通过硬件指纹生成激活码,发给用户。
- 在线方式:通过扫码购买
在有网络的情况下,推荐在线方式,对于使用者和开发者都最为方便。离线方式有几个问题,
- 不方便,需要用户导指纹信息,如果客户换硬件,又需要重新获取。
- 如果涉及过期时间,那么时间容易被篡改
- 指纹获取的信息需要比较固定,比如cpu信息、bios信息、硬盘信息等,不要采用用户简单能修改的信息,如计算机名、注册表等
我这里采用的是在线方式,通过自己部署一个简单的http服务器,记录用户账号、密码、授权信息、到期时间,通过http接口保持客户端和服务端的通信:
新建账号:post /japi/v1/account
登录账号:post /japi/v1/account/auth
心跳:       post /japi/v1/account/keepalive
购买:       post /japi/v1/account/buy
服务端使用python+flask开发,这部分不再详细描述。
软件加密
python作为解释型语言,发布之后是容易被逆向查看源码,比如通过pyinstxtractor.py、python-uncompyle6 很容易将python打包的exe进行反编译。即使c++等编译型语言,如果在不加壳的情况下,也是可以被反编译的。
找不到完美的不被破解的解决方案,我们只要增加破解的难度即可,如果破解者无法带来合适的商业价值,他对你的软件就没有破解的兴趣。对于此,我们只要稍微增加一点难度即可,在pyinstaller 打包时增加 ‘–key xxxx’
软件打包
软件打包采用pyinstaller,安装:
pip install pyinstaller
执行打包命令:
pyinstaller -w -i tubiao.ico cdJPQUI.py --key thisiskey
等待比较长的时间后,程序打包完成。这时候我们需要考虑一个问题:
用户的电脑都会安装cuda吗?
为了兼容更多的客户端,因为1帧/s的识别速度cpu也完全能够满足,所以我们要考虑使用cpu推理的方法才能兼容更多的客户端。
因此我们需要使用虚拟环境进行打包,并采用pytorch cpu模型进行发布。
- 创建python 虚拟环境
- 进入虚拟环境
- 安装pytorch cpu 环境
- 安装yolov5 依赖包
- 安装pyinstaller
- 重新打包
安装包制作
pyinstaller 制作的安装包对于静态依赖的库都copy到了dist目录,所以只要将这个目录复制给其他人就可以正常运行,方法如下:
- 通过绿色安装方式,即将dist目录整个压缩为一个压缩包,解压即可运行
- 通过安装包的方式,如使用软件advancedInstaller等工具制作安装包
我采用的时第一种。
项目路径
https://gitee.com/yingchengpa/qq-yolov5


 265
265

 被折叠的 条评论
为什么被折叠?
被折叠的 条评论
为什么被折叠?
 到【灌水乐园】发言


