


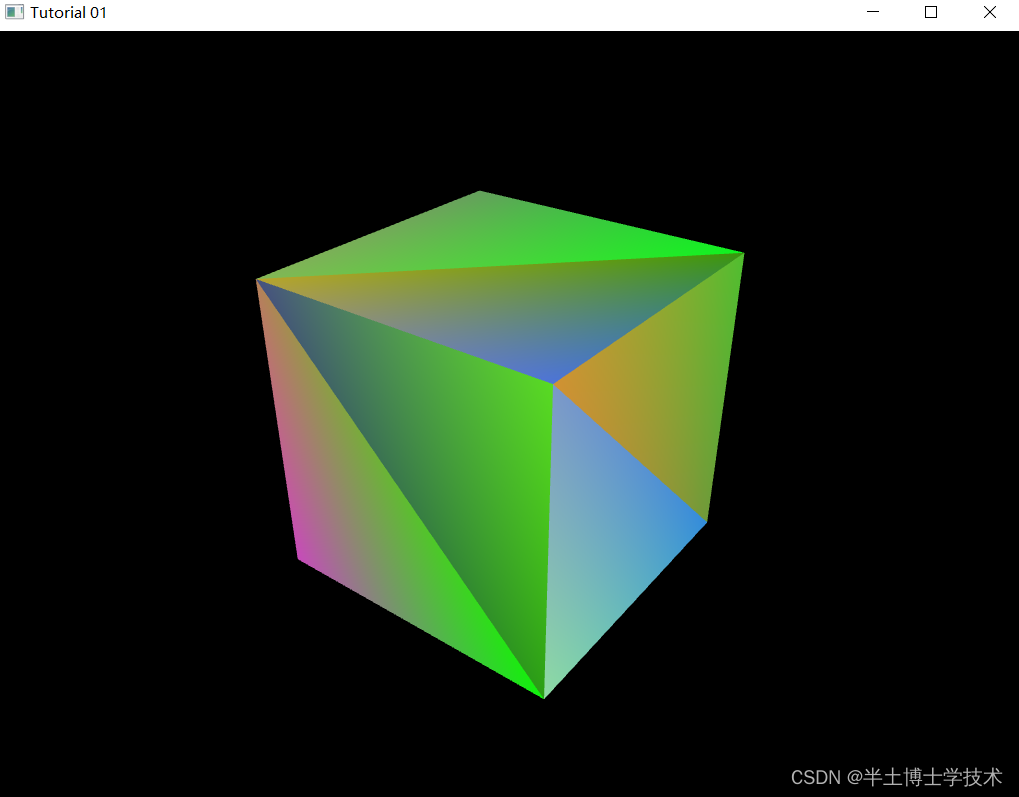
本程序实现彩色立方体的绘制。主要包括立方体顶点位置、顶点颜色的定义,着色语言的编写,以及深度缓冲的应用等。
参考视频:【2.4.2 VS-OpenGL之彩色立方体2】 https://b23.tv/VCx93GB
【2.4.1 VS-OpenGL 彩色立方体】 https://b23.tv/jQX6KKU
参考网站Tutorial 4 : A Colored Cube (opengl-tutorial.org)
主程序.cpp:
#include <stdio.h>
#include <stdlib.h>
#include <GL/glew.h>
#include <GLFW/glfw3.h>
#include <glm/glm.hpp>
#include <glm/gtc/matrix_transform.hpp>
#include <glm/gtx/transform.hpp>
#include <common/shader.hpp>
using namespace glm;

// A cube has 6 faces with 2 triangles each, so this makes 6*2=12 triangles, and 12*3 vertices
static const GLfloat g_vertex_buffer_data[] = {
    -1.0f,-1.0f,-1.0f, // triangle 1 : begin
    -1.0f,-1.0f, 1.0f,
    -1.0f, 1.0f, 1.0f, // triangle 1 : end
    1.0f, 1.0f,-1.0f, // triangle 2 : begin
    -1.0f,-1.0f,-1.0f,
    -1.0f, 1.0f,-1.0f, // triangle 2 : end
    1.0f,-1.0f, 1.0f,
    -1.0f,-1.0f,-1.0f,
    1.0f,-1.0f,-1.0f,
    1.0f, 1.0f,-1.0f,
    1.0f,-1.0f,-1.0f,
    -1.0f,-1.0f,-1.0f,
    -1.0f,-1.0f,-1.0f,
    -1.0f, 1.0f, 1.0f,
    -1.0f, 1.0f,-1.0f,
    1.0f,-1.0f, 1.0f,
    -1.0f,-1.0f, 1.0f,
    -1.0f,-1.0f,-1.0f,
    -1.0f, 1.0f, 1.0f,
    -1.0f,-1.0f, 1.0f,
    1.0f,-1.0f, 1.0f,
    1.0f, 1.0f, 1.0f,
    1.0f,-1.0f,-1.0f,
    1.0f, 1.0f,-1.0f,
    1.0f,-1.0f,-1.0f,
    1.0f, 1.0f, 1.0f,
    1.0f,-1.0f, 1.0f,
    1.0f, 1.0f, 1.0f,
    1.0f, 1.0f,-1.0f,
    -1.0f, 1.0f,-1.0f,
    1.0f, 1.0f, 1.0f,
    -1.0f, 1.0f,-1.0f,
    -1.0f, 1.0f, 1.0f,
    1.0f, 1.0f, 1.0f,
    -1.0f, 1.0f, 1.0f,
    1.0f,-1.0f, 1.0f
};

// One color for each vertex.They were generated randomly.
static const GLfloat g_color_buffer_data[] = {
    0.583f,  0.771f,  0.014f,
    0.609f,  0.115f,  0.436f,
    0.327f,  0.483f,  0.844f,
    0.822f,  0.569f,  0.201f,
    0.435f,  0.602f,  0.223f,
    0.310f,  0.747f,  0.185f,
    0.597f,  0.770f,  0.761f,
    0.559f,  0.436f,  0.730f,
    0.359f,  0.583f,  0.152f,
    0.483f,  0.596f,  0.789f,
    0.559f,  0.861f,  0.639f,
    0.195f,  0.548f,  0.859f,
    0.014f,  0.184f,  0.576f,
    0.771f,  0.328f,  0.970f,
    0.406f,  0.615f,  0.116f,
    0.676f,  0.977f,  0.133f,
    0.971f,  0.572f,  0.833f,
    0.140f,  0.616f,  0.489f,
    0.997f,  0.513f,  0.064f,
    0.945f,  0.719f,  0.592f,
    0.543f,  0.021f,  0.978f,
    0.279f,  0.317f,  0.505f,
    0.167f,  0.620f,  0.077f,
    0.347f,  0.857f,  0.137f,
    0.055f,  0.953f,  0.042f,
    0.714f,  0.505f,  0.345f,
    0.783f,  0.290f,  0.734f,
    0.722f,  0.645f,  0.174f,
    0.302f,  0.455f,  0.848f,
    0.225f,  0.587f,  0.040f,
    0.517f,  0.713f,  0.338f,
    0.053f,  0.959f,  0.120f,
    0.393f,  0.621f,  0.362f,
    0.673f,  0.211f,  0.457f,
    0.820f,  0.883f,  0.371f,
    0.982f,  0.099f,  0.879f
};

int main() {
    // Initialise GLFW
    glewExperimental = true; // Needed for core profile
    if (!glfwInit())
    {
        fprintf(stderr, "Failed to initialize GLFW\n");
        return -1;
    }
    glfwWindowHint(GLFW_SAMPLES, 4); // 4x antialiasing
    glfwWindowHint(GLFW_CONTEXT_VERSION_MAJOR, 3); // We want OpenGL 3.3
    glfwWindowHint(GLFW_CONTEXT_VERSION_MINOR, 3);
    glfwWindowHint(GLFW_OPENGL_FORWARD_COMPAT, GL_TRUE); // To make MacOS happy; should not be needed
    glfwWindowHint(GLFW_OPENGL_PROFILE, GLFW_OPENGL_CORE_PROFILE);

    // Open a window and create its OpenGL context
    GLFWwindow* window; // (In the accompanying source code, this variable is global for simplicity)
    window = glfwCreateWindow(1024, 768, "Tutorial 01", NULL, NULL);
    if (window == NULL) {
        fprintf(stderr, "Failed to open GLFW window. If you have an Intel GPU, they are not 3.3 compatible. Try the 2.1 version of the tutorials.\n");
        glfwTerminate();
        return -1;
    }

    glfwMakeContextCurrent(window); // Initialize GLEW
    glewExperimental = true; // Needed in core profile
    if (glewInit() != GLEW_OK) {
        fprintf(stderr, "Failed to initialize GLEW\n");
        return -1;
    }

	// Projection matrix : 45° Field of View, 4:3 ratio, display range : 0.1 unit <-> 100 units
	glm::mat4 Projection = glm::perspective(glm::radians(45.0f), (float)4 / (float)3, 0.1f, 100.0f);
	// Or, for an ortho camera :
	//glm::mat4 Projection = glm::ortho(-10.0f,10.0f,-10.0f,10.0f,0.0f,100.0f); // In world coordinates

	// Camera matrix
	glm::mat4 View = glm::lookAt(
		glm::vec3(4, 3, -3), // Camera is at (4,3,-3), in World Space
		glm::vec3(0, 0, 0), // and looks at the origin
		glm::vec3(0, 1, 0)  // Head is up (set to 0,-1,0 to look upside-down)
	);

	// Model matrix : an identity matrix (model will be at the origin)
	glm::mat4 Model = glm::mat4(1.0f);
	// Our ModelViewProjection : multiplication of our 3 matrices
	glm::mat4 mvp = Projection * View * Model; // Remember, matrix multiplication is the other way around


    GLuint VertexArrayID;
    glGenVertexArrays(1, &VertexArrayID);
    glBindVertexArray(VertexArrayID);

    // This will identify our vertex buffer
    GLuint vertexbuffer;
    glGenBuffers(1, &vertexbuffer);// Generate 1 buffer, put the resulting identifier in vertexbuffer
    glBindBuffer(GL_ARRAY_BUFFER, vertexbuffer); // The following commands will talk about our 'vertexbuffer' buffer
    glBufferData(GL_ARRAY_BUFFER, sizeof(g_vertex_buffer_data), g_vertex_buffer_data, GL_STATIC_DRAW); // Give our vertices to OpenGL.

    GLuint colorbuffer;
    glGenBuffers(1, &colorbuffer);
    glBindBuffer(GL_ARRAY_BUFFER, colorbuffer);
    glBufferData(GL_ARRAY_BUFFER, sizeof(g_color_buffer_data), g_color_buffer_data, GL_STATIC_DRAW);

	// Create and compile our GLSL program from the shaders
	GLuint programID = LoadShaders("SimpleVertexShader.vertexshader", "SimpleFragmentShader.fragmentshader");
	GLuint MatrixID = glGetUniformLocation(programID, "MVP");

    glfwSetInputMode(window, GLFW_STICKY_KEYS, GL_TRUE);

    do {

        // Clear the screen. It's not mentioned before Tutorial 02, but it can cause flickering, so it's there nonetheless.
        glClear(GL_COLOR_BUFFER_BIT | GL_DEPTH_BUFFER_BIT);
        glEnable(GL_DEPTH_TEST);// Enable depth test
        glDepthFunc(GL_LESS);// Accept fragment if it closer to the camera than the former one
		glUseProgram(programID);// Use our shader

        // 1st attribute buffer : vertices
        glEnableVertexAttribArray(0);
        glBindBuffer(GL_ARRAY_BUFFER, vertexbuffer);
        glVertexAttribPointer(
            0,                  // attribute 0. No particular reason for 0, but must match the layout in the shader.
            3,                  // size
            GL_FLOAT,           // type
            GL_FALSE,           // normalized?
            0,                  // stride
            (void*)0            // array buffer offset
        );

        // 2nd attribute buffer : colors
        glEnableVertexAttribArray(1);
        glBindBuffer(GL_ARRAY_BUFFER, colorbuffer);
        glVertexAttribPointer(
            1,                                // attribute. No particular reason for 1, but must match the layout in the shader.
            3,                                // size
            GL_FLOAT,                         // type
            GL_FALSE,                         // normalized?
            0,                                // stride
            (void*)0                          // array buffer offset
        );
		glUniformMatrix4fv(MatrixID, 1, GL_FALSE, &mvp[0][0]);// Send our transformation to the currently bound shader, in the "MVP" uniform

        glDrawArrays(GL_TRIANGLES, 0, 3*12); // Starting from vertex 0; 3 vertices total -> 1 triangle
        glDisableVertexAttribArray(0);
        glDisableVertexAttribArray(1);

        glfwSwapBuffers(window);// Swap buffers
        glfwPollEvents();

    } // Check if the ESC key was pressed or the window was closed
    while (glfwGetKey(window, GLFW_KEY_ESCAPE) != GLFW_PRESS &&
        glfwWindowShouldClose(window) == 0);
}
顶点着色器SimpleVertexShader.vertexshader 文件中GLSL代码为:
#version 330 core
layout(location = 0) in vec3 vertexPosition_modelspace;
layout(location = 1) in vec3 vertexColor;
uniform mat4 MVP;
out vec3 fragmentColor;
void main(){
    gl_Position =  MVP * vec4(vertexPosition_modelspace,1);
    fragmentColor = vertexColor;
}
片段着色器SimpleFragmentShader.fragmentshader 文件中代码:
#version 330 core
in vec3 fragmentColor;
out vec3 Color;
void main(){
 Color=fragmentColor;
}
shader.hpp 文件中的代码同博客<1.2.2 Visual Studio OpenGL着色器语言文件读取>,链接为:Visual Studio OpenGL着色器语言文件读取-CSDN博客
运行结果:


 853
853


 被折叠的 条评论
为什么被折叠?
被折叠的 条评论
为什么被折叠?
 到【灌水乐园】发言


