


sass导入sass

There are many benefits of Sass for WordPress developers. You’ve probably heard many arguments for using a pre-processor by now. CSS pre-processors provide the opportunity for better code organization by using partials and nesting styles. Pre-processors help developers style faster by writing mixins and functions. Pre-processors also allow us to write more maintainable, scalable code with logic and variables.
Sass对于WordPress开发人员有很多好处。 到目前为止,您可能已经听说过许多有关使用预处理器的争论。 CSS预处理器通过使用partials和嵌套样式为更好的代码组织提供了机会。 预处理器通过编写mixin和函数来帮助开发人员更快地进行样式设置。 预处理器还使我们能够编写具有逻辑和变量的更可维护,可扩展的代码。
将样式表转换为Sass (Convert a Stylesheet to Sass)
The best way to start using Sass in WordPress development is to use a theme that has Sass files included. The Underscores theme is my favorite starting place for a new theme. However, if you’re starting with a theme that doesn’t have Sass files included, you’ll need to convert the existing stylesheet to Sass.
在WordPress开发中开始使用Sass的最佳方法是使用包含Sass文件的主题。 Underscores主题是我最喜欢的新主题起点。 但是,如果您从不包含Sass文件的主题开始,则需要将现有样式表转换为Sass。
The good news is that if you’re using the .scss syntax (which I recommend), your existing CSS is all valid Sass. You can simply copy style.css to style.scss and that .scss file will compile properly.
好消息是,如果您使用.scss语法(我建议这样做),则现有CSS都是有效的Sass。 您可以简单地将style.css复制到style.scss然后该style.scss文件将正确编译。
设置部分 (Setting Up Partials)
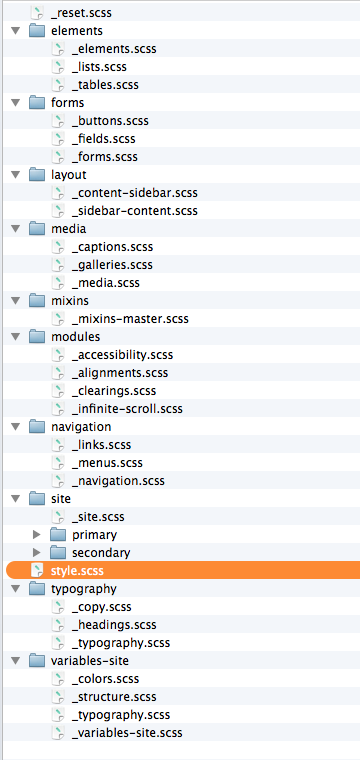
At this point, you’ve got a long .scss file with just as much code as your original CSS file. You can now use variables and mixins, but this still isn’t organized better yet. We can get some much-needed organization by breaking the long stylesheet up into smaller files. Copy each “section” of style.css to a separate .scss file in your Sass folder. Name this file after what it contains with an underscore prefix. For example, your styles relating to your navigation go to _navigation.scss.
此时,您已经有了一个长的.scss文件,其代码与原始CSS文件一样多。 您现在可以使用变量和mixin,但这还没有更好地组织。 通过将较长的样式表分解为较小的文件,我们可以得到一些急需的组织。 将style.css每个“部分”复制到Sass文件夹中的单独的.scss文件中。 用下划线前缀命名该文件后的名称。 例如,与导航有关的样式转到_navigation.scss 。
Once you’ve moved code to a partial, you’ll need to import that partial in your main style.scss file. Essentially, you’ll copy all the navigation code to _navigation.scss and replace it in style.scss with an import command. Note: the file name in the import does not have the underscore or the extension.
将代码移至部分后,需要将其导入到主style.scss文件中。 本质上,您将所有导航代码复制到_navigation.scss并使用import命令将其替换为style.scss 。 注意:导入中的文件名没有下划线或扩展名。
[sass] @import ‘navigation’; [/sass]
[sass] @import'导航'; [/ sass]
CSS is still cascades (earlier styles are overridden by later styles of the same specificity), so be sure to keep these @import statements in the order you need for your final output.
CSS仍然是层叠的(以前的样式被具有相同特性的以后的样式覆盖),因此请确保按最终输出所需的顺序保留这些@import语句。
根据需要进行重构 (Refactor as Necessary)
Once you’ve broken the long stylesheet into smaller partials (so you can find code more easily), you can work on refactoring those partials. This step helps make things easier to maintain, but I wouldn’t consider it essential. One way to refactor is to nest selectors. If you have several styles defined with in a certain parent selector, you’ll have this in your original stylesheet:
将长样式表分解成较小的部分(以便您可以更轻松地找到代码)后,就可以重构这些部分。 此步骤有助于使事情更易于维护,但我认为这不是必不可少的。 重构的一种方法是嵌套选择器。 如果您在某个父选择器中定义了几种样式,则可以在原始样式表中使用:
[sass] .header .logo { //styles } .header .tagline { //styles } .header .menu { //styles } [/sass]
[sass] .header .logo {// styles} .header .tagline {// styles} .header .menu {// styles} [/ sass]
You can refactor those styles to make them easier to scan and edit by nesting the child selectors like this. The following block of Sass will compile to the same CSS we had above.
您可以通过嵌套子选择器来重构这些样式,以使其更易于扫描和编辑。 下面的Sass块将编译为与上面相同CSS。
[sass] .header { .logo { //styles } .tagline { //styles } .menu { //styles } } [/sass]
[sass] .header {.logo {//样式} .tagline {//样式} .menu {//样式}} [/ sass]
You can also refactor by replacing repeated prefixed properties with short mixins.
您还可以通过使用短混合替换替换重复的前缀属性来进行重构。
[sass] .menu a { -webkit-transition: color 0.2s; transition: color 0.2s; } [/sass]
[sass] .menu a {-webkit-transition:color 0.2s; 过渡:颜色0.2秒; } [/ sass]
A mixin can do the same thing. Note: I haven’t include the @mixin statement here: I recommend using the Bourbon or Compass mixin libraries for standard things like this.
一个mixin可以做同样的事情。 注意:我没有在此处包含@mixin语句:建议将Bourbon或Compass mixin库用于此类标准操作。
[sass] .menu a { @include transition(color 0.2s); } [/sass]
[sass] .menu a {@include transition(color 0.2s); } [/ sass]
Further note: I actually don’t recommend using mixins for prefixing: AutoPrefixer is a much better solution, but that’s a different article.
进一步说明:实际上,我不建议使用mixins作为前缀: AutoPrefixer是更好的解决方案,但这是另一篇文章。
为WordPress编译Sass (Compile Your Sass for WordPress)
Now that we’ve broken the big style.css file down: how do we put it back together?
现在,我们已经分解了style.css大文件:如何将其放回原处?
编译器要求 (Compiler Requirements)
WordPress has a few unique requirements for the CSS output. This file needs to be named style.css, it must live in the theme root, and it needs a special block of WordPress comments at the top.
WordPress对CSS输出有一些独特的要求。 该文件需要命名为style.css,它必须位于主题根目录中,并且在顶部需要一个特殊的WordPress注释块。
In addition those WordPress-specific considerations, I’d also add the following requirements for our compile process. It’s best to keep all the Sass files in a subdirectory (/sass/) so we can keep the theme root clean. We should also be able to compress CSS output for our deployed code.
除了这些特定于WordPress的注意事项外,我还将为我们的编译过程添加以下要求。 最好将所有Sass文件保存在一个子目录( /sass/ )中,以便我们可以使主题根目录保持整洁。 我们还应该能够为已部署的代码压缩CSS输出。
GUI编译方法 (GUI Compile Methods)
If you prefer an app to compile your Sass, the following apps provide a GUI for selecting and watching folders of .scss files.
如果您希望使用某个应用程序来编译Sass,则以下应用程序提供了一个GUI,用于选择和监视.scss文件的文件夹。
Codekit ($30)
Codekit (30美元)
Koala (free)
考拉 (免费)
Scout (free)
侦察兵 (免费)
Compass.app ($10)
Compass.app (10美元)
CLI编译方法 (CLI Compile Methods)
I don’t use those apps often: I prefer the command line. There are two tools to compile your Sass from the command line: Sass and Compass. You can find instructions for installing Sass and Compass as command line tools (Ruby gems): Sass / Compass.
我不经常使用这些应用程序:我更喜欢命令行。 有两种工具可从命令行编译Sass:Sass和Compass。 您可以找到有关将Sass和Compass作为命令行工具(Ruby gem)安装的说明: Sass / Compass 。
Sass’s CLI provides the sass command for compiling a Sass input file to CSS output: sass style.scss:style.css. Of course, re-running that command every time you change something in your Sass partials isn’t ideal. You can add the --watch parameter and Sass will watch the .scss file (and the partials it imports) and compile every time it detects a change: sass --watch style.scss:style.css.
Sass的CLI提供了sass命令,用于将Sass输入文件编译为CSS输出: sass style.scss:style.css 。 当然,每次更改Sass部分中的某些内容时都重新运行该命令是不理想的。 可以添加--watch参数,Sass将监视--watch文件(及其导入的部分文件),并在每次检测到更改时进行编译: sass --watch style.scss:style.css 。
We can improve our compile method even more by using Compass instead of Sass. The biggest benefit of Compass is that it operates on a config.rb file. You can save your configuration options (expanded vs. compressed, input & output directories, etc) in a file, then tell Compass to watch and compile your Sass by running compass watch in the directory that contains config.rb.
通过使用Compass而不是Sass,我们可以进一步改进编译方法。 Compass的最大好处是它可以在config.rb文件上config.rb 。 您可以将配置选项(扩展或压缩,输入和输出目录等)保存在文件中,然后通过在包含config.rb的目录中运行compass watch来告诉Compass监视和编译Sass。
Here’s how I use my Compass config.rb file:
这是我使用Compass config.rb文件的方法:
It lives in
/{theme-name}/sass/它位于
/{theme-name}/sass/It ouputs
style.cssup a level to the theme root:css_dir = '..'它输出
style.css到主题根目录:css_dir = '..'The .scss files live in the
/sass/directory:sass_dir = ''.scss文件位于
/sass/目录中:sass_dir = ''During development:
output_style = :expanded在开发过程中:
output_style = :expandedFor deployment:
output_style = :compressed对于部署:
output_style = :compressed
WordPress style.css注释 (WordPress style.css Comments)
As we noted above, WordPress requires some specific comments at the top of the theme stylesheet. We can control those in style.scss in our /sass/ directory. Since Compass will remove comments with output_style = :compressed, we’ll need to start the comment block with an exclamation mark (!) to preserve these comments.
如上所述,WordPress在主题样式表的顶部需要一些特定的注释。 我们可以在/sass/目录中的style.scss中控制它们。 由于Compass将使用output_style = :compressed删除注释, output_style = :compressed我们需要在注释块中以感叹号(!)开头,以保留这些注释。
[sass] /*! Theme Name: Sassy Theme Theme URI: http://jamessteinbach.com/themes/sassy/ Author: James Steinbach Author URI: http://jamessteinbach.com Description: From CSS to Sass Sample Theme Code */
[sass] / *! 主题名称:Sassy主题主题URI:http://jamessteinbach.com/themes/sassy/作者:James Steinbach作者URI:http://jamessteinbach.com说明:从CSS到Sass示例主题代码* /
//import all your partials [/sass]
//导入所有的部分[/ sass]
整理局部 (Organize Your Partials)
Now that we know how to turn a stylesheet into Sass and put it back together, let’s talk about how to organize your Sass partials. The first thing to keep in mind is that cascades still matter. Make sure to import your broadest styles first and your most specific styles last.
现在,我们知道了如何将样式表转换为Sass并将其放回原处,让我们讨论如何组织Sass局部。 要记住的第一件事是级联仍然很重要。 确保首先导入最广泛的样式,最后导入最特定的样式。
You can use folders to organize your partials. For a partial in a folder, your @import statement would include the directory name like this:
您可以使用文件夹来组织局部文件。 对于文件夹中的部分文件,您的@import语句将包含如下目录名称:
[sass] @import ‘base/variables’; // imports _variables.scss from the /base/ directory [/sass]
[sass] @import'base / variables'; //从/ base /目录[/ sass]导入_variables.scss
There are many ways to group your partials into folders. The “Sass Resources” list below contains some good philosophies for organizing partials. Here’s one example:
有很多方法可以将局部文件分组到文件夹中。 下面的“ Sass资源”列表包含一些用于组织局部的良好哲学。 这是一个例子:
- /base/ (variables, mixins, reset, typography) / base /(变量,mixin,重置,排版)
- /layout/ (grid, header, footer) / layout /(网格,页眉,页脚)
- /vendors/ (plugins, vendors, etc) / vendors /(插件,供应商等)
- /components/ (buttons, menus, forms, widgets) / components /(按钮,菜单,表单,小部件)
- /pages/ (home, landing page, portfolio) / pages /(首页,着陆页,作品集)
萨斯资源 (Sass Resources)
We’ve just scratched the surface of using Sass to build WordPress themes. If this is your first read on the topic, you might be wondering, “Where do I get more information?” The following lists provide more information on methods for using Sass for WordPress development. Some of their advice differs from this post: you can follow the path that works best for you.
我们只是从头开始使用Sass构建WordPress主题。 如果这是您第一次阅读该主题,则您可能会想:“我在哪里可以获得更多信息?” 以下列表提供了有关使用Sass进行WordPress开发的方法的更多信息。 他们的一些建议与这篇文章有所不同:您可以按照最适合自己的方式进行学习。
额外的Sass阅读 (Additional Sass Reading)
If you have other resources to recommend or lessons to share, please post them in the comments!
如果您有其他资源值得推荐或要分享的课程,请在评论中发布它们!
翻译自: https://www.sitepoint.com/sass-for-wordpress-developers/
sass导入sass


 714
714

 被折叠的 条评论
为什么被折叠?
被折叠的 条评论
为什么被折叠?
 到【灌水乐园】发言


