


dcom oxid
In part one of this series we had a broad introduction to OXID eSales, a high quality e-commerce package which is simple to install, configure, and extend. We looked at some of its features and requirements, and then finished with its installation for a fully working shop.
在本系列的第1部分中,我们对OXID eSales进行了广泛介绍,OXID eSales是一种高质量的电子商务软件包,易于安装,配置和扩展。 我们研究了它的一些功能和要求,然后完成了其安装工作,从而可以正常工作。
Here we’ll be building on what we learned in part 1, learning how themes work in OXID and how we can write new ones by extending its default theme. So, let’s dive in and look at just what a theme is.
在这里,我们将基于在第1部分中学到的知识,了解主题在OXID中的工作方式以及如何通过扩展其默认主题来编写新主题。 因此,让我们深入探讨一下主题是什么。
什么是主题? (What is a Theme?)
Themes in OXID are like themes in most other applications which you’re most likely already familiar with. Themes allow both developers and designers alike to manipulates the information provided from the business logic layer made available via the core libraries, custom modules, and extensions that we write.
OXID中的主题与您很可能已经熟悉的大多数其他应用程序中的主题相似。 主题使开发人员和设计人员都可以操纵从业务逻辑层提供的信息,这些信息通过我们编写的核心库,自定义模块和扩展而可用。
The theming system in OXID uses the Smarty Template engine which allows templates to be built using PHP-like syntax, as well as full access to the PHP core if desired.
OXID中的主题系统使用Smarty模板引擎 ,该引擎允许使用类似PHP的语法来构建模板,并且可以根据需要完全访问PHP核心。
Below is a snippet of the header.tpl template. In it you can see the Smarty Template tags interspersed with standard HTML. The template tags used in OXID are a slight variation on the standard version which use both a square and curly bracket instead of just the curly brace.
以下是header.tpl模板的代码段。 在其中,您可以看到Smarty模板标签和标准HTML穿插在一起。 OXID中使用的模板标签与标准版本略有不同,标准版本同时使用方括号和花括号,而不仅仅是花括号。
[{assign var="slogoImg" value="logo.png"}]
  <a id="logo" href="[{$oViewConf->getHomeLink()}]"
      title="[{$oxcmp_shop->oxshops__oxtitleprefix->value}]"
          ><img src="[{$oViewConf->getImageUrl($slogoImg)}]"
              alt="[{$oxcmp_shop->oxshops__oxtitleprefix->value}]"
          ></a>
    [{oxid_include_widget cl="oxwCategoryTree"
        cnid=$oView->getCategoryId() sWidgetType="header"
        _parent=$oView->getClassName() nocookie=1}]

      [{if $oxcmp_basket->getProductsCount()}]
          [{assign var="blAnon" value=0}]
          [{assign var="force_sid" value=$oViewConf->getSessionId()}]
      [{else}]
          [{assign var="blAnon" value=1}]
      [{/if}]
    [{oxid_include_widget cl="oxwMiniBasket" nocookie=$blAnon
        force_sid=$force_sid}]
    [{include file="widget/header/search.tpl"}]
</div>
[{if $oView->getClassName()=='start' && $oView->getBanners()|@count > 0 }]
    <div class="oxSlider">
        [{include file="widget/promoslider.tpl" }]
    </div>
[{/if}]
As you can see in the table below, there’s really not much difference. If you’re already familiar with Smarty (or another PHP template language), then you’ll feel right at home.
正如您在下表中看到的,实际上没有太大区别。 如果您已经熟悉Smarty(或其他PHP模板语言),那么您会感到宾至如归。

OXID also makes a number of custom plugins available which makes using it simpler and easier. You can find these interspersed with the included Smarty ones under /core/smarty/plugins. There’s quite a few available, but I’ll stick to covering the ones relevant for this article series. If you’d like to know more, I encourage you to read through the source code at your leisure.
OXID还提供了许多自定义插件,这使使用起来更简单。 您可以在/core/smarty/plugins下找到这些穿插的Smarty。 有很多可用的方法,但是我将坚持涵盖与本系列文章相关的内容。 如果您想了解更多信息,我建议您在闲暇时仔细阅读源代码。
Getting back to templates, in the template snippet above you can see the conditional logic and inclusion of other templates. I’ve formatted it slightly for readability. Let’s step through the template so you get a bit better of an understanding as to the parts involved.
回到模板,在上面的模板片段中,您可以看到条件逻辑和其他模板的包含。 为了便于阅读,我对其进行了略微格式化。 让我们逐步浏览模板,以便对所涉及的部分有更好的了解。
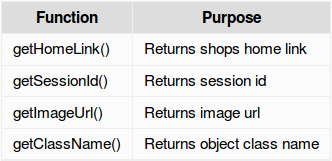
At the start we’re assigning logo.png to the template variable slogoImg. Then we pass it to the getImageUrl method of the $oViewConf object. This returns a shop-specific reference to the image requested.
首先,我们将logo.png分配给模板变量slogoImg 。 然后,将其传递给$oViewConf对象的getImageUrl方法。 这将返回特定于商店的参考图像。
There are several methods called on the $oViewConf object. These are:
$oViewConf对象调用了几种方法。 这些是:
[{assign var="slogoImg" value="logo.png"}]

  <a id="logo" href="[{$oViewConf->getHomeLink()}]"
      title="[{$oxcmp_shop->oxshops__oxtitleprefix->value}]"
      ><img src="[{$oViewConf->getImageUrl($slogoImg)}]"
          alt="[{$oxcmp_shop->oxshops__oxtitleprefix->value}]"></a>
In this line, we’re using an excellent feature of OXID, widgets, which allow us to reuse conditional business and template logic throughout the application. In this case we’re referencing the oxwCategoryTree widget as identified by the cl argument.
在这一行中,我们使用了OXID的一项出色功能,即widgets ,它使我们能够在整个应用程序中重用条件业务和模板逻辑。 在这种情况下,我们将引用由cl参数标识的oxwCategoryTree小部件。
[{oxid_include_widget cl="oxwCategoryTree"
        cnid=$oView->getCategoryId() sWidgetType="header"
        _parent=$oView->getClassName() nocookie=1}]
Here we use simple conditional logic to determine which template variables to set.
在这里,我们使用简单的条件逻辑来确定要设置的模板变量。
[{if $oxcmp_basket->getProductsCount()}]
          [{assign var="blAnon" value=0}]
          [{assign var="force_sid" value=$oViewConf->getSessionId()}]
      [{else}]
          [{assign var="blAnon" value=1}]
      [{/if}]
Finally, we include another widget oxwMiniBasket and the widget/header/search.tpl template.
最后,我们包括另一个小部件oxwMiniBasket和widget/header/search.tpl模板。
[{oxid_include_widget
        cl="oxwMiniBasket"
        nocookie=$blAnon
        force_sid=$force_sid}]
    [{include file="widget/header/search.tpl"}]
One convention you’ll want to get used to is how OXID objects and the database tables are dynamically referenced. Take the following snippet from the above code sample as an example:
您将习惯的一种约定是如何动态引用OXID对象和数据库表。 以上述代码示例中的以下代码段为例:
title="[{$oxcmp_shop->oxshops__oxtitleprefix->value}]"In this example, the template is retrieving the value of the oxtitleprefix column in the oxshops table. It does this through magic methods on the oxcmp_shop class which extends the oxView class. You can find this under application/components. In short, we’re able to retrieve a value from the database through a pre-defined template object.
在此示例中,模板正在检索oxshops表中oxtitleprefix列的值。 它通过扩展oxView类的oxcmp_shop类上的魔术方法来执行此oxView 。 您可以在application/components下找到它。 简而言之,我们能够通过预定义的模板对象从数据库中检索值。
I realize this is starting to race through everything just a bit, but after this introduction the rest is rather simple as it consistently builds on it.
我意识到这只是一点点地经历了所有事情,但是在介绍之后,其余的就很简单了,因为它始终以它为基础。
主题文件结构 (Theme File Structure)
Now that we have a basic understanding of the structure of templates. Let’s have a look at the file structure of an OXID Theme. Starting in OXID Community Edition (CE) 4.7 and Professional/Enterprise Edition (PE/EE) 5.0, the theme is split in to two locations.
现在,我们对模板的结构有了基本的了解。 让我们看一下OXID主题的文件结构。 从OXID社区版(CE)4.7和专业版/企业版(PE / EE)5.0开始,该主题分为两个位置。
/application/views/

       /
: for templates, translations, and configuration files/application/views/ //application/views/ /:用于模板,翻译和配置文件/out/: for public files ( CSS, JavaScript, images, etc.)/out/:用于公共文件(CSS,JavaScript,图像等)
Have a look through them in your installation and familiarize yourself with them.
在安装过程中浏览一下它们,并熟悉它们。
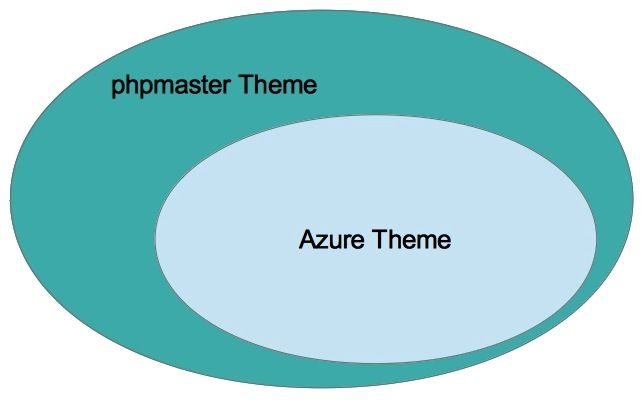
We can create a theme in one of two ways. We can either create all the templates, images, CSS, and JavaScript ourselves, or we can extend an existing theme and change only what we need. Both the CE 4.7 and PE/EE 5.0 versions of the store come with a default theme called Azure which provides all of the core templates, CSS, JavaScript, and image files required to build a working shop. For the sakes of time and simplicity, in this example, we’ll be extending it to build our custom theme.
我们可以通过以下两种方式之一创建主题。 我们既可以自己创建所有模板,图像,CSS和JavaScript,也可以扩展现有主题并仅更改需要的内容。 该商店的CE 4.7和PE / EE 5.0版本都带有一个称为Azure的默认主题,该主题提供了建立一个工作车间所需的所有核心模板,CSS,JavaScript和图像文件。 为了节省时间和简化起见,在本示例中,我们将对其进行扩展以构建自定义主题。
扩展基本主题 (Extending the Basic Theme)
Let’s get started creating our new custom theme. Under application/views, create a new directory called sitepoint. In it, create a file called theme.php and add the information below to it.
让我们开始创建新的自定义主题。 在application/views ,创建一个名为sitepoint的新目录。 在其中创建一个名为theme.php的文件,并将以下信息添加到其中。
<?php
/**
 * Theme Information
 */
$aTheme = array(
    'id'             => 'sitepoint',
    'title'          => 'SitePoint',
    'description'    => 'example for SitePoint.com',
    'thumbnail'      => 'theme.jpg',
    'version'        => '1.3',
    'author'         => 'Matthew Setter <matthew@maltblue.com>',
    'parentTheme'    => 'azure',
    'parentVersions' => array('1.3')
);
This give a unique ID and name to our theme and tells OXID we’ll be using the Azure theme as the foundation. That way, if OXID can’t find a template in our theme, it will then go look in the Azure theme for it and serve it from there.
这为我们的主题提供了唯一的ID和名称,并告诉OXID我们将使用Azure主题作为基础。 这样,如果OXID在我们的主题中找不到模板,则它将在Azure主题中查找并从那里提供。
To keep these examples practical, we’ll implement three minor changes to the look and feel of the store.
为了使这些示例切实可行,我们将对商店的外观和风格进行三个小的更改。
- Changing the logo 更改徽标
- Removing the image scroller from the home page 从主页上删除图像滚动器
- Display extra content in the users account profile 在用户帐户资料中显示其他内容
更改徽标 (Changing the Logo)
Under /out create a new directory called sitepoint. Under it, create two new directories: img and src and download the theme.jpg file. Next download the logo.png file into /img. This is a slightly modified version of the default which I made to clearly show we’re changing the theme.
在/out下/out创建一个名为sitepoint的新目录。 在其下,创建两个新目录: img和src并下载theme.jpg文件。 接下来,将logo.png文件下载到/img 。 这是默认设置的略微修改版本,我明确表示要更改主题。
Now that’s done, you need to login to the shop and enable the new theme. So go to
/admin
and login. After which, you’ll see a layout like the screenshot below. In the left-hand side navigation column click Extensions, then Themes.
现在,您需要登录商店并启用新主题。 所以去
/admin
并登录。 之后,您将看到如下屏幕截图所示的布局。 在左侧导航栏中,单击扩展,然后单击主题。
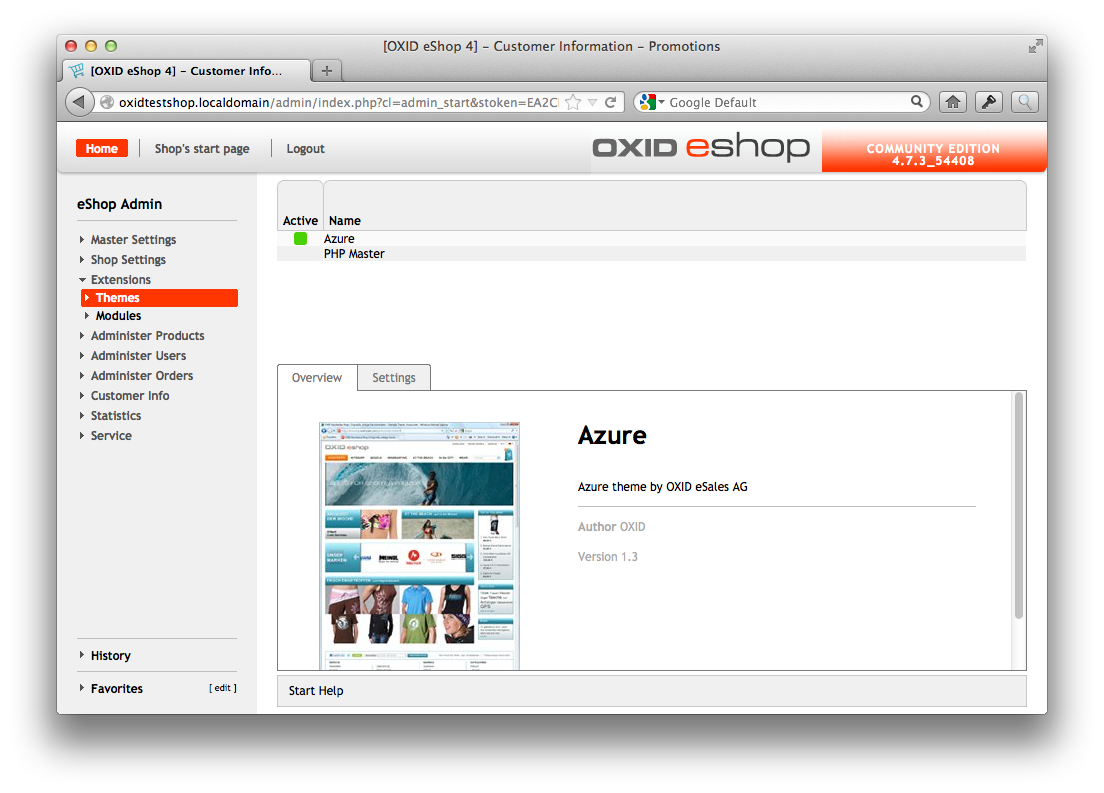
In the list which comes up on the right hand side, you’ll see Azure and PHP Master. Click “PHP Master”. Then in the top right hand side of the bottom panel, click Activate. All being well, your theme is now active.
在右侧出现的列表中,您将看到Azure和PHP Master。 点击“ PHP Master”。 然后,在底部面板的右上角,单击“激活”。 一切都很好,您的主题现在处于活动状态。
When you reload the shop, you’ll likely see the original logo there, not the one you’ve just put in place. This is a good time to introduce the tmp directory. Like all good software, OXID makes extensive use of caching.
重新加载商店时,您可能会在此处看到原始徽标,而不是刚刚放置的徽标。 这是介绍tmp目录的好时机。 像所有好的软件一样,OXID广泛使用了缓存。
It’s caching covers the Smarty templates, database queries, modules, and so on. In the third and final part of this series, I’ll be going over the caching configuration and options – so stay tuned for that one.
它的缓存涵盖了Smarty模板,数据库查询,模块等。 在本系列的第三篇也是最后一部分中,我将介绍缓存配置和选项-因此请继续关注。
In the meantime, in the root of your installation, you’ll see a directory called tmp. Delete all the files in it and then reload the shop. Now you’ll be seeing your new amazing shop logo.
同时,在安装的根目录中,您将看到一个名为tmp 。 删除其中的所有文件,然后重新加载商店。 现在,您将看到新的惊人商店徽标。
删除主页的图像滚动器 (Removing the Home Page’s Image Scroller)
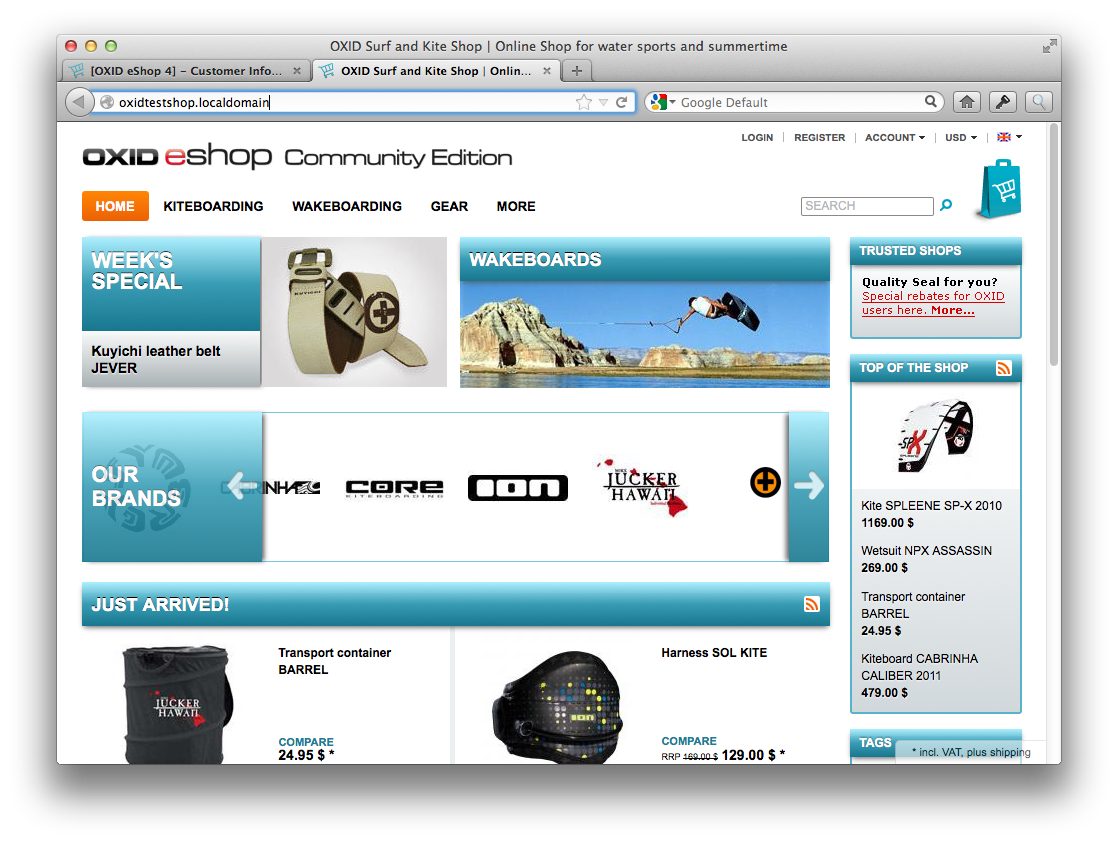
Ok, changing the logo was a pretty simple, an easy way to get started. Now let’s do some actual template changes. Let’s remove the image scroller from the home page. It’s the large image area just below the main navigation section and search bar, as shown in the screenshot below.
好的,更改徽标是一种非常简单,容易的入门方法。 现在让我们进行一些实际的模板更改。 让我们从主页中删除图像滚动器。 这是主导航部分和搜索栏下方的大图像区域,如下面的屏幕快照所示。

Copy application/views/azure/tpl/layout/header.tpl to application/views/sitepoint/tpl/layout/header.tpl, creating the directory structure as required. Once that’s done, open up the copied file and remove the section right at the bottom which resembles the code below:
将application/views/azure/tpl/layout/header.tpl复制到application/views/sitepoint/tpl/layout/header.tpl ,根据需要创建目录结构。 完成后,打开复制的文件,并在底部删除类似于以下代码的部分:
[{if $oView->getClassName()=='start' && $oView->getBanners()|@count > 0 }]
 <div class="oxSlider">
  [{include file="widget/promoslider.tpl" }]
 </div>
[{/if}]
Clear the tmp directory and reload the shop. With this removed, your shop should now resemble the screenshot below.
清除tmp目录并重新加载商店。 删除此选项后,您的商店现在应该类似于以下屏幕截图。
显示输出条件 (Display Output Conditional)
Now let’s continue to step up with a slightly tougher example. This time, we’re going to display some extra information in the users account when they’re logged in.
现在,让我们继续讲一个稍微强硬的例子。 这次,我们将在用户登录时在用户帐户中显示一些其他信息。
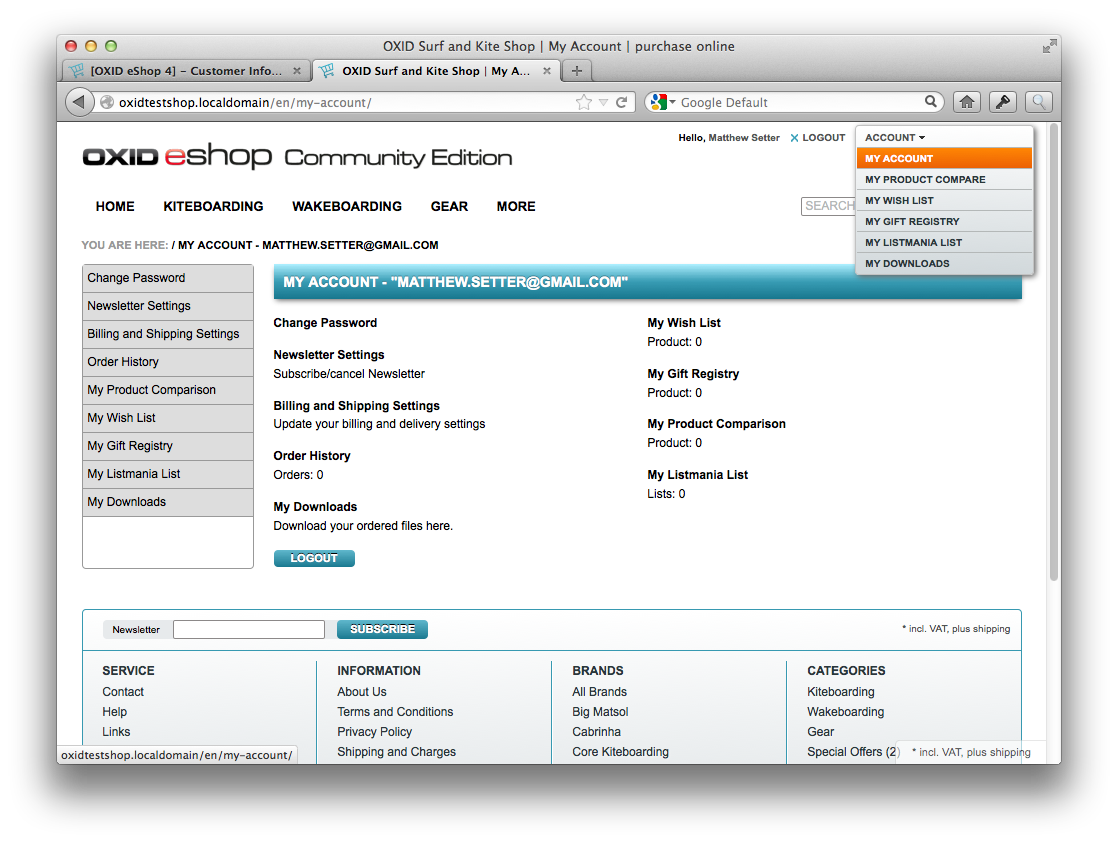
To see what an existing account of the user looks like, login to the fronted of the shop and then navigate to /en/my-account/. Alternatively, when you’re logged in you can click Account in the top right hand side of the shop and then click My Account as in the screenshot below.
要查看用户现有帐户的外观,请登录商店的正面,然后导航至/ en / my-account / 。 或者,登录后,可以单击商店右上角的“帐户”,然后单击“我的帐户”,如下面的屏幕截图所示。
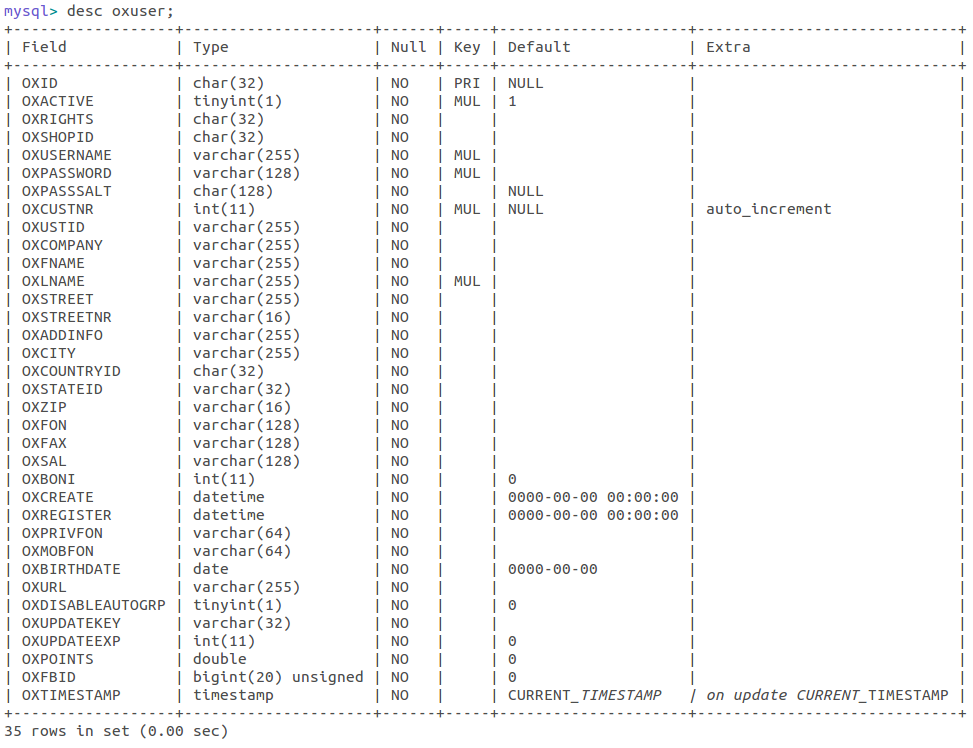
On that page, you’ll see a number of links and also user details, such as email address, and name. If you do a DESCRIBE on the table oxuser in the database, you’ll see the schema looks like this:
在该页面上,您将看到许多链接以及用户详细信息,例如电子邮件地址和名称。 如果在数据库中的表oxuser上执行DESCRIBE ,您将看到模式如下:
What we’re going to do is to add a small table at the bottom of the My Account page which lists several key details about the user. These are:
我们要做的是在“我的帐户”页面的底部添加一个小表,其中列出了有关用户的几个关键详细信息。 这些是:
- Company 公司
- Address 地址
- Phone Number 电话号码
To do this, we’ll need to do two things:
为此,我们需要做两件事:
- Modifyi another template 修改另一个模板
- Interact with some OXID template objects 与某些OXID模板对象进行交互
First copy the template application/views/azure/tpl/page/account/dashboard.tpl to the same location under application/views/sitepoint/tpl/page/account/dashboard.tpl, creating the directory structure where required. In it, you’ll notice two divs, one for each column in the layout. At the bottom of the first div you’ll see the following code:
首先将模板application/views/azure/tpl/page/account/dashboard.tpl复制到application/views/sitepoint/tpl/page/account/dashboard.tpl下的相同位置,并在需要时创建目录结构。 在其中,您会注意到两个div,布局中的每一列一个。 在第一个div的底部,您将看到以下代码:
[{if $oView->isEnabledDownloadableFiles()}]
 <dl>
  <dt><a id="linkAccountDownloads" href="[{ oxgetseourl ident=$oViewConf->getSelfLink()|cat:"cl=account_downloads" }]" rel="nofollow">[{ oxmultilang ident="MY_DOWNLOADS" }]</a></dt>
  <dd>[{ oxmultilang ident="MY_DOWNLOADS_DESC" }]</dd>
 </dl>
[{/if}]
Under which, add the following:
在其下添加以下内容:
<dl>
 <dt>[{ oxmultilang ident="PAGE_ACCOUNT_DASHBOARD_COMPANY" }]</dt>
 <dd>[{ $oxcmp_user->oxuser__oxcompany->value }]</dd>
</dl>
<dl>
 <dt>[{ oxmultilang ident="PAGE_ACCOUNT_DASHBOARD_ADDRESS" }]</dt>
 <dd>
  [{ $oxcmp_user->oxuser__oxstreet->value }] [{ $oxcmp_user->oxuser__oxstreetnr->value }]
  [{ $oxcmp_user->oxuser__oxcity->value }] [{ $oxcmp_user->oxuser__oxzip->value }]
 </dd>
</dl>
<dl>
 <dt>[{ oxmultilang ident="PAGE_ACCOUNT_DASHBOARD_PHONE" }]</dt>
 <dd>[{ $oxcmp_user->oxuser__oxfon->value }]</dd>
</dl>
This will add in both a label and the value of the respective properties by using the available objects magic methods to retrieve the information from the database.
通过使用可用的对象magic方法从数据库中检索信息,这将在标签和相应属性的值中添加。
添加翻译 (Adding Translations)
If we clear the tmp directory and reload the shop, we’ll have some rather nasty warnings be displayed because translations are missing. We need to add in the custom translation files along with the new translations so that no matter the user’s language, our changes will work.
如果我们清除tmp目录并重新加载商店,由于缺少翻译,将会显示一些相当讨厌的警告。 我们需要将自定义翻译文件与新翻译一起添加,以便无论用户使用哪种语言,我们的更改都将起作用。
So, under application/views/sitepoint/ create two directories: de and en. Under those, create a new file called cust_lang.php. In the one under de, add the following:
因此,在application/views/sitepoint/创建两个目录: de和en 。 在这些文件下,创建一个名为cust_lang.php的新文件。 在de下方的一个中,添加以下内容:
<?php
$sLangName  = "Deutsch";
// -------------------------------
// RESOURCE IDENTIFIER = STRING
// -------------------------------
$aLang = array(
    'charset'                        => 'ISO-8859-15',
    'PAGE_ACCOUNT_DASHBOARD_COMPANY' => "Company",
    'PAGE_ACCOUNT_DASHBOARD_ADDRESS' => "Address",
    'PAGE_ACCOUNT_DASHBOARD_PHONE'   => "Phone Nummer"
);
In the one under en add:
在对下一个en地址:
<?php
$sLangName = "English";
// -------------------------------
// RESOURCE IDENTIFIER = STRING
// -------------------------------
$aLang = array(
'charset' => 'ISO-8859-15',
'PAGE_ACCOUNT_DASHBOARD_COMPANY' => "Firma",
'PAGE_ACCOUNT_DASHBOARD_ADDRESS' => "Adresse",
'PAGE_ACCOUNT_DASHBOARD_PHONE' => "Telefonnummer"
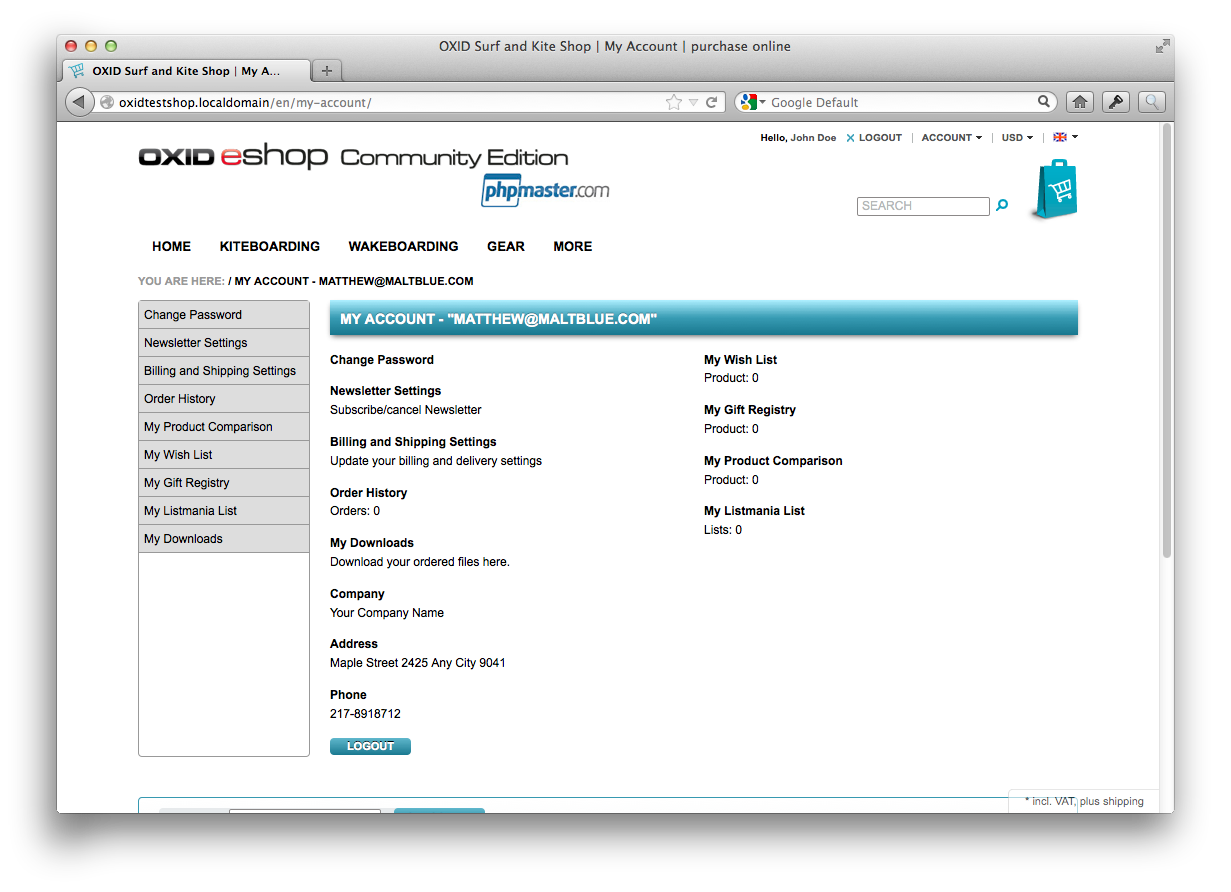
);Now, when you clear the tmp directory and reload the page, you’ll see the new additions which will look like the screenshot below.
现在,当您清除tmp目录并重新加载页面时,您将看到新添加的内容,如下图所示。
结论 (In Conclusion)
We’ve gone from installing a copy of OXID eSales community edition to customizing the look and feel for our needs. All very simple, predictable, and straight-forward.
我们已经从安装OXID eSales社区版本的副本到根据我们的需求自定义外观。 所有这些都非常简单,可预测且简单明了。
I hope you’ve enjoyed this series so far and it’s showing you what an excellent tool OXID is for eCommerce. Stay around for part 3 where we build a custom module taking your ability to customize OXID to the proverbial “next level”.
我希望您到目前为止喜欢这个系列,并且向您展示了OXID对于电子商务来说是一种出色的工具。 继续学习第3部分 ,我们将在第3部分中构建定制模块,使您能够将OXID定制到众所周知的“下一级”。
Image via Fotolia
图片来自Fotolia
dcom oxid


 343
343

 被折叠的 条评论
为什么被折叠?
被折叠的 条评论
为什么被折叠?
 到【灌水乐园】发言


