


laravel5.2.15
Laravel 5.5 will require PHP 7.0+. For the features this modern PHP version brings, please see our recap.
Laravel 5.5将需要PHP 7.0+。 有关此现代PHP版本带来的功能,请参阅我们的概述 。
Laravel 5.5 will also be the next LTS (Long Term Support) release. This means bugfixes for two years and three years of security updates. That was also the case with Laravel 5.1, but its two-year window of bug fixes is coming to an end this year. Without further ado, let’s see what this new version has to offer.
Laravel 5.5还将是下一个LTS(长期支持)版本。 这意味着可以修正两年和三年的安全更新。 Laravel 5.1也是如此,但其为期两年的错误修复窗口将于今年结束。 事不宜迟,让我们看看这个新版本提供了什么。
创建一个新的Laravel 5.5项目 (Creating a New Laravel 5.5 Project)
目录 ( Table of Contents)
Since the release has not yet officially happened, we can install the dev release version by running the command:
由于尚未正式发布发行版,因此我们可以通过运行以下命令来安装开发发行版:
laravel new laravel55 --dev
cd laravel55
php artisan key:generate
If you prefer not to use the Laravel installer, you can also take the Composer approach:
如果您不想使用Laravel安装程序,也可以采用Composer方法:
composer create-project --prefer-dist --stability=dev laravel/laravel:dev-master
cd laravel
php artisan key:generate
Once we visit the homepage of the newly set up app, we should be greeted with a welcome page similar to what we used to have in previous Laravel versions.
一旦我们访问了新设置的应用程序的主页,我们将获得一个欢迎页面,该页面类似于以前的Laravel版本中的欢迎页面。
将可发送邮件呈现给浏览器 (Rendering Mailables to the Browser)
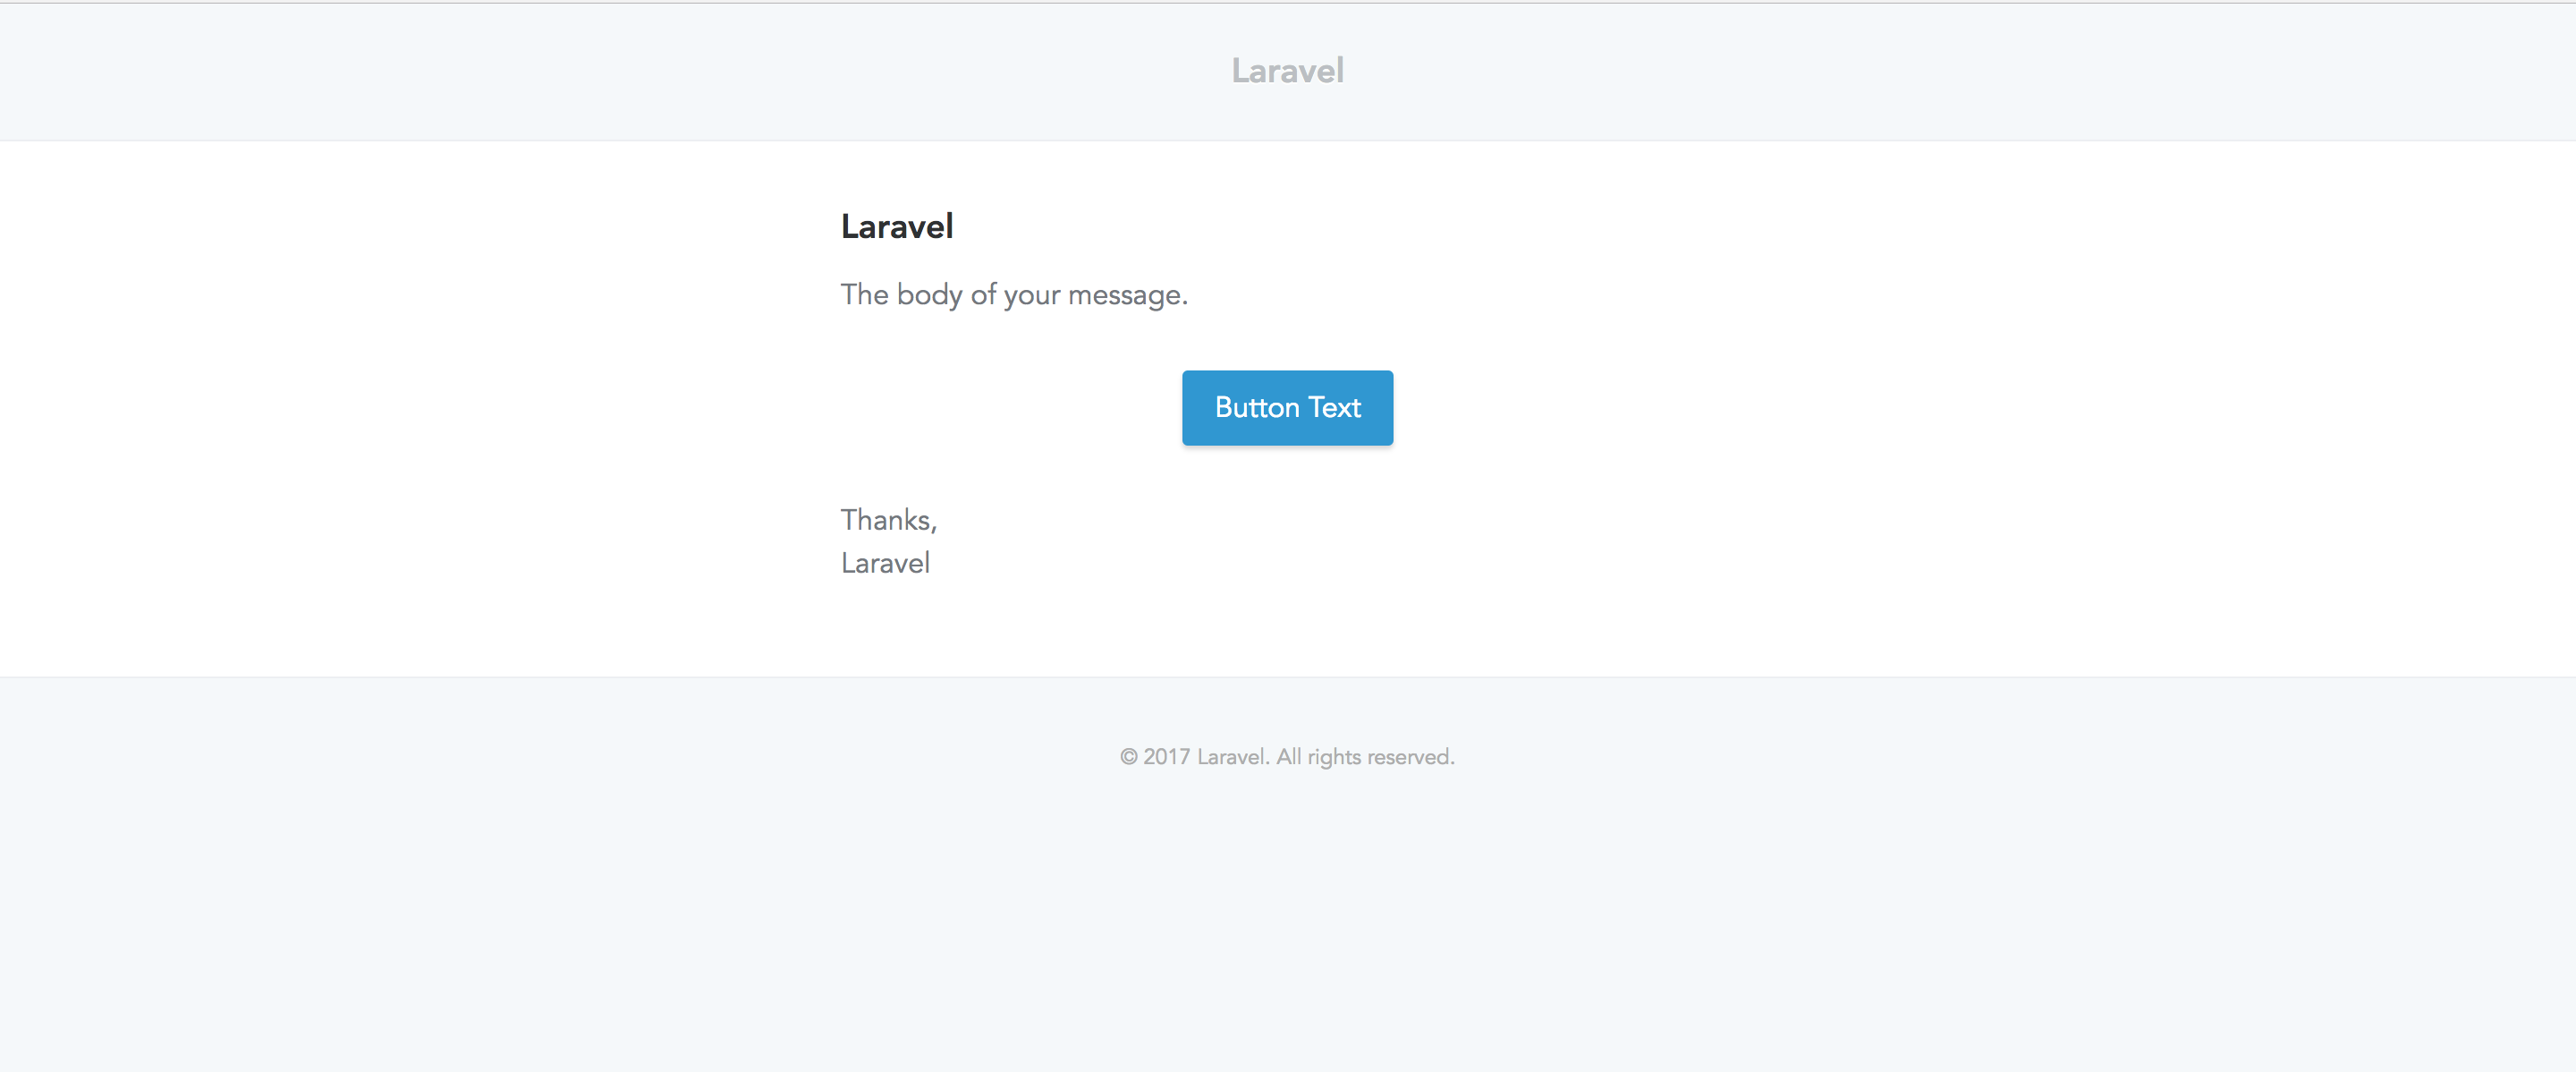
I feel this is something that will come in very handy. In the previous Laravel versions, we had to send actual emails or use an email client like Mailtrap to test email layouts, and this wasn’t a fun task. This won’t be the case any more, as with Laravel 5.5 it’s possible to render the email layout to the browser directly.
我觉得这很有用。 在以前的Laravel版本中,我们必须发送实际的电子邮件或使用诸如Mailtrap之类的电子邮件客户端来测试电子邮件布局,而这并不是一个有趣的任务。 情况不再如此,因为使用Laravel 5.5,可以将电子邮件布局直接呈现到浏览器。
A quick walkthrough on how to achieve this: let’s create a new mailable as well as the email template for our current project:
关于如何实现此目的的快速演练:让我们为当前项目创建一个新的可发送邮件以及电子邮件模板:
php artisan make:mail Welcome --markdown=emails.welcomeI prefer the markdown approach since we will get a template with some content already. Let’s open our web.php file and create a test route to checkout the email layout:
我更喜欢markdown方法,因为我们已经获得了包含一些内容的模板。 让我们打开我们的web.php文件并创建一个测试路由以检查电子邮件布局:
Route::get('/email', function () {
    return new App\Mail\Welcome();
});
routes/web.php
routes/web.php
By visiting the route /email we should be able to preview the email template:
通过访问路线/email我们应该能够预览电子邮件模板:
What’s actually going on under the hood is that with Laravel 5.5, the Mailable class implements the Renderable contract which has a render() method. This is the implementation of the render() method inside lluminate/Mail/Mailable.php:
实际情况是,在Laravel 5.5中, Mailable类实现了具有render()方法的Renderable协定。 这是lluminate/Mail/Mailable.php render()方法的实现:
public function render()
{
    Container::getInstance()->call([$this, 'build']);

    return Container::getInstance()->make('mailer')->render(
        $this->buildView(), $this->buildViewData()
    );
}
lluminate/Mail/Mailable.php
lluminate/Mail/Mailable.php
This is the method that makes it possible to get a view. Had we tried returning an instance of a class that does not implement the Renderable contract within our routes, we’d get an UnexpectedValueException thrown.
这是使获取视图成为可能的方法。 如果我们尝试返回未在路由内实现Renderable合同的类的实例,则会抛出UnexpectedValueException 。
自定义电子邮件主题 (Custom Email Themes)
When using Markdown for emails, Laravel will provide a default theme. However, some people may prefer having some custom styling in their email templates for branding purposes.
将Markdown用于电子邮件时,Laravel将提供默认主题。 但是,有些人可能更喜欢在电子邮件模板中使用一些自定义样式以进行品牌宣传。
To use a custom theme for a particular mailable, we first create a custom .css file containing the styles we want:
要将自定义主题用于特定的邮件,我们首先创建一个包含所需样式的自定义.css文件:
touch resources/views/vendor/mail/html/themes/custom.cssWe then then specify this filename as a property in the Mailable class:
然后,我们将此文件名指定为Mailable类中的属性:
class Welcome extends Mailable
{
    protected $theme = 'custom';
    [...]
}
app/Mail/Welcome.php
app/Mail/Welcome.php
This way, the email layout will be based on the styles we defined in the custom.css file. The good thing with this approach is that we can have different themes for different mailables.
这样,电子邮件布局将基于我们在custom.css文件中定义的样式。 这种方法的好处是,我们可以为不同的可邮件对象设置不同的主题。
异常助手功能 (Exception Helper Functions)
Laravel 5.5 comes with two exception helper functions which will help us write more expressive code. The two helpers are the throw_if and throw_unless methods. Both take three arguments with the third argument being optional.
Laravel 5.5带有两个异常帮助器功能,这些功能将帮助我们编写更具表现力的代码。 这两个助手是throw_if和throw_unless方法。 两者都带有三个参数,第三个参数是可选的。
Let’s look at the different implementations of these exceptions:
让我们看一下这些异常的不同实现:
$number = 2;
throw_if($number !== 3, new NotThreeException('Number is not three'));
// or
throw_if($number !== 3, NotThreeException::class, 'Number is not three');
With the throw_if helper, an exception will be thrown if the first argument evaluates to true.
使用throw_if帮助器,如果第一个参数的值为true,则将引发异常。
Implementing the throw_unless helper is no different from what we did above, the only difference being that an exception will only be thrown if the first argument evaluates to false:
实现throw_unless帮助程序与上面的操作没有什么不同,唯一的区别是,仅当第一个参数的计算结果为false时,才会引发异常:
$number = 2;
throw_unless($number === 3, new NotThreeException('Number is not three'));
// or
throw_unless($number === 3, NotThreeException::class, 'Number is not three');
Not the best example, but serves our demonstration purposes.
这不是最好的例子,但符合我们的演示目的。
介绍migration:fresh命令 (Introducing the migrate:fresh Command)
You’ve probably found yourself in a situation that required you to rebuild the database. With previous Laravel versions, we achieved this by running the php artisan migrate:refresh command. The migrate:refresh command rolls back all migrations based on what is specified in the down method for each migration file then runs the migrations again:
您可能发现自己处于需要重建数据库的情况。 在以前的Laravel版本中,我们通过运行php artisan migrate:refresh命令来实现。 migration migrate:refresh命令根据down方法中为每个迁移文件指定的内容回滚所有迁移,然后再次运行迁移:

But you’ve probably run into issues with this command a couple of times, especially when working with foreign key constraints or say you have a down() method in one of your migrations that has not been well defined. When that happens, we resort to dropping the table raising issues manually most of the time – (could be from the CLI or some GUI). That’s where migrate:fresh comes to our rescue. This command drops all the tables, then runs the existing migrations again:
但是您可能已经几次遇到了该命令的问题,尤其是在使用外键约束时,或者说您的迁移中有一个down()方法的定义不明确时。 发生这种情况时,我们通常会在大多数情况下采用手动方式丢弃表格引发问题- (可能来自CLI或某些GUI) 。 这就是migrate:fresh到来。 此命令删除所有表,然后再次运行现有的迁移:

JSON错误堆栈跟踪 (JSON Error Stack Traces)
Not a really big change but then in previous Laravel versions, we’d see HTML markup from an API client such as Postman every time we got an error while building out APIs. In Laravel 5.5, we get a JSON stack trace rather than HTML markup if an error occurs which looks neater and easier to follow:
并不是很大的变化,但是在以前的Laravel版本中,每次构建API时出错时,我们都会从API客户端(如Postman)看到HTML标记。 在Laravel 5.5中,如果发生看起来更整洁且易于理解的错误,我们将获得JSON堆栈跟踪而不是HTML标记:

自动包装发现 (Automatic Package Discovery)
These are the steps we follow in order to use a third party package in our Laravel projects.
这些是我们要在Laravel项目中使用第三方程序包的步骤。
- Install the package 安装套件
- Register the package’s service provider 注册包的服务提供商
- Register facades if any 注册立面(如果有)
As you can see, it could be simpler. Now it is.
如您所见,它可能更简单。 现在它是。
With automatic package discovery, we’ll just require a package and start using it on the fly. Note, however, this only happens if the package provider has configured the package for autodiscovery.
使用自动程序包发现,我们只需要一个程序包并立即开始使用它。 但是请注意,只有在程序包提供者已将程序包配置为自动发现时,才会发生这种情况。
Looking at the Laravel Debugbar package which has already been updated for package autodiscovery, we see that there is an extra section inside the composer.json file:
查看已经针对软件包自动发现进行了更新的Laravel Debugbar软件包,我们发现composer.json文件中还有一个extra部分:
"extra": {
    "laravel": {
        "providers": [
            "Foo\\Bar\\ServiceProvider"
        ],
        "aliases": {
            "Bar": "Foo\\Bar\\Facade"
        }
    }
}
Package providers will have to update the composer.json file with an extra section, then specify the providers and any aliases for the package.
程序包提供者必须用额外的部分更新composer.json文件,然后指定包的提供者和任何别名。
Another good thing with automatic package discovery is that things won’t break after removing a dependency. Normally, even after uninstalling a package we still have the package’s service providers and facades hanging around in the config/app.php file and this may raise issues in some cases.
自动软件包发现的另一件好事是,删除依赖项后事情不会中断。 通常,即使卸载了软件包,我们仍然在config/app.php文件中挂着该软件包的服务提供程序和外观,这在某些情况下可能会引起问题。
With package autodiscovery, when a package is removed via Composer, then everything related to the package is also removed.
借助包自动发现,当通过Composer删除包时,与该包相关的所有内容也将被删除。
对vendor:publish命令的更改 (Changes to the vendor:publish Command)
In previous Laravel versions, running the vendor:publish command would publish all resources from packages and some from the framework itself. Some of the resources published include migrations, views, and configs.
在以前的Laravel版本中,运行vendor:publish命令将发布软件包中的所有资源,以及框架本身的一些资源。 已发布的一些资源包括迁移,视图和配置。
With Laravel 5.5, we have to be a bit more explicit on what we want to be published when running this command. If we run php artisan vendor:publish without passing any flags, we’ll be prompted to pick a provider or tag making it easier to only publish what we want. See screenshot below:
使用Laravel 5.5,我们必须在运行此命令时更加明确地声明要发布的内容。 如果我们在不传递任何标志的情况下运行php artisan vendor:publish ,则系统将提示您选择提供程序或标记,从而更轻松地仅发布所需内容。 参见下面的截图:

We can bypass the prompt by specifying the --all or --provider flag when running the publish command:
我们可以在运行publish命令时通过指定--all或--provider标志来绕过提示:
php artisan vendor:publish --all各种前端预设 (Variety of Front End Presets)
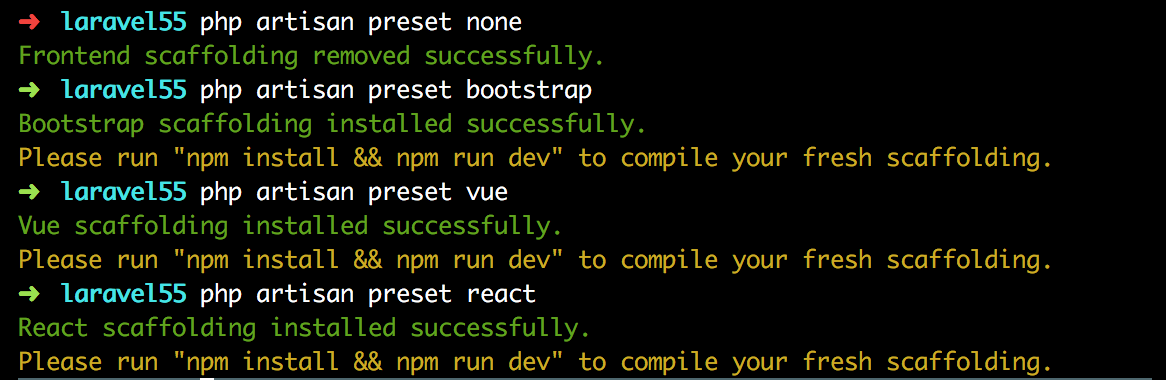
In Laravel 5.3 and 5.4, we had some Vue and Bootstrap scaffolding by default to help us with the front-end bit. In this new version, React has been included in the mix. It’s not there by default though.
在Laravel 5.3和5.4中,默认情况下,我们有一些Vue和Bootstrap脚手架来帮助我们使用前端位。 在这个新版本中,React已包含在组合中。 默认情况下不存在。
There is a new artisan command to manage the front-end presets. This means we’ll only have the scaffolding for the preset we want to work with. But then not everyone wants to use the default front-end presets – i.e. Vue, Bootstrap and React – and might opt for something else, maybe a different front-end framework. And Laravel has already taken that into consideration:
有一个新的artisan命令来管理前端预设。 这意味着我们只有要使用的预设的脚手架。 但是,并非所有人都希望使用默认的前端预设(即Vue,Bootstrap和React),并且可能会选择其他东西,也许是一个不同的前端框架。 Laravel已经考虑到了这一点:
php artisan preset noneThe above command will remove any existing front-end scaffolding. Had we wanted to use React for our front-end, the command below would get us some React scaffolding:
上面的命令将删除任何现有的前端脚手架。 如果我们想在前端使用React,下面的命令将为我们提供一些React支架:
php artisan preset reactBelow is a screenshot of this new command in action:
以下是该新命令的屏幕截图:
哎呀回来了! (Whoops is Back!)
Laravel 5.5 has brought Whoops! back, changing the way errors are displayed. With Whoops!, every time we have an error in development, we’ll be able to see the line of code that resulted in the error in the form of a screenshot as well as the error message.
Laravel 5.5带来了哎呀! 返回,更改错误的显示方式。 哎呀! ,每当我们在开发中遇到错误时,我们都可以以屏幕截图的形式查看错误的代码行以及错误消息。
In my opinion, error messages look better with this new handler and the fact that we get a screenshot with the line of code that resulted in the error makes debugging even easier:
我认为,使用此新处理程序后,错误消息看起来更好,而且我们获得了包含导致错误的代码行的屏幕快照,这使得调试更加容易:
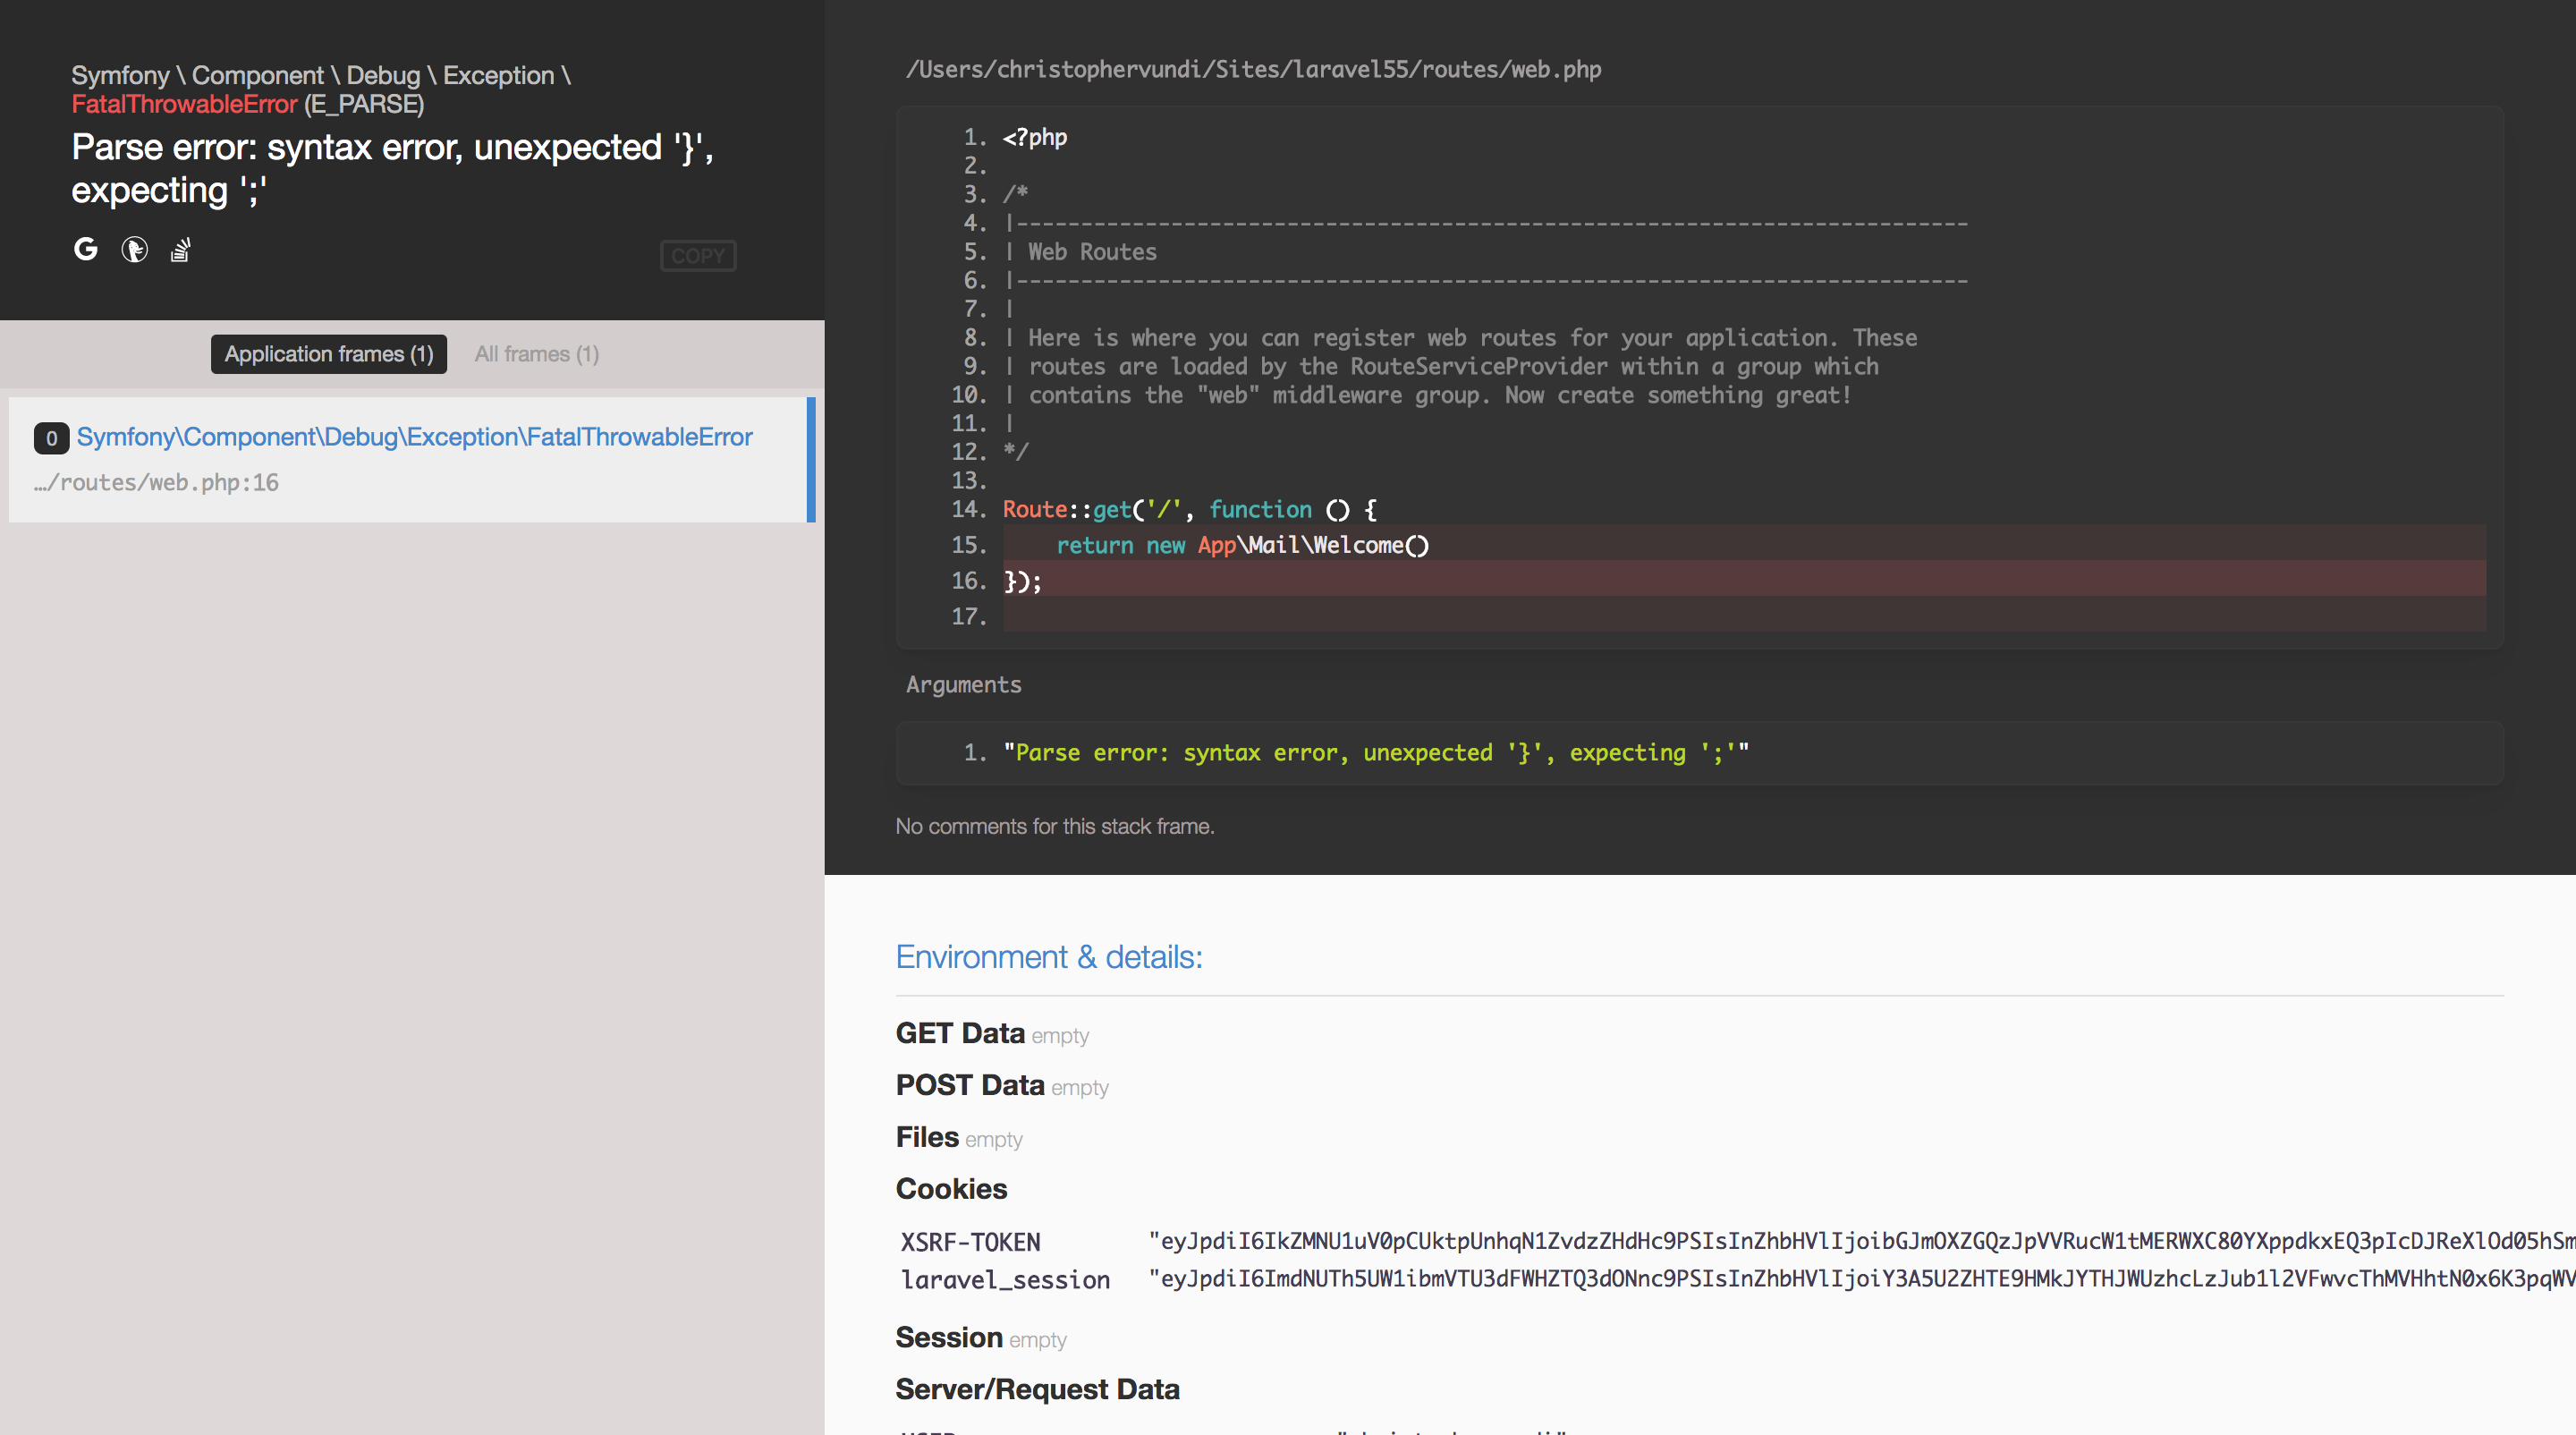
Whoops error example:
糟糕的错误示例:
Another cool thing is that Whoops comes with the ability to open referenced files directly in your IDE or editor. This feature only works in case your PHP-source files are locally accessible to the machine on which the editor is installed. To achieve this, head over to app/Exceptions/Handler.php and add this snippet:
另一个很酷的事情是,Whoops具有直接在您的IDE或编辑器中打开引用文件的功能。 仅当安装编辑器的计算机可本地访问您PHP源文件时,此功能才起作用。 为此,请转到app / Exceptions / Handler.php并添加以下代码段:
[...]
use Illuminate\Filesystem\Filesystem;
use Illuminate\Support\Arr;
use Whoops\Handler\PrettyPageHandler;
[...]
class Handler extends ExceptionHandler
{
[...]
    protected function whoopsHandler()
    {
        return tap(new PrettyPageHandler, function ($handler) {
            $files = new Filesystem;
            $handler->setEditor('sublime');
            $handler->handleUnconditionally(true);
            $handler->setApplicationPaths(
                array_flip(Arr::except(
                    array_flip($files->directories(base_path())), [base_path('vendor')]
                ))
            );
        });
    }
}
app\Exceptions\Handler.php
app\Exceptions\Handler.php
The above snippet overrides the whoopsHandler() method from the base class by adding the line: $handler->setEditor('sublime'), which causes the link to open in Sublime Text. In case you are using a different editor, visit this link to see the list of supported editors and also how to add your own editor. Mac users, don’t forget to download the sublime URL protocol for this to work.
上面的代码片段通过添加以下行覆盖了基类中的whoopsHandler()方法: $handler->setEditor('sublime') ,这会使链接在Sublime Text中打开。 如果您使用其他编辑器,请访问此链接以查看受支持的编辑器列表以及如何添加自己的编辑器。 Mac用户,别忘了下载sublime URL协议以使其工作。
自定义例外报告方法 (Custom Exception Report Method)
For previous Laravel versions, if we wanted to handle custom exceptions thrown in a specific way, then we had to place our logic inside the report method of the Handler.php file. Below is an example:
对于以前的Laravel版本,如果我们想处理以特定方式引发的自定义异常,则必须将逻辑放置在Handler.php文件的report方法内。 下面是一个示例:
[...]
public function report(Exception $exception)
{
    if ($exception instanceof CustomException) {
        // Do something
    }

    if ($exception instanceof MyOtherException) {
        // Do something
    }

    if ($exception instanceof MyOtherCustomException) {
        // Do something
    }

    return parent::report($exception);
}
[...]
app/Exceptions/Handler.php
app/Exceptions/Handler.php
Say we have about 50 custom exceptions – you can tell things are going to get ugly.
假设我们有大约50个自定义例外-您可以说情况将变得丑陋。
In Laravel 5.5, it’s possible to specify what happens when a custom exception is thrown by creating a report() method inside that exception:
在Laravel 5.5中,可以通过在该异常内创建report()方法来指定引发自定义异常时发生的情况:
[...]
class CustomException extends \Exception
{
    public function report()
    {
        // send email
    }
}

[...]
app/Exceptions/CustomException.php
app/Exceptions/CustomException.php
模型工厂发电机 (Model Factory Generators)
Laravel 5.5 has introduced a new command to create a model factory. Model factories come in handy when we want to generate fake data or a new instance of an object when writing tests.
Laravel 5.5引入了创建模型工厂的新命令。 当我们要在编写测试时生成伪数据或对象的新实例时,模型工厂会派上用场。
To generate a factory for a particular class, we run the command:
要为特定类生成工厂,我们运行以下命令:
php artisan make:factory PostIf we now navigate to database/factories, we’ll see a PostFactory class:
如果现在导航到database/factories ,我们将看到一个PostFactory类:
[...]
$factory->define(App\Post::class, function (Faker $faker) {
    return [
        //
    ];
});
database/factories/PostFactory.php
数据库/工厂/PostFactory.php
I find this approach more elegant due to the separation of concerns. In previous Laravel versions, all factories went inside the app/factories/ModelFactory.php file.
由于关注点的分离,我发现这种方法更加优雅。 在以前的Laravel版本中,所有工厂都位于app/factories/ModelFactory.php文件中。
验证数据返回 (Validation Data Return)
It’s now possible to get data from the validator and pass it to the create method. In previous Laravel versions this is how we went about creating new objects:
现在可以从验证器获取数据并将其传递给create方法。 在以前的Laravel版本中,这就是我们创建新对象的方式:
public function store()
{
    $this->validate(request(), [
        'title' => 'required',
        'body' => 'required'
    ]);

    // return Post::create(request()->only(['title', 'body'])); or
    return Post::create(request()->all());
}
Laravel 5.5 will now let us create objects directly from the validated data:
Laravel 5.5现在可以让我们直接从验证的数据创建对象:
public function store()
{
    $post = $this->validate(request(), [
        'title' => 'required',
        'body' => 'required'
    ]);

    return Post::create($post);
}
It’s also possible to call validate on a request instance directly in Laravel 5.5:
也可以在Laravel 5.5中直接在请求实例上调用validate :
public function store()
{
    $post = request()->validate([
        'title' => 'required',
        'body' => 'required'
    ]);

    return Post::create($post);
}
Note, however, we need to be careful when creating objects with this approach since any attribute that is left out from the validate method will not have a value. To counter this, we pass in all the attributes we want for the object to be created inside the validate method even if the values passed don’t need any validation:
但是请注意,使用这种方法创建对象时需要小心,因为validate方法遗漏的任何属性都没有值。 为了解决这个问题,即使传入的值不需要任何验证,我们也会在validate方法中传入想要创建对象的所有属性:
$post = request()->validate([
        'title' => 'required',
        'body' => 'required',
        'notRequiredField' => '',
    ]);

return Post::create($post);
With that, the field will automatically get added to the allowed request data, but not be restricted by any validation rules.
这样,该字段将自动添加到允许的请求数据中,但不受任何验证规则的限制。
自定义验证规则 (Custom Validation Rules)
This was still possible in previous Laravel versions by using the Validator::extend method. However, things were not centralized. We had the rule go inside the AppServiceProvider file, then the message inside the resources/lang/en/validation.php file. See Laravel documentation on how to achieve this in Laravel 5.4.
在以前的Laravel版本中,仍然可以通过使用Validator::extend方法来实现。 但是,事情不是集中的。 我们将规则AppServiceProvider文件中,然后将消息AppServiceProvider resources/lang/en/validation.php文件中。 有关如何在Laravel 5.4中实现此目的,请参见Laravel文档 。
In Laravel 5.5 we have a new artisan command to define custom validation. This command will generate a new class implementing the Rule contract. Let’s generate a new rule to see what’s inside this generated file:
在Laravel 5.5中,我们有了一个新的artisan命令来定义自定义验证。 该命令将生成一个实现Rule合同的新类。 让我们生成一条新规则,以查看此生成文件中的内容:
php artisan make:rule CustomRuleIf we look inside app/Rules/CustomRule.php, we see two methods i.e. the passes method and the message method. The passes method takes two arguments i.e. the attribute and the value, and returns a boolean. In case you are confused, the $attribute is the field to be validated while the $value is the actual value being passed to that attribute.
如果我们查看app/Rules/CustomRule.php , app/Rules/CustomRule.php看到两种方法,即passes方法和message方法。 passes方法采用两个参数,即attribute和value ,并返回一个布尔值。 如果您感到困惑,则$attribute是要验证的字段,而$value是传递给该属性的实际值。
As an example, let’s say we didn’t want our app to take a certain name, then we’d have our Rule looking like this:
例如,假设我们不希望我们的应用使用一个特定的名称,那么我们的规则应如下所示:
class CustomRule implements Rule
{
    [...]
    public function passes($attribute, $value)
    {
        return $value !== 'unwantedname';
    }

    public function message()
    {
        return 'You cannot use that as your username';
    }
    [...]
}
app/Rules/CustomRule.php
app/Rules/CustomRule.php
Then using the new rule to validate our username attribute:
然后使用新规则来验证我们的username属性:
use App\Rules\CustomRule;

request()->validate([
    'username' => [
        'required',
        new CustomRule()
    ],
    'anotherfield' => 'required|min:5'
]);
app/Rules/CustomRule.php
app/Rules/CustomRule.php
See Taylor Otwell’s post which goes into depth on how to define custom validation in this new Laravel Version.
请参阅Taylor Otwell的文章 ,该文章深入探讨了如何在此新Laravel版本中定义自定义验证。
DD和转储进入集合 (DD and Dump Coming to Collections)
Collections now have a dump() method as well as a dd() method. In previous Laravel versions, when debugging collections we’d assign a variable to a collection then keep dumping the variable as we altered the collection. This won’t be the case anymore in Laravel 5.5 as we can now call dd() or dump() directly on a collection making debugging a lot easier.
集合现在具有dump()方法和dd()方法。 在以前的Laravel版本中,调试集合时,我们会为集合分配一个变量,然后在更改集合时继续转储该变量。 在Laravel 5.5中将不再是这种情况,因为我们现在可以直接在集合上调用dd()或dump() ,从而使调试更加容易。
Assuming we had a collection of posts which went through a series of transformations and we wanted to inspect the collection at each step, then this will do:
假设我们有一个经过一系列转换的帖子集合,并且我们想在每个步骤中检查该集合,那么这样做:
$posts = Post::all();

 $posts
    ->dump()
    ->sorBy('title')
    ->dump()
    ->pluck('title')
    ->dump();
And the output:
并输出:
Collection {#284 ▼
    #items: array:3 [▼
        0 => Post {#285 ▶}
        1 => Post {#286 ▶}
        2 => Post {#287 ▶}
    ]
}

Collection {#272 ▼
    #items: array:3 [▼
        0 => Post {#285 ▶}
        2 => Post {#287 ▶}
        1 => Post {#286 ▶}
    ]
}

Collection {#268 ▼
    #items: array:3 [▼
        0 => "Aida Bosco"
        1 => "Madge Leuschke"
        2 => "Miss Bulah Armstrong Jr."
    ]
}
This makes it easy to inspect the contents of the collection at each step. Note, however, that there’s a difference between calling dump() and dd() on a collection. dump() outputs the results at that moment and then continues processing while dd() stops the process immediately and dumps out the results (dd stands for dump and die). Had we called dd() on the collection at every step, then we’d only get the results at the very first point when we called dd() on the collection. Consider this:
这使得在每个步骤中检查集合的内容变得容易。 但是请注意,在集合上调用dump()和dd()有区别。 dump()在那一刻输出结果,然后继续处理,而dd()立即停止进程并转储结果( dd代表dump and die )。 如果我们所谓的dd()在每一步上集合,然后我们就只在第一个点得到的结果时,我们称为dd()的集合。 考虑一下:
$posts = Post::all();

 $posts
    ->dump()
    ->sorBy('title')
    ->dd()
    ->pluck('title')
    ->dump();
The output will be different:
输出将不同:
Collection {#284 ▼
    #items: array:3 [▼
        0 => Post {#285 ▶}
        1 => Post {#286 ▶}
        2 => Post {#287 ▶}
    ]
}

array:3 [▼
    0 => Post {#285 ▶}
    2 => Post {#287 ▶}
    1 => Post {#286 ▶}
]
在多对多关系中进行数据透视表转换 (Pivot Table Casting in Many to Many Relationships)
Normally, it’s possible to declare a casts property on a Model which defines how an attribute should be saved or read. Let’s say we have a Post model and among the fields, we want one field to be serialized as JSON during reading and writing, then the code snippet below will help us achieve that:
通常,可以在Model上声明casts属性,该属性定义应如何保存或读取属性。 假设我们有一个Post模型,并且在字段之间,我们希望在读写期间将一个字段序列化为JSON,那么下面的代码段将帮助我们实现这一目标:
class Post extends Model
{
    [...]
    protected $casts = [
        'somefield' => 'array',
    ];
    [...]
}
They even made it possible to cast custom pivots in many-to-many relationships in Laravel 5.4, but this was limited to just reading data. Had we wanted to perform write operations on the data, we first had to cast the attribute values manually before finally saving. This won’t be the case anymore as the $casts property on the Eloquent\Model and Eloquent\Relations\Pivot classes will behave the same making the attach, sync and save methods available to pivot models.
他们甚至可以在Laravel 5.4中的多对多关系中投放自定义数据透视表,但这仅限于读取数据。 如果我们想对数据执行写操作,我们首先必须手动转换属性值,然后再进行保存。 情况将不再如此,因为Eloquent\Model和Eloquent\Relations\Pivot类上的$casts属性将具有相同的行为,从而使attach , sync和save方法可用于枢轴模型。
自定义Blade :: if()指令 (Custom Blade::if() Directives)
Long repetitive checks within blade templates can make our templates ugly. The good news is that it’s now possible to abstract repetitive checks out of templates, leaving our templates looking cleaner and more readable. Checks like:
对刀片模板进行长时间的重复检查会使我们的模板难看。 好消息是,现在可以从模板中提取重复检查,从而使我们的模板看起来更整洁,更易读。 检查像:
@if (auth()->check() && auth()->user()->isSubscribed())
    <p>Subscribed</p>
@else
    <p>Not Subscribed</p>
@endif
Can be substituted for:
可以代替:
@subscribed
    <p>Subscribed</p>
@else
    <p>Not Subscribed</p>
@endsubscribed
The logic for creating a custom blade directive goes inside the boot method of the AppServiceProvider class:
创建自定义刀片指令的逻辑位于AppServiceProvider类的boot方法内:
[...]
use Illuminate\Support\Facades\Blade;

class AppServiceProvider extends ServiceProvider
{
    [...]
    public function boot()
    {
        Blade::if('subscribed', function () {
            return auth()->check() && auth()->user()->isSubscribed();
        });
    }
    [...]
}
app/Providers/AppServiceProvider.php
app/Providers/AppServiceProvider.php
Some checks may require an argument be passed to some method. In that case, we pass in an argument to our closure when coming up with a custom blade directive.
某些检查可能需要将参数传递给某些方法。 在这种情况下,我们在提出自定义刀片指令时将参数传递给闭包。
@if (auth()->check() && auth()->user()->isFollowing($user->id))Using the above conditional as an example, we see that we need the $user->id passed to the isFollowing() method. To create a custom blade directive which takes in the $user->id as an argument:
以上述条件为例,我们看到需要将$user->id传递给isFollowing()方法。 要创建一个以$user->id作为参数的定制刀片指令:
Blade::if('following', function (User $user) {
    return auth()->check() && auth()->user()->isFollowing($user->id)
});
Then to use this new directive in our templates:
然后在我们的模板中使用此新指令:
@following($user)
    <p>Following</p>
@else
    <p>Not Following</p>
@endfollowing
在内核中自动注册新的Artisan命令 (Autoregistering of New Artisan Commands in the Kernel)
We usually run the command php artisam make:command command-name to create new artisan commands. After that, we declare our signature inside the class with the command then head over to the kernel and manually register the command.
我们通常运行php artisam make:command command-name来创建新的artisan命令。 之后,我们使用命令在类中声明我们的签名,然后转到内核并手动注册该命令。
Registering new commands in the Kernel won’t be a requirement anymore. Inside the app/Console/kernel.php file, we have a new method which looks within the command directory and turns all file paths into a namespaced path:
不再需要在内核中注册新命令。 在app/Console/kernel.php文件中,我们有一个新方法,该方法在命令目录中查找并将所有文件路径转换为命名空间:
[...]
protected function commands()
{
    $this->load(__DIR__.'Commands');

    require base_path('routes/console.php');
}
[...]
Assuming we referenced a command which has not yet been registered in the kernel, the commands() method will resolve the command automatically.
假设我们引用了一个尚未在内核中注册的commands() ,那么commands()方法将自动解析该命令。
新的路由方法 (New Routing Methods)
Not really a big feature but we now have two extra routing methods:
并不是很大的功能,但是我们现在有两种额外的路由方法:
Route::view('/welcome', 'welcome');
Route::redirect('home', 'dashboard');
The first route will map the welcome view to the /welcome path while the second will redirect any requests made to /home to the /dashboard.
第一条路线会将welcome view映射到/welcome path而第二条路线会将对/home所有请求重定向到/dashboard 。
介绍Laravel Horizon (Introducing Laravel Horizon)
This is a new Laravel package which provides a dashboard and code-driven configuration system for Laravel Redis queues:
这是一个新的Laravel软件包,为Laravel Redis队列提供了一个仪表板和代码驱动的配置系统:

Horizon provides real-time insight into queue workloads, recent jobs, failed jobs, job retries, throughput and runtime metrics, and process counts.
Horizon可以实时了解队列工作负载,最近的作业,失败的作业,作业重试,吞吐量和运行时指标以及进程数。
Some of the features that come with Horizon include:
Horizon随附的一些功能包括:
High-level analytics for jobs – Things like jobs per minute and jobs in the past hour
作业的高级分析 –每分钟的作业和过去一小时的作业
Job and queue specific analytics
作业和队列特定分析
Tags and monitoring – It’s possible to add tags to jobs and also monitor certain tags
标签和监视 –可以将标签添加到作业中,也可以监视某些标签
Recent jobs – We can get information about the most recent jobs
最近的工作 –我们可以获得有关最近工作的信息
Queue Balancing Strategies – Horizon can automatically balance your queue worker processes across your queues depending on the workload of those queues
队列平衡策略 – Horizon可以根据队列的工作量自动平衡整个队列中的队列工作进程
See Taylor Otwell’s post which goes into depth on how to configure Horizon and all the features Horizon is packed with. We’ll have a dedicated Horizon post as well, so stay tuned.
请参阅Taylor Otwell的文章 ,该文章深入介绍了如何配置Horizon以及Horizon附带的所有功能。 我们还将有一个专门的Horizon帖子,敬请期待。
新的数据库迁移特征 (New database migration trait)
This is the RefreshDatabase trait. Some might wonder if we really need this, but the move behind coming up with this makes sense. Initially we had the DatabaseMigrations and DatabaseTransactions traits.
这是RefreshDatabase特性。 有人可能会怀疑我们是否真的需要这个,但是提出这个建议的背后的意义是合理的。 最初,我们具有DatabaseMigrations和DatabaseTransactions特性。
Using the DatabaseMigrations trait in our tests makes sure that migrations are run before and after each test, while the DatabaseTransactions trait ensures that the database is restored to its initial state after each test is run.
在我们的测试中使用DatabaseMigrations特性可以确保在每次测试之前和之后都运行迁移,而DatabaseTransactions特性可以确保在每次测试之后将数据库还原到其初始状态。
The RefreshDatabase trait will tap both capabilities by migrating the database once at the start of our tests and then running every test after that with transactions. The advantage of this is that we don’t have to re-migrate the database for each test, meaning faster tests.
RefreshDatabase特征将通过在测试开始时迁移一次数据库,然后在此之后使用事务运行每个测试来利用这两种功能。 这样做的好处是我们不必为每个测试重新迁移数据库,这意味着可以进行更快的测试。
结论 (Conclusion)
As you can see, we have a lot of exciting new stuff. However, the official release has not yet happened, so we have to wait for the upgrade guide to be published.
如您所见,我们有很多令人兴奋的新东西。 但是,尚未发布正式版本,因此我们必须等待升级指南发布。
More features are still being rolled out so keep a keen eye on this post as we keep it up to date. Leave your thoughts and suggestions in the comments section below, and don’t forget to share this post with fellow Laravel enthusiasts!
更多功能仍在推出中,因此请在我们保持最新状态的同时密切关注该帖子。 在下面的评论部分中留下您的想法和建议,不要忘记与Laravel爱好者分享这篇文章!
laravel5.2.15


 355
355

 被折叠的 条评论
为什么被折叠?
被折叠的 条评论
为什么被折叠?
 到【灌水乐园】发言


