


fitbit手表中文说明书
I’ve been trying to wake up earlier in the morning. The trouble is that alarms wake everybody up, not just me. To get around this problem, I recently bought the cheapest Fitbit I could find, having learned that they have a neat silent alarm.
我一直在努力早上起床。 问题在于警报不仅唤醒了我,还唤醒了所有人。 为了解决这个问题,我最近购买了我能找到的最便宜的Fitbit,了解到它们具有整洁的静音警报。
The truth is, if I had the cash I would rather have bought an Apple watch. When I got the Fitbit, my programmer brain immediately jumped to the question; “How can I hack this thing?”
事实是,如果我有现金,我宁愿购买苹果手表。 当我拿到Fitbit时,我的程序员脑子立刻跳到了这个问题。 “我该如何破解?”

I ended up learning a bit about Fitbit, OAuth and the Twitter API. I also learned that sometimes it’s better just to get an Apple watch…
我最终学习了一些有关Fitbit,OAuth和Twitter API的知识。 我还了解到有时候有时候买一块苹果手表会更好。
The code for this tutorial can be found on Github.
可以在Github上找到本教程的代码。
入门 (Getting Started)
I decided to try using the silent alarms as a notification system. I would check for new Twitter direct messages, and set an alarm as quickly as possible. That way, when I felt a silent alarm I wasn’t expecting, I could check Twitter…
我决定尝试将无声警报用作通知系统。 我会检查是否有新的Twitter直接消息,并尽快设置警报。 这样一来,当我感到意外的声音时,没想到,我可以查看Twitter…
It turns out both Fitbit and Twitter have JSON APIs, and both authenticate with OAuth. I began by creating a new Lumen app which would serve as the task scheduler and communicator for this project:
事实证明, Fitbit和Twitter都具有JSON API,并且都通过OAuth进行身份验证。 我首先创建了一个新的Lumen应用程序,它将用作该项目的任务计划程序和通讯器:
composer install laravel/lumen .Lumen is really just a slimmed-down version of the Laravel framework. There are a few things disabled by default, and other things set to “light” alternative implementations. Everything you build in Lumen can be ported to Laravel, so I thought I would try it out and see if it was both fast enough and featured enough to handle the communication.
Lumen实际上只是Laravel框架的精简版。 默认情况下禁用了一些功能,而其他功能则设置为“轻便”的替代实现。 您在Lumen中构建的所有内容都可以移植到Laravel,因此我想尝试一下一下,看看它是否足够快且功能强大,足以处理通信。
The communication needed to happen in two steps:
沟通需要分两个步骤进行:
- Create links/buttons to connect the app to Twitter and Fitbit 创建链接/按钮以将应用程序连接到Twitter和Fitbit
- Schedule command-line tasks to check for new direct messages and set alarms. 计划命令行任务以检查是否有新的直接消息并设置警报。
I began by adding routes for the first step:
我首先为第一步添加路线:
$app->get("/", function() {
    return view("dashboard");
});

$app->get("/auth/fitbit", function() {
    // begin auth with fitbit
});

$app->get("/auth/fitbit/callback", function() {
    // store oauth credentials
});

$app->get("/auth/twitter", function() {
    // begin auth with twitter
});

$app->get("/auth/twitter/callback", function() {
    // store oauth credentials
});
This happens in app/Http/routes.php.
这发生在app/Http/routes.php 。
I also had to create a dashboard view for these:
我还必须为这些创建仪表盘视图:
<a href="{{ url("auth/fitbit") }}">connect with fitbit</a>
<a href="{{ url("auth/twitter") }}">connect with twitter</a>
This happens in resources/views/dashboard.blade.php.
这发生在resources/views/dashboard.blade.php 。
The artisan serve command has been removed from Lumen, but if you really want it back (like I do), you can install it with:
artisan serve命令已从流明中删除,但是如果您真的想要它(像我一样),则可以使用以下命令安装它:
composer require mlntn/lumen-artisan-serveYou’ll also have to add \Mlntn\Console\Commands\Serve::class to the list of registered console commands, in app/Console/Kernel.php.
您还必须在app/Console/Kernel.php中将\Mlntn\Console\Commands\Serve::class到已注册的控制台命令列表中。
注册申请 (Registering Applications)
Both Fitbit and Twitter required I register new applications before they would provide the OAuth keys I needed to authenticate.
Fitbit和Twitter都要求我注册新的应用程序,然后它们才能提供我需要进行身份验证的OAuth密钥。
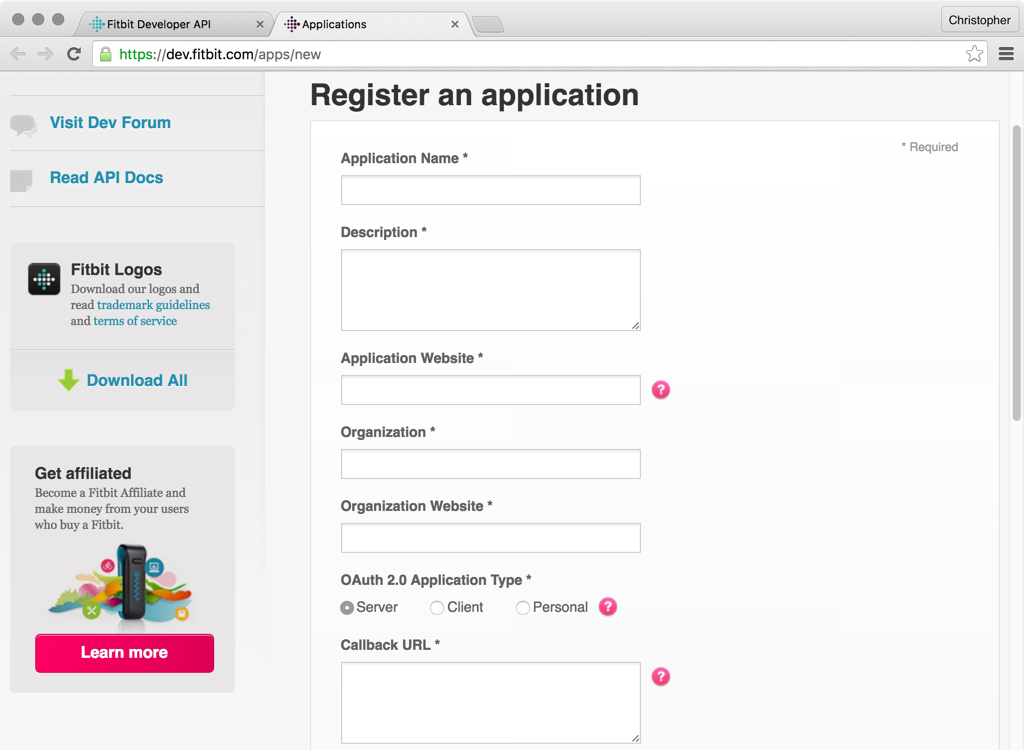
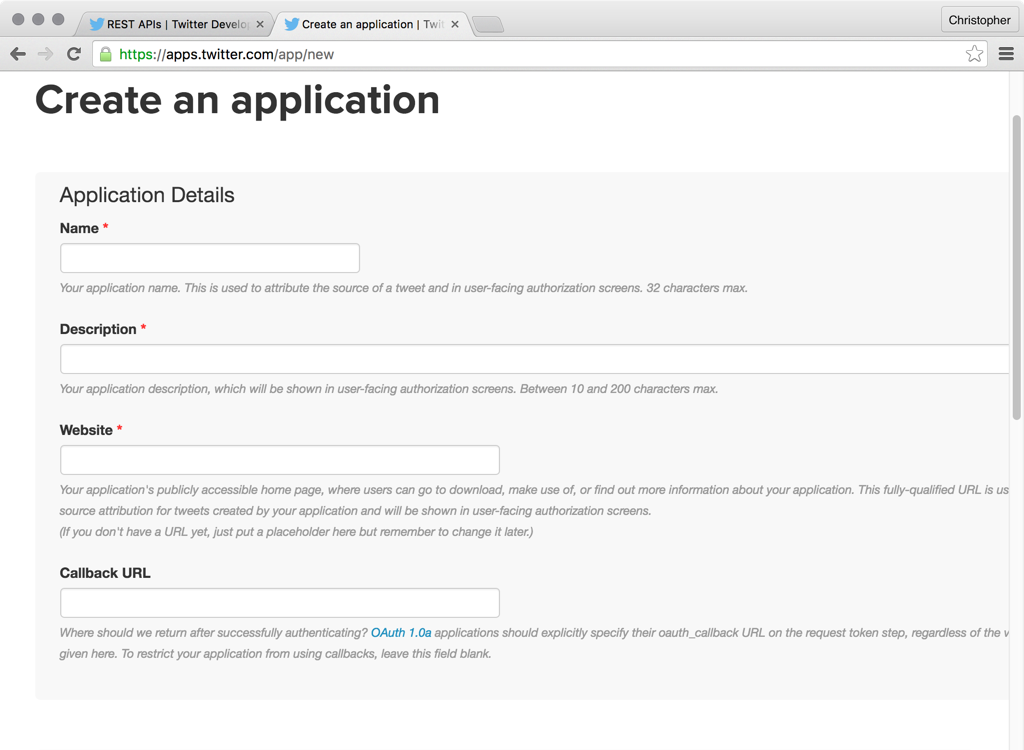
I was developing this all locally, using the Artisan server, to get to routes like http://localhost:8080/auth/twitter. The Twitter app registration page wouldn’t allow callback URLs with localhost, IP address, or port numbers.
我正在使用Artisan服务器在本地进行所有开发,以到达http://localhost:8080/auth/twitter类的路由。 Twitter应用程序注册页面不允许使用带有localhost,IP地址或端口号的回调URL。
I was about to set up a redirect from https://assertchris.io/auth/twitter to http://localhost:8080/auth/twitter when I noticed that you can use different callback URLs in Twitter’s interface and the OAuth requests. If you come across this same problem, just use a fake URL (from a real domain) in the Twitter interface, and the local URL when you make the OAuth requests I’m about to show you…
当我注意到您可以在Twitter界面和OAuth请求中使用不同的回调URL时,我将要设置从https://assertchris.io/auth/twitter到http://localhost:8080/auth/twitter的重定向。 如果您遇到同样的问题,请在Twitter界面中使用伪造的URL(来自真实域),并在发出我要向您显示的OAuth请求时使用本地URL……
发出OAuth请求 (Making OAuth Requests)
One of the reasons I chose Lumen was because of Socialite. Socialite abstracts most of the drudgery involved with OAuth and Guzzle abstracts the rest!
我选择流明的原因之一是因为社交名流 。 社交名流将OAuth涉及的大部分工作抽象化,而Guzzle则将其余的抽象化!
I added the public and secret keys for Fitbit and Twitter:
我为Fitbit和Twitter添加了公共密钥和秘密密钥:
FITBIT_KEY=...
FITBIT_SECRET=...
FITBIT_REDIRECT_URI=...

TWITTER_KEY=...
TWITTER_SECRET=...
TWITTER_REDIRECT_URI=...
This happens in .env.
这发生在.env 。
If I were building this app in Laravel, I would also need to modify app/config/services.php to reference these .env variables.
如果要在Laravel中构建此应用程序,则还需要修改app/config/services.php以引用这些.env变量。
Then I installed Socialite and the Fitbit and Twitter providers from https://socialiteproviders.github.io:
然后,我从https://socialiteproviders.github.io安装了Socialite以及Fitbit和Twitter提供程序:
composer require laravel/socialite
composer require socialiteproviders/fitbit
composer require socialiteproviders/twitter
Part of the Socialite installation instructions recommend adding the Socialite service provider to the list of service providers in config/app.php. The third-party Fitbit and Twitter providers have a different service provider which replaces the official one.
部分Socialite安装说明建议将社交服务提供者添加到config/app.php中的服务提供者列表config/app.php 。 第三方Fitbit和Twitter提供商拥有另一家服务提供商,以替代官方提供商。
Lumen does away with the config folder, so this service provider needs to be registered in bootstrap/app.php. I also uncommented the EventServiceProvider class:
Lumen取消了config文件夹,因此该服务提供商需要在bootstrap/app.php注册。 我还取消了对EventServiceProvider类的注释:
$app->register(
    App\Providers\EventServiceProvider::class
);

$app->register(
    SocialiteProviders\Manager\ServiceProvider::class
);
This happens in bootstrap/app.php.
这发生在bootstrap/app.php 。
Now that the EventServiceProvider class was back in play, I could add the events these OAuth providers required:
现在, EventServiceProvider类已恢复正常运行,我可以添加以下OAuth提供程序所需的事件:
namespace App\Providers;

use Laravel\Lumen\Providers\EventServiceProvider as Base;
use SocialiteProviders\Manager\SocialiteWasCalled;
use SocialiteProviders\Fitbit\FitbitExtendSocialite;
use SocialiteProviders\Twitter\TwitterExtendSocialite;

class EventServiceProvider extends Base
{
    protected $listen = [
        SocialiteWasCalled::class => [
            FitbitExtendSocialite::class . "@handle",
            TwitterExtendSocialite::class . "@handle",
        ],
    ];
}
This happens in app/Providers/EventServiceProvider.php.
这发生在app/Providers/EventServiceProvider.php 。
With all these settings out the way, I could start to connect to Fitbit and Twitter:
完成所有这些设置后,我可以开始连接到Fitbit和Twitter:
use Laravel\Socialite\Contracts\Factory;

$manager = $app->make(Factory::class);

$fitbit = $manager->with("fitbit")->stateless();
$twitter = $manager->with("twitter");

$app->get("/auth/fitbit", function() use ($fitbit) {
    return $fitbit->redirect();
});

$app->get("/auth/fitbit/callback", function() use ($fitbit) {
    // use $fitbit->user()
});

$app->get("/auth/twitter", function() use ($twitter) {
    return $twitter->redirect();
});

$app->get("/auth/twitter/callback", function() use ($twitter) {
    // use $twitter->user()
});
This happens in app/Http/routes.php.
这发生在app/Http/routes.php 。
Something else that is disabled by default in Lumen is session management. It makes sense, since Lumen is intended mostly for stateless JSON web services, not actual websites. The trouble is that Socialite uses sessions by default for OAuth 2. I can disable this with the stateless() method…
在流明中默认禁用的其他功能是会话管理。 这很有意义,因为Lumen主要用于无状态JSON Web服务,而不是实际的网站。 问题在于,Socialite默认使用OAuth 2会话。我可以使用stateless()方法禁用该会话…
Each Socialite provider provides a redirect() method, which I can return in a custom route. When users hit that route, they are redirected to the service I want them to authenticate with.
每个Socialite提供程序都提供了redirect()方法,我可以通过自定义路由返回该方法。 当用户点击该路由时,他们将被重定向到我希望他们进行身份验证的服务。
A simple dd($fitbit->user()) and dd($twitter->user()) show me that the details are arriving back on my local server as expected.
简单的dd($fitbit->user())和dd($twitter->user())告诉我,详细信息已按预期返回到我的本地服务器上。
Now I can pull direct messages from Twitter:
现在,我可以从Twitter提取直接消息:
use GuzzleHttp\Client;
use GuzzleHttp\HandlerStack;
use GuzzleHttp\Subscriber\Oauth\Oauth1;
use Illuminate\Support\Facades\Cache;

$app->get("/auth/twitter/callback", function() use ($twitter) {
    $user = $twitter->user();

    Cache::forever("TWITTER_TOKEN", $user->token);
    Cache::forever("TWITTER_TOKEN_SECRET", $user->tokenSecret);

    return redirect("/");
});
This happens in app/Http/routes.php.
这发生在app/Http/routes.php 。
Connecting to these services is only the first step. Once they send data back to my application, I need to attach it to future requests. It’s better to fetch the direct messages in another route, so for now I’m just going to store them in cache.
连接到这些服务只是第一步。 一旦他们将数据发送回我的应用程序,我需要将其附加到将来的请求中。 最好以另一条路径来获取直接消息,因此,现在我将它们存储在缓存中。
The default cache provider is Memcache. You can install it if it’s missing on your OS, or configure a different cache driver.
默认的缓存提供程序是Memcache。 如果操作系统上缺少它,则可以安装它,或者配置其他缓存驱动程序。
I’m also using a Laravel facade to get quick access to the underlying cache classes. These are disabled by default in Lumen, but you can uncomment $app->withFacades(); in boostrap/app.php to enable them again.
我还使用Laravel门面来快速访问底层的缓存类。 这些默认在流明中被禁用,但是您可以取消注释$app->withFacades(); 在boostrap/app.php中再次启用它们。
提取直接消息 (Fetching Direct Messages)
Next I’ll add a link to the dashboard, and a new route, for fetching direct messages:
接下来,我将添加一个指向仪表板的链接和一条新路径,以获取直接消息:
<a href="{{ url("twitter/fetch") }}">fetch direct messages</a>This happens in resources/views/dashboard.blade.php.
这发生在resources/views/dashboard.blade.php 。
$app->get("twitter/fetch", function() {
    $middleware = new Oauth1([
        "consumer_key" => getenv("TWITTER_KEY"),
        "consumer_secret" => getenv("TWITTER_SECRET"),
        "token" => Cache::get("TWITTER_TOKEN"),
        "token_secret" => Cache::get("TWITTER_TOKEN_SECRET"),
    ]);

    $stack = HandlerStack::create();
    $stack->push($middleware);

    $client = new Client([
        "base_uri" => "https://api.twitter.com/1.1/",
        "handler" => $stack,
    ]);

    $response = $client->get("direct_messages.json", [
        "auth" => "oauth",
    ]);

    header("content-type: application/json");
    print $response->getBody();
});
This happens in app/Http/routes.php.
这发生在app/Http/routes.php 。
Since I have the token and token secret (sent back to us from Twitter, as part of the OAuth process), we can use HandlerStack and Oauth1 classes to transparently add OAuth credentials to requests I make with Guzzle.
由于我拥有令牌和令牌密钥(作为OAuth流程的一部分,从Twitter发送回给我们),因此我们可以使用HandlerStack和Oauth1类将OAuth凭据透明地添加到我用Guzzle发出的请求中。
I can modify this slightly, to record current direct messages, so I can know when I’ve received something new:
我可以稍作修改,以记录当前的直接消息,这样我就可以知道何时收到新消息:
$latest = Cache::get("TWITTER_LATEST", 0);

$response = $client->get("direct_messages.json", [
    "auth" => "oauth",
    "query" => [
        "since_id" => $latest,
    ],
]);

// header("content-type: application/json");
// print $response->getBody();

$response = (string) $response->getBody();
$response = json_decode($response, true);

foreach ($response as $message) {
    if ($message["id"] > $latest) {
        $latest = $message["id"];
    }
}

Cache::forever("TWITTER_LATEST", $latest);
This happens in app/Http/routes.php.
这发生在app/Http/routes.php 。
Twitter lets me filter out all direct messages since a specified direct message ID, so the idea is that I should loop over all direct messages and cache the newest (largest) ID. Then future requests will not include old direct messages and I can set alarms if there are any new messages.
Twitter使我可以过滤出自指定直接消息ID以来的所有直接消息,因此,我的想法是我应该遍历所有直接消息并缓存最新(最大)ID。 然后,将来的请求将不包括旧的直接消息,如果有任何新消息,我可以设置警报。
设置静音警报 (Setting Silent Alarms)
I want to store the Fitbit OAuth token details, in the same way I did for Twitter:
我想以与Twitter相同的方式存储Fitbit OAuth令牌详细信息:
$app->get("/auth/fitbit/callback", function() use ($fitbit) {
    $user = $fitbit->user();

    Cache::forever("FITBIT_TOKEN", $user->token);
    Cache::forever("FITBIT_USER_ID", $user->id);

    return redirect("/");
});
This happens in app/Http/routes.php.
这发生在app/Http/routes.php 。
Now, assuming I’ve connected to Fitbit and Twitter, I can set alarms when there are new direct messages:
现在,假设我已经连接到Fitbit和Twitter,则可以在有新的直接消息时设置警报:
if (count($response)) {
    $token = Cache::get("FITBIT_TOKEN");
    $userId = Cache::get("FITBIT_USER_ID");

    $client = new Client([
        "base_uri" => "https://api.fitbit.com/1/",
    ]);

    $response = $client->get("user/-/devices.json", [
        "headers" => [
            "Authorization" => "Bearer {$token}"
        ]
    ]);

    $response = (string) $response->getBody();
    $response = json_decode($response, true);

    $id = $response[0]["id"];

    $endpoint =
        "user/{$userId}/devices/tracker/{$id}/alarms.json";

    $response = $client->post($endpoint, [
        "headers" => [
            "Authorization" => "Bearer {$token}"
        ],
        "form_params" => [
            "time" => date("H:iP", strtotime("+1 minute")),
            "enabled" => "true",
            "recurring" => "false",
            "weekDays" => [strtoupper(date("l"))],
        ],
    ]);

    header("content-type: application/json");
    print $response->getBody();
}
This happens in app/Http/routes.php.
这发生在app/Http/routes.php 。
Notice how I need to use a different kind of authentication in Fitbit? Fitbit uses OAuth 2, and allows Bearer headers for the token. It’s a lot easier than Twitter’s OAuth 1 requirements.
请注意,我需要在Fitbit中使用另一种身份验证吗? Fitbit使用OAuth 2,并允许令牌的Bearer标头。 比Twitter的OAuth 1要求容易得多。
The first request I make is to fetch the devices I have in my Fitbit account. Given a bit more time I could create a list, and some sort of selection so that it’s a bit more dynamic.
我发出的第一个请求是获取我在Fitbit帐户中拥有的设备。 给我更多的时间,我可以创建一个列表和某种选择,以使它更具动态性。
Once I have the device ID (Fitbit assigned), I can create a new silent alarm. It requires a special date format, and the day needs to be what ever today is, in upper case. That bit of debug info tells me whether a new alarm has been set or not. If there are no direct messages, I see nothing.
一旦获得设备ID(分配了Fitbit),就可以创建一个新的静音警报。 它需要特殊的日期格式,并且大写日期必须与今天一样。 调试信息会告诉我是否设置了新警报。 如果没有直接消息,我什么也看不到。
结论 (Conclusion)
This was a really fun project for me. I got to learn a bit about the constraints placed on new Lumen applications, connecting to OAuth services using Socialite, and how to interact with the Fitbit and Twitter APIs.
对我来说,这是一个非常有趣的项目。 我需要学习一些有关新Lumen应用程序的限制,使用Socialite连接到OAuth服务以及如何与Fitbit和Twitter API进行交互的知识。
My Fitbit synchronizes every 15 minutes (at minimum) as well as every time I open the iPhone app. Perhaps newer Fitbit models sync more frequently, or have some kind of server-initiated push. It’s just a limitation I’m going to have to live with. Or I could buy an Apple Watch.
我的Fitbit至少每15分钟进行一次同步,以及每次打开iPhone应用程序时进行一次同步。 也许新的Fitbit型号更频繁地同步,或者具有某种服务器启动的推送。 这只是我必须忍受的限制。 或者我可以购买Apple Watch。
翻译自: https://www.sitepoint.com/hacking-the-fitbit-emulating-a-pager-for-twitter-dms/
fitbit手表中文说明书


 8676
8676

 被折叠的 条评论
为什么被折叠?
被折叠的 条评论
为什么被折叠?
 到【灌水乐园】发言


