


Besides providing us with features like creating post and pages, WordPress also offers good support for enhancing site functionality through plugins. In this article we are going to see how to create a simple contact form plugin in WordPress and post data via AJAX.
除了为我们提供创建帖子和页面等功能外,WordPress还为通过插件增强站点功能提供了良好的支持。 在本文中,我们将了解如何在WordPress中创建一个简单的联系表单插件以及如何通过AJAX发布数据。
创建插件 (Creating the Plugin)
Let’s start by creating a plugin. To create a plugin in WordPress in the wp-contentplugins folder, make a folder for the plugin called ajaxcontactform. Inside this, create a file called ajaxcontactform.php, which will be the main file of our plugin.
让我们从创建一个插件开始。 要在WordPress的wp-contentplugins文件夹中创建一个插件,请为该插件创建一个名为ajaxcontactform的文件夹。 在其中创建一个名为ajaxcontactform.php的文件,它将是我们插件的主文件。
In this file, let’s now put the plugin header as follows:
现在,在此文件中,将插件标头如下所示:
<?php

/*

Plugin Name: Ajax Contact Form

Plugin URI:

Description:Uses a short code for contact form

Author: Abbas Suterwala

Version:

Author URI:

*/
This header is necessary for WordPress to identify the plugin. Now login to the admin section of your WordPress installation, and if everything has worked correctly, you should be able to see your WordPress plugin in the plugin list, as shown below. Let’s activate the plugin now.
该标头对于WordPress识别插件是必需的。 现在登录到WordPress安装的admin部分,如果一切正常,您应该可以在插件列表中看到WordPress插件,如下所示。 让我们现在激活插件。
We are going to use jQuery to take care of our AJAX request. For this, let’s create a folder called js in our ajaxcontactform folder, in which you can create an ajaxcontact.js file. This file will contain the code for our AJAX call.
我们将使用jQuery来处理我们的AJAX请求。 为此,让我们在ajaxcontactform文件夹中创建一个名为js的文件夹,您可以在其中创建ajaxcontact.js文件。 该文件将包含我们AJAX调用的代码。
Our folder structure will be as follows:
我们的文件夹结构如下:
Now let’s define some basic variables which we will use in our plugin and enqueue our JavaScript file. We will do it as follows:
现在,让我们定义一些基本变量,这些变量将在插件中使用并入队JavaScript文件。 我们将按如下方式进行:
define('ACFSURL', WP_PLUGIN_URL."/".dirname( plugin_basename( __FILE__ ) ) );

define('ACFPATH', WP_PLUGIN_DIR."/".dirname( plugin_basename( __FILE__ ) ) );


function ajaxcontact_enqueuescripts()

{

wp_enqueue_script('ajaxcontact', ACFSURL.'/js/ajaxcontact.js', array('jquery'));

wp_localize_script( 'ajaxcontact', 'ajaxcontactajax', array( 'ajaxurl' => admin_url( 'admin-ajax.php' ) ) );

}

add_action('wp_enqueue_scripts', ajaxcontact_enqueuescripts);
创建表格 (Creating the Form)
Now let’s create the UI for our contact form. The function to create the UI for our contact form is as follows:
现在,让我们为联系表单创建UI。 为我们的联系表单创建UI的功能如下:
function ajaxcontact_show_contact()

{

?>


<form id="ajaxcontactform" action="" method="post"enctype="multipart/form-data">

<div id="ajaxcontact-text">

<div id="ajaxcontact-response" style="background-color:#E6E6FA ;color:blue;"></div>

<strong>Name </strong> <br/>

<input type="text" id="ajaxcontactname" name="ajaxcontactname"/><br />

<br/>

<strong>Email </strong> <br/>

<input type="text" id="ajaxcontactemail" name="ajaxcontactemail"/><br />

<br/>

<strong>Subject </strong> <br/>

<input type="text" id="ajaxcontactsubject" name="ajaxcontactsubject"/><br />

<br/>

<strong>Contents </strong> <br/>

<textarea id="ajaxcontactcontents" name="ajaxcontactcontents"  rows="10" cols="20"></textarea><br />

<a onclick="ajaxformsendmail(ajaxcontactname.value,ajaxcontactemail.value,ajaxcontactsubject.value,ajaxcontactcontents.value);" style="cursor: pointer"><b>Send Mail</b></a>

</div>

</form>


<?php


}
In this function we create a <form> tag area for our contact form plugin. Inside the tags we have text fields for Name, Email and Subject. We have used a text area for the contents of the contact form.
在此功能中,我们为联系表单插件创建一个<form>标签区域。 在标签内,我们有用于“名称”,“电子邮件”和“主题”的文本字段。 我们在联系表格的内容中使用了文本区域。
Then we have created a link called Send mail, clicking on which will call the function ajaxformsendmail(). We’ll define this function below. In this function we pass the values of the Name, Email, Subject and Contents fields.
然后,我们创建了一个名为“发送邮件”的链接,单击该链接将调用ajaxformsendmail()函数。 我们将在下面定义此功能。 在此函数中,我们传递“名称”,“电子邮件”,“主题”和“内容”字段的值。
To inspect our UI, we can call this function from some place in our theme. If we call the function in our theme, the contact form should look as follows:
要检查我们的UI,我们可以在主题的某个位置调用此函数。 如果我们在主题中调用该函数,则联系表单应如下所示:
AJAX处理程序 (The AJAX handler)
Now let’s create the function which will handle our AJAX request. The $_POST request which will be linked to this handler will post the name, email, subject and content values the user has typed in.
现在让我们创建一个函数来处理我们的AJAX请求。 链接到此处理程序的$ _POST请求将发布用户键入的名称,电子邮件,主题和内容值。
Here’s the code for the handler:
这是处理程序的代码:
function ajaxcontact_send_mail()

{

$results = '';

$error = 0;

$name = $_POST['acfname'];

$email =            $_POST['acfemail'];

$subject = $_POST['acfsubject'];

$contents = $_POST['acfcontents'];

$admin_email = get_option('admin_email');

if (!filter_var($email, FILTER_VALIDATE_EMAIL))

{

$results = $email." :email address is not valid.";

$error = 1;

}

elseif( strlen($name) == 0 )

{

$results = "Name is invalid.";

$error = 1;

}

elseif( strlen($subject) == 0 )

{

$results = "Subject is invalid.";

$error = 1;

}

elseif( strlen($contents) == 0 )

{

$results = "Content is invalid.";

$error = 1;

}

if($error == 0)

{

$headers = 'From:'.$email. "rn";

if(wp_mail($admin_email, $subject, $contents, $headers))

{

$results = "*Thanks for you mail.";

}

else{

$results = "*The mail could not be sent.”

}

}

// Return the String

die($results);

}
In the handler we first get the name, email, subject, and content from the $_POST variable. Then we perform some validations on the data. To check if the email is a valid address, we use the PHP function filter_var($email, FILTER_VALIDATE_EMAIL) which basically validates the email address for us. Then we perform simple validations for the other parameters are not empty. If we find an error we return the error so that the UI can display an error message to the user.
在处理程序中,我们首先从$ _POST变量获取名称,电子邮件,主题和内容。 然后,我们对数据进行一些验证。 要检查电子邮件是否为有效地址,我们使用PHP函数filter_var($ email,FILTER_VALIDATE_EMAIL)基本上可以为我们验证电子邮件地址。 然后我们对其他不为空的参数执行简单的验证。 如果发现错误,则返回错误,以便UI可以向用户显示错误消息。
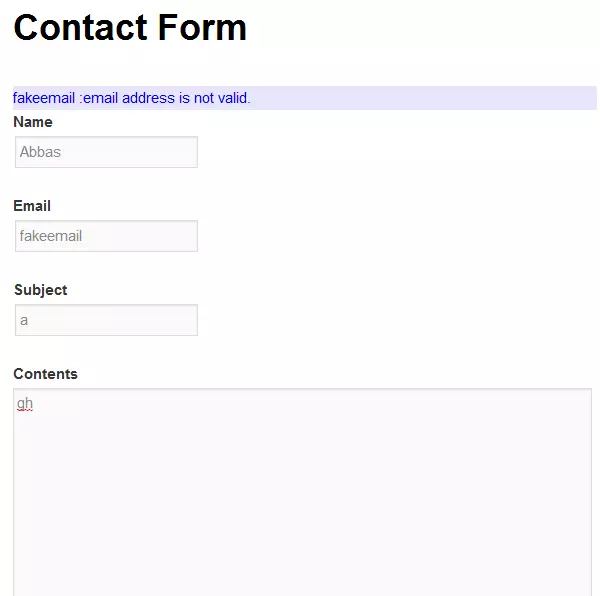
In the case of a failed validation, the following error message will be seen:
在验证失败的情况下,将看到以下错误消息:
Once the basic validations are done we will get the WordPress admin email by the function get_option(‘admin_email’). Then we use the WordPress function wp_mail() via which the mail is sent to the WordPress admin. If there is an error, the error message is set, which will be displayed to the user.
完成基本验证后,我们将通过功能get_option('admin_email')获得WordPress管理员电子邮件。 然后,我们使用WordPress函数wp_mail(),通过该函数将邮件发送到WordPress管理员。 如果有错误,则会设置错误消息,并向用户显示。
注册AJAX处理程序 (Registering the AJAX Handler)
Now our AJAX handler is ready, let’s register is with WordPress so that it can start handling AJAX requests. We can do it as follows:
现在我们的AJAX处理程序已经准备好,让我们在WordPress中注册,以便它可以开始处理AJAX请求。 我们可以做到如下:
// creating Ajax call for WordPress

add_action( 'wp_ajax_nopriv_ajaxcontact_send_mail', 'ajaxcontact_send_mail' );

add_action( 'wp_ajax_ajaxcontact_send_mail', 'ajaxcontact_send_mail' );
This basically registers our function ajaxcontact_send_mail() to handle AJAX requests coming to WordPress with the action name ajaxcontact_send_mail.
这基本上注册了我们的函数ajaxcontact_send_mail()来处理以动作名称ajaxcontact_send_mail到达WordPress的AJAX请求。
发送AJAX请求 (Sending the AJAX Request)
Now let’s write the JavaScript function ajaxformsendmail() which will take the form values as input.
现在,让我们编写JavaScript函数ajaxformsendmail(),它将表单值作为输入。
The function is as follows:
功能如下:
function ajaxformsendmail(name,email,subject,contents)

{

jQuery.ajax({

type: 'POST',

url: ajaxcontactajax.ajaxurl,

data: {

action: 'ajaxcontact_send_mail',

acfname: name,

acfemail: email,

acfsubject:subject,

acfcontents:contents

},


success:function(data, textStatus, XMLHttpRequest){

var id = '#ajaxcontact-response';

jQuery(id).html('');

jQuery(id).append(data);

},


error: function(MLHttpRequest, textStatus, errorThrown){

alert(errorThrown);

}


});

}
In this function we use the jQuery .ajax function to post our AJAX request. We use the ajaxcontactajax.ajaxurl which we had set. We set the action to ‘ajaxcontact_send_mail’ so that the request goes to our AJAX handler. We also post the required information.
在此函数中,我们使用jQuery .ajax函数发布AJAX请求。 我们使用已设置的ajaxcontactajax.ajaxurl。 我们将动作设置为“ ajaxcontact_send_mail”,以便将请求发送到我们的AJAX处理程序。 我们还会发布所需的信息。
When the request is successful the success: function is called, in which we set the data which came from the request handler, and add it to the <div> ajaxcontact-response.
当请求成功时,将调用success:函数,在其中我们设置来自请求处理程序的数据,并将其添加到<div> ajaxcontact-response。
In case the AJAX request fails, we just show up an alert with the error.
万一AJAX请求失败,我们将显示一个带有错误的警报。
创建简码 (Creating the shortcode)
Now let’s create a shortcode so we can add our contact form to any page or post. We first create a function as below:
现在让我们创建一个简码,以便我们可以将联系表单添加到任何页面或帖子中。 我们首先创建一个如下函数:
function ajaxcontact_shortcode_func( $atts )

{

ob_start();

ajaxcontact_show_contact();

$output = ob_get_contents();

ob_end_clean();

return $output;

}
This function will start output buffering first, so that the output is not printed to the screen directly. Then we basically call our ob_get_contents() function which has the code for the contact form. We get the output in a variable, clean the buffer and return the output.
此功能将首先开始输出缓冲,以便不将输出直接打印到屏幕上。 然后,我们基本上调用我们的ob_get_contents()函数,该函数具有联系表单的代码。 我们使用变量获取输出,清理缓冲区并返回输出。
To create a shortcode out of this function we do the following:
要使用此功能创建简码,请执行以下操作:
add_shortcode( 'ajaxcontact', 'ajaxcontact_shortcode_func' );Now we can create a separate page and add the shortcode [ajaxcontact] to display the form.
现在,我们可以创建一个单独的页面,并添加简码[ajaxcontact]以显示表单。
Our finished contact form will look as follows:
我们完成的联系表如下所示:
翻译自: https://www.sitepoint.com/building-a-wordpress-plugin-to-create-an-ajax-contact-form/


 1万+
1万+

 被折叠的 条评论
为什么被折叠?
被折叠的 条评论
为什么被折叠?
 到【灌水乐园】发言


