


This article was originally published on MongoDB. Thank you for supporting the partners who make SitePoint possible.
本文最初在MongoDB上发布。 感谢您支持使SitePoint成为可能的合作伙伴。
You can get started with MongoDB and your favorite programming language by leveraging one of its drivers, many of which are maintained by MongoDB engineers, and others which are maintained by members of the community. MongoDB has a native Python driver, PyMongo, and a team of Driver engineers dedicated to making the driver fit to the Python community’s needs.
您可以利用MongoDB的一种驱动程序来开始使用MongoDB和您喜欢的编程语言,其中许多驱动程序由MongoDB工程师维护,而其他驱动程序由社区成员维护。 MongoDB有一个本地Python驱动程序PyMongo,以及一组驱动程序工程师,致力于使该驱动程序适合Python社区的需求。
In this article, which is aimed at Python developers who are new to MongoDB, you will learn how to do the following:
在这篇针对MongoDB新手的Python开发人员的文章中,您将学习如何执行以下操作:
- Create a free hosted MongoDB database using MongoDB Atlas 使用MongoDB Atlas创建免费的托管MongoDB数据库
- Install PyMongo, the Python Driver 安装PyMongo,Python驱动程序
- Connect to MongoDB 连接到MongoDB
- Explore MongoDB Collections and Documents 探索MongoDB集合和文档
- Perform basic Create, Retrieve, Update and Delete (CRUD) operations using PyMongo 使用PyMongo执行基本的创建,检索,更新和删除(CRUD)操作
Let’s get started!
让我们开始吧!
You can start working immediately with MongoDB by using a free MongoDB cluster via MongoDB Atlas. MongoDB Atlas is a hosted database service that allows you to choose your database size and get a connection string! If you are interested in using the free tier, follow the instructions in the Appendix section at the end of this article.
您可以通过MongoDB Atlas使用免费的MongoDB集群,立即开始使用MongoDB。 MongoDB Atlas是托管数据库服务,可让您选择数据库大小并获取连接字符串! 如果您有兴趣使用免费套餐,请按照本文末尾的附录部分中的说明进行操作。
安装Python驱动程序 (Install the Python Driver)
For this article we will install the Python driver called “PyMongo”.
在本文中,我们将安装名为“ PyMongo”的Python驱动程序。
Although there are other drivers written by the community, PyMongo is the official Python driver for MongoDB. For detailed documentation of the driver check out the documentation here.
尽管社区还编写了其他驱动程序,但是PyMongo是MongoDB的官方Python驱动程序。 有关驱动程序的详细文档,请在此处查看文档 。
The easiest way to install the driver is through the pip package management system. Execute the following on a command line:
安装驱动程序的最简单方法是通过pip软件包管理系统。 在命令行上执行以下操作:
python -m pip install pymongoNote: If you are using the Atlas M0 (Free Tier) cluster, you must use Python 2.7.9+ and use Python 3.4 or newer. You can check which version of Python and PyMongo you have installed by issuing python --version and pip list commands respectively.
注意:如果您使用的是Atlas M0(免费套餐)集群,则必须使用Python 2.7.9+并使用Python 3.4或更高版本。 您可以通过分别发出python --version和pip list命令来检查已安装的Python和PyMongo版本。
For variations of driver installation check out the complete documentation:
有关驱动程序安装的变化,请查看完整的文档 :
Once PyMongo is installed we can write our first application that will return information about the MongoDB server. In your Python development environment or from a text editor enter the following code.
一旦安装了PyMongo,我们就可以编写第一个应用程序,该应用程序将返回有关MongoDB服务器的信息。 在您的Python开发环境中或通过文本编辑器输入以下代码。
from pymongo import MongoClient
# pprint library is used to make the output look more pretty
from pprint import pprint
# connect to MongoDB, change the << MONGODB URL >> to reflect your own connection string
client = MongoClient(<<MONGODB URL>>)
db=client.admin
# Issue the serverStatus command and print the results
serverStatusResult=db.command("serverStatus")
pprint(serverStatusResult)
Replace <<MONGODB URL>> with your connection string to MongoDB. Save this file as mongodbtest.py and run it from the command line via python mongodbtest.py.
用与MongoDB的连接字符串替换<<MONGODB URL>> 。 将此文件另存为mongodbtest.py ,然后通过python mongodbtest.py从命令行运行它。
An example output appears as follows:
输出示例如下:
{u'asserts': {u'msg': 0,
              u'regular': 0,
              u'rollovers': 0,
              u'user': 0,
              u'warning': 0},
 u'connections': {u'available': 96, u'current': 4, u'totalCreated': 174L},
 u'extra_info': {u'note': u'fields vary by platform', u'page_faults': 0},
 u'host': u'cluster0-shard-00-00-6czvq.mongodb.net:27017',
 u'localTime': datetime.datetime(2017, 4, 4, 0, 18, 45, 616000),
.
.
.
}
Note that the u character comes from the Python output and it means that the strings are stored in Unicode. This example also uses the pprint library, which is not related to MongoDB but is used here only to make the output structured and visually appealing from a console.
请注意, u字符来自Python输出,这意味着字符串以Unicode存储。 此示例还使用了pprint库,该库与MongoDB不相关,但在这里仅用于使输出结构化并在控制台上具有视觉吸引力。
In this example we are connecting to our MongoDB instance and issuing the db.serverStatus() command (reference). This command returns information about our MongoDB instance and is used in this example as a way to execute a command against MongoDB.
在此示例中,我们将连接到我们的MongoDB实例并发出db.serverStatus()命令( 参考 )。 此命令返回有关我们的MongoDB实例的信息,并且在本示例中用作对MongoDB执行命令的方式。
If your application runs successfully, you are ready to continue!
如果您的应用程序成功运行,则可以继续!
探索馆藏和文件 (Exploring Collections and Documents)
MongoDB stores data in documents. Documents are not like Microsoft Word or Adode PDF documents but rather JSON documents based on the JSON specification.
MongoDB将数据存储在文档中。 文档不同于Microsoft Word或Adode PDF文档,而是基于JSON规范的 JSON文档。
An example of a JSON document would be as follows:
JSON文档的示例如下:
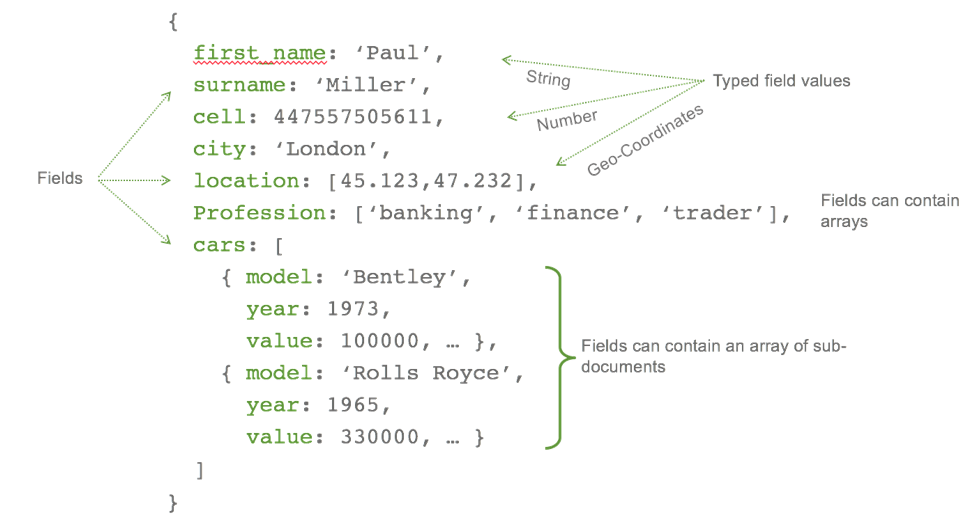
Notice that documents are not just key/value pairs, but can include arrays and subdocuments. The data itself can be different data types like geospatial, decimal, and ISODate to name a few. Internally MongoDB stores a binary representation of JSON known as BSON. This allows MongoDB to provide data types like decimal that are not defined in the JSON specification. For more information on the BSON spec check out its site.
请注意,文档不仅是键/值对,还可以包括数组和子文档。 数据本身可以是不同的数据类型,例如地理空间,十进制和ISODate等。 MongoDB在内部存储JSON的二进制表示形式,即BSON。 这允许MongoDB提供JSON规范中未定义的数据类型(如小数)。 有关BSON规范的更多信息, 请访问其站点 。
A collection in MongoDB is a container for documents. A database is the container for collections. This grouping is similar to relational databases and is pictured below:
MongoDB中的集合是文档的容器。 数据库是集合的容器。 该分组类似于关系数据库,如下图所示:
| Relational concept | MongoDB equivalent |
|---|---|
| Database | Database |
| Tables | Collections |
| Rows | Documents |
| Index | Index |
| 关系概念 | 相当于MongoDB |
|---|---|
| 数据库 | 数据库 |
| 桌子 | 馆藏 |
| 行数 | 文件资料 |
| 指数 | 指数 |
There are many advantages to storing data in documents. While a deeper discussion is out of the scope of this article, some of the advantages like dynamic, flexible schema, and the ability to store arrays can be seen from our simple Python scripts. For more information on MongoDB document structure take a look at the online documentation.
在文档中存储数据有很多优点。 尽管不进行更深入的讨论,但可以从我们的简单Python脚本中看到一些优势,例如动态,灵活的模式以及存储数组的能力。 有关MongoDB文档结构的更多信息, 请查看在线文档 。
Let’s take a look at how to perform basic CRUD operations on documents in MongoDB using PyMongo.
让我们看一下如何使用PyMongo对MongoDB中的文档执行基本的CRUD操作。
使用PyMongo执行基本的CRUD操作 (Performing Basic CRUD Operations Using PyMongo)
To establish a connection to MongoDB with PyMongo you use the MongoClient class.
要使用PyMongo与MongoDB建立连接,请使用MongoClient类。
from pymongo import MongoClient
client = MongoClient('<<MongoDB URL>>’)
The <<MongoDB URL>> is a placeholder for the connection string to MongoDB. See the connection string documentation for detailed information on how to create your MongoDB connection string. If you are using Atlas for your MongoDB database, refer to the “testing your connection” section for more information on obtaining the connection string for MongoDB Atlas.
<<MongoDB URL>>是到MongoDB的连接字符串的占位符。 请参阅连接字符串文档,以获取有关如何创建MongoDB连接字符串的详细信息。 如果将Atlas用于MongoDB数据库,请参阅“测试连接”部分,以获得有关获取MongoDB Atlas连接字符串的更多信息。
We can now create a database object referencing a new database, called business, as follows:
现在,我们可以创建一个数据库对象,引用一个名为business的新数据库,如下所示:
db = client.businessOnce we create this object we can perform our CRUD operations. Since we want something useful to query let’s start by building a sample data generator application.
创建此对象后,我们可以执行CRUD操作。 由于我们希望查询有用的东西,因此我们从构建示例数据生成器应用程序开始。
生成样本数据代码示例 (Generating Sample Data Code Example)
Create a new file called createsamples.py using your development tool or command line text editor and copy the following code:
使用开发工具或命令行文本编辑器创建一个名为createsamples.py的新文件,并复制以下代码:
from pymongo import MongoClient
from random import randint
#Step 1: Connect to MongoDB - Note: Change connection string as needed
client = MongoClient(port=27017)
db=client.business
#Step 2: Create sample data
names = ['Kitchen','Animal','State', 'Tastey', 'Big','City','Fish', 'Pizza','Goat', 'Salty','Sandwich','Lazy', 'Fun']
company_type = ['LLC','Inc','Company','Corporation']
company_cuisine = ['Pizza', 'Bar Food', 'Fast Food', 'Italian', 'Mexican', 'American', 'Sushi Bar', 'Vegetarian']
for x in xrange(1, 501):
    business = {
        'name' : names[randint(0, (len(names)-1))] + ' ' + names[randint(0, (len(names)-1))]  + ' ' + company_type[randint(0, (len(company_type)-1))],
        'rating' : randint(1, 5),
        'cuisine' : company_cuisine[randint(0, (len(company_cuisine)-1))]
    }
    #Step 3: Insert business object directly into MongoDB via isnert_one
    result=db.reviews.insert_one(business)
    #Step 4: Print to the console the ObjectID of the new document
    print('Created {0} of 100 as {1}'.format(x,result.inserted_id))
#Step 5: Tell us that you are done
print('finished creating 100 business reviews')
Be sure to change the MongoDB client connection URL to one that points to your MongoDB database instance. Once you run this application, 500 randomly named businesses with their corresponding ratings will be created in the MongoDB database called business. All of these businesses are created in a single collection called reviews. Notice that we do not have to explicitly create a database beforehand in order to use it. This is different from other databases that require statements like CREATE DATABASE to be performed first.
确保将MongoDB客户端连接URL更改为指向您的MongoDB数据库实例的URL。 运行此应用程序后,将在MongoDB数据库中创建500个带有相应等级的随机命名的企业,名称为business 。 所有这些业务都在一个称为“ reviews集合中创建。 注意,我们不必事先显式创建数据库即可使用它。 这与其他需要先执行诸如CREATE DATABASE类的语句的数据库不同。
The command that inserts data into MongoDB in this example is the insert_one() function. A bit self-explanatory, insert_one will insert one document into MongoDB. The result set will return the single ObjectID that was created. This is one of a few methods that insert data. If you wanted to insert multiple documents in one call you can use the insert_many function.
在此示例中,将数据插入MongoDB的命令是insert_one()函数。 不言而喻, insert_one会将一个文档插入MongoDB。 结果集将返回创建的单个ObjectID。 这是插入数据的几种方法之一。 如果要在一个调用中插入多个文档,则可以使用insert_many函数。
In addition to an acknowledgement of the insertion, the result set for insert_many will include a list of the ObjectIDs that were created. For more information on insert_many see the documentation located here.
除了确认插入外, insert_many的结果集还将包括已创建的ObjectID的列表。 有关insert_many更多信息,请参见此处的文档 。
For details on the result set of insert_many check out this section of documentation as well.
有关insert_many结果集的详细信息, insert_many请insert_many 本节内容 。
We are now ready to explore querying and managing data in MongoDB using Python. To guide this exploration we will create another application that will manage our business reviews.
现在,我们准备使用Python探索MongoDB中的查询和管理数据。 为了指导这一探索,我们将创建另一个应用程序来管理我们的业务评论。
探索业务评论数据 (Exploring Business Review Data)
Now that we have a good set of data in our database let’s query for some results using PyMongo.
现在,我们的数据库中已有一组很好的数据,让我们使用PyMongo查询一些结果。
In MongoDB the find_one command is used to query for a single document, much like select statements are used in relational databases. To use the find_one command in PyMongo we pass a Python dictionary that specifies the search criteria. For example, let’s find a single business with a review score of 5 by passing the dictionary, { ‘rating’ : 5 }.
在MongoDB中, find_one命令用于查询单个文档,就像在关系数据库中使用select语句一样。 为了在find_one中使用find_one命令,我们传递了一个Python字典来指定搜索条件。 例如,让我们通过字典{ 'rating' : 5 }找到一个评论得分为5的企业。
fivestar = db.reviews.find_one({'rating': 5})
print(fivestar)
The result will contain data similar to the following:
结果将包含类似于以下内容的数据:
{u'rating': 5,
 u'_id': ObjectId('58e65383ea0b650c867ef195'),
 u'name': u'Fish Salty Corporation',
u'cuisine': u'Sushi Bar'}
Given that we created 500 sample pieces of data, there must be more than one business with a rating of 5. The find_one method is just one in a series of find statements that support querying MongoDB data. Another statement, called find, will return a cursor over all documents that match the search criteria. These cursors also support methods like count(), which returns the number of results in the query. To find the total count of businesses that are rated with a 5 we can use the count() method as follows:
假设我们创建了500个样本数据,则必须有多个业务,且评级为find_one方法只是一系列支持查询MongoDB数据的find语句中的一个。 另一个名为find语句将在所有符合搜索条件的文档上返回光标。 这些游标还支持诸如count()类的方法,该方法返回查询中的结果数。 要查找被评为5的企业总数,我们可以使用count()方法,如下所示:
fivestarcount = db.reviews.find({'rating': 5}).count()
print(fivestarcount)
Your results may vary since the data was randomly generated but in a test run the value of 103 was returned.
由于数据是随机生成的,因此您的结果可能会有所不同,但是在测试运行中返回的值为103。
MongoDB can easily perform these straightforward queries. However, consider the scenario where you want to sum the occurrence of each rating across the entire data set. In MongoDB you could create 5 separate find queries, execute them and present the results, or you could simply issue a single query using the MongoDB aggregation pipeline as follows:
MongoDB可以轻松执行这些直接查询。 但是,请考虑要对整个数据集中每个评级的发生进行求和的情况。 在MongoDB中,您可以创建5个单独的查找查询,执行它们并显示结果,也可以使用MongoDB聚合管道简单地发出一个查询,如下所示 :
from pymongo import MongoClient
# Connect to the MongoDB, change the connection string per your MongoDB environment
client = MongoClient(port=27017)
# Set the db object to point to the business database
db=client.business
# Showcasing the count() method of find, count the total number of 5 ratings
print('The number of 5 star reviews:')
fivestarcount = db.reviews.find({'rating': 5}).count()
print(fivestarcount)
# Not let's use the aggregation framework to sum the occurrence of each rating across the entire data set
print('\nThe sum of each rating occurance across all data grouped by rating ')
stargroup=db.reviews.aggregate(
# The Aggregation Pipeline is defined as an array of different operations
[
# The first stage in this pipe is to group data
{ '$group':
    { '_id': "$rating",
     "count" :
                 { '$sum' :1 }
    }
},
# The second stage in this pipe is to sort the data
{"$sort":  { "_id":1}
}
# Close the array with the ] tag
] )
# Print the result
for group in stargroup:
    print(group)
A deep dive into the aggregation framework is outside of the scope of this article, however, if you are interested in learning more about it check out this documentation.
对聚合框架的深入探讨不在本文讨论范围之内,但是,如果您有兴趣了解更多有关该框架的信息, 请查阅本文档 。
使用PyMongo更新数据 (Updating Data with PyMongo)
Similar to insert_one and insert_many, there are functions to help you update your MongoDB data including update_one, update_many, and replace_one. The update_one method will update a single document based on a query that matches a document. For example, let’s assume that our business review application now has the ability for users to “like” a business. To illustrate updating a document with this new “likes” field, let’s first take a look at what an existing document looks like from our previous application’s insertion into MongoDB. Next, let’s update the document and requery the document and see the change.
与insert_one和insert_many类似,有一些函数可帮助您更新MongoDB数据,包括update_one , update_many和replace_one 。 update_one方法将基于与文档匹配的查询来更新单个文档。 例如,假设我们的业务审查应用程序现在具有用户“喜欢”业务的能力。 为了说明如何使用这个新的“点赞”字段更新文档,让我们首先看一下先前应用程序插入MongoDB后现有文档的外观。 接下来,让我们更新文档并重新查询文档并查看更改。
from pymongo import MongoClient
#include pprint for readabillity of the
from pprint import pprint

#change the MongoClient connection string to your MongoDB database instance
client = MongoClient(port=27020)
db=client.business

ASingleReview = db.reviews.find_one({})
print('A sample document:')
pprint(ASingleReview)

result = db.reviews.update_one({'_id' : ASingleReview.get('_id') }, {'$inc': {'likes': 1}})
print('Number of documents modified : ' + str(result.modified_count))

UpdatedDocument = db.reviews.find_one({'_id':ASingleReview.get('_id')})
print('The updated document:')
pprint(UpdatedDocument)
When running the sample code above you may see results similar to the following:
运行上面的示例代码时,您可能会看到类似于以下内容的结果:
A sample document:
{'_id': ObjectId('58eba417ea0b6523b0fded4f'),
 'cuisine': 'Pizza',
 'name': 'Kitchen Goat Corporation',
 'rating': 1}

Number of documents modified : 1

The updated document:
{'_id': ObjectId('58eba417ea0b6523b0fded4f'),
 'cuisine': 'Pizza',
 'likes': 1,
 'name': 'Kitchen Goat Corporation',
 'rating': 1}
Notice that the original document did not have the “likes” field and an update allowed us to easily add the field to the document. This ability to dynamically add keys without the hassle of costly Alter_Table statements is the power of MongoDB’s flexible data model. It makes rapid application development a reality.
请注意,原始文档没有“喜欢”字段,而更新使我们可以轻松地将该字段添加到文档中。 这种动态添加键的能力而无需麻烦的Alter_Table语句,这是MongoDB灵活数据模型的强大功能。 它使快速的应用程序开发成为现实。
If you wanted to update all the fields of the document and keep the same ObjectID, you will want to use the replace_one function. For more details on replace_one check out the PyMongo documentation here.
如果要更新文档的所有字段并保留相同的ObjectID,则需要使用replace_one函数。 有关replace_one更多详细信息,请在此处查看PyMongo文档 。
The update functions also support an option called “upsert”. With upsert you can tell MongoDB to create a new document if the document you are trying to update does not exist.
更新功能还支持称为“ upsert”的选项。 如果您要更新的文档不存在,那么使用upsert可以告诉MongoDB创建一个新文档。
删除文件 (Deleting Documents)
Much like the other commands discussed so far, the delete_one and delete_many commands take a query that matches the document to delete as the first parameter. For example, if you wanted to delete all documents in the reviews collection where the category was “Bar Food”, you would issue the following:
与到目前为止讨论的其他命令非常相似, delete_one和delete_many命令采用与要删除的文档匹配的查询作为第一个参数。 例如,如果您要删除评论集合中类别为“酒吧食品”的所有文档,则将发出以下信息:
result = db.restaurants.delete_many({“category”: “Bar Food“})If you are deleting a large number of documents it may be more efficient to drop the collection instead of deleting all the documents.
如果要删除大量文档,则删除集合而不是删除所有文档可能更有效。
下一步去哪里 (Where to Go Next)
There are lots of options when it comes to learning about MongoDB and Python. MongoDB University is a great place to start and learn about administration, development and other topics such as analytics with MongoDB. One course in particular is MongoDB for Developers (Python). This course covers the topics of this article in much more depth including a discussion on the MongoDB aggregation framework. Check it out here.
学习MongoDB和Python时有很多选择。 MongoDB大学是开始和学习管理,开发以及其他主题(例如,使用MongoDB进行分析)的理想场所。 特别是一门课程是面向开发人员的MongoDB(Python)。 本课程将更深入地涵盖本文的主题,包括有关MongoDB聚合框架的讨论。 在这里查看 。
附录:创建免费的MongoDB Atlas数据库 (Appendix: Creating a free tier MongoDB Atlas database)
MongoDB Atlas is a hosted database service that allows you to choose your database size and get a connection string! Follow the steps below to start using your free database.
MongoDB Atlas是托管数据库服务,可让您选择数据库大小并获取连接字符串! 请按照以下步骤开始使用免费数据库。
免费构建集群 (Build your cluster for free)
Follow the steps below to create a free MongoDB database:
请按照以下步骤创建免费的MongoDB数据库:
Go to MongoDB Atlas.
转到MongoDB Atlas 。
- Click the “Start Free” button. 点击“免费开始”按钮。
- Fill out the form to create an account. You will use this information to login to and manage your MongoDB. 填写表格以创建一个帐户。 您将使用此信息登录和管理您的MongoDB。
Once you fill out the form, the website will create your account and you will be presented with the “Build Your New Cluster” pop up as shown:
填写表格后,网站将创建您的帐户,并向您显示“建立新集群”弹出窗口,如下所示:
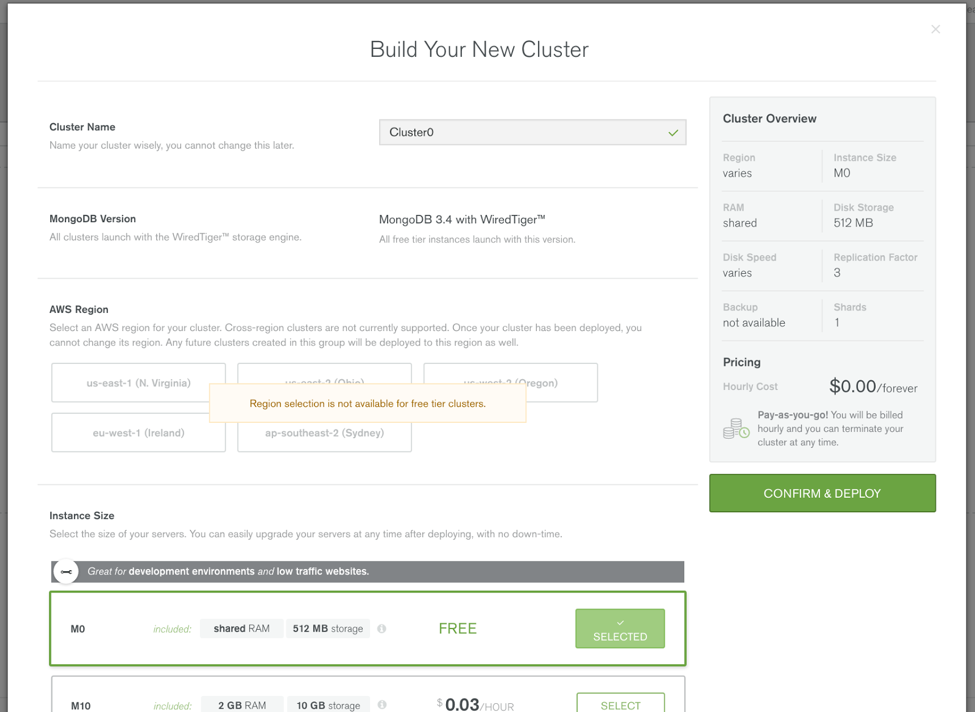
To use the free tier, scroll down and select “M0”. When you do this the regions panel will be disabled. The free tier has some restrictions, with the ability to select a region being one of them. Your database size will be limited to 512MB of storage. Given that, when you are ready to use MongoDB for more than just some simple operations you can easily create another instance by choosing a size from the “Instance Size” list. Before you click “Confirm & Deploy” scroll down the page and notice the additional options shown here:
要使用免费套餐,请向下滚动并选择“ M0”。 当您这样做时,区域面板将被禁用。 免费套餐有一些限制,选择区域就是其中之一。 您的数据库大小将限制为512MB。 鉴于此,当您准备将MongoDB不仅用于一些简单操作时,还可以通过从“实例大小”列表中选择大小来轻松创建另一个实例。 在单击“确认并部署”之前,向下滚动页面并注意此处显示的其他选项:
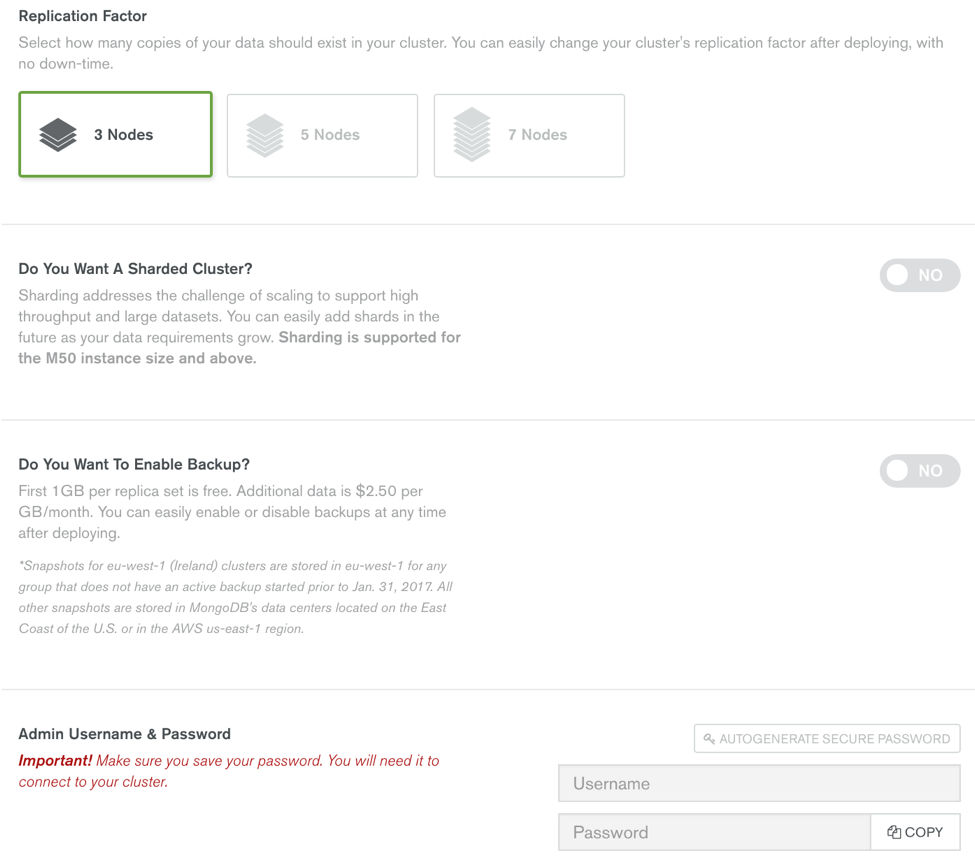
From the “Build Your New Cluster” pop up, you can see that there are other options available, including choosing a 3, 5 or 7 node replica set and up to a 12 shard cluster. Note that the free tier does not allow you to chose anything more than the 3 node cluster, but if you move into other sizes these options will become available.
从“构建新群集”弹出窗口中,您可以看到还有其他可用选项,包括选择3、5或7节点副本集以及最多12个分片群集。 请注意,免费套餐不允许您选择3节点群集以外的任何内容,但是如果您采用其他大小,则这些选项将变为可用。
At this point we are almost ready — the last thing to address is the admin username and password. You may also choose to have a random password generated for you by clicking the “Autogenerate Secure Password” button. Finally, click the “Confirm & Deploy” button to create your Atlas cluster.
至此,我们几乎准备就绪-最后要解决的是管理员用户名和密码。 您也可以通过单击“自动生成安全密码”按钮来选择为您生成随机密码。 最后,单击“确认并部署”按钮以创建您的Atlas集群。
设置您的IP白名单 (Setting up your IP Whitelist)
While Atlas is creating your database you will need to define which IPs are allowed access to your new database, since MongoDB Atlas does not allow access from the internet by default. This list of granted IP addresses is called the “IP Whitelist”. To add the IP of your machine to this list, click on the “Security” tab, then “IP Whitelist”, and then click the “+ ADD IP ADDRESS” button. This will pop up another dialog shown below.
在Atlas创建数据库的过程中,您将需要定义允许访问新数据库的IP,因为默认情况下MongoDB Atlas不允许从Internet访问。 此授予的IP地址列表称为“ IP白名单”。 要将计算机的IP添加到此列表,请单击“安全性”选项卡,然后单击“ IP白名单”,然后单击“ +添加IP地址”按钮。 这将弹出另一个对话框,如下所示。
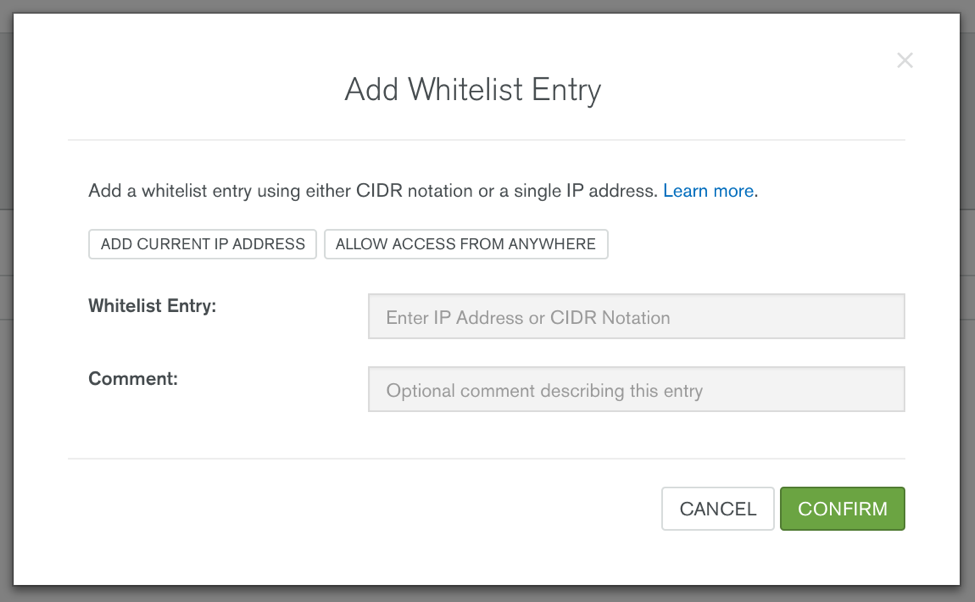
You can click the “Add current IP Address” button to add your IP or provide a specific IP address, or enable access to the world by not restricting IPs at all (not a fantastic idea, but there in case you have no other choice and need to allow authentication from any IP).
您可以单击“添加当前IP地址”按钮来添加IP或提供特定的IP地址,或者根本不限制IP来实现对世界的访问(这不是一个好主意,但是如果您别无选择,并且需要允许来自任何IP的身份验证)。
Once you have filled out this dialog click “Confirm” and this will update the firewall settings on your MongoDB Atlas cluster. Next, click on the “Clusters” tab and you should see your new MongoDB database ready for action!
填写此对话框后,单击“确认”,这将更新MongoDB Atlas集群上的防火墙设置。 接下来,单击“集群”选项卡,您应该会看到准备好执行操作的新MongoDB数据库!

测试您的连接 (Testing your connection)
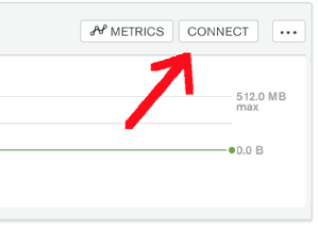
We want to make sure the MongoDB database is accessible from our development box before we start typing in code. A quick way to test is to make a connection using the Mongo Shell command line tool. Be sure to have your MongoDB connection information available. If you are using MongoDB Atlas, you can obtain the connection information by clicking on the “Connect” button on the Clusters tab as shown below.
我们要确保在开始输入代码之前,可以从开发框中访问MongoDB数据库。 一种快速的测试方法是使用Mongo Shell命令行工具建立连接。 确保提供您的MongoDB连接信息。 如果使用的是MongoDB Atlas,则可以通过单击“群集”选项卡上的“连接”按钮来获取连接信息,如下所示。
The Connect button will launch a dialog that provides connection information. At the bottom of this dialog, you will see a prepared command line ready for you to simply copy and paste into a command prompt.
连接按钮将启动一个对话框,提供连接信息。 在此对话框的底部,您将看到准备好的命令行,可以轻松地将其复制并粘贴到命令提示符中。
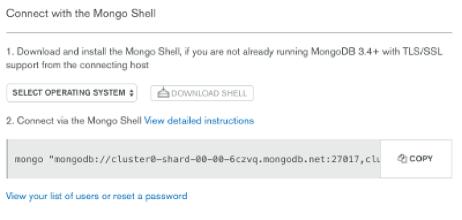
Note that if you copy the connection text as-is you will have to replace with the password for the admin user, and with the name of the database to which you wish to connect.
请注意,如果您按原样复制连接文本,则必须替换 使用管理员用户的密码,以及 以及您要连接的数据库的名称。
The command text that comes from this dialog is lengthy. For clarity, let’s take a look at each of the parameters individually.
来自此对话框的命令文本很长。 为了清楚起见,让我们分别看一下每个参数。
mongo
"mongodb://cluster0-shard-00-00-2ldwo.mongodb.net:27017,cluster0-shard-00-01-2ldwo.mongodb.net:27017,cluster0-shard-00-02-2ldwo.mongodb.net:27017/test?replicaSet=Cluster0-shard-0"
 --authenticationDatabase admin
--ssl
--username myadmin
--password S$meComPLeX1!
The first parameter is a string containing the list of all the nodes in our cluster, including the definition of a replica set called Cluster0-shard-0. The next parameter, --authenticationDatabase tells us which database contains the user we want to authenticate.
第一个参数是一个字符串,其中包含集群中所有节点的列表,包括定义为Cluster0-shard-0的副本集的定义。 下一个参数--authenticationDatabase告诉我们哪个数据库包含我们要认证的用户。
The --ssl forces the connection to be encrypted via SSL/TLS protocol. Finally, we provide the username and password, and we are connected! Note that if you are not using MongoDB Atlas, your MongoDB deployment may not have security enabled or require SSL. Thus, connecting to it could be as simple as typing “mongo” into the command prompt.
--ssl强制通过SSL / TLS协议对连接进行加密。 最后,我们提供用户名和密码,并且我们已经连接! 请注意,如果您不使用MongoDB Atlas,则您的MongoDB部署可能未启用安全性或需要SSL。 因此,连接到该命令就像在命令提示符下键入“ mongo”一样简单。
You are now ready to use MongoDB!
您现在可以使用MongoDB了!
If you’re interested in learning everything you need to know to get started building a MongoDB-based app, you can sign up for one of our free online MongoDB University courses.
如果您有兴趣学习开始构建基于MongoDB的应用程序所需的全部知识,可以注册我们的免费在线MongoDB大学课程之一 。
翻译自: https://www.sitepoint.com/getting-started-with-python-and-mongodb/


 329
329


 被折叠的 条评论
为什么被折叠?
被折叠的 条评论
为什么被折叠?
 到【灌水乐园】发言


