


aws mongodb
This article was originally published on mongoDB. Thank you for supporting the partners who make SitePoint possible.
本文最初在mongoDB上发布 。 感谢您支持使SitePoint成为可能的合作伙伴。
The developer landscape has dramatically changed in recent years. It used to be fairly common for us developers to run all of our tools (databases, web servers, development IDEs…) on our own machines, but cloud services such as GitHub, MongoDB Atlas and AWS Lambda are drastically changing the game. They make it increasingly easier for developers to write and run code anywhere and on any device with no (or very few) dependencies.
近年来,开发人员的状况发生了巨大变化。 对于我们开发人员来说,在我们自己的机器上运行我们所有的工具(数据库,Web服务器,开发IDE…),这是相当普遍的事情,但是GitHub , MongoDB Atlas和AWS Lambda等云服务正在极大地改变游戏规则。 它们使开发人员在没有任何依赖关系(或很少有依赖关系)的任何地方和任何设备上,更容易地编写和运行代码。
A few years ago, if you crashed your machine, lost it or simply ran out of power, it would have probably taken you a few days before you got a new machine back up and running with everything you need properly set up and configured the way it previously was.
几年前,如果您崩溃了机器,丢失了机器或者只是断电了,那么可能要花几天的时间才能让新机器恢复正常运行并以正确设置和配置方式进行的所有操作以前是。
With developer tools in the cloud, you can now switch from one laptop to another with minimal disruption. However, it doesn’t mean everything is rosy. Writing and debugging code in the cloud is still challenging; as developers, we know that having a local development environment, although more lightweight, is still very valuable.
借助云中的开发人员工具,您现在可以在中断最少的情况下从一台笔记本电脑切换到另一台笔记本电脑。 但是,这并不意味着一切都是乐观的。 在云中编写和调试代码仍然充满挑战。 作为开发人员,我们知道拥有本地开发环境虽然更轻巧,但仍然非常有价值。
And that’s exactly what I’ll try to show you in this blog post: how to easily integrate an AWS Lambda Node.js function with a MongoDB database hosted in MongoDB Atlas, the DBaaS (database as a service) for MongoDB. More specifically, we’ll write a simple Lambda function that creates a single document in a collection stored in a MongoDB Atlas database. I’ll guide you through this tutorial step-by-step, and you should be done with it in less than an hour.
这正是我将在此博文中向您展示的内容:如何轻松地将AWS Lambda Node.js函数与MongoDB Atlas托管的MongoDB数据库(用于MongoDB的DBaaS(数据库即服务))集成。 更具体地说,我们将编写一个简单的Lambda函数,该函数在MongoDB Atlas数据库中存储的集合中创建单个文档。 我将逐步指导您完成本教程,并且您应该在不到一个小时的时间内完成它。
Let’s start with the necessary requirements to get you up and running:
让我们从必要的要求开始,以使您开始运行:
An Amazon Web Services account available with a user having administrative access to the IAM and Lambda services. If you don’t have one yet, sign up for a free AWS account.
具有对IAM和Lambda服务具有管理访问权的用户可用的Amazon Web Services帐户。 如果您还没有,请注册一个免费的AWS账户 。
A local machine with Node.js (I told you we wouldn’t get rid of local dev environments so easily…). We will use Mac OS X in the tutorial below but it should be relatively easy to perform the same tasks on Windows or Linux.
带有Node.js的本地计算机(我告诉过我们,我们不会轻易摆脱本地开发环境…)。 在下面的教程中,我们将使用Mac OS X,但是在Windows或Linux上执行相同的任务应该相对容易一些。
A MongoDB Atlas cluster alive and kicking. If you don’t have one yet, sign up for a free MongoDB Atlas account and create a cluster in just a few clicks. You can even try our M0, free cluster tier, perfect for small-scale development projects!).
MongoDB Atlas集群活跃起来。 如果您还没有,请注册一个免费的MongoDB Atlas帐户,然后单击几下即可创建集群 。 您甚至可以尝试我们的M0免费集群层 ,非常适合小型开发项目!)。
Now that you know about the requirements, let’s talk about the specific steps we’ll take to write, test and deploy our Lambda function:
既然您已经了解了需求,那么让我们来谈谈我们编写,测试和部署Lambda函数将要采取的具体步骤:
MongoDB Atlas is by default secure, but as application developers, there are steps we should take to ensure that our app complies with least privilege access best practices. Namely, we’ll fine-tune permissions by creating a MongoDB Atlas database user with only read/write access to our app database.
默认情况下, MongoDB Atlas是安全的,但是作为应用程序开发人员,我们应该采取一些步骤来确保我们的应用程序符合最小特权访问最佳实践 。 也就是说,我们将通过创建仅对应用程序数据库具有读/写访问权限的MongoDB Atlas数据库用户来微调权限。
- We will set up a Node.js project on our local machine, and we’ll make sure we test our lambda code locally end-to-end before deploying it to Amazon Web Services. 我们将在本地计算机上设置Node.js项目,并确保在将lambda代码部署到Amazon Web Services之前对其进行端到端本地测试。
- We will then create our AWS Lambda function and upload our Node.js project to initialize it. 然后,我们将创建我们的AWS Lambda函数,并上传Node.js项目以对其进行初始化。
- Last but not least, we will make some modifications to our Lambda function to encrypt some sensitive data (such as the MongoDB Atlas connection string) and decrypt it from the function code. 最后但并非最不重要的一点是,我们将对Lambda函数进行一些修改,以加密一些敏感数据(例如MongoDB Atlas连接字符串)并从函数代码中对其解密。
关于VPC对等的简短说明 (A Short Note About VPC Peering)
I’m not delving into the details of setting up VPC Peering between our MongoDB Atlas cluster and AWS Lambda for 2 reasons: 1) we already have a detailed VPC Peering documentation page and a VPC Peering in Atlas post that I highly recommend and 2) M0 clusters (which I used to build that demo) don’t support VPC Peering.
我没有深入研究在MongoDB Atlas集群和AWS Lambda之间设置VPC对等的细节,原因有两个:1)我们已经拥有详细的VPC对等文档页面和我强烈推荐的Atlas中的VPC对等信息 ,以及2) M0集群(我用来构建该演示的集群) 不支持VPC Peering 。
Here’s what happens if you don’t set up VPC Peering though:
如果您没有设置VPC对等,则会发生以下情况:
- You will have to add the infamous 0.0.0.0/0 CIDR block to your MongoDB Atlas cluster IP Whitelist because you won’t know which IP address AWS Lambda is using to make calls to your Atlas database. 您将必须将臭名昭著的0.0.0.0/0 CIDR块添加到MongoDB Atlas群集IP白名单中,因为您将不知道AWS Lambda使用哪个IP地址拨打Atlas数据库。
- You will be charged for the bandwidth usage between your Lambda function and your Atlas cluster. 您需要为Lambda函数和Atlas群集之间的带宽使用情况付费。
If you’re only trying to get this demo code to write, these 2 caveats are probably fine, but if you’re planning to deploy a production-ready Lambda-Atlas integration, setting up VPC Peering is a security best practice we highly recommend. M0 is our current free offering; check out our MongoDB Atlas pricing page for the full range of available instance sizes.
如果您只想编写此演示代码,则这两个警告可能很好,但是如果您打算部署可用于生产的Lambda-Atlas集成,则强烈建议设置VPC对等是安全性最佳做法。 M0是我们当前的免费产品; 请查看我们的MongoDB Atlas定价页面 ,以获取可用实例大小的所有范围。
As a reminder, for development environments and low traffic websites, M0, M10 and M20 instance sizes should be fine. However, for production environments that support high traffic applications or large datasets, M30 or larger instances sizes are recommended.
提醒一下,对于开发环境和低流量网站,M0,M10和M20实例大小应该合适。 但是,对于支持高流量应用程序或大型数据集的生产环境,建议使用M30或更大的实例大小。
在您的MongoDB Atlas集群中设置安全性 (Setting up Security in Your MongoDB Atlas Cluster)
Making sure that your application complies with least privilege access policies is crucial to protect your data from nefarious threats. This is why we will set up a specific database user that will only have read/write access to our travel database. Let’s see how to achieve this in MongoDB Atlas:
确保您的应用程序符合最低特权访问策略,这对于保护数据免受恶意威胁至关重要。 这就是为什么我们将设置一个特定的数据库用户,该用户仅对我们的旅行数据库具有读/写访问权限。 让我们看看如何在MongoDB Atlas中实现这一点:
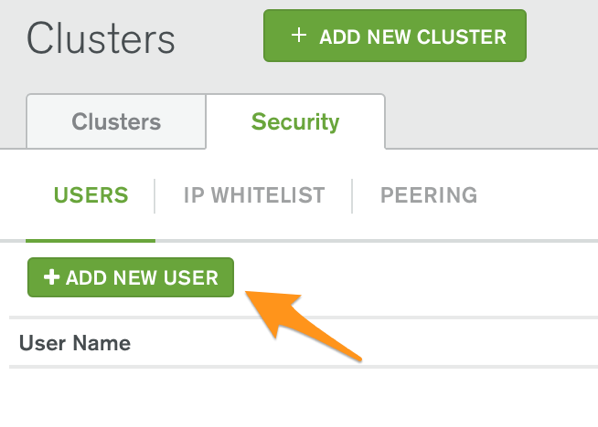
On the Clusters page, select the Security tab, and press the Add New User button
在“ 群集”页面上,选择“ 安全性”选项卡,然后按“ 添加新用户”按钮
In the User Privileges section, select the link. This allows us to assign read/write on a specific database, not any database.
在“ 用户权限”部分中,选择 链接。 这使我们可以在特定数据库而不是任何数据库上分配读/写。
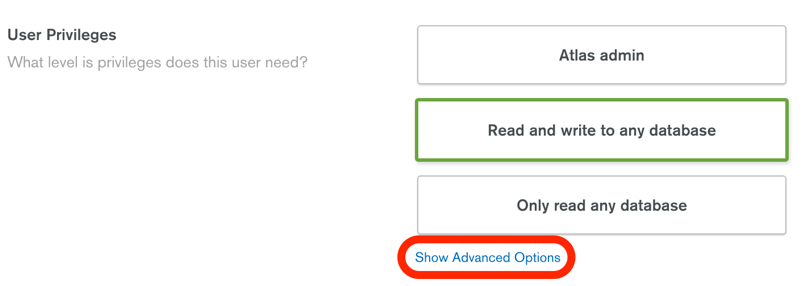
You will then have the option to assign more fine-grained access control privileges:
然后,您可以选择分配更多细粒度的访问控制特权:

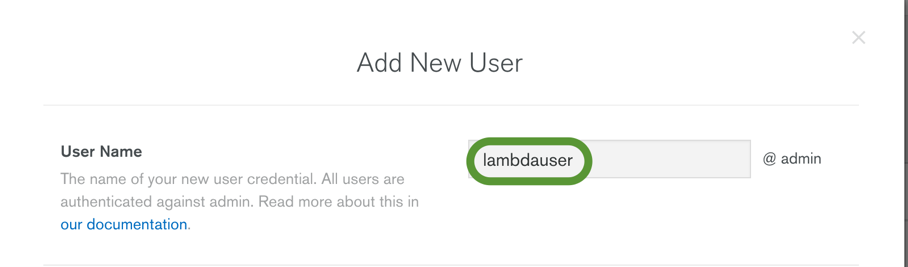
In the Select Role dropdown list, select readWrite and fill out the Database field with the name of the database you’ll use to store documents. I have chosen to name it travel.
在“ 选择角色”下拉列表中,选择readWrite,然后在“ 数据库”字段中填写将用于存储文档的数据库的名称。 我选择将其命名为travel 。

In the Password section, use the Autogenerate Secure Password button (and make a note of the generated password) or set a password of your liking. Then press the Add User button to confirm this user creation.
在“ 密码”部分中,使用“自动生成安全密码”按钮(并记下生成的密码)或设置您喜欢的密码。 然后按添加用户按钮以确认此用户的创建。
Let’s grab the cluster connection string while we’re at it since we’ll need it to connect to our MongoDB Atlas database in our Lambda code:
让我们抓住集群连接字符串,因为它需要用Lambda代码连接到我们的MongoDB Atlas数据库:
Assuming you already created a MongoDB Atlas cluster, press the Connect button next to your cluster:
假设您已经创建了MongoDB Atlas集群 ,请按集群旁边的Connect按钮:

Copy the URI Connection String value and store it safely in a text document. We’ll need it later in our code, along with the password you just set.
复制URI连接字符串值并将其安全地存储在文本文档中。 我们稍后将在代码中将其与您刚设置的密码一起使用。

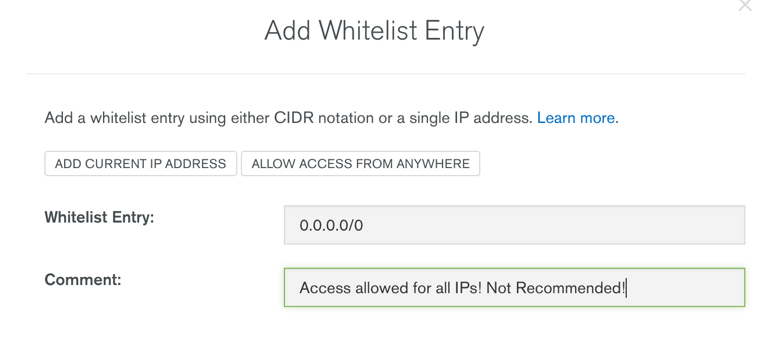
Additionally, if you aren’t using VPC Peering, navigate to the IP Whitelist tab and add the 0.0.0.0/0 CIDR block or press the Allow access from anywhere button. As a reminder, this setting is strongly NOT recommended for production use and potentially leaves your MongoDB Atlas cluster vulnerable to malicious attacks.
此外,如果您不使用VPC对等网络,请导航到IP白名单选项卡并添加0.0.0.0/0 CIDR块,或按“ 允许从任何地方访问”按钮。 提醒您,强烈不建议将此设置用于生产环境,这可能会使您的MongoDB Atlas群集容易受到恶意攻击。
创建一个本地Node.js项目 (Create a Local Node.js Project)
Though Lambda functions are supported in multiple languages, I have chosen to use Node.js thanks to the growing popularity of JavaScript as a versatile programming language and the tremendous success of the MEAN and MERN stacks (acronyms for MongoDB, Express.js, Angular/React, Node.js – check out Andrew Morgan’s excellent developer-focused blog series on this topic). Plus, to be honest, I love the fact it’s an interpreted, lightweight language which doesn’t require heavy development tools and compilers.
虽然LAMBDA功能在多国语言的支持,我已经选择使用Node.js的感谢JavaScript的日益普及,作为一种多用途的编程语言和的巨大成功MEAN和MERN栈(缩写词对于M ongoDB,E xpress.js, Angular / R eact, N ode.js –请查看Andrew Morgan关于该主题的出色的面向开发人员的博客系列 )。 另外,老实说,我喜欢它是一种解释性的,轻量级的语言,不需要大量的开发工具和编译器。
Time to write some code now, so let’s go ahead and use Node.js as our language of choice for our Lambda function.
现在该写一些代码了,让我们继续使用Node.js作为我们Lambda函数的首选语言。
Start by creating a folder such as lambda-atlas-create-doc
首先创建一个文件夹,例如lambda-atlas-create-doc
mkdir lambda-atlas-create-doc
&& cd lambda-atlas-create-doc
Next, run the following command from a Terminal console to initialize our project with a package.json file
接下来,从终端控制台运行以下命令以使用package.json文件初始化我们的项目
npm initYou’ll be prompted to configure a few fields. I’ll leave them to your creativity but note that I chose to set the entry point to app.js (instead of the default index.js) so you might want to do so as well.
系统将提示您配置一些字段。 我将让他们发挥自己的创造力,但请注意,我选择将入口点设置为app.js(而不是默认的index.js),因此您可能也希望这样做。
We’ll need to use the MongoDB Node.js driver so that we can connect to our MongoDB database (on Atlas) from our Lambda function, so let’s go ahead and install it by running the following command from our project root:
我们将需要使用MongoDB Node.js驱动程序,以便可以从Lambda函数连接到Atlas上的MongoDB数据库,因此,我们从项目根目录运行以下命令,继续进行安装:
npm install mongodb --saveWe’ll also want to write and test our Lambda function locally to speed up development and ease debugging, since instantiating a lambda function every single time in Amazon Web Services isn’t particularly fast (and debugging is virtually non-existent, unless you’re a fan of the console.log() function). I’ve chosen to use the lambda-local package because it provides support for environment variables (which we’ll use later):
我们还希望在本地编写和测试Lambda函数,以加快开发速度并简化调试,因为在Amazon Web Services中每次实例化一个Lambda函数并不是特别快(并且几乎不存在调试功能,除非您成为console.log()函数的console.log() )。 我选择使用lambda-local包,因为它提供了对环境变量的支持(我们将在以后使用):
(sudo) npm install lambda-local -gCreate an app.js file. This will be the file that contains our lambda function:
创建一个app.js文件。 这将是包含我们的lambda函数的文件:
touch app.jsNow that you have imported all of the required dependencies and created the Lambda code file, open the app.js file in your code editor of choice (Atom, Sublime Text, Visual Studio Code…) and initialize it with the following piece of code:
现在,您已经导入了所有必需的依赖项并创建了Lambda代码文件,在您选择的代码编辑器(Atom,Sublime Text,Visual Studio Code…)中打开app.js文件,并使用以下代码段对其进行初始化:
'use strict'

var MongoClient = require('mongodb').MongoClient;

let atlas_connection_uri;
let cachedDb = null;

exports.handler = (event, context, callback) => {
  var uri = process.env['MONGODB_ATLAS_CLUSTER_URI'];

  if (atlas_connection_uri != null) {
    processEvent(event, context, callback);
  }
  else {
    atlas_connection_uri = uri;
    console.log('the Atlas connection string is ' + atlas_connection_uri);
    processEvent(event, context, callback);
  }
};

function processEvent(event, context, callback) {
  console.log('Calling MongoDB Atlas from AWS Lambda with event: ' + JSON.stringify(event));
}
Let’s pause a bit and comment the code above, since you might have noticed a few peculiar constructs:
让我们暂停一下并注释上面的代码,因为您可能已经注意到一些特殊的构造:
The file is written exactly as the Lambda code Amazon Web Services expects (e.g. with an “exports.handler” function). This is because we’re using lambda-local to test our lambda function locally, which conveniently lets us write our code exactly the way AWS Lambda expects it. More about this in a minute.
该文件的编写与Amazon Web Services期望的Lambda代码完全相同(例如,使用“ exports.handler”功能)。 这是因为我们正在使用lambda-local在本地测试我们的lambda函数,这可以方便地使我们完全按照AWS Lambda的期望编写代码。 一分钟内将提供更多信息。
- We are declaring the MongoDB Node.js driver that will help us connect to and query our MongoDB database. 我们宣布了MongoDB Node.js驱动程序,它将有助于我们连接和查询MongoDB数据库。
Note also that we are declaring a
cachedDbobject OUTSIDE of the handler function. As the name suggests, it’s an object that we plan to cache for the duration of the underlying container AWS Lambda instantiates for our function. This allows us to save some precious milliseconds (and even seconds) to create a database connection between Lambda and MongoDB Atlas. For more information, please read my follow-up blog post on how to optimize Lambda performance with MongoDB Atlas.还要注意,我们在处理程序函数的外部声明了一个
cachedDb对象。 顾名思义,这是我们计划在AWS Lambda为我们的函数实例化基础容器的持续时间内缓存的对象。 这使我们节省了一些宝贵的毫秒(甚至几秒钟)来在Lambda和MongoDB Atlas之间建立数据库连接。 有关更多信息,请阅读我的后续博客文章, 了解如何使用MongoDB Atlas优化Lambda性能 。We are using an environment variable called
MONGODB_ATLAS_CLUSTER_URIto pass the uri connection string of our Atlas database, mainly for security purposes: we obviously don’t want to hardcode this uri in our function code, along with very sensitive information such as the username and password we use. Since AWS Lambda supports environment variables since November 2016 (as the lambda-local NPM package does), we would be remiss not to use them.我们正在使用一个名为
MONGODB_ATLAS_CLUSTER_URI的环境变量来传递Atlas数据库的uri连接字符串,主要出于安全目的:我们显然不想在功能代码中硬编码此uri以及非常敏感的信息(例如用户名和密码)我们用。 由于AWS Lambda自2016年11月以来就支持环境变量 (就像lambda-local NPM软件包所做的那样),因此我们不使用它们就被遗漏了。- The function code looks a bit convoluted with the seemingly useless if-else statement and the processEvent function but it will all become clear when we add decryption routines using AWS Key Management Service (KMS). Indeed, not only do we want to store our MongoDB Atlas connection string in an environment variable, but we also want to encrypt it (using AWS KMS) since it contains highly sensitive data (note that you might incur charges when you use AWS KMS even if you have a free AWS account). 该函数代码看起来似乎毫无用处的if-else语句和processEvent函数看起来有些复杂,但是当我们使用AWS Key Management Service(KMS)添加解密例程时,所有这些都将变得清晰起来。 实际上,我们不仅要在环境变量中存储MongoDB Atlas连接字符串,而且还希望对其进行加密(使用AWS KMS),因为它包含高度敏感的数据(请注意,即使使用AWS KMS,您也可能会产生费用)如果您有一个免费的AWS账户)。
Now that we’re done with the code comments, let’s create an event.json file (in the root project directory) and fill it with the following data:
现在,我们已经完成了代码注释,让我们在根项目目录中创建一个event.json文件,并用以下数据填充它:
{
  "address" : {
    "street" : "2 Avenue",
    "zipcode" : "10075",
    "building" : "1480",
    "coord" : [ -73.9557413, 40.7720266 ]
  },
  "borough" : "Manhattan",
  "cuisine" : "Italian",
  "grades" : [
    {
      "date" : "2014-10-01T00:00:00Z",
      "grade" : "A",
      "score" : 11
    },
    {
      "date" : "2014-01-16T00:00:00Z",
      "grade" : "B",
      "score" : 17
    }
  ],
 "name" : "Vella",
 "restaurant_id" : "41704620"
}
(in case you’re wondering, that JSON file is what we’ll send to MongoDB Atlas to create our BSON document)
(以防您想知道该JSON文件是我们将发送给MongoDB Atlas来创建我们的BSON文档的文件)
Next, make sure that you’re set up properly by running the following command in a Terminal console:
接下来,通过在终端控制台中运行以下命令来确保设置正确:
lambda-local -l app.js -e event.json -E {\"MONGODB_ATLAS_CLUSTER_URI\":\"mongodb://lambdauser:$PASSWORD@lambdademo-shard-00-00-7xh42.mongodb.net:27017\,lambdademo-shard-00-01-7xh42.mongodb.net:27017\,lambdademo-shard-00-02-7xh42.mongodb.net:27017/$DATABASE?ssl=true\&replicaSet=lambdademo-shard-0\&authSource=admin\"}If you want to test it with your own cluster URI Connection String (as I’m sure you do), don’t forget to escape the double quotes, commas and ampersand characters in the E parameter, otherwise lambda-local will throw an error (you should also replace the $PASSWORD and $DATABASE keywords with your own values).
如果要使用自己的群集URI连接字符串进行测试(如我确定的那样),请不要忘记在E参数中转义双引号,逗号和&字符,否则lambda-local会抛出错误(您还应该用自己的值替换$ PASSWORD和$ DATABASE关键字)。
After you run it locally, you should get the following console output:
在本地运行它之后,应该获得以下控制台输出:
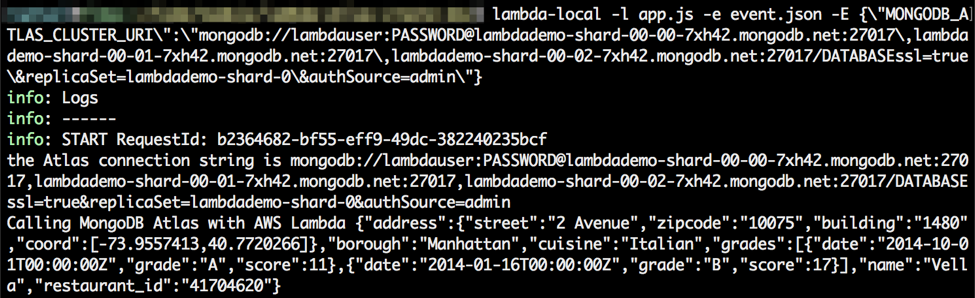
If you get an error, check your connection string and the double quotes/commas/ampersand escaping (as noted above).
如果出现错误,请检查您的连接字符串以及双引号/逗号/符号和转义符(如上所述)。
Now, let’s get down to the meat of our function code by customizing the processEvent() function and adding a createDoc() function:
现在,让我们通过自定义processEvent()函数并添加createDoc()函数来深入了解函数代码:
function processEvent(event, context, callback) {
  console.log('Calling MongoDB Atlas from AWS Lambda with event: ' + JSON.stringify(event));
  var jsonContents = JSON.parse(JSON.stringify(event));

  //date conversion for grades array
  if(jsonContents.grades != null) {
    for(var i = 0, len=jsonContents.grades.length; i  connecting to database');
    MongoClient.connect(atlas_connection_uri, function (err, db) {
      cachedDb = db;
        return createDoc(db, jsonContents, callback);
      });
    }
    else {
      createDoc(cachedDb, jsonContents, callback);
    }
  }
  catch (err) {
    console.error('an error occurred', err);
  }
}

function createDoc (db, json, callback) {
  db.collection('restaurants').insertOne( json, function(err, result) {
    if(err!=null) {
      console.error("an error occurred in createDoc", err);
      callback(null, JSON.stringify(err));
    }
    else {
      console.log("Kudos! You just created an entry into the restaurants collection with id: " + result.insertedId);
      callback(null, "SUCCESS");
    }
    //we don't need to close the connection thanks to context.callbackWaitsForEmptyEventLoop = false (above)
   //this will let our function re-use the connection on the next called (if it  can re-use the same Lambda container)
     //db.close();
  });
};
Note how easy it is to connect to a MongoDB Atlas database and insert a document, as well as the small piece of code I added to translate JSON dates (formatted as ISO-compliant strings) into real JavaScript dates that MongoDB can store as BSON dates.
请注意连接到MongoDB Atlas数据库并插入文档有多么容易,以及我添加的一小段代码将JSON日期(格式化为符合ISO的字符串)转换为真实JavaScript日期,MongoDB可以将其存储为BSON日期。
You might also have noticed my performance optimization comments and the call to context.callbackWaitsForEmptyEventLoop = false. If you’re interested in understanding what they mean (and I think you should!), please refer to my follow-up blog post on how to optimize Lambda performance with MongoDB Atlas.
您可能还注意到了我的性能优化注释以及对context.callbackWaitsForEmptyEventLoop = false的调用。 如果您有兴趣了解它们的含义(我想您应该!),请参阅我的后续博客文章,了解如何使用MongoDB Atlas优化Lambda性能。
You’re now ready to fully test your Lambda function locally. Use the same lambda-local command as before and hopefully you’ll get a nice “Kudos” success message:
现在,您可以在本地全面测试Lambda函数了。 使用与以前相同的lambda-local命令,希望您会收到一个不错的“ Kudos”成功消息:

If all went well on your local machine, let’s publish our local Node.js project as a new Lambda function!
如果在您的本地计算机上一切正常,让我们将本地Node.js项目发布为新的Lambda函数!
创建Lambda函数 (Create the Lambda Function)
The first step we’ll want to take is to zip our Node.js project, since we won’t write the Lambda code function in the Lambda code editor. Instead, we’ll choose the zip upload method to get our code pushed to AWS Lambda.
我们要采取的第一步是压缩Node.js项目,因为我们不会在Lambda代码编辑器中编写Lambda代码函数。 相反,我们将选择zip上传方法来将代码推送到AWS Lambda。
I’ve used the zip command line tool in a Terminal console, but any method works (as long as you zip the files inside the top folder, not the top folder itself!) :
我已经在终端控制台中使用了zip命令行工具,但是任何方法都可以工作(只要将文件压缩在顶层文件夹中,而不是顶层文件夹本身中即可!):
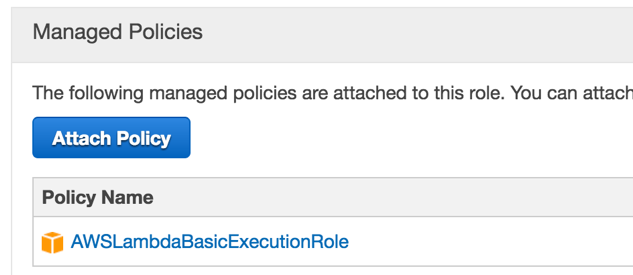
zip -r archive.zip node_modules/ app.js package.jsonNext, sign in to the AWS Console and navigate to the IAM Roles page and create a role (such as LambdaBasicExecRole) with the AWSLambdaBasicExecutionRole permission policy:
接下来,登录到AWS控制台并导航到“ IAM角色”页面,并使用AWSLambdaBasicExecutionRole权限策略创建一个角色(例如LambdaBasicExecRole):
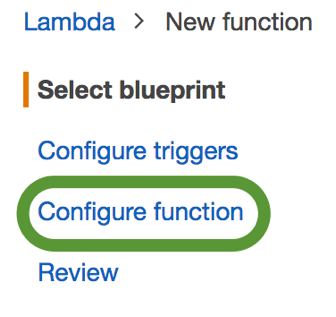
Let’s navigate to the AWS Lambda page now. Click on Get Started Now (if you’ve never created a Lambda function) or on the Create a Lambda function button. We’re not going to use any blueprint and won’t configure any trigger either, so select Configure function directly in the left navigation bar:
现在让我们导航到AWS Lambda页面。 单击立即开始 (如果您从未创建Lambda函数)或单击“ 创建Lambda函数”按钮。 我们不会使用任何蓝图,也不会配置任何触发器,因此请直接在左侧导航栏中选择“ 配置功能” :
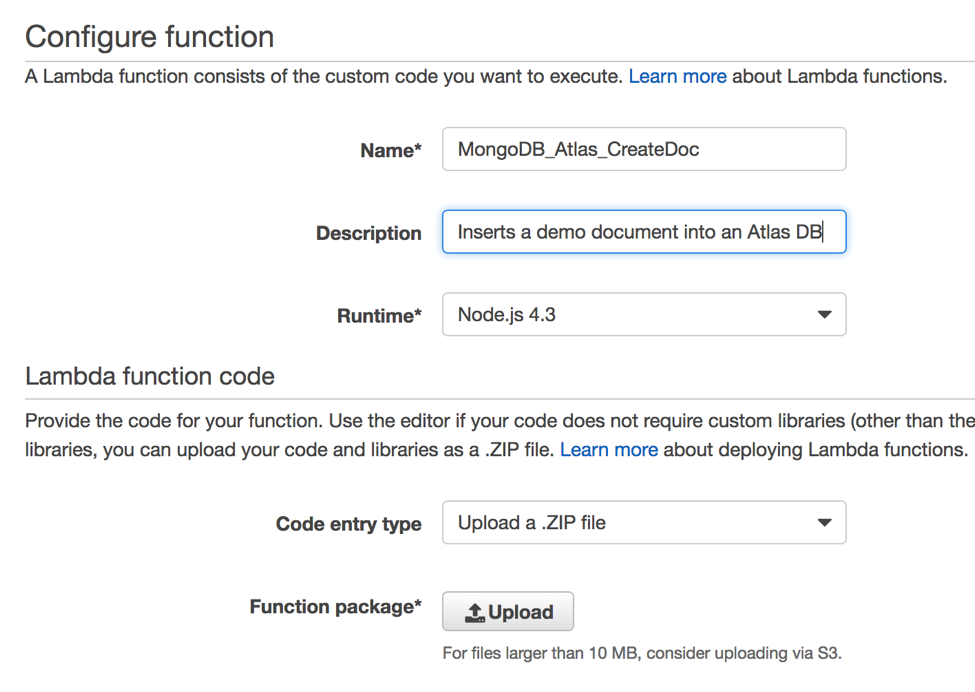
In the Configure function page, enter a Name for your function (such as MongoDB_Atlas_CreateDoc). The runtime is automatically set to Node.js 4.3, which is perfect for us, since that’s the language we’ll use. In the Code entry type list, select Upload a .ZIP file, as shown in the screenshot below:
在“ 配置功能”页面中,输入您的功能的名称(例如MongoDB_Atlas_CreateDoc )。 运行时会自动设置为Node.js 4.3 ,这对我们来说是完美的,因为这是我们将使用的语言。 在“ 代码输入类型”列表中,选择“上Upload a .ZIP file ,如下面的屏幕快照所示:
Click on the Upload button and select the zipped Node.js project file you previously created.
单击上载按钮,然后选择先前创建的压缩的Node.js项目文件。
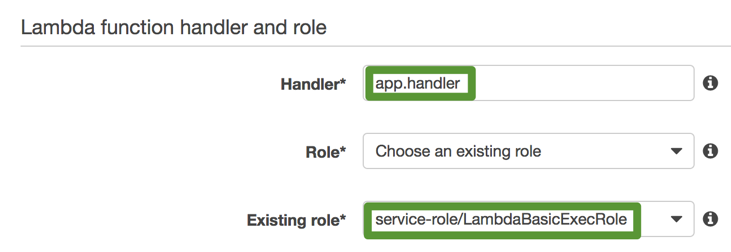
In the Lambda function handler and role section, modify the Handler field value to app.handler (why? here’s a hint: I’ve used an app.js file, not an index.js file for my Lambda function code…) and choose the existing LambdaBasicExecRole role we just created:
在Lambda函数处理程序和角色部分中,将Handler字段的值修改为app.handler (为什么?这是一个提示:我使用了app.js文件,而不是Lambda函数代码使用index.js文件…),然后选择我们刚刚创建的现有LambdaBasicExecRole角色:
In the Advanced Settings section, you might want to increase the Timeout value to 5 or 10 seconds, but that’s always something you can adjust later on. Leave the VPC and KMS key fields to their default value (unless you want to use a VPC and/or a KMS key) and press Next.
在“ 高级设置”部分中,您可能希望将“ 超时”值增加到5或10秒,但始终可以在以后进行调整。 将VPC和KMS密钥字段保留为默认值(除非您想使用VPC和/或KMS密钥),然后按Next 。
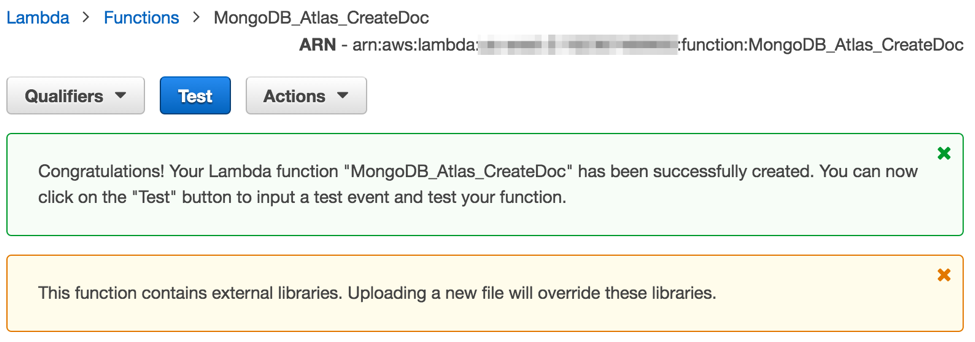
Last, review your Lambda function and press Create function at the bottom. Congratulations, your Lambda function is live and you should see a page similar to the following screenshot:
最后,查看您的Lambda函数,然后按底部的创建函数 。 恭喜,您的Lambda函数已启用,您应该会看到类似于以下屏幕截图的页面:
But do you remember our use of environment variables? Now is the time to configure them and use the AWS Key Management Service to secure them!
但是您还记得我们对环境变量的使用吗? 现在是配置它们并使用AWS Key Management Service保护它们的时候了!
配置和保护Lambda环境变量 (Configure and Secure Your Lambda Environment Variables)
Scroll down in the Code tab of your Lambda function and create an environment variable with the following properties:
在Lambda函数的“代码”选项卡中向下滚动,并创建具有以下属性的环境变量:
| Name | Value |
|---|---|
| MONGODB_ATLAS_CLUSTER_URI | YOUR_ATLAS_CLUSTER_URI_VALUE |
| 名称 | 值 |
|---|---|
| MONGODB_ATLAS_CLUSTER_URI | YOUR_ATLAS_CLUSTER_URI_VALUE |

At this point, you could press the Save and test button at the top of the page, but for additional (and recommended) security, we’ll encrypt that connection string.
此时,您可以按页面顶部的“ 保存并测试”按钮,但是为了提高安全性(并建议使用),我们将加密该连接字符串。
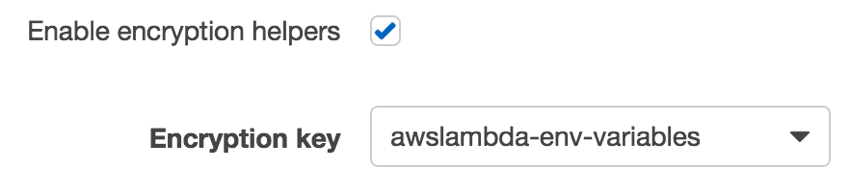
Check the Enable encryption helpers check box and if you already created an encryption key, select it (otherwise, you might have to create one – it’s fairly easy):
选中“ 启用加密助手”复选框,如果您已经创建了一个加密密钥,请选择它(否则,您可能必须创建一个密钥-这相当简单):
Next, select the Encrypt button for the MONGODB_ATLAS_CLUSTER_URI variable:
接下来,为MONGODB_ATLAS_CLUSTER_URI变量选择“ 加密”按钮:

Back in the inline code editor, add the following line at the top:
返回内联代码编辑器,在顶部添加以下行:
const AWS = require('aws-sdk');and replace the contents of the “else” statement in the “exports.handler” method with the following code:
并使用以下代码替换“ exports.handler”方法中“ else”语句的内容:
const kms = new AWS.KMS();
  kms.decrypt({ CiphertextBlob: new Buffer(uri, 'base64') }, (err, data) => {
  if (err) {
    console.log('Decrypt error:', err);
    return callback(err);
  }
  atlas_connection_uri = data.Plaintext.toString('ascii');
  processEvent(event, context, callback);
});
(hopefully the convoluted code we originally wrote makes sense now!)
(希望我们最初编写的复杂代码现在变得有意义了!)
If you want to check the whole function code I’ve used, check out the following Gist. And for the Git fans, the full Node.js project source code is also available on GitHub.
如果要检查我使用的整个功能代码 ,请查看以下Gist 。 对于Git爱好者, 完整的Node.js项目源代码也可以在GitHub上获得 。
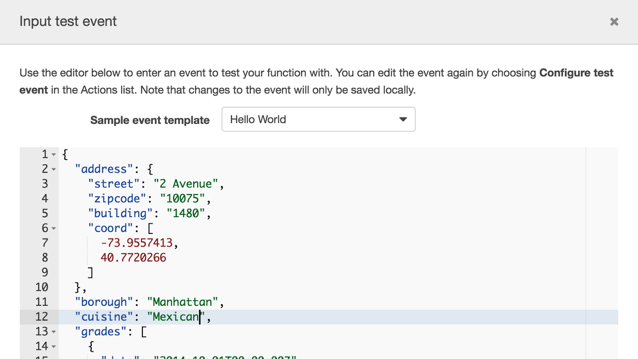
Now press the Save and test button and in the Input test event text editor, paste the content of our event.json file:
现在按下“ 保存并测试”按钮,然后在“ 输入测试事件”文本编辑器中,粘贴event.json文件的内容:
Scroll and press the Save and test button.
滚动并按保存并测试按钮。
If you configured everything properly, you should receive the following success message in the Lambda Log output:
如果正确配置了所有内容,则应该在Lambda日志输出中收到以下成功消息:

Kudos! You can savor your success a few minutes before reading on.
荣誉! 您可以在几分钟前品尝成功,然后继续阅读。
下一步是什么? (What’s Next?)
I hope this AWS Lambda-MongoDB Atlas integration tutorial provides you with the right steps for getting started in your first Lambda project. You should now be able to write and test a Lambda function locally and store sensitive data (such as your MongoDB Atlas connection string) securely in AWS KMS.
我希望此AWS Lambda-MongoDB Atlas集成教程为您提供第一个Lambda项目入门的正确步骤。 您现在应该能够在本地编写和测试Lambda函数,并将敏感数据(例如MongoDB Atlas连接字符串)安全地存储在AWS KMS中。
So what can you do next?
那你下一步该怎么办?
If you don’t have a MongoDB Atlas account yet, it’s not too late to create one!
如果您还没有MongoDB Atlas帐户,那么创建一个帐户还为时不晚!
If you’re not familiar with the MongoDB Node.js driver, check out our Node.js driver documentation to understand how to make the most of the MongoDB API. Additionally, we also offer an online Node.js course for the Node.js developers who are getting started with MongoDB.
如果您不熟悉MongoDB Node.js驱动程序 ,请查看我们的Node.js驱动程序文档,以了解如何充分利用MongoDB API。 此外,我们还为MongoDB入门的Node.js开发人员提供了在线Node.js课程 。
Learn how to visualize the data you created with your Lambda function, download MongoDB Compass and read Visualizing your data with MongoDB Compass to learn how to connect it to MongoDB Atlas.
了解如何形象化使用Lambda函数创建的数据,下载MongoDB Compass以及阅读如何使用MongoDB Compass可视化数据以了解如何将其连接到MongoDB Atlas。
Planning to build a lot of Lambda functions? Learn how to orchestrate them with AWS Step Functions by reading our Integrating MongoDB Atlas, Twilio and AWS Simple Email Service with AWS Step Functions post.
计划构建大量Lambda函数? 通过阅读我们的《 将MongoDB Atlas,Twilio和AWS Simple Email Service与AWS Step Functions集成在一起》了解如何使用AWS Step Functions 整理它们 。
Learn how to integrate MongoDB and AWS Lambda in a more complex scenario, check out our more advanced blog post: Developing a Facebook Chatbot with AWS Lambda and MongoDB Atlas.
了解如何在更复杂的场景中集成MongoDB和AWS Lambda,请查看我们更高级的博客文章: 使用AWS Lambda和MongoDB Atlas开发Facebook Chatbot 。
And of course, don’t hesitate to ask us any questions or leave your feedback in a comment below. Happy coding!
当然,请随时向我们提问或在下面的评论中留下您的反馈。 祝您编码愉快!
Enjoyed this post? Replay our webinar where we have an interactive tutorial on serverless architectures with AWS Lambda.
喜欢这篇文章吗? 重播我们的网络研讨会,那里有关于使用AWS Lambda的无服务器架构的交互式教程。
翻译自: https://www.sitepoint.com/serverless-development-with-node-js-aws-lambda-and-mongodb-atlas/
aws mongodb


 996
996

 被折叠的 条评论
为什么被折叠?
被折叠的 条评论
为什么被折叠?
 到【灌水乐园】发言


