


excel催化剂
In part one of this article we started building a small Rich Internet Application that would display music charts using data from a YQL query. We started with Adobe Illustrator to mock up the user interface for our app, then transferred the Illustrator file into Flash Catalyst to begin converting the design into an interactive piece.
在本文的第一部分中,我们开始构建一个小型的Rich Internet Application,该应用程序将使用来自YQL查询的数据显示音乐图表。 我们从Adobe Illustrator开始,为我们的应用程序模拟了用户界面,然后将Illustrator文件传输到Flash Catalyst中,开始将设计转换为交互式作品。
In part two, we will continue adding interactivity in Catalyst, and then move into Flash Builder to finish it up. For fun, there’s a quiz at the end!
在第二部分中,我们将继续在Catalyst中添加交互性,然后移入Flash Builder来完成它。 为了好玩,最后有一个测验!
从图稿创建按钮 (Creating Buttons From The Artwork)
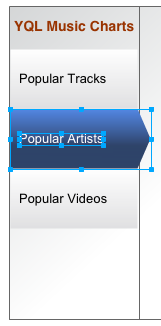
Each of the tabs on the left of our application will now be converted into a button component. We’ll do this by selecting both the text and background graphic for the first tab, and using the Heads Up Display (HUD) to convert it into a button. Repeat this process for the other two tab graphics.
现在,应用程序左侧的每个选项卡都将转换为按钮组件。 为此,我们将选择第一个选项卡的文本和背景图形,然后使用抬头显示器(HUD)将其转换为按钮。 对其他两个选项卡图形重复此过程。
Button components have four states:
按钮组件具有四种状态:
Up, as a normal state for the button
向上 ,作为按钮的正常状态
Over, when the mouse is hovering over the button
在 ,当鼠标悬停在按钮
Down, for when the button is being clicked
向下 ,用于单击按钮时
Disabled, for when the button may not be pressed
禁用 ,用于可能不按下按钮的情况
Buttons for each of these states appear within the HUD whenever one of your buttons has been selected. We can edit each of the states’ graphics individually by clicking on them.
只要选择了其中一个按钮,每种状态的按钮就会显示在HUD中。 我们可以通过单击来分别编辑每个州的图形。
Double-click on the button with the blue arrow graphic to select it, and copy the button. Use the breadcrumb at the top of the Design area to switch out of the button, and then double-click one of the other two buttons. Go to the Over state, delete the graphic that’s there, then paste the blue arrow in its place. To align it precisely, look at the Properties panel and set the X and Y values to 0. You should now find that the arrow is positioned perfectly.
双击带有蓝色箭头图形的按钮将其选中,然后复制按钮。 使用“设计”区域顶部的面包屑切换到该按钮之外,然后双击其他两个按钮之一。 进入“结束”状态,删除那里的图形,然后将蓝色箭头粘贴到其位置。 要精确对齐,请查看“ 属性”面板,并将X和Y值设置为0。现在,您应该发现箭头的位置正确。
Something missing? The text in that state will most likely have disappeared, because the blue arrow will have been placed into a new layer above the text. To make it reappear, simply go to the Layers panel and grab and drag the text layer and drop it above the new graphic layer. This text will also need a change of font color.
缺少什么? 该状态下的文本很可能会消失,因为蓝色箭头将被放置在文本上方的新层中。 要使其重新显示,只需转到“ 图层”面板,然后抓取并拖动文本图层并将其拖放到新的图形图层上方。 此文本还需要更改字体颜色。
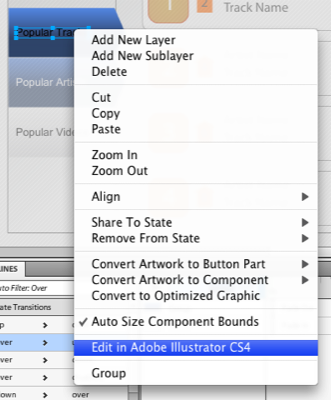
Currently, Catalyst’s ability to edit graphics is quite limited. We’re able to modify this label’s size and opacity, but to change other attributes like color or font, we need to return to Illustrator. To do that, right click on the text object and choose Edit in Adobe Illustrator CS4.. You can do this either in the design area, or within the Layers palette.
当前,Catalyst编辑图形的能力非常有限。 我们可以修改此标签的大小和不透明度,但是要更改其他属性(例如颜色或字体),我们需要返回Illustrator。 为此,请右键单击文本对象,然后在Adobe Illustrator CS4中选择“ 编辑”。 。 您可以在设计区域或“ 图层”调板中执行此操作。
This will launch the artwork in Illustrator – only the text will be editable‚ and the remaining content will be disabled. You’ll also see a bold yellow message above the Illustrator artboard, telling you to save and close the window when you’re finished.
这将在Illustrator中启动图稿–只有文本是可编辑的,其余内容将被禁用。 您还将在Illustrator画板上方看到一个黄色的粗体消息,告诉您完成后保存并关闭窗口。
In Illustrator, change the font colour to white and save. Illustrator will prompt you to save with FXG options‚ FXG is the new language that Catalyst uses to exchange graphics between itself and Adobe design tools like Illustrator and Photoshop. Accept the defaults and close the file in Illustrator, and then switch back to Catalyst. There’ll be a dialog asking you whether you want to accept the Illustrator changes. Accept them, and you’ll see the text with its new colour.
在Illustrator中,将字体颜色更改为白色并保存。 Illustrator会提示您使用FXG选项进行保存。FXG是Catalyst用于在其自身与Adobe设计工具(例如Illustrator和Photoshop)之间交换图形的新语言。 接受默认设置并在Illustrator中关闭文件,然后切换回Catalyst。 将出现一个对话框,询问您是否要接受Illustrator的更改。 接受它们,您将看到带有新颜色的文本。
Repeat that process for the button’s Down state. You’ll need to copy a grey background from one of the other two buttons to use for the Up and Disabled states in the Popular Artists button as it had the blue arrow graphic when we created it. You’ll also need to change the colour of the font for this button in Illustrator to black for the Up and Disabled states‚ so let’s do that now.
对按钮的“按下”状态重复该过程。 您需要从其他两个按钮之一复制灰色背景,以用于“流行艺术家”按钮中的“向上”和“已禁用”状态,因为在创建它时它具有蓝色箭头图形。 您还需要将Illustrator中此按钮的字体颜色更改为“黑色”(对于“向上”和“禁用”状态),所以现在就开始进行操作。
将状态添加到重复项 (Adding States to the Repeated Item)
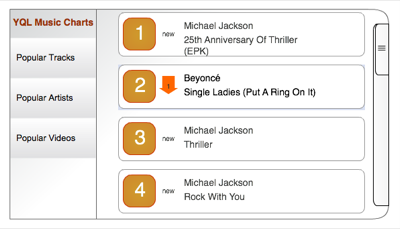
Back in part one, we created a Data List component for the list of tracks. The repeated item in the Data List features some interactivity that may not be apparent until testing‚ you can do this by choosing File > Run Project. In your browser, you’ll see the application appear in a new tab or window. You should notice that when you roll over or click on an item, the items reveal a subtle light blue background: we’re going to adjust the background colour to be a bit brighter.
在第一部分中,我们为轨道列表创建了一个“数据列表”组件。 “数据列表”中重复的项目具有某些交互性,这些交互性直到测试后才会显现出来。您可以通过选择“ 文件” > “运行项目”来进行此操作。 在浏览器中,您会看到该应用程序出现在新的标签或窗口中。 您应该注意,当您将鼠标悬停或单击某个项目时,这些项目会显示出淡淡的浅蓝色背景:我们将调整背景色,使其更亮一些。
Double-click on the repeated item component to open it, and you’ll see the three states that represent different interactions‚ normal, hovered, and selected. Managing the appearance of the way the item changes across states is relatively easy; we simply edit the appearance of the object in each state, much as we did for buttons.
双击重复的项目组件以将其打开,您将看到代表不同交互的三种状态-正常,悬停和选定。 管理项目在各州之间变化的方式的外观相对容易; 我们只需在每种状态下编辑对象的外观,就像我们对按钮所做的一样。
First, we’ll modify the colour of the background in the Hovered state. Right click on the background image and choose Edit in Adobe Illustrator CS4.. Change the fill colour of the graphic to a shade to your liking. Save the changes in Illustrator and switch back to Catalyst, accepting the change it asks for. You’ll see that the background colour of the Hovered state has been updated. We can do the same for the Selected state.
首先,我们将在“悬浮”状态下修改背景的颜色。 右键单击背景图像,然后在Adobe Illustrator CS4中选择“ 编辑”。 。 将图形的填充颜色更改为您喜欢的阴影。 将更改保存在Illustrator中,然后切换回Catalyst,接受其要求的更改。 您会看到“悬浮”状态的背景色已更新。 我们可以对Selected状态执行相同的操作。
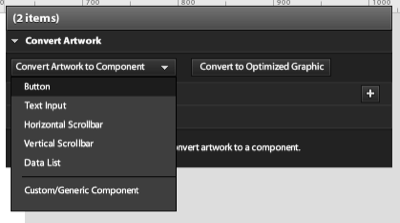
The music chart up/down arrow needs states too; we’ll show an up or down arrow to show how the track has changed chart position lately. Since none of the pre-set component types in Catalyst will be able to help us with this task, we’ll need to convert the arrow into a custom component. Select the arrow and select Custom/Generic Component from the Convert Artwork list. Then, choose Duplicate State from the top left of the screen‚ it’s a small button just below the Pages/State list. At the top right of Catalyst is a toolbar: clicking the last one, Transform, will let you rotate the arrow to point down. Double-clicking on the name of a state will allow you to rename it. Here, I’ve named the states trackUp and trackDown, respectively.
音乐图表上/下箭头也需要状态; 我们将显示一个向上或向下箭头,以显示该轨道最近如何改变了图表位置。 由于Catalyst中的任何预设组件类型都无法帮助我们完成此任务,因此我们需要将箭头转换为自定义组件。 选择箭头,然后从“ 转换图稿”列表中选择“ 自定义/通用组件 ”。 然后,从屏幕左上方选择“ 重复状态”-这是“ 页面/状态”列表下方的一个小按钮。 Catalyst的右上角是一个工具栏:单击最后一个工具栏Transform ,可以旋转箭头向下。 双击州名将允许您重命名它。 在这里,我分别将状态命名为trackUp和trackDown 。

向应用程序添加状态 (Adding States To The Application)
The list will look a little empty until the user has selected a music chart to display. We’re going to set the application to start with the list hidden, only displaying it once the data has been fetched from Yahoo. We’re going to use two application states to achieve this effect.
在用户选择要显示的音乐图表之前,该列表看起来有些空白。 我们将应用程序设置为从隐藏列表开始,仅在从Yahoo提取数据后才显示该列表。 我们将使用两个应用程序状态来实现此效果。
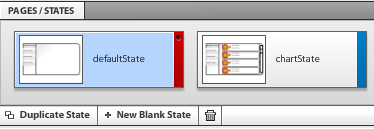
Duplicate the current state and rename it to defaultState, then name the second one chartState. Select the Data List in defaultState and delete it: you’ll see that the list is still in the second state when you switch between the two.
复制当前状态并将其重命名为defaultState ,然后将第二个状态命名为chartState 。 在defaultState选择Data List并将其删除:在两者之间切换时,您会看到列表仍处于第二状态。
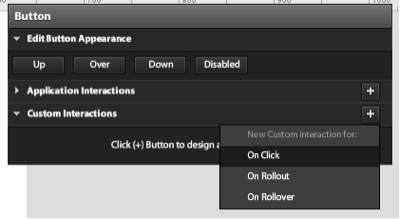
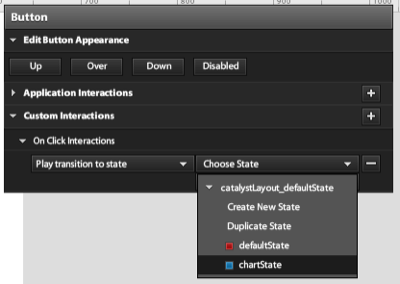
When a user presses one of the chart buttons on the left, we’d like to show the chartState. To make this happen, we’ll choose one of the buttons in the first state and select the plus button to the right of Custom Interactions in the HUD. Choose On Click from the list. From On Click Interactions choose Play transition to state and choose chartState from the list. For the user, clicking on the button will make the list appear. Later, we’ll add code to that button in Flash Builder to call a Yahoo YQL query to fetch the data to display in the list.
当用户按下左侧的图表按钮之一时,我们想显示chartState 。 为此,我们将在第一种状态下选择一个按钮,然后在HUD中选择“ 自定义交互 ”右侧的加号按钮。 从列表中选择“单击时”。 从“单击交互”中,选择“ 播放过渡到状态” , chartState从列表中选择“ chartState ”。 对于用户,单击按钮将显示该列表。 稍后,我们将代码添加到Flash Builder中的该按钮,以调用Yahoo YQL查询以获取要显示在列表中的数据。
Repeat the process for each of the buttons. With the interactions added you should see that each object has a Fade transition effect added to the Timeline below the design view. The switch between states’ actions can be animated with that Fade effect. Sliding the effect in the Timeline to control it is quite intuitive: simply grab it and move it. You’re now ready to test the interactions. Choose File > Run Project to run the application again, and click on the buttons to see the change between states. Adjust the interaction changes in the Timeline to taste.
对每个按钮重复该过程。 添加交互后,您应该看到每个对象都在设计视图下方的时间轴中添加了淡入淡出过渡效果。 状态动作之间的切换可以使用该淡入淡出效果进行动画处理。 在时间轴中滑动效果以控制效果非常直观:只需抓住并移动它即可。 现在您可以测试交互了。 选择“ 文件” > “运行项目”以再次运行该应用程序,然后单击按钮以查看状态之间的更改。 调整时间轴中的交互更改以进行品尝。
We’re going to add one more state to the application to serve as a detail view for the repeated items: this will use the artwork from the detailed view we created all the way back in part one. The additional panel will behave like a pop up to display other releases for a selected artist.
我们将在应用程序中添加一个状态,以作为重复项的详细视图:这将使用在第一部分中一直创建的详细视图中的插图。 附加面板的行为类似于弹出窗口,以显示选定艺术家的其他发行版本。
Start by duplicating chartState – call the new state artistDetailState. The design has a pop over panel to display the new information. We’re going to dim the current content for this state as the detail panel appears. Do this by selecting all the items in the state except the background graphic, and set their opacity to 40 in the properties panel.
首先复制chartState –调用新的状态artistDetailState 。 该设计具有弹出面板以显示新信息。 当详细信息面板出现时,我们将使该状态的当前内容变暗。 通过选择状态中除背景图形之外的所有项目来执行此操作,然后在属性面板中将其不透明度设置为40。
If you look carefully at the Layers palette you’ll see a layer called Overlay. This contains all the objects that will be shown in the detail state. When we do this, we’ll make the repeated item a button. Go back to chartState and enter the Data List component by double-clicking on it, then open the repeated item by double-clicking again, and select its background. Convert the background into a button using the HUD and set its On Click event to play to artistDetailState. The Fade effect in the Timeline will do a really nice job of transitioning the opacity later on if you choose to use it. The detail view has repeated data in its design. Later, we’ll convert this to a component in Flash Builder. For now, delete the text, leaving the title text as is.
如果仔细查看“ 图层”调板,您会看到一个名为“ 覆盖”的图层。 这包含将在详细信息状态下显示的所有对象。 当我们这样做时,我们将使重复项成为一个按钮。 返回到chartState并双击以输入“数据列表”组件,然后再次双击以打开重复的项目,然后选择其背景。 使用HUD将背景转换为按钮,并设置其On Click事件以播放artistDetailState 。 如果您选择使用时间轴中的淡入淡出效果,则以后可以很好地转换不透明度。 局部视图在其设计中具有重复的数据。 稍后,我们将其转换为Flash Builder中的组件。 现在,删除文本,保留标题文本不变。
Oops‚ I’ve just realised we forgot to provide a way of closing the panel in the artwork! This is a great excuse to show you how to create a new button from scratch in Catalyst.
糟糕,我刚刚意识到我们忘记了提供一种关闭艺术品中面板的方法! 这是一个很好的借口,向您展示如何在Catalyst中从头开始创建新按钮。
To do it, draw a circle with the Ellipse tool found in the toolbar at the top right of Catalyst‚ it looks like a circle itself. Add a letter X with the Text tool to the center of the circle and select the two, converting them to a button from the HUD‚ feel free to edit the button to have other graphics in the other states if required. Add an On Click interaction to the new button and set it to switch back to chartState to close the panel.
为此,请使用Catalyst右上角工具栏中的“椭圆”工具绘制一个圆,它看起来像一个圆。 使用文本工具将字母X添加到圆的中心,然后选择两个字母,然后将它们从HUD转换为按钮,可以随意编辑该按钮,以在需要时使其他图形处于其他状态。 将“单击时”交互添加到新按钮,并将其设置为切换回chartState以关闭面板。
With all of the interactions the way we want them, we’re almost ready to complete the project in Flash Builder! This is a great time to double-check that you’ve saved your work.
通过所有交互方式,我们几乎准备就绪,可以在Flash Builder中完成项目! 这是仔细检查您是否保存了工作的好时机。
在Flash Builder中编码数据服务 (Coding Data Services In Flash Builder)
While we’ve been working on our project, Catalyst has been building a number of MXML files that Flash Builder can compile to Flash. It’s possible to view that code right here in Catalyst by switching from Design to Code view‚ do this by using the pull-down menu at the top right in Catalyst. Save the Catalyst project and then launch Flash Builder.
在我们进行项目时,Catalyst一直在构建许多MXML文件,Flash Builder可以将这些文件编译为Flash。 通过从“设计”切换到“代码”视图,可以在Catalyst的此处查看该代码。使用Catalyst右上角的下拉菜单可以执行此操作。 保存Catalyst项目,然后启动Flash Builder。
In Flash Builder, you can create a project from an FXP file by selecting File > Import Flex Project (FXP). Using the navigator on the left, locate the project’s root file at src > (default package) > Main.mxml. You’ll see that there is a fx:Script block at the top of the code that contains functions for each of the three buttons that you created in Flash Catalyst. Also, note the s:transitions tag pair, which contains any transition effects you may have added via the Timeline in Catalyst. Below that the states are defined in the s:states tag pair. Finally, you should see buttons and other visual elements, all of which have been assigned instance names that we can access from ActionScript.
在Flash Builder中,可以通过选择“ 文件” >“ 导入Flex项目(FXP)”从FXP文件创建项目。 使用左侧的导航器,在src>(默认包)> Main.mxml中找到项目的根文件。 您会看到在代码顶部有一个fx:Script块,其中包含您在Flash Catalyst中创建的三个按钮的功能。 另外,请注意s:transitions标记对,其中包含您可能通过Catalyst中的时间轴添加的任何过渡效果。 下面,在s:states标记对中定义s:states 。 最后,您应该看到按钮和其他可视元素,所有这些元素均已分配了实例名称,我们可以从ActionScript中访问它们。
We’re going to be calling a Yahoo service called YQL to fill our application with data. It’s a language that you can use to query data from web services. You will need to have a developer account with Yahoo to build and test with YQL: more details can be found at the Yahoo developers’ site. YQL queries are simply URLs with your query attached as a string at the end. You can choose to have the results returned as either XML or JSON using an additional variable at the end of the URL to indicate the return type‚ &format=xml or &format=json, respectively.
我们将调用名为YQL的Yahoo服务,以将数据填充到我们的应用程序中。 您可以使用这种语言从Web服务中查询数据。 您将需要具有Yahoo的开发者帐户才能使用YQL进行构建和测试: 可以在Yahoo开发者网站上找到更多详细信息。 YQL查询只是URL,查询末尾附加为字符串。 您可以选择使用URL末尾的附加变量以XML或JSON的形式返回结果,以分别指示返回类型&format=xml或&format=json 。
The Flex HTTPService component is used to call a remote HTTP service. We need to add one HTTPService for each YQL call, and both these tags need to be nested in a pair of fx:Declarations tags.
Flex HTTPService组件用于调用远程HTTP服务。 我们需要为每个YQL调用添加一个HTTPService ,并且这两个标签都必须嵌套在一对fx:Declarations标签中。
Below is an example of a HTTPService call to a YQL service to retrieve the most popular music tracks. The URL value of the tag is the YQL query. The tag’s result attribute indicates what function to use once the query result is received. Flash Builder will prompt to create the outline of a function for you if you add that attribute, which is what we’ve chosen to do here. The resultFormat attribute is used to indicate how the result’s data will be typed. To provide feedback to the user, we’ve also used the showBusyCursor attribute to change the cursor while the data is being fetched.
以下是对YQL服务进行HTTPService调用以检索最受欢迎的音乐曲目的示例。 标签的URL值为YQL查询。 标记的result属性指示接收到查询结果后要使用的功能。 如果您添加该属性,Flash Builder将提示您为该函数创建轮廓,这是我们在此处选择的功能。 resultFormat属性用于指示如何键入结果的数据。 为了向用户提供反馈,我们还使用了showBusyCursor属性来在获取数据时更改光标。
<s:HTTPService id="trackPopularService"
  url="http://query.yahooapis.com/v1/public/yql?
  q=select%20*%20from%20music.track.popular"
  result="releasePopularService_resultHandler(event)"
  resultFormat="xml" showBusyCursor="true"/>
These services will be called by clicking on one of the buttons that we created in Flash Catalyst. There’s a click handler function for each button already in the fx:Script block at the top of the code. These click handlers were created in order of button creation by Catalyst – you may need to run the application later to double check that the names match the positions. Here’s an example of one of these button click handlers: we’ve added a second line to it to call the URL of the HTTPService discussed above.
通过单击我们在Flash Catalyst中创建的按钮之一将调用这些服务。 在代码顶部的fx:Script块中已经为每个按钮提供了一个单击处理程序功能。 这些单击处理程序是由Catalyst按创建按钮的顺序创建的–您稍后可能需要运行该应用程序以仔细检查名称是否与位置匹配。 这是这些按钮单击处理程序之一的示例:我们在其中添加了第二行以调用上面讨论的HTTPService的URL。
protected function Button_click():void
  {
    currentState='chartState';
    trackPopularService.send();
  }
The function that will be called once the result has been received has a ResultEvent parameter, which in turn has a result property. This is where we’ll find the XML data that we need to populate the Data List. Flex data components have a dataProvider property that typically has an ArrayCollection assigned as its value. This is a wrapper class that exposes an array as a collection, but essentially is an array of objects that has additional methods and properties. We’ve already defined a variable typed as ArrayCollection called chartData in the script block and made that bindable so that any component using that variable as a dataProvider will update if the ArrayCollection changes. Here’s that variable:
收到结果后将被调用的函数具有ResultEvent参数,该参数又具有result属性。 在这里,我们将找到填充数据列表所需的XML数据。 Flex数据组件具有dataProvider属性,该属性通常将ArrayCollection分配为其值。 这是一个包装器类,将数组公开为集合,但实际上是具有其他方法和属性的对象数组。 我们已经在脚本块中定义了一个名为ArrayCollection的变量,称为chartData ,并使该变量可绑定,以便如果ArrayCollection发生更改,使用该变量作为dataProvider任何组件都将更新。 这是该变量:
[Bindable] private var chartData:ArrayCollection = new ArrayCollection();The function for the result of the first HTTPService call is listed below. You’ll notice that we reset the chartData ArrayCollection by re-initializing it. We then create an XML variable out of the event’s result property, then loop over the XML to parse it. With each iteration of the loop we create an object called dataObj and add properties to it which are equal to specific values in the XML. The last thing that we do in the loop is use the ArrayCollection‘s addItem method to add dataObj to it.
下面列出了第一个HTTPService调用的结果HTTPService 。 您会注意到,我们通过重新初始化来重置chartData ArrayCollection 。 然后,我们根据事件的result属性创建一个XML变量,然后遍历XML进行解析。 在循环的每次迭代中,我们都会创建一个名为dataObj的对象, dataObj其添加与XML中的特定值相等的属性。 在循环中,我们要做的最后一件事是使用ArrayCollection的addItem方法向其中添加dataObj 。
protected function releasePopularService_resultHandler(event:ResultEvent):void
  {
    chartData = new ArrayCollection();
    var resultsXML:XML = XML(event.result);
    var tracksXMLList:XMLList = resultsXML.child("results").children();
    var len:Number = tracksXMLList.length();
    for ( var i:Number = 0;i<len;i++) {
      var dataObj:Object = new Object();
      dataObj.track = tracksXMLList[i].attribute("title");
      dataObj.artist = tracksXMLList[i].child("Artist").attribute("name");
      dataObj.artistID = tracksXMLList[i].child("Artist").attribute("id");
      dataObj.chartNow = tracksXMLList[i].child("ItemInfo").child("ChartPosition").attribute("this");
      dataObj.chartPrevious = tracksXMLList[i].child("ItemInfo").child("ChartPosition").attribute("last");
      chartData.addItem(dataObj);
    }
}
在Flash Builder中绑定数据 (Binding Data In Flash Builder)
The Data List we created in Catalyst is used as the skin for a Flex List component. That’s located in the code below the three buttons, which you’ll see in the following example. Catalyst has manually added values to populate the list by nesting an ArrayCollection. You’ll see that the dataProvider attribute is there, but has an empty string value. We’re going to delete that ArrayCollection and bind the dataProvider attribute to our chartData ArrayCollection. Below, you’ll notice I’ve used a pair of curly brackets, this will repopulate the list if the value of chartData changes.
我们在Catalyst中创建的数据列表用作Flex List组件的外观。 该代码位于三个按钮下方的代码中,在以下示例中将看到该代码。 Catalyst已通过嵌套ArrayCollection手动添加了值以填充列表。 您将看到dataProvider属性在那里,但是具有空字符串值。 我们将删除该ArrayCollection并将dataProvider属性绑定到我们的chartData ArrayCollection 。 在下面,您会注意到我使用了一对大括号,如果chartData的值发生更改,它将重新填充列表。
<s:List x="200" y="89" skinClass="components.DataList1" id="list1" includeIn="artistDetailState,chartState" alpha.artistDetailState="0.4" dataProvider="{chartData}"/>The repeated item that we built in Catalyst is now a component in the Flex project. It’s stored in a file, RepeatedItem1.mxml, which can be found in the components folder of the project. Open it and you’ll see RichText components that we’ll need to populate with data from the List’s dataProvider. You should see that the text attribute of each of the RichText components is already bound to a property of an object called data‚ this is the collective name given to the values passed by the List component the current row as it loops over the dataProvider. We need to update the text attribute of each of these RichText tags to equal the data we’ve received.
我们在Catalyst中构建的重复项现在是Flex项目中的组件。 它存储在文件RepeatedItem1.mxml中 ,该文件可以在项目的components文件夹中找到。 打开它,您将看到我们需要使用List的dataProvider数据填充的RichText组件。 您应该看到,每个RichText组件的text属性已经绑定到名为data的对象的属性,这是对当前行遍历dataProvider List组件传递的值的集合名称。 我们需要更新每个RichText标签的text属性,以等于我们收到的数据。
The example code below is one of the RichText components from RepeatedItem1.mxml. Look at the text attribute of this tag and you’ll see that its value is bound using curly brackets‚ this means it will update to the current value assigned, which in this case is data.chartNow. The chartNow value is in the chartData ArrayCollection that we populated with the function detailed above. It’s one of the properties of the dataObj object that we built and populated while we looped over the XML data received from the YQL service call. Check the other RichText tags and you’ll see that we’ve also updated ours to equal other properties in the data from the ArrayCollection.
下面的示例代码是一个RichText从RepeatedItem1.mxml组件。 查看此标记的text属性,您将看到它的值使用大括号绑定了-这意味着它将更新为分配的当前值,在本例中为data.chartNow 。 chartNow值位于我们用上述函数填充的chartData ArrayCollection中。 这是我们遍历从YQL服务调用接收到的XML数据时构建并填充的dataObj对象的属性之一。 检查其他RichText标签,您将看到我们还更新了我们的标签,使其与ArrayCollection数据中的其他属性相等。
<s:RichText width="38" height="54"
  textAlign="center" fontFamily="Helvetica"
  fontSize="30" lineHeight="120%" color="0xffffff"
  whiteSpaceCollapse="preserve" kerning="on"
  ai:knockout="0" d:userLabel="5" text="{data.chartNow}"
  x="14" id="richtext1" y="18"></s:RichText>
We’ve added a function to the fx:Script block of RepeatedItem1.mxml to change the display of the chart arrow to either up, down or hidden based on music chart movement. It’s using the chartNow and chartPrevious values from the same data we used to populate the RichText tags. The function is controlling the chart arrow component, which in this case will have a name like customcomponent11. That function is called each time we render a row by using the opening tag’s render event. You’ll find that in the first line of code in RepeatedItem1.mxml in our sample version. The function is detailed below:
我们增加了一个功能,到fx:Script RepeatedItem1.mxml的块图表箭头的显示更改为向上,向下或基于音乐排行榜运动隐藏。 它使用来自用于填充RichText标签的相同数据中的chartNow和chartPrevious值。 该函数控制图表箭头组件,在这种情况下,其名称将类似于customcomponent11 。 每次我们使用开始标记的render事件渲染一行时,都会调用该函数。 在示例版本的RepeatedItem1.mxml的第一行代码中,您会发现它。 具体功能如下:
private function chartPosIndicator():void {
  if (data.chartPrevious == "0" ) {
    customcomponent11.visible = false;
    richtext2.text = "new";
  } else if ( Number(data.chartNow) < Number(data.chartPrevious) ) {
    customcomponent11.currentState = 'trackUp';
  } else if ( data.chartNow == data.chartPrevious ) {
    customcomponent11.visible = false;
    richtext2.text = "";
  } else if ( Number(data.chartNow) > Number(data.chartPrevious) ) {
    customcomponent11.currentState = 'trackDown';
  }
}
The other function in RepeatedItem1.mxml calls a public method in the parent file, Main.mxml, passing the artistID and artist values for the current row.
在RepeatedItem1.mxml其他函数调用父文件,Main.mxml在公开方法,将artistID和艺术家值当前行。
protected function Button_click():void
{
  mx.core.FlexGlobals.topLevelApplication.showArtistReleases(data.artistID,data.artist);
}
This function in turn assigns the values received to local variables already created, calls the send method of the last HTTPService, and changes the state of the application to artistDetailState.
该函数将接收到的值分配给已经创建的局部变量,调用最后一个HTTPService的send方法,并将应用程序的状态更改为artistDetailState 。
public function showArtistReleases(selectedArtistID:Number,selectedArtistName:String):void {
  artistID = selectedArtistID;
  artistName = selectedArtistName;
  releaseArtistService.send();
  currentState='artistDetailState';
}
The fourth HTTPService call uses a parameter to retrieve releases for a specific artist. We need to use the data from the row that the user clicks on to make that work, which is why we’re using the two functions listed above. The first calls the second from within RepeatedItem1.mxml, passing the artistID needed as a parameter for the HTTPService call. Within the second function, we’re assigning that artistID to a local variable that we’re using within the url attribute of the last HTTPService call. Below is that URL, and if you look towards the end of the value you’ll see {artistID}, which is a binding to the variable.
第四个HTTPService调用使用参数来检索特定艺术家的发行。 我们需要使用用户单击的行中的数据来完成这项工作,这就是为什么我们要使用上面列出的两个函数。 所述第一呼叫的第二从内RepeatedItem1.mxml,传递artistID需要作为一个参数HTTPService呼叫。 在第二个函数中,我们将artistID分配给在上一个HTTPService调用的url属性内使用的局部变量。 下面是该URL,如果您看向该值的末尾,则会看到{artistID} ,它是对该变量的绑定。
url="http://query.yahooapis.com/v1/public/yql?q=select%20*%20from%20music.release.artist%20where%20id%3D%22{artistID}%22"The result handler function for that service call is similar to the other result functions. Instead of the chartData ArrayCollection, we’re populating another ArrayCollection called otherReleasesArtist. This is used to populate a DataGrid component that we’ve added to the details panel we build as part of this article. The panel can be found in the components directory as CustomComponent2.mxml. We’ve added an ArrayCollection to this component and used it as the dataProvider for the DataGrid, setting the ArrayCollection as public so that we can change its value from Main.mxml – this is set in the last line of the result handler listed below. We’re also setting the title of the panel to the artistName variable passed when RepeatedItem1.mxml was clicked.
该服务调用的结果处理程序函数与其他结果函数相似。 代替了chartData ArrayCollection ,我们填充了另一个名为otherReleasesArtist ArrayCollection 。 这用于填充DataGrid组件,该组件已添加到作为本文的一部分而构建的详细信息面板中。 该面板可以在组件目录中作为CustomComponent2.mxml找到 。 我们已经向该组件添加了ArrayCollection并将其用作DataGrid的dataProvider ,将ArrayCollection设置为public,以便我们可以从Main.mxml更改其值-这在下面列出的结果处理程序的最后一行中进行设置。 我们还设置面板中的标题artistName变量传递被点击RepeatedItem1.mxml时。
protected function releaseArtistService_resultHandler(event:ResultEvent):void
{
  otherReleasesArtist = new ArrayCollection();
  var resultsXML:XML = XML(event.result);
  var tracksXMLList:XMLList = resultsXML.child("results").children();
  var len:Number = tracksXMLList.length();
  for ( var i:Number = 0;i<len;i++) {
    var dataObj:Object = new Object();
    dataObj.releaseTitle = tracksXMLList[i].attribute("title");
    dataObj.releaseYear = tracksXMLList[i].attribute("releaseYear");;
    otherReleasesArtist.addItem(dataObj);
  }
  customcomponent21.artistName = artistName;
  customcomponent21.otherReleasesData = otherReleasesArtist;
}
And that should be it! Save your work, and test your application by pressing the Run button at the top of Flash Builder. If all went well, chart data should start flowing into the completed application.
就是这样! 保存您的工作,并通过按下Flash Builder顶部的“ 运行”按钮来测试您的应用程序。 如果一切顺利,则图表数据应开始流入完整的应用程序中。
You can view my completed app here, and if you’re interested in viewing the complete source of my project, you can download my Flash Builder project here.
您可以在这里查看我完成的应用程序,如果您有兴趣查看我的项目的完整源代码,可以在这里下载我的Flash Builder项目。
设计师和开发商,最后在一起 (Designers and Developers, Together at Last)
Through both parts of this article we have demonstrated how to design a Flash application interface using Illustrator, and then convert the resulting Illustrator file into interactive Flash content using Flash Catalyst. Designers can now easily translate their design skills into interactive user interfaces and add functionality using Flash Builder. So, congratulations – you’ve just created a Flash masterpiece!
在本文的两部分中,我们都演示了如何使用Illustrator设计Flash应用程序界面,然后使用Flash Catalyst将生成的Illustrator文件转换为交互式Flash内容。 设计人员现在可以轻松地将其设计技能转换为交互式用户界面,并使用Flash Builder添加功能。 恭喜,您已经创建了Flash杰作!
Why not test your knowledge of this article with our quiz?
翻译自: https://www.sitepoint.com/flash-catalyst-flash-builder-2/
excel催化剂


 99
99

 被折叠的 条评论
为什么被折叠?
被折叠的 条评论
为什么被折叠?
 到【灌水乐园】发言


