


flash加载图片 代码
Of the examples and solutions I developed for inclusion in the The Flash Anthology: Cool Effects & Practical ActionScript, there were several that didn’t make it into the book. I’ll be presenting a number of these solutions over the coming months, starting with this tutorial.
在我开发并包含在《 Flash Anthology:酷效果和实用ActionScript 》中的示例和解决方案中,有一些没有纳入本书。 从本教程开始,我将在接下来的几个月中介绍许多这些解决方案。
Here, we’ll look at two very practical solutions: the loading of images using components, and creating a random "Link of the Day" display for your site.
在这里,我们将看两个非常实用的解决方案:使用组件加载图像,以及为您的站点创建随机的“每日链接”显示。
Before we get started, make sure you download the archive of all the code we’ll see in these examples.
在开始之前,请确保下载了这些示例中将看到的所有代码的存档 。
使用组件加载图像 (Image Loading with Components)
This solution requires: Flash MX 2004
该解决方案要求:Flash MX 2004
I thought it would be a great idea to create a dynamic image loader that utilized some of the built-in components in Flash MX 2004, but I wanted to make sure the information was displayed in a structured way.
我认为创建一个利用Flash MX 2004中的某些内置组件的动态图像加载器是一个好主意,但是我想确保信息以结构化的方式显示。
Here’s the application in action.
这是实际的应用程序。
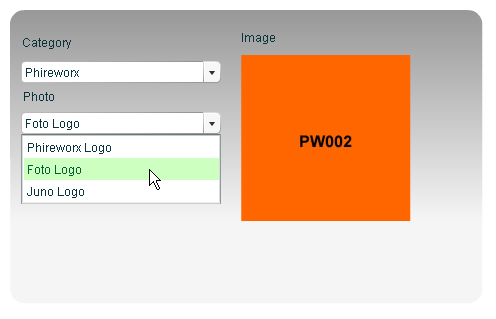
In this application, the Photo drop-down menu is populated according to the selection in the Category drop-down. When the user selects a photo, the image is displayed on the right-hand side.
在此应用程序中,根据“类别”下拉菜单中的选择填充“照片”下拉菜单。 当用户选择照片时,图像显示在右侧。
设置场景 (Setting the Scene)
The source files for this example are Dynamicimageloader.fla and dynamicimageloader_graphics.zip which are available from the code archive.
此示例的源文件是Dynamicimageloader.fla和dynamicimageloader_graphics.zip,可从代码档案中获得。
- Create a new 500 x 320 pixel Flash document. Accept the default frame rate and click OK. 创建一个新的500 x 320像素的Flash文档。 接受默认的帧速率,然后单击确定。
- Rename the default layer Actions and add two further layers below, named Components and Background. 重命名默认图层“动作”,并在下面添加另外两个图层,分别称为“组件”和“背景”。
Select the first frame of the Components layer. Drag two instances of the ComboBox component from the UI Components section of the Components Panel onto the stage, positioning the second below the first. Name the instances parentCombo and childCombo.
选择“组件”层的第一帧。 将ComboBox组件的两个实例从“组件面板”的“ UI组件”部分拖到舞台上,将第二个实例放置在第一个实例的下方。 将实例命名为parentCombo和childCombo。
We will populate the childCombo instance dynamically in just a moment, using values from several arrays.
我们将使用多个数组中的值,在短时间内动态填充childCombo实例。
- With the parentCombo instance selected, add the information from the table shown below into the Parameters section of the Component Inspector: 选中parentCombo实例后,将下表中显示的信息添加到Component Inspector的Parameters部分中:
The labels for the Category ComboBox will appear as Phireworx, Work, and Home. We’ll use the "data" parameters to trigger the population of the childCombo ComboBox component.
类别组合框的标签将显示为Phireworx,Work和Home。 我们将使用“数据”参数来触发childCombo ComboBox组件的填充。
Drag three label components from the UI Components section of the Components Panel. Position one above the
parentComboComboBox, one above thechildComboComboBox, and one to the right of the first label. Select each label component and change the text parameter within the Property Inspector to Category, Photo and Image respectively.从“组件面板”的“ UI组件”部分中拖动三个标签组件。 放置一个以上
parentCombo组合框,一个以上childComboComboBox和一个到第一个标签的右侧。 选择每个标签组件,然后将“属性”检查器中的text参数分别更改为Category,Photo和Image。Drag a Loader component from the UI Components section of the Components Panel into the first frame of the Components layer and name the instance
imageLoader.将Loader组件从“组件面板”的“ UI组件”部分拖动到“组件”层的第一帧中,并将实例命名为
imageLoader。We’ll use the Loader component as a repository for the images we’ll load dynamically in a moment.
我们将使用Loader组件作为暂时存储的图像的存储库。
- Make the application more attractive: add a rounded framing rectangle with a smooth linear gradient background to the Background layer. Lock the Background layer. 使应用程序更具吸引力:向背景图层添加具有平滑线性渐变背景的圆形框架矩形。 锁定背景图层。
We’re all done here; let’s add the ActionScript that glues the application together!
我们都做完了; 让我们添加将应用程序粘合在一起的ActionScript!
添加动作脚本 (Adding the ActionScript)
The ActionScript for this example hinges around three multidimensional arrays that hold "child" information for the "parent" categories. Through careful modification, and event listeners attached to the ComboBox components, we can trigger a cascade of events that result in the display of the relevant image.
此示例的ActionScript围绕着三个多维数组,这些多维数组包含“父”类别的“子”信息。 通过仔细修改以及将事件侦听器附加到ComboBox组件,我们可以触发一系列事件,从而导致相关图像的显示。
- Select the first frame of the Actions layer and add the following code within the Actions Panel: 选择“动作”层的第一帧,然后在“动作面板”中添加以下代码:
var PhireworxInfo = new Array(["Phireworx Logo", "pw001.jpg"], ["Foto Logo", "pw002.jpg"], ["Juno Logo", "pw003.jpg"]);

var WorkInfo = new Array(["Work Logo", "wk001.jpg"], ["Work Image 001", "wk002.jpg"], ["Work Image 002", "wk003.jpg"]);

var HomeInfo = new Array(["Home Image", "hm001.jpg"], ["Home Image 001", "hm002.jpg"], ["Home Image 002", "hm003.jpg"]);

function populateChild() {

  childCombo.removeAll();

  var childArray = eval(parentCombo.getSelectedItem().data);

  for (var i = 0; i < childArray.length; i++) {

    childCombo.addItem(childArray[i][0]);

  }

}

function showImage(img) {

  loadMovie(img, "imageLoader");

}

// Parent Combo Listener

var parentComboListener = new Object();

parentComboListener.change = function() {

  populateChild();

};

parentCombo.addEventListener("change", parentComboListener);

// Child Combo Listener

var childComboListener = new Object();

childComboListener.change = function() {

  var childArray = eval(parentCombo.getSelectedItem().data);

  showImage(childArray[childCombo.selectedIndex][1]);

};

childCombo.addEventListener("change", childComboListener);

// First run when loaded, populate combo's

populateChild();

var childArray = eval(parentCombo.getSelectedItem().data);

showImage(childArray[childCombo.selectedIndex][1]);
Let’s get the code scalpel again and see how this looks on the ActionScript operating table. First of all, we create three multidimensional arrays.
让我们再次获取代码解剖刀,并在ActionScript操作表上查看其外观。 首先,我们创建三个多维数组。
var PhireworxInfo = new Array(["Phireworx Logo", "pw001.jpg"], ["Foto Logo", "pw002.jpg"], ["Juno Logo", "pw003.jpg"]);

var WorkInfo = new Array(["Work Logo", "wk001.jpg"], ["Work Image 001", "wk002.jpg"], ["Work Image 002", "wk003.jpg"]);

var HomeInfo = new Array(["Home Image", "hm001.jpg"], ["Home Image 001", "hm002.jpg"], ["Home Image 002", "hm003.jpg"]);
These arrays contain the description of the image and its filename, like so:
这些数组包含图像的描述及其文件名,如下所示:
["Phireworx Logo", "pw001.jpg"]Notice that the array names (
PhireworxInfo,WorkInfo, etc.) are the same as the "data" values within the parentCombo ComboBox component. As you will see in a moment, we use the "data" property from the parentCombo ComboBox to trigger the population of thechildComboComboBox.请注意,数组名称(
PhireworxInfo,WorkInfo等)与parentCombo ComboBox组件中的“数据”值相同。 稍后您将看到,我们使用来自parentCombo ComboBox的“ data”属性来触发childComboComboBox的childCombo。We then add an event listener to the
parentComboComboBox, which waits for its value to change.然后,我们将一个事件侦听器添加到
parentComboComboBox,它等待其值更改。/ Parent Combo Listener
var parentComboListener = new Object();
parentComboListener.change = function()
{
populateChild ();
};
parentCombo.addEventListener("change", parentComboListener);When the value is registered as changing, we trigger the
populateChild()function.当值被注册为更改时,我们触发
populateChild()函数。function populateChild()
{
childCombo.removeAll();
var childArray = eval(parentCombo.getSelectedItem().data);
for (var i = 0; i < childArray.length; i++)
{
childCombo.addItem(childArray[i][0]);
}
}First of all, this function removes all items from the
childComboComboBox, to make it nice and tidy.首先,此功能从
childComboComboBox中删除所有项目,使其变得整洁。childCombo.removeAll();We then transfer the contents of the data parameter of the
parentComboComboBox to a variable calledchildArray, which basically takes the array we defined at lines 1-3 of the code, and matches it to the data parameter of theparentComboComboBox. We use this to populate thechildArrayvariable.然后,我们将
parentComboComboBox的data参数的内容传输到一个名为childArray的变量,该变量基本上采用我们在代码的第1-3行定义的数组,并将其与parentComboComboBox的data参数进行匹配。 我们用它来填充childArray变量。We then use a for loop based on the length of the array to add items to the
childComboComboBox. The items added form the first part of the multidimensional array (the description).然后,我们基于数组的长度使用for循环将项目添加到
childComboComboBox。 添加的项形成多维数组的第一部分(描述)。childCombo.addItem(childArray[i][0]);With the
childComboComboBox populated, we can move on to the section of code that deals with what happens when the value changes.填充
childComboComboBox之后,我们可以转到处理值更改时发生的事情的代码部分。Again we set up an event listener, this time for the
childComboinstance for thechangeevent.再次,我们设置了一个事件侦听器,这次是为
change事件的childCombo实例设置的。// Child Combo Listener
childComboListener = new Object();
childComboListener.change = function()
{
var childArray = eval(parentCombo.getSelectedItem().data);
showImage(childArray[childCombo.selectedIndex][1]);
};
childCombo.addEventListener("change", childComboListener);This time, however, a different function is triggered — the
showImage()function. We pass it the second part of the multidimensional array (the image name) as a parameter.但是,这次触发了另一个函数
showImage()函数。 我们将其传递给多维数组的第二部分(图像名称)作为参数。Note: As both the selectedIndex property of the ComboBox and the "data" parameter of the
childComboinstance are array-based, we can use the selectedIndex value of thechildComboComboBox to select the image name for the currently assigned array.注意:由于ComboBox的selectedIndex属性和
childCombo实例的“ data”参数都是基于数组的,因此我们可以使用childComboComboBox的selectedIndex值来为当前分配的数组选择图像名称。showImage(childArray[childCombo.selectedIndex][1]);showImage(childArray[childCombo.selectedIndex][1]);The
showImage()function is the simplest part of the ActionScript. It simply triggers theloadMovie()function to load the image in question into theimageLoaderLoader component:showImage()函数是ActionScript中最简单的部分。 它只是触发loadMovie()函数将有问题的图像加载到imageLoaderLoader组件中:function showImage(img)
{
loadMovie (img, "imageLoader");
}When the movie is run first with no selection, we simply trigger child population and image retrieval using the following ActionScript:
如果先无选择地运行电影,则只需使用以下ActionScript触发子群体填充和图像检索:
// First run when loaded, populate combo's

populateChild();

var childArray = eval(parentCombo.getSelectedItem().data);

showImage(childArray[childCombo.selectedIndex][1]);- Save the document to a location of your choice and export your SWF, making sure the ‘ActionScript 2.0’ option is selected in the ‘ActionScript version’ dropdown. 将文档保存到您选择的位置,然后导出SWF,并确保在“ ActionScript版本”下拉列表中选择了“ ActionScript 2.0”选项。
Extract the contents of the dynamicimageloader_graphics.zip file from the code archive into the same directory as your exported SWF.
从代码存档中将dynamicimageloader_graphics.zip文件的内容提取到与导出的SWF相同的目录中。
We need to extract the image to the same directory as the SWF file, because this is referenced within the showImage() function as being located in the same directory
我们需要将图像提取到与SWF文件相同的目录中,因为这在showImage()函数中被引用为位于同一目录中
- Preview your exported SWF file. 预览导出的SWF文件。
That’s a great technique! It’s scalable too — simply modify the array information, the parentCombo ComboBox (if you require more categories) and the actual images that are imported. The technique makes use of the built-in components within Flash MX 2004 and creates a clever interaction between ComboBox instances.
这是一个很棒的技术! 它也具有可伸缩性-只需修改数组信息, parentCombo ComboBox(如果需要更多类别)和导入的实际图像即可。 该技术利用Flash MX 2004中的内置组件,并在ComboBox实例之间创建了巧妙的交互。
You could easily add a ProgressBar component to give you feedback on how much of the file is loaded if you’re working with larger files, and use XML data to populate both the parent and child combo boxes, but I’ll leave it up to you to extend the effect!
您可以很容易地添加一个ProgressBar组件,以在使用较大文件时就加载了多少文件提供反馈,并可以使用XML数据填充父组合框和子组合框,但我将保留它。您扩大效果!
每日随机链接 (Random Link of the Day)
What I set out to do in this example was to create a random featured link of the day for which the link was selected randomly from a multidimensional array within a loop, then launched within a new chromeless browser window using simple JavaScript behaviors. The effect works really well and leverages some built-in JavaScript functions such as closing the parent window in which the SWF file is embedded, and triggering printing of the page.
在此示例中,我打算创建一个当天的随机特征链接,从循环中的多维数组中随机选择该链接,然后使用简单JavaScript行为在新的无边框浏览器窗口中启动该链接。 该效果非常好,并利用了一些内置JavaScript函数,例如关闭嵌入SWF文件的父窗口,并触发页面的打印。
There is much scope for extending this effect, but that’s what learning Flash is all about: experimenting with effects and extending them for your own needs.
扩展此效果的空间很大,但这就是学习Flash的全部目的:尝试效果并根据自己的需要扩展它们。
To edit this effect, locate RandomLinkOfTheDay.fla within the code archive.
要编辑此效果,请在代码存档中找到RandomLinkOfTheDay.fla。
设置场景 (Setting the Scene)
- Create a new Flash document that’s 510 pixels wide and 105 pixels high. Change the default frame rate to 24 fps and click OK. 创建一个新的Flash文档,该文档的宽度为510像素,高度为105像素。 将默认帧速率更改为24 fps,然后单击“确定”。
- Rename the default layer Actions, and add below it two further layers called Interface and Background. 重命名默认层“动作”,并在其下添加两个名为“接口”和“背景”的其他层。
- Create a background rectangle to frame the application within the first frame of the Background layer as shown in Error! Reference source not found.. Lock the Background layer. 创建一个背景矩形以将应用程序框入Background图层的第一帧中,如错误! 找不到参考源。锁定“背景”层。
- Select the first frame of the Interface layer and create a new movie clip called linkMC. Name the instance linkMC. Embed a dynamic text box that’s approximately 445 pixels wide and 18 high within the linkMC movie clip. Name the instance randomlink. 选择“接口”层的第一帧,然后创建一个名为linkMC的新影片剪辑。 将实例命名为linkMC。 在linkMC电影剪辑中嵌入一个动态文本框,该文本框的宽度约为445像素,高度为18。 将实例命名为randomlink。
Select the randomLink text box and click Character in the Property Inspector. Click the Specify Ranges checkbox and select Uppercase, Lowercase, Numerals and Punctuation. Add / and under the Include these characters section. Click OK. Click the Show border around text option from the Property Inspector
选择randomLink文本框,然后在属性检查器中单击“字符”。 单击指定范围复选框,然后选择大写,小写,数字和标点。 添加/并在“包括这些字符”部分下。 单击确定。 单击属性检查器中的“在文本周围显示边框”选项
This dynamic text box will be referenced and populated later by a series of URLs from part of the array that we’ll create shortly via ActionScript.
我们稍后将通过ActionScript创建的数组一部分的一系列URL引用并填充此动态文本框。
- Move the linkMC movie clip approximately to center-stage, leaving enough room to add more content above and below the movie clip. 将linkMC影片剪辑大约移动到中心位置,留出足够的空间在影片剪辑的上方和下方添加更多内容。
Create a new dynamic text box that’s approximately 160 pixels wide above, and aligned with, the upper right edge of the linkMC movie clip. Name the instance reccount. Select Character from the Property Inspector, click the Specify Ranges checkbox, and select Uppercase, Lowercase, Numerals and Punctuation. Click OK. On the color swatch in the Property Inspector, change the text color to #990000.
创建一个新的动态文本框,该文本框在linkMC影片剪辑的右上边缘上方并与之对齐约160像素宽。 命名实例记录。 从属性检查器中选择“字符”,单击“指定范围”复选框,然后选择“大写,小写,数字和标点符号”。 单击确定。 在“属性”检查器中的色样上,将文本颜色更改为#990000。
This dynamic text box will constantly be updated when the ActionScript loops are running in a moment, and will provide feedback as to whether a link is in the process of being selected, or is selected.
当ActionScript循环立即运行时,此动态文本框将不断更新,并将提供有关链接是处于选择状态还是处于选中状态的反馈。
Create another dynamic text box that’s approximately 160 pixels wide. Align it with the bottom right edge of the linkMC Movie Clip naming the instance title. Select Character from the Property Inspector, Specify Ranges checkbox and select Uppercase, Lowercase, Numerals and Punctuation. Click OK.
创建另一个动态文本框,该文本框的宽度约为160像素。 将其与命名实例标题的linkMC Movie Clip的右下角对齐。 从属性检查器中选择“字符”,“指定范围”复选框,然后选择“大写,小写,数字和标点符号”。 单击确定。
This dynamic text box will hold another part of the array that we will select randomly, and will hold the title for the URL within the ‘randomlink’ dynamic text box.
这个动态文本框将保留我们将随机选择的数组的另一部分,并将在“ randomlink”动态文本框中保留URL的标题。
- Create a new static text box above the linkMC Movie Clip. Align it with the upper left edge of the clip, and add the text Featured Link of the Day. 在linkMC电影剪辑上方创建一个新的静态文本框。 将其与剪辑的左上边缘对齐,然后添加文本“今日精选链接”。
Drag three instances of the button component from the UI Components of the Actions Panel into the first frame of the Interface layer. Arrange two instances so that they are grouped together at the bottom left edge of the linkMC Movie Clip; align the other with the lower right edge. Name the instance left to right
closeParent,printPage,windowLauncher.将按钮组件的三个实例从“动作”面板的UI组件拖到“界面”层的第一帧中。 安排两个实例,以便它们在linkMC电影剪辑的左下边缘分组在一起; 将另一个与右下边缘对齐。 从左到右将实例命名为
closeParent,printPage,windowLauncher。With each of the button instances selected, within the Property Inspector change the label parameters left to right as follows: Close Parent, Print, launch.
选中每个按钮实例后,在“属性”检查器中从左到右更改标签参数,如下所示:关闭父级,打印,启动。
We will use these buttons to execute certain JavaScript functions later in the example.
在本示例的后面,我们将使用这些按钮来执行某些JavaScript函数。
- Save your work. 保存您的工作。
We’ve added all the dynamic text boxes and buttons that we need to set the scene for the effect, now we need to add the ActionScript to the movie to make it all gel together.
我们添加了设置效果场景所需的所有动态文本框和按钮,现在我们需要将ActionScript添加到影片中以使其全部融合在一起。
添加动作脚本 (Adding the ActionScript)
The ActionScript for this example explores the control of external JavaScript functions and the clever use of multidimensional arrays within Flash. Without further ado, let’s start to add the ActionScript!
此示例的ActionScript探索了外部JavaScript函数的控制以及Flash中多维数组的巧妙使用。 事不宜迟,让我们开始添加ActionScript!
- Select the first frame of the Actions layer and add the following code within the Actions Panel: 选择“动作”层的第一帧,然后在“动作面板”中添加以下代码:
//Randomizer Function for Array

function randomBetween(min, max) {

  return (min+Math.floor(Math.random()*(max-min+1)));

}

//Create New Pseudo MultiDimensional Array

RandomLinkArray = new Array(

["Front Page", "https://www.phireworx.com/"],

["Register for Free Commands", "https://www.phireworx.com/content/commands/registration.asp"],

["Phireworx Tutorials", "https://www.phireworx.com/content/tutorials/default.asp"],

["Crew Bios", "https://www.phireworx.com/content/crew/crew_bios.asp"],

["Quick Tips", "https://www.phireworx.com/content/quicktips/default.asp"],

["Tutorial 1", "https://www.phireworx.com/tutorial_jumper.asp?id=D2615715-D19B-49A8-91C2-52A0DA859E57"],

["Tutorial 2", "https://www.phireworx.com/tutorial_jumper.asp?id=3E301402-DD6F-4A26-AC27-7E8C8FDCED9C"],

["Tutorial 3", "https://www.phireworx.com/tutorial_jumper.asp?id=41163698-FD96-4DF4-A3E4-8217CBB80B22"]);

//Set Initial LoopCount

_root.linkMC.loopCount = 0;

_root.linkMC.onEnterFrame = function() {

  if (this.loopCount<=50) {

    //Change Header Text Whilst Incrementing Throught the Loop

    _root.reccount.text = "Selecting Link";

    //Create Random Array Position

    var placer = randomBetween(0, RandomLinkArray.length-1);

    //Set the Random Link Text

    this.randomlink.text = RandomLinkArray[placer][1];

    //Set Random Link Title

    _root.title.text = RandomLinkArray[placer][0];

  } else {

    //Control for Text Feedback Area

    _root.reccount.text = "Link Selected";

  }

  this.loopCount++;

};

//Miscellaneous Button Functions

windowLauncher.onPress = function() {

  //Open New Browser Window with random array position

  getURL("javascript:openNewWindow('"+_root.linkMC.randomlink.text+"','','scrollbars=yes,resizable=yes,width=600,height=600')");

};

closeParent.onPress = function() {

  getURL("javascript:window.close()");

};

printPage.onPress = function() {

  getURL("javascript:window.print()");

};
Let’s examine what we’re doing here, as the script may seem a little complicated at first glance. First of all, we create a new global variable to hold the value of a loop count and add our often-used randomBetween function. As we’ll see in a moment, this loopcount global variable is used to make sure a condition loops only a given number of times.
让我们检查一下我们在这里做什么,因为乍一看该脚本可能看起来有些复杂。 首先,我们创建一个新的全局变量来保存循环计数的值,并添加我们经常使用的randomBetween函数。 稍后我们将看到,此循环计数全局变量用于确保条件仅循环给定次数。
//Set Initial LoopCount

loopCount = 0;

//Randomizer Function for Array

function randomBetween(min, max) {

  return (min+Math.floor(Math.random()*(max-min+1)));

}

Next up, we create an array called RandomLinkArray.

//Create New Pseudo MultiDimensional Array

RandomLinkArray = new Array(

["Front Page", "https://www.phireworx.com/"],

["Register for Free Commands", "https://www.phireworx.com/content/commands/registration.asp"],

["Phireworx Tutorials", "https://www.phireworx.com/content/tutorials/default.asp"],

["Crew Bios", "https://www.phireworx.com/content/crew/crew_bios.asp"],

["Quick Tips", "https://www.phireworx.com/content/quicktips/default.asp"],

["Tutorial 1", "https://www.phireworx.com/tutorial_jumper.asp?id=D2615715-D19B-49A8-91C2-52A0DA859E57"],

["Tutorial 2", "https://www.phireworx.com/tutorial_jumper.asp?id=3E301402-DD6F-4A26-AC27-7E8C8FDCED9C"],

["Tutorial 3", "https://www.phireworx.com/tutorial_jumper.asp?id=41163698-FD96-4DF4-A3E4-8217CBB80B22"]);

};
To create the multidimensional array, we place an array within another array. We use this structure to hold both the title of a URL and the actual URL in the following format:
为了创建多维数组,我们将一个数组放置在另一个数组中。 我们使用此结构以以下格式保存URL的标题和实际URL:
new Array (["Title", "URL"], ["Title", "URL"]);In this way, we can get both the title and the URL when referencing a random array element. In this example, we’re using pages from phireworx.com and, as the
RandomLinkArrayarray is created as soon as the SWF is loaded, we are ready to reference the array within theonEnterFrameevent handler of the linkMC Movie Clip.这样,在引用随机数组元素时,我们可以同时获得标题和URL。 在此示例中,我们使用的是来自phireworx.com的页面,并且在SWF加载后立即创建
RandomLinkArray数组时,我们准备在linkMC电影剪辑的onEnterFrame事件处理程序中引用该数组。_root.linkMC.onEnterFrame = function() {
if (loopCount<=50) {
//Change Header Text Whilst Incrementing Throught the Loop
_root.reccount.text = "Selecting Link";
//Create Random Array Position
var placer = randomBetween(0, RandomLinkArray.length-1);
//Set the Random Link Text
this.randomlink.text = RandomLinkArray[placer][1];
//Set Random Link Title
_root.title.text = RandomLinkArray[placer][0];
} else {
//Control for Text Feedback Area
_root.reccount.text = "Link Selected";
}
loopCount++;
};We check that the value for the
loopCountvariable is less than 50; if it is, we enter into the code within the condition. TheloopCountvariable is incremented at the end of the loop, and while theloopCountvalue is less than 50, thereccountdynamic text box displays the text Selecting Link, progressing to Link Selected when theloopCountvariable hits 50.我们检查
loopCount变量的值是否小于50。 如果是,我们将在条件内输入代码。loopCount变量在循环结束时增加,并且loopCount值小于50时,reccount动态文本框将显示文本Selecting Link,当loopCount变量达到50时,将前进到Link Selected。The next section of code within the event handler function for the linkMC movie clip is responsible for selecting a random array position by using the
randomBetween()function to populate a variable (placer) with a number between 0 (first position within the array) and the final array position (we use the array length to determine this).linkMC电影剪辑的事件处理程序函数中的下一部分代码负责通过使用
randomBetween()函数在变量(放置器)中填充介于0(数组中的第一个位置)和0之间的数字来选择随机数组的位置。最终的数组位置(我们使用数组长度来确定)。Note: we subtract one length of the random number generated as the
randomBetween()function adds one to the number generated注意:我们减去生成的随机数的一个长度,因为
randomBetween()函数将生成的随机数加一var placer = randomBetween(0, RandomLinkArray.length-1);Remember how we created the
RandomLinkArray? The following code pulls out the URL for the array member and populates the randomlink dynamic text box.还记得我们如何创建
RandomLinkArray吗? 以下代码为数组成员提取URL,并填充randomlink动态文本框。this.randomlink.text = RandomLinkArray[placer][1];The following code pulls out the title and populates the title dynamic text box:
以下代码提取标题并填充标题动态文本框:
_root.title.text = RandomLinkArray[placer][0];This code sits within the
onEnterFrameevent handler for the linkMC movie clip. Thus, this random pulling of array members and writing to therandomLinkdynamic text box and title text box occurs at the frame rate of the movie (24 fps). Added to this is the fact we only loop 50 times while the value of the loopCounter global variable is less than 50. As such, we have about 2 seconds until the linkMC movie clip comes to rest finally on a random value.此代码位于linkMC电影剪辑的
onEnterFrame事件处理程序中。 因此,以数组的帧速率(24 fps)发生这种对数组成员的随机拉动并写入randomLink动态文本框和标题文本框。 此外,事实是我们只循环了50次,而loopCounter全局变量的值小于50。因此,大约有2秒钟,直到linkMC电影剪辑最终停留在一个随机值上。It’s all very well to have some nifty code that creates a random link and title… But what do we do with it?
拥有一些可以创建随机链接和标题的漂亮代码真是太好了……但是我们该怎么办呢?
Well, because we’ll want to open a new browser window when we click the
windowLauncherbutton, we add the following code to the onPress event for thewindowLauncherbutton.好吧,因为我们想在单击
windowLauncher按钮时打开一个新的浏览器窗口,因此将以下代码添加到windowLauncher按钮的onPress事件中。windowLauncher.onPress = function() {
//Open New Browser Window with random array position
getURL("javascript:openNewWindow('"+_root.linkMC.randomlink.text+"','','scrollbars=yes,resizable=yes,width=600,height=600')");
};When the
windowLauncherbutton is pressed, we’ll call an external JavaScript function calledopenNewWindow();. This is a simple function that opens windows. With it, we’ll pass the random URL with which we’ve populated the randomLink dynamic text box.当按下
windowLauncher按钮时,我们将调用一个名为openNewWindow();的外部JavaScript函数openNewWindow();。 这是一个打开窗口的简单功能。 有了它,我们将传递用来填充randomLink动态文本框的随机URL。The
openNewWindow()function that we’re calling externally is contained within the code of the page into which the SWF file is embedded, so we pass the URL and some optional feature values for the size of the window, scrollbars and resize handles.我们在外部调用的
openNewWindow()函数包含在嵌入SWF文件的页面的代码中,因此我们传递URL和一些可选的功能值来表示窗口的大小,滚动条和调整大小的句柄。It’s pretty nifty to be able to call native JavaScript functions supported by common browsers, as well as any custom JavaScript functions we may wish to include in the Web page that houses the SWF. To this end, we must add the following code to allow the browser window to be closed, and to allow the user to print by the pressing the relevant buttons.
能够调用常见浏览器支持的本机JavaScript函数以及我们希望包含在包含SWF的网页中的任何自定义JavaScript函数,这是很不错的。 为此,我们必须添加以下代码以允许关闭浏览器窗口,并允许用户通过按相关按钮进行打印。
closeParent.onPress = function() {

  getURL("javascript:window.close()");

};

printPage.onPress = function() {

  getURL("javascript:window.print()");

};- Save and preview your work. 保存并预览您的工作。
It’s a pleasant cyclic effect that creates the random URL and displays the category of the URL. However, although clicking on the Launch button does launch a new browser window with a load of JavaScript in the address bar, it doesn’t produce the right effect.
这是一种令人愉悦的循环效果,可创建随机URL并显示URL的类别。 但是,尽管单击“启动”按钮确实会启动一个新的浏览器窗口,并在地址栏中加载了JavaScript,但效果不理想。
In order to take advantage of external JavaScript functions, we must export and embed the SWF file within an HTML page that contains our custom function.
为了利用外部JavaScript函数,我们必须将SWF文件导出并嵌入包含我们的自定义函数HTML页面中。
- Export your Flash Movie as RandomLinkOfTheDay.swf to a location of your choice making sure that ActionScript version is set to ActionScript 2.0. 将Flash电影作为RandomLinkOfTheDay.swf导出到您选择的位置,确保将ActionScript版本设置为ActionScript 2.0。
嵌入网页 (Embed in the Web Page)
The source file for the Web page we’re about to create is called URLJumper.htm. It can be located within the code archive.
我们将要创建的网页的源文件称为URLJumper.htm。 它可以位于代码档案中。
- With your HTML editor open, create a new .HTML page and type in the following code: 在您HTML编辑器打开的情况下,创建一个新的.HTML页面并输入以下代码:
<html>

<head>

<title>Flash URL Jumper</title>

<meta http-equiv="Content-Type" content="text/html; charset=iso-8859-1">

<script language="JavaScript" type="text/JavaScript">

<!--

function openNewWindow(url,windowName,chrome) {

  window.open(url,windowName,chrome);

}

//-->

</script>

</head>

<body>

<object classid="clsid:D27CDB6E-AE6D-11cf-96B8-444553540000" codebase="http://download.macromedia.com/pub/shockwave/cabs/flash/swflash.cab#version=6,0,29,0" width="550" height="110">

  <param name="movie" value="RandomLinkOfTheDay.swf">

  <param name="quality" value="high">

  <embed src="RandomLinkOfTheDay.swf" quality="high" pluginspage="http://www.macromedia.com/go/getflashplayer" type="application/x-shockwave-flash" width="550" height="110"></embed>

</object>

</body>

</html>
As you will note, we have embedded our SWF in a standard fashion within the Web page, but we’ve also added the
openNewWindow()function declaration, which is sitting there waiting for us to call it!您将注意到,我们已经以标准的方式将SWF嵌入到网页中,但是我们还添加了
openNewWindow()函数声明,该声明正坐在那里等待我们调用它!- Save your page as URLJumper.htm in the same location as your previously exported RandomLinkOfTheDay.swf. 将页面另存为URLJumper.htm,与先前导出的RandomLinkOfTheDay.swf相同。
- Double click the URLJumper.htm file to preview the effect. 双击URLJumper.htm文件以预览效果。
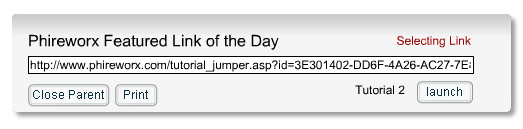
Now, when you preview the embedded SWF file, clicking the "Launch" button after it has selected a random URL will open a new Browser Window — but without most of the "chrome" at the size we specified in Flash!
现在,当您预览嵌入的SWF文件时,在选择随机URL后单击“启动”按钮将打开一个新的浏览器窗口-但大多数“ chrome”没有我们在Flash中指定的大小!
Click on the ‘Close Parent’ window and the browser page in which the SWF file is embedded will happily close (after warning you!). A click on the ‘Print’ button will open the printing dialog boxes.
单击“关闭父级”窗口,嵌入SWF文件的浏览器页面将很高兴关闭(警告您之后!)。 单击“打印”按钮将打开打印对话框。
This is just a small cross-section of the JavaScript functions you can call. Of course, you can call any of your own custom JavaScript functions that are located within the same page as the SWF that’s being viewed.
这只是您可以调用JavaScript函数的一小部分。 当然,您可以调用与正在查看的SWF位于同一页面内的任何自定义JavaScript函数。
翻译自: https://www.sitepoint.com/image-loader-random-link-flash/
flash加载图片 代码


 1364
1364


 被折叠的 条评论
为什么被折叠?
被折叠的 条评论
为什么被折叠?
 到【灌水乐园】发言


