


在excel日期比对大小
As a teenager, group dates can be fun. If you have strict parents, that might be the only kind of dates they allow! But, in your Excel worksheets, it can be annoying when dates are automatically grouped. This happens in AutoFilters, and in pivot tables too (in newer versions). Here's how you can undo or prevent grouped dates in Excel AutoFilters and Pivot Tables.
在青少年时期,团体约会可能很有趣。 如果您有严格的父母,那可能是他们允许的唯一约会方式! 但是,在Excel工作表中,将日期自动分组可能会很烦人。 这会在自动筛选器和数据透视表中发生(在新版本中)。 这是您可以在Excel自动筛选和数据透视表中撤消或阻止分组日期的方法。
自动筛选分组日期 (AutoFilter Grouped Dates)
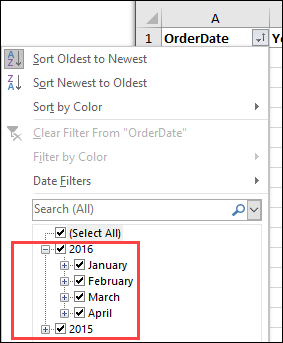
By default, when you turn on an AutoFilter, the dates are grouped by year and month in the drop down list. This screen shot shows an example.
默认情况下,当您打开自动筛选时,日期会在下拉列表中按年和月分组。 此屏幕快照显示了一个示例。
在自动筛选中防止分组日期 (Prevent Grouped Dates in AutoFilter)
If you want to see the individual dates, you can change one of the Excel options. This is a workbook level setting, so it will affect all the AutoFilters in the active workbook.
如果要查看各个日期,可以更改Excel选项之一。 这是工作簿级别的设置,因此它将影响活动工作簿中的所有“自动筛选”。
This video shows the steps, and the written instruction are below the video.
该视频显示了步骤,视频下方是书面说明。
如何更改设定 (How to Change the Setting)
Here are the steps for changing the Group Dates option:
以下是更改“组日期”选项的步骤:
- On the Ribbon, click the File tab, then click Options 在功能区上,单击“文件”选项卡,然后单击“选项”。
- Click the Advanced category 单击高级类别
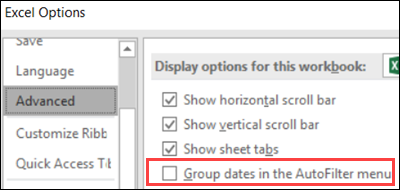
- Scroll down to the Display Options for This Workbook section 向下滚动到“此工作簿的显示选项”部分
- Remove the check mark from Group Dates in the AutoFilter menu. 从自动筛选菜单中的组日期中删除复选标记。
- Click OK to apply the setting change. 单击确定以应用设置更改。
使用宏 (Use a Macro)
If ungrouping dates is something that you do frequently, you can use a macro to turn the grouping option on or off.
如果您经常要对日期进行分组 ,则可以使用宏来打开或关闭分组选项 。
Or, if you have my Excel Tools add-in, that macro is built in. Click the Workbook Appearance command, then click Toggle Filter Grouping.
或者,如果您具有我的Excel Tools加载项 ,则将内置该宏。单击“工作簿外观”命令,然后单击“切换筛选器分组”。
数据透视表中的分组日期 (Grouped Dates in Pivot Table)
Starting in Excel 2016, dates are automatically grouped in a pivot table. It's not a bug, it's an enhancement!
从Excel 2016开始,日期会自动在数据透视表中分组。 这不是错误,而是增强功能!
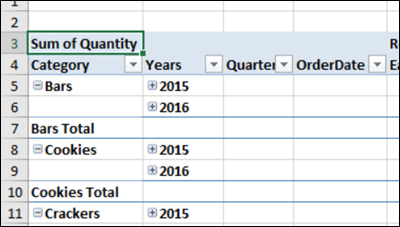
Here's a pivot table in which I added the Order Date field to the Rows area. Extra columns were created, to show the Years and Quarters, as well as the Order Date.
这是一个数据透视表,在其中将“订购日期”字段添加到“行”区域。 创建了额外的列,以显示年和季度以及订购日期。
删除数据透视表日期分组 (Remove the Pivot Table Date Grouping)
To get rid of the date grouping in a pivot table,
要摆脱数据透视表中的日期分组,
- press Ctrl+Z, immediately after adding the date field. 添加日期字段后,立即按Ctrl + Z。
- or, right-click on one of the date fields, and click Ungroup. 或者,右键单击日期字段之一,然后单击“取消组合”。
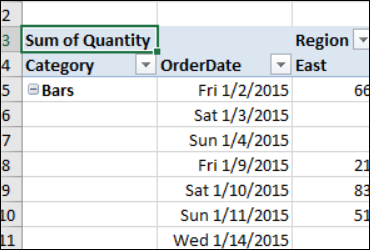
That removes the extra columns, and just leaves the original date field.
这将删除多余的列,而仅保留原始日期字段。
防止数据透视表日期分组 (Prevent Pivot Table Date Grouping)
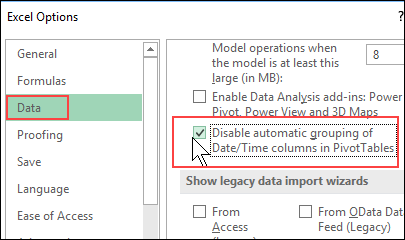
If you’re using Excel 2019 or Excel for Office 365, there’s good news. You don’t have to use workarounds or make changes to the registry. Now, you can simply change one of the Excel options, to stop pivot table date grouping. Thanks to Sue, who pointed out this option in the comments below.
如果您使用的是Excel 2019或Excel for Office 365 ,则有个好消息。 您不必使用变通办法或对注册表进行更改。 现在,您只需更改Excel选项之一,即可停止数据透视表日期分组。 感谢Sue,他在下面的评论中指出了该选项。
NOTE: This is an application-level setting, not a setting for individual workbooks or pivot tables.
注意:这是应用程序级别的设置 ,而不是单个工作簿或数据透视表的设置。
To turn this setting off:
要关闭此设置:
- At the top of Excel, click the File tab 在Excel顶部,单击“文件”选项卡
- Click Options, then click the Data category 单击选项,然后单击数据类别
- In the “Data options” section, add a check mark to “Disable automatic grouping of Date/Time columns in PivotTables” 在“数据选项”部分,向“禁用数据透视表中的日期/时间列的自动分组”添加复选标记
- Click OK to close Excel Options 单击“确定”关闭Excel选项
在Excel 2016中避免日期分组 (Avoid Date Grouping in Excel 2016)
If you're still using Excel 2016, that option setting to disable automatic is not available. Here's a workaround that I used in Excel 2016.
如果您仍在使用Excel 2016,则禁用自动禁用的选项设置不可用。 这是我在Excel 2016中使用的解决方法。
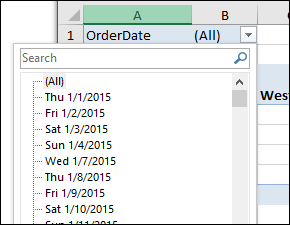
When I dropped a date field into the Filters area, I noticed that the individual dates were listed, instead of grouped dates.
当我将日期字段放入“过滤器”区域时,我注意到列出了各个日期,而不是分组的日期。
Then, if I moved that date field into the Rows area, Excel didn't automatically group the dates – they still showed as individual dates.
然后,如果我将该日期字段移到“行”区域,Excel不会自动将日期分组-它们仍显示为单独的日期。
So, you could use that 2-step process to add a date to the pivot table, to avoid the automatic date grouping, until you get Excel 2019 or Excel for Office 365.
因此,在获取Excel 2019或Excel for Office 365之前,您可以使用该两步过程将日期添加到数据透视表中,以避免自动进行日期分组。
翻译自: https://contexturesblog.com/archives/2017/01/19/how-to-prevent-grouped-dates-in-excel/
在excel日期比对大小


 6096
6096


 被折叠的 条评论
为什么被折叠?
被折叠的 条评论
为什么被折叠?
 到【灌水乐园】发言


