excel宏 拆分工作表
In my workbooks, I sometimes add buttons to run macros. Usually, they're for navigation to the next or previous sheet, or to run a macro that's specific to the contents of the worksheet.
在工作簿中,有时会添加按钮以运行宏。 通常,它们用于导航到下一个或上一个工作表,或运行特定于工作表内容的宏。
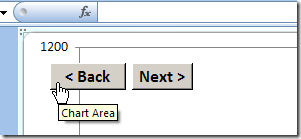
In this example, I've got two macros in the workbook – one that takes you to the next sheet in the workbook, and one that takes you to the previous sheet.
在此示例中,我在工作簿中有两个宏–一个将您带到工作簿中的下一个工作表,另一个将您带到上一个工作表。
So, if you're on the second sheet, you can click the Next button to go to the third sheet. Or, click the Back button to go to the first sheet.
因此,如果您在第二张纸上,则可以单击“下一步”按钮转到第三张纸。 或者,单击“后退”按钮转到第一页。
添加一个按钮 (Add a Button)
-
- Note: If the Developer tab isn't visible, click the Office Button, then click Excel Options. Click the Popular category, then add a check mark to Show Developer tab in the Ribbon. 注意:如果“开发人员”选项卡不可见,请单击“ Office按钮”,然后单击“ Excel选项”。 单击“流行”类别,然后在功能区中的“显示开发人员”选项卡上添加一个复选标记。
- In the Controls group, click Insert, to see the controls from the Form toolbar and the Control Toolbox. 在“控件”组中,单击“插入”,以从“表单”工具栏和“控件工具箱”中查看控件。
- In the Form Controls section, click Button. 在“表单控件”部分中,单击“按钮”。
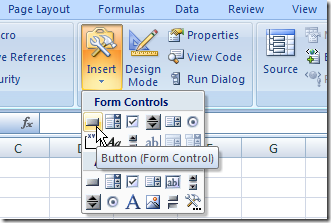
- Click on the worksheet to add a button, or drag on the worksheet to add a button of a specific size. 单击工作表上以添加按钮,或在工作表上拖动以添加特定大小的按钮。
- In the Assign Macro dialog box that opens automatically, click on the name of a macro to select it, then click OK 在自动打开的“分配宏”对话框中,单击一个宏的名称以将其选中,然后单击“确定”。
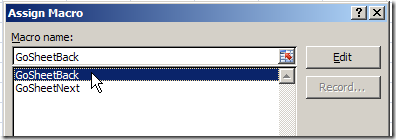
格式化按钮 (Format the Button)
While the button is still selected, you can change its caption and add some formatting.
当按钮仍处于选中状态时,您可以更改其标题并添加一些格式。
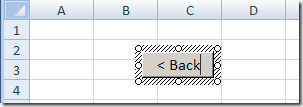
- To change the button's caption, select the existing text, and type a caption to replace it. The border around the button will have diagonal lines when you're editing the text 要更改按钮的标题,请选择现有文本,然后键入标题以替换它。 编辑文字时,按钮周围的边框将带有对角线
- Click on the border of the button, to select it. The outline should change to a dotted pattern, as you can see in the next screenshot. 单击按钮的边框以将其选中。 轮廓应更改为虚线,如您在下一个屏幕截图中所见。
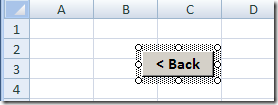
- On the Ribbon's Home tab, use the font formatting buttons, such as Bold and Font Size, to change the appearance of the button. 在“功能区”的“主页”选项卡上,使用字体格式化按钮(如“粗体”和“字体大小”)来更改按钮的外观。
使用按钮 (Use the Buttons)
After you've added the Back button, repeat the steps to create a Next button. Then, copy the two buttons to any worksheets or chart sheets in the workbook.
添加“后退”按钮后,重复上述步骤以创建“下一步”按钮。 然后,将两个按钮复制到工作簿中的任何工作表或图表表。
To move through the sheets, click either the Back or Next button on any sheet.
要遍历工作表,请在任何工作表上单击“上一步”或“下一步”按钮。
导航代码 (The Navigation Code)
Here's the code that I used to make the buttons select the next or previous sheet.
这是我用来使按钮选择下一页或上一页的代码。
Sub GoSheetNext()
Dim wb As Workbook
Dim lSheet As Long
Set wb = ActiveWorkbook
lSheet = ActiveSheet.Index
With wb
  If lSheet = .Sheets.Count Then
    .Sheets(1).Select
  Else
    .Sheets(lSheet + 1).Select
  End If
End With
End Sub
'=================================
Sub GoSheetBack()
Dim wb As Workbook
Dim lSheet As Long
Set wb = ActiveWorkbook
lSheet = ActiveSheet.Index
With wb
  If lSheet = 1 Then
    .Sheets(.Sheets.Count).Select
  Else
    .Sheets(lSheet - 1).Select
  End If
End With
End Sub
翻译自: https://contexturesblog.com/archives/2009/07/08/run-an-excel-macro-with-a-worksheet-button/
excel宏 拆分工作表


 本文介绍了如何在Excel工作簿中添加和格式化按钮,以运行宏进行工作表之间的导航。通过创建Next和Back按钮,可以在工作表之间轻松切换,代码示例提供了实现此功能的方法。


 1738
1738

 被折叠的 条评论
为什么被折叠?


