如何用宏来debug

Recently, we saw how you can use Excel Slicers, to filter fields in one or more pivot tables. This week, we'll use a macro to move a pivot table slicer. In the comments of the previous article, James asked how to keep those Slicers from overlapping the pivot tables.
最近,我们看到了如何使用Excel Slicers来过滤一个或多个数据透视表中的字段。 本周,我们将使用宏来移动数据透视表切片器。 在上一篇文章的评论中,James询问如何防止这些Slicers重叠数据透视表。
- Does anyone know how to stop slicers moving around when you make selections. This happens if the slicers are viewed on top of the pivot table data. As the pivot output data shrinks or expands the slicers move around and sometimes obscure each other. Any idea how to fix in place? 进行选择时,有谁知道如何阻止切片器移动。 如果在数据透视表数据之上查看切片器,则会发生这种情况。 随着枢轴输出数据的收缩或扩展,切片器会四处移动,有时会彼此遮挡。 任何想法如何修复到位?
数据透视表更新事件 (Pivot Table Update Event)

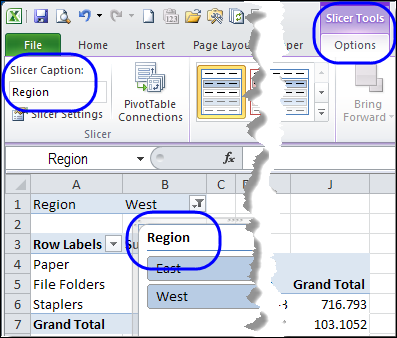
One way to fix the problem of sliding Slicers is to automatically move the Slicers, any time the pivot table is updated. To do that, you can use the PivotTableUpdate event, and a macro that moves the Slicer to the right side of the pivot table. Each Slicer has a caption, and you can refer the the Slicer by that caption in the code. In this example, the Slicer has a caption of "Region", which you can see at the top of the Slicer. The caption is also visible on the Excel Ribbon's Options tab, when the Slicer is selected.
解决滑动切片机问题的一种方法是,在更新数据透视表时自动移动切片机。 为此,您可以使用PivotTableUpdate事件和一个宏,该宏将切片器移动到数据透视表的右侧。 每个切片器都有一个标题,您可以在代码中通过该标题引用切片器。 在此示例中,切片器的标题为“区域”,您可以在切片器的顶部看到。 选择切片器后,标题在Excel功能区的“选项”选项卡上也可见。
宏来移动数据透视表切片器 (Macro to Move a Pivot Table Slicer)
Here is the sample code that I used -- a macro to move a pivot table slicer to the right side of the pivot table, any time the pivot table is updated. This code is stored on a regular code module. In the code, a variable is set for the pivot table, and the code counts the columns in the pivot table's TableRange2 range, which includes the Report Filters area. (TableRange1 does not include the report filters.) We add 1 to the column number that the last pivot table column is in. A set amount of padding is added (10 in this example), to indent the Slicer by that amount in the column to the right of the pivot table.
这是我使用的示例代码-每次更新数据透视表时将宏数据透视表切片器移动到数据透视表右侧的宏。 此代码存储在常规代码模块中 。 在代码中,为数据透视表设置了一个变量,并且代码对数据透视表的TableRange2范围(包括“报告过滤器”区域)中的列进行计数。 (TableRange1不包括报表过滤器。)我们在最后一个数据透视表列所在的列号中加1。添加一定数量的填充(在此示例中为10),以使Slicer缩进该列中的该数量在数据透视表的右侧。
Sub MoveSlicer()
    Dim wsPT As Worksheet
    Dim pt As PivotTable
    Dim sh As Shape
    Dim rngSh As Range
    Dim lColPT As Long
    Dim lCol As Long
    Dim lPad As Long
    Set wsPT = Worksheets("PivotSales")
    Set pt = wsPT.PivotTables("PivotDate")
    Set sh = wsPT.Shapes("Region")
    lPad = 10
    lColPT = pt.TableRange2.Columns.Count
    lCol = pt.TableRange2.Columns(lColPT).Column
    Set rngSh = wsPT.Cells(1, lCol + 1)
    sh.Left = rngSh.Left + lPad
End Sub
数据透视表更新代码 (Pivot Table Update Code)
The following code should be copied to the pivot table's worksheet module. It will run the macro to move a pivot table slicer (MoveSlicer), any time the PivotDate pivot table is updated.
以下代码应复制到数据透视表的工作表模块中。 每当更新PivotDate数据透视表时,它将运行宏以移动数据透视表切片器(MoveSlicer)。
Private Sub Worksheet_PivotTableUpdate(ByVal Target As PivotTable)
    If Target.Name = "PivotDate" Then
        MoveSlicer
    End If
End Sub
下载样本文件 (Download the Sample File)
To see how the macro to move a pivot table slicer works, you can download the Excel Slicer Move Code sample workbook. The file is in xlsm format, and is zipped. You'll have to enable macros, to test the code. _______
要查看用于移动数据透视表切片器的宏的工作方式,可以下载Excel Slicer移动代码示例工作簿 。 该文件为xlsm格式,并已压缩。 您必须启用宏才能测试代码。 _______
翻译自: https://contexturesblog.com/archives/2011/05/04/keep-excel-slicers-from-sliding/
如何用宏来debug


 1206
1206


 被折叠的 条评论
为什么被折叠?


