three.js创建光线_如何使用Three.js创建具有图像失真的运动悬停效果

three.js创建光线

three.js创建光线

Motion_feat

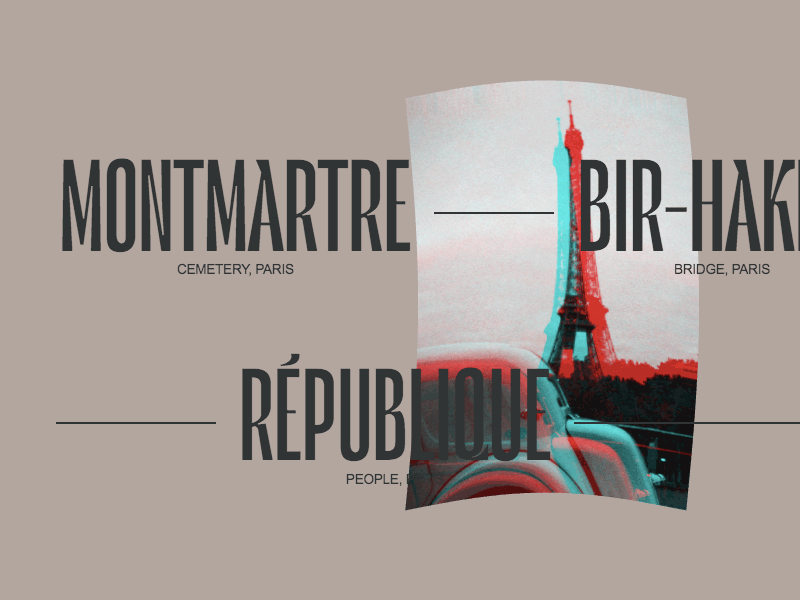
The reveal hover effect on images has become a very popular pattern in modern websites. It plays an important role in taking the user experience to a higher level. But usually these kind of animations remain too “flat”. Natural movements with a realistic feel are much more enjoyable for the user. In this tutorial we’re going to build some special interactive reveal effects for images when a link is hovered. The aim is to add fluid and interesting motion to the effects. We will be exploring three different types of animations. This dynamic experience consists of two parts:

在图像上显示悬停效果已成为现代网站中非常流行的模式。 它在将用户体验提升到更高水平方面起着重要作用。 但是通常这些动画仍然太“平坦”。 具有逼真的感觉的自然运动对于用户而言更加令人愉悦。 在本教程中,我们将在悬停链接时为图像构建一些特殊的交互式显示效果。 目的是为效果添加流畅而有趣的运动。 我们将探索三种不同类型的动画。 这种动态体验包括两个部分:

  1. Distortion Image Effect (main effect)

    失真图像效果(主要效果)

  2. RGB Displacement, Image Trail Effect, Image Stretch (additional effects)

    RGB位移,图像拖尾效果,图像拉伸(附加效果)

We assume that you are confident with JavaScript and have some basic understanding of Three.js and WebGL.

我们假设您对JavaScript充满信心,并且对Three.js和WebGL有一些基本的了解。

入门 (Getting started)

The markup for this effect will include a link element that contains an image (and some other elements that are not of importance for our effect):

此效果的标记将包括一个链接元素,其中包含一个图像(以及一些其他对我们的效果不重要的元素):

<a class="link" href="#">
	<!-- ... -->
	<img src="img/demo1/img1.jpg" alt="Some image" />
</a>

The EffectShell class will group common methods and properties of the three distinct effects we’ll be creating. As a result, each effect will extend EffectShell.

EffectShell类将对我们将要创建的三个不同效果的通用方法和属性进行分组。 结果,每个效果都会扩展EffectShell。

Three.js设置 (Three.js setup)

First of all, we need to create the Three.js scene.

首先,我们需要创建Three.js场景

class EffectShell {
 constructor(container = document.body, itemsWrapper = null) {
   this.container = container
   this.itemsWrapper = itemsWrapper
   if (!this.container || !this.itemsWrapper) return
   this.setup()
 }
 
 setup() {
   window.addEventListener('resize', this.onWindowResize.bind(this), false)
 
   // renderer
   this.renderer = new THREE.WebGLRenderer({ antialias: true, alpha: true })
   this.renderer.setSize(this.viewport.width, this.viewport.height)
   this.renderer.setPixelRatio = window.devicePixelRatio
   this.container.appendChild(this.renderer.domElement)
 
   // scene
   this.scene = new THREE.Scene()
 
   // camera
   this.camera = new THREE.PerspectiveCamera(
     40,
     this.viewport.aspectRatio,
     0.1,
     100
   )
   this.camera.position.set(0, 0, 3)
 
   // animation loop
   this.renderer.setAnimationLoop(this.render.bind(this))
 }
 
 render() {
   // called every frame
   this.renderer.render(this.scene, this.camera)
 }
 
 get viewport() {
   let width = this.container.clientWidth
   let height = this.container.clientHeight
   let aspectRatio = width / height
   return {
     width,
     height,
     aspectRatio
   }
 }
 
 onWindowResize() {
   this.camera.aspect = this.viewport.aspectRatio
   this.camera.updateProjectionMatrix()
   this.renderer.setSize(this.viewport.width, this.viewport.height)
 }
}

获取项目并加载纹理 (Get items and load textures)

In our markup we have links with images inside. The next step is to get each link from the DOM and put them in an array.

在我们的标记中,我们具有内部图像的链接。 下一步是从DOM获取每个链接,并将它们放入数组中。

class EffectShell {
 ...
 get itemsElements() {
   // convert NodeList to Array
   const items = [...this.itemsWrapper.querySelectorAll('.link')]
 
   //create Array of items including element, image and index
   return items.map((item, index) => ({
     element: item,
     img: item.querySelector('img') || null,
     index: index
   }))
 }
}

Because we will use the images as a texture, we have to load the textures through Three.js’ TextureLoader. It’s an asynchronous operation so we shouldn’t initialize the effect without all textures being loaded. Otherwise our texture will be fully black. That’s why we use Promises here:

因为我们将图像用作纹理,所以我们必须通过Three.js的TextureLoader加载纹理。 这是一个异步操作,因此在加载所有纹理之前,不要初始化效果。 否则,我们的纹理将完全变黑。 这就是为什么我们在这里使用Promises的原因:

class EffectShell {
 ...
 initEffectShell() {
   let promises = []
 
   this.items = this.itemsElements
 
   const THREEtextureLoader = new THREE.TextureLoader()
   this.items.forEach((item, index) => {
     // create textures
     promises.push(
       this.loadTexture(
         THREEtextureLoader,
         item.img ? item.img.src : null,
         index
       )
     )
   })
 
   return new Promise((resolve, reject) => {
     // resolve textures promises
     Promise.all(promises).then(promises => {
       // all textures are loaded
       promises.forEach((promise, index) => {
         // assign texture to item
         this.items[index].texture = promise.texture
       })
       resolve()
     })
   })
 }
 
 loadTexture(loader, url, index) {
   // https://threejs.org/docs/#api/en/loaders/TextureLoader
   return new Promise((resolve, reject) => {
     if (!url) {
       resolve({ texture: null, index })
       return
     }
     // load a resource
     loader.load(
       // resource URL
       url,
 
       // onLoad callback
       texture => {
         resolve({ texture, index })
       },
 
       // onProgress callback currently not supported
       undefined,
 
       // onError callback
       error => {
         console.error('An error happened.', error)
         reject(error)
       }
     )
   })
 }
}

At this point we get an array of items. Each item contains an Element, Image, Index and Texture. Then, when all textures are loaded we can initialize the effect.

至此,我们得到了一系列的物品。 每个项目都包含一个元素图像索引纹理。 然后,在加载所有纹理时,我们可以初始化效果。

class EffectShell {
 constructor(container = document.body, itemsWrapper = null) {
   this.container = container
   this.itemsWrapper = itemsWrapper
   if (!this.container || !this.itemsWrapper) return
   this.setup()
   this.initEffectShell().then(() => {
     console.log('load finished')
     this.isLoaded = true
   })
 }
 ...
}

创建飞机 (Create the plane)

Once we have created the scene and loaded the textures, we can create the main effect. We start by creating a plane mesh using PlaneBufferGeometry and ShaderMaterial with three uniforms:

创建场景并加载纹理后,就可以创建主效果了。 我们首先使用带有三个制服的PlaneBufferGeometryShaderMaterial创建平面网格:

  1. uTexture contains the texture data to display the image on the plane

    uTexture包含纹理数据以在平面上显示图像

  2. uOffset provides plane deformation values

    uOffset提供平面变形值

  3. uAlpha manages plane opacity

    uAlpha管理平面不透明度

class Effect extends EffectShell {
 constructor(container = document.body, itemsWrapper = null, options = {}) {
   super(container, itemsWrapper)
   if (!this.container || !this.itemsWrapper) return
 
   options.strength = options.strength || 0.25
   this.options = options
 
   this.init()
 }
 
 init() {
   this.position = new THREE.Vector3(0, 0, 0)
   this.scale = new THREE.Vector3(1, 1, 1)
   this.geometry = new THREE.PlaneBufferGeometry(1, 1, 32, 32)
   this.uniforms = {
     uTexture: {
       //texture data
       value: null
     },
     uOffset: {
       //distortion strength
       value: new THREE.Vector2(0.0, 0.0)
     },
     uAlpha: {
       //opacity
       value: 0
     }
 
   }
   this.material = new THREE.ShaderMaterial({
     uniforms: this.uniforms,
     vertexShader: `
       uniform vec2 uOffset;
       varying vec2 vUv;
 
       void main() {
         vUv = uv;
         vec3 newPosition = position;
         gl_Position = projectionMatrix * modelViewMatrix * vec4( newPosition, 1.0 );
       }
     `,
     fragmentShader: `
       uniform sampler2D uTexture;
       uniform float uAlpha;
       varying vec2 vUv;
 
       void main() {
         vec3 color = texture2D(uTexture,vUv).rgb;
         gl_FragColor = vec4(color,1.0);
       }
     `,
     transparent: true
   })
   this.plane = new THREE.Mesh(this.geometry, this.material)
   this.scene.add(this.plane)
 }
}

At this point, we have a black squared plane in the center of our screen. Not very impressive.

此时,我们在屏幕中央有一个黑色正方形平面。 不太令人印象深刻。

添加互动 (Adding interactions)

建立活动(Creating events)

So, let's outline all our possible events and what needs to be done:

因此,让我们概述所有可能发生的事件以及需要执行的操作:

  1. when we hover over an item, the plane’s texture takes the item’s texture

    当我们将鼠标悬停在某个项目上时,平面的纹理会采用该项目的纹理
  2. when the mouse moves on the container, the plane’s position follows the mouse and its vertices are deformed

    当鼠标在容器上移动时,平面的位置跟随鼠标移动,其顶点变形
  3. when the mouse leaves the container, the plane’s opacity fades to 0

    当鼠标离开容器时,飞机的不透明度逐渐变为0
  4. when the mouse hovers a link, if the plane was invisible, its opacity animates to 1

    当鼠标悬停链接时,如果该平面不可见,则其不透明度变为1
class EffectShell {
 constructor(container = document.body, itemsWrapper = null) {
   this.container = container
   this.itemsWrapper = itemsWrapper
   if (!this.container || !this.itemsWrapper) return
 
   this.setup()
   this.initEffectShell().then(() => {
     console.log('load finished')
     this.isLoaded = true
   })
   this.createEventsListeners()
 }
 ...
 createEventsListeners() {
   this.items.forEach((item, index) => {
     item.element.addEventListener(
       'mouseover',
       this._onMouseOver.bind(this, index),
       false
     )
   })
 
   this.container.addEventListener(
     'mousemove',
     this._onMouseMove.bind(this),
     false
   )
   this.itemsWrapper.addEventListener(
     'mouseleave',
     this._onMouseLeave.bind(this),
     false
   )
 }
 
 _onMouseLeave(event) {
   this.isMouseOver = false
   this.onMouseLeave(event)
 }
 
 _onMouseMove(event) {
   // get normalized mouse position on viewport
   this.mouse.x = (event.clientX / this.viewport.width) * 2 - 1
   this.mouse.y = -(event.clientY / this.viewport.height) * 2 + 1
 
   this.onMouseMove(event)
 }
 
 _onMouseOver(index, event) {
   this.onMouseOver(index, event)
 }
}

更新纹理 (Updating the texture)

When we created the plane geometry we gave it 1 as height and width, that’s why our plane is always squared. But we need to scale the plane in order to fit the image dimensions otherwise the texture will be stretched.

当我们创建平面几何时,我们给它1作为高度和宽度,这就是为什么我们的平面总是平方的原因。 但是我们需要缩放平面以适合图像尺寸,否则纹理将被拉伸。

class Effect extends EffectShell {
 ...
 onMouseEnter() {}
 
 onMouseOver(index, e) {
   if (!this.isLoaded) return
   this.onMouseEnter()
   if (this.currentItem && this.currentItem.index === index) return
   this.onTargetChange(index)
 }
 
 onTargetChange(index) {
   // item target changed
   this.currentItem = this.items[index]
   if (!this.currentItem.texture) return
 
   //update texture
   this.uniforms.uTexture.value = this.currentItem.texture
 
   // compute image ratio
   let imageRatio =
     this.currentItem.img.naturalWidth / this.currentItem.img.naturalHeight
 
   // scale plane to fit image dimensions
   this.scale = new THREE.Vector3(imageRatio, 1, 1)
   this.plane.scale.copy(this.scale)
 }
}

更新飞机位置 (Updating the plane position)

Here comes the first mathematical part of this tutorial. As we move the mouse over the viewport, the browser gives us the mouse's 2D coordinates from the viewport, but what we need is the 3D coordinates in order to move our plane in the scene. So, we need to remap the mouse coordinate to the view size of our scene.

这是本教程的第一部分数学内容。 当我们将鼠标移到视口上时,浏览器会从视口为我们提供鼠标的2D坐标,但是我们需要3D坐标才能在场景中移动飞机。 因此,我们需要将鼠标坐标重新映射到场景的视图大小。

First, we need to get the view size of our scene. For this, we can compute the plane's fit-to-screen dimensions by resolving AAS triangles using the camera position and camera FOV. This solution is provided by ayamflow.

首先,我们需要获取场景的视图大小。 为此,我们可以通过使用相机位置和相机FOV解析AAS三角形来计算平面的适合屏幕尺寸。 此解决方案由ayamflow提供。

class EffectShell {
 ...
 get viewSize() {
   // https://gist.github.com/ayamflow/96a1f554c3f88eef2f9d0024fc42940f
 
   let distance = this.camera.position.z
   let vFov = (this.camera.fov * Math.PI) / 180
   let height = 2 * Math.tan(vFov / 2) * distance
   let width = height * this.viewport.aspectRatio
   return { width, height, vFov }
 }
}

We are going to remap the normalized mouse position with the scene view dimensions using a value mapping function.

我们将使用值映射功能使用场景视图尺寸重新映射标准化的鼠标位置。

Number.prototype.map = function(in_min, in_max, out_min, out_max) {
 return ((this - in_min) * (out_max - out_min)) / (in_max - in_min) + out_min
}

Finally, we will add a GSAP-powered animation in order to smooth out our movements.

最后,我们将添加由GSAP驱动的动画,以使动作平滑。

class Effect extends EffectShell {
 ...
 onMouseMove(event) {
   // project mouse position to world coordinates
   let x = this.mouse.x.map(
     -1,
     1,
     -this.viewSize.width / 2,
     this.viewSize.width / 2
   )
   let y = this.mouse.y.map(
     -1,
     1,
     -this.viewSize.height / 2,
     this.viewSize.height / 2
   )
 
   // update plane position
   this.position = new THREE.Vector3(x, y, 0)
   TweenLite.to(this.plane.position, 1, {
     x: x,
     y: y,
     ease: Power4.easeOut,
     onUpdate: this.onPositionUpdate.bind(this)
   })
 }
}

淡化不透明度 (Fading the opacity)

class Effect extends EffectShell {
 ...
 onMouseEnter() {
   if (!this.currentItem || !this.isMouseOver) {
     this.isMouseOver = true
     // show plane
     TweenLite.to(this.uniforms.uAlpha, 0.5, {
       value: 1,
       ease: Power4.easeOut
     })
   }
 }
 
 onMouseLeave(event) {
   TweenLite.to(this.uniforms.uAlpha, 0.5, {
     value: 0,
     ease: Power4.easeOut
   })
 }
}

Once correctly animated, we have to put uAlpha as alpha channel inside fragment shader of the plane material.

正确设置动画后,我们必须将uAlpha作为Alpha通道放入平面材质的片段着色器中。

fragmentShader: `
 uniform sampler2D uTexture;
 uniform float uAlpha;
 varying vec2 vUv;

 void main() {
   vec3 color = texture2D(uTexture,vUv).rgb;
   gl_FragColor = vec4(color,uAlpha);
 }
`,

添加弯曲的,对速度敏感的失真效果 (Adding the curved, velocity-sensitive distortion effect)

During the movement animation, we compute the plane’s velocity and use it as uOffset for our distortion effect.

在运动动画期间,我们将计算平面的速度,并将其用作uOffset以获得变形效果。

vector
class Effect extends EffectShell {
 ...
 onPositionUpdate() {
   // compute offset
   let offset = this.plane.position
     .clone()
     .sub(this.position) // velocity
     .multiplyScalar(-this.options.strength)
   this.uniforms.uOffset.value = offset
 }
}

Now, in order to make the "curved" distortion we will use the sine function. As you can see, the sine function is wave-shaped (sinusoidal) between x = 0 and x = PI. Moreover, the plane's UVs are mapped between 0 and 1 so by multiplying uv by we can remap between 0 and PI. Then we multiply it by the uOffset value that we calculated beforehand and we get the curve distortion thanks to the velocity.

现在,为了产生“弯曲”失真,我们将使用正弦函数。 如您所见,正弦函数是介于x = 0和x = PI之间的波形(正弦波)。 此外,平面的UV映射在0和1之间,因此通过将uv乘以我们可以在0和PI之间重新映射。 然后,将其乘以我们预先计算的uOffset值,并由于速度而得到曲线失真。

sine
vertexShader: `
 uniform vec2 uOffset;
 varying vec2 vUv;

 #define M_PI 3.1415926535897932384626433832795

 vec3 deformationCurve(vec3 position, vec2 uv, vec2 offset) {
   position.x = position.x + (sin(uv.y * M_PI) * offset.x);
   position.y = position.y + (sin(uv.x * M_PI) * offset.y);
   return position;
 }

 void main() {
   vUv = uv;
   vec3 newPosition = deformationCurve(position, uv, uOffset);
   gl_Position = projectionMatrix * modelViewMatrix * vec4( newPosition, 1.0 );
 }
`,

附加效果 (Additional effects)

RGBShift(RGBShift)

demo1

To do an RGB shift we have to separate the red channel from other channels and apply its offset:

要进行RGB移位,我们必须将红色通道与其他通道分开并应用其偏移量:

fragmentShader: `
 uniform sampler2D uTexture;
 uniform float uAlpha;
 uniform vec2 uOffset;

 varying vec2 vUv;

 vec3 rgbShift(sampler2D texture, vec2 uv, vec2 offset) {
   float r = texture2D(uTexture,vUv + uOffset).r;
   vec2 gb = texture2D(uTexture,vUv).gb;
   return vec3(r,gb);
 }

 void main() {
   vec3 color = rgbShift(uTexture,vUv,uOffset);
   gl_FragColor = vec4(color,uAlpha);
 }
`,

伸展 (Stretch)

demo3

By offsetting UV with the uOffset values we can achieve a “stretch effect”, but in order to avoid that the texture border gets totally stretched we need to scale the UVs.

通过使用uOffset值偏移UV,我们可以实现“拉伸效果”,但是为了避免纹理边界被完全拉伸,我们需要缩放UV。

vertexShader: `
 uniform vec2 uOffset;

 varying vec2 vUv;

 vec3 deformationCurve(vec3 position, vec2 uv, vec2 offset) {
   float M_PI = 3.1415926535897932384626433832795;
   position.x = position.x + (sin(uv.y * M_PI) * offset.x);
   position.y = position.y + (sin(uv.x * M_PI) * offset.y);
   return position;
 }

 void main() {
   vUv =  uv + (uOffset * 2.);
   vec3 newPosition = position;
   newPosition = deformationCurve(position,uv,uOffset);
   gl_Position = projectionMatrix * modelViewMatrix * vec4( newPosition, 1.0 );
 }
`,
fragmentShader: `
 uniform sampler2D uTexture;
 uniform float uAlpha;

 varying vec2 vUv;

 // zoom on texture 
 vec2 scaleUV(vec2 uv,float scale) {
   float center = 0.5;
   return ((uv - center) * scale) + center;
 }

 void main() {
   vec3 color = texture2D(uTexture,scaleUV(vUv,0.8)).rgb;
   gl_FragColor = vec4(color,uAlpha);
 }
`,

步道 (Trails)

demo2

To make a trail-like effect, we have to use several planes with the same texture but with a different position animation duration.

为了产生类似轨迹的效果,我们必须使用具有相同纹理但位置动画持续时间不同的多个平面。

class TrailsEffect extends EffectShell {
 ...
 init() {
   this.position = new THREE.Vector3(0, 0, 0)
   this.scale = new THREE.Vector3(1, 1, 1)
   this.geometry = new THREE.PlaneBufferGeometry(1, 1, 16, 16)
   //shared uniforms
   this.uniforms = {
     uTime: {
       value: 0
     },
     uTexture: {
       value: null
     },
     uOffset: {
       value: new THREE.Vector2(0.0, 0.0)
     },
     uAlpha: {
       value: 0
     }
   }
   this.material = new THREE.ShaderMaterial({
     uniforms: this.uniforms,
     vertexShader: `
       uniform vec2 uOffset;
 
       varying vec2 vUv;
 
       vec3 deformationCurve(vec3 position, vec2 uv, vec2 offset) {
         float M_PI = 3.1415926535897932384626433832795;
         position.x = position.x + (sin(uv.y * M_PI) * offset.x);
         position.y = position.y + (sin(uv.x * M_PI) * offset.y);
         return position;
       }
 
       void main() {
         vUv = uv;
         vec3 newPosition = position;
         newPosition = deformationCurve(position,uv,uOffset);
         gl_Position = projectionMatrix * modelViewMatrix * vec4( newPosition, 1.0 );
       }
     `,
     fragmentShader: `
       uniform sampler2D uTexture;
       uniform float uAlpha;
       uniform vec2 uOffset;
 
       varying vec2 vUv;
 
       void main() {
         vec3 color = texture2D(uTexture,vUv).rgb;
         gl_FragColor = vec4(color,uAlpha);
       }
     `,
     transparent: true
   })
   this.plane = new THREE.Mesh(this.geometry, this.material)
 
   this.trails = []
   for (let i = 0; i < this.options.amount; i++) {
     let plane = this.plane.clone()
     this.trails.push(plane)
     this.scene.add(plane)
   }
 }
 
 onMouseMove(event) {
   // project mouse position to world coodinates
   let x = this.mouse.x.map(
     -1,
     1,
     -this.viewSize.width / 2,
     this.viewSize.width / 2
   )
   let y = this.mouse.y.map(
     -1,
     1,
     -this.viewSize.height / 2,
     this.viewSize.height / 2
   )
 
   TweenLite.to(this.position, 1, {
     x: x,
     y: y,
     ease: Power4.easeOut,
     onUpdate: () => {
       // compute offset
       let offset = this.position
         .clone()
         .sub(new THREE.Vector3(x, y, 0))
         .multiplyScalar(-this.options.strength)
       this.uniforms.uOffset.value = offset
     }
   })
 
   this.trails.forEach((trail, index) => {
     let duration =
       this.options.duration * this.options.amount -
       this.options.duration * index
     TweenLite.to(trail.position, duration, {
       x: x,
       y: y,
       ease: Power4.easeOut
     })
   })
 }
}

结论 (Conclusion)

We have tried to make this tutorial as easy as possible to follow, so that it's understandable to those who are not as advanced in Three.js. If there's anything you have not understood, please feel free to comment below.

我们试图使本教程尽可能容易地遵循,以便对Three.js不那么高级的人可以理解。 如果您不了解任何内容,请在下面发表评论。

The main purpose of this tutorial was to show how to create motion-distortion effects on images, but you can play around with the base effect and add something else or try something different. Feel free to make pull requests or open an issue in our GitHub repo. These effects can also fit very well with texture transitions; it's something you can explore with GL Transitions.

本教程的主要目的是演示如何在图像上创建运动失真效果,但是您可以尝试使用基本效果并添加其他内容或尝试其他操作。 随时发出拉取请求或在我们的GitHub存储库中发布问题。 这些效果也非常适合纹理过渡。 您可以使用GL Transitions探索它。

We hope you enjoyed this article and play around with this to explore new stuff.

我们希望您喜欢这篇文章并尝试使用它来探索新事物。

参考文献 (References)

  • 0
    点赞
  • 1
    收藏
    觉得还不错? 一键收藏
  • 0
    评论

“相关推荐”对你有帮助么?

  • 非常没帮助
  • 没帮助
  • 一般
  • 有帮助
  • 非常有帮助
提交
评论
添加红包

请填写红包祝福语或标题

红包个数最小为10个

红包金额最低5元

当前余额3.43前往充值 >
需支付:10.00
成就一亿技术人!
领取后你会自动成为博主和红包主的粉丝 规则
hope_wisdom
发出的红包
实付
使用余额支付
点击重新获取
扫码支付
钱包余额 0

抵扣说明:

1.余额是钱包充值的虚拟货币,按照1:1的比例进行支付金额的抵扣。
2.余额无法直接购买下载,可以购买VIP、付费专栏及课程。

余额充值