中型商城前端html页面

Medium, a blogging platform which has gained popularity over the past several months, has one of the smoothest, most polished user interfaces on the web. As you click and touch the interface, you’ll notice that great attention has been paid to transitions, white space, color, fonts, imagery, and iconography.
Medium是一个博客平台,该博客平台在过去几个月中获得了广泛的欢迎,它拥有网络上最流畅,最优美的用户界面之一。 当您单击并触摸界面时,您会注意到对过渡,空白,颜色,字体,图像和图标的关注度很高。
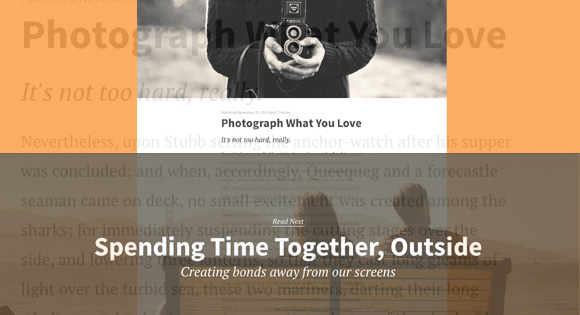
In this article, I will outline how to achieve Medium’s page transition effect—an effect that can be seen by clicking anywhere on the “Read Next” footer at the bottom of the page. This effect is characterized by the lower article easing upward as the current article fades up and out. See the animation below for an illustration of this effect.
在本文中,我将概述如何实现Medium的页面过渡效果-通过单击页面底部“ Read Next”页脚中的任意位置可以看到这种效果。 此效果的特征是,随着当前文章逐渐淡出和淡出,下部文章逐渐向上放松。 有关此效果的说明,请参见下面的动画。

HTML (HTML)
In this demo, the page first loads with barebones HTML, which we’ll use as a template that will be filled in later with Ajax’d-in data. Below is what our <body> looks like on initial page load. One main <article> tag. Pretty simple, eh?
在此演示中,页面首先加载准系统HTML,我们将其用作模板,稍后将使用Ajax的输入数据进行填充。 以下是<body>在初始页面加载时的外观。 一个主要的<article>标签。 很简单,是吗?
<body>
  <article class='page hidden'>
    <div class='big-image'></div>
    <div class='content'></div>
  </article>
</body>
Once the content is Ajax’d-in, the <body> looks something like so:
内容放入Ajax'd后, <body>看起来像这样:
<body>
  <article class='page current'><!--other HTML --></article>
  <article class='page next '><!--other HTML --></article>
<body>
The page currently being viewed has a class of current, and the next article has a class of next. The next article only has its large image being shown at the bottom of the page, which, when clicked on, brings it into focus.
当前正在查看的页面具有current类,下一篇文章具有next类。 下一篇文章的大图仅显示在页面底部,当单击它时,会将其聚焦。
CSS (CSS)
The styles in this demo which control the article transitions are both applied dynamically via jQuery’s css() method, as well as by applying classes to the <article> elements using jQuery’s addClass() method.
此演示中控制文章过渡的样式既可以通过jQuery的css()方法动态应用,也可以通过使用jQuery的addClass()方法将类应用于<article>元素来动态应用。
Here’s a rundown of the pertinent classes used:
以下是使用的相关类的摘要:
    article.page.hidden {
        display: none
    }

    article.page.content-hidden .content {
        display: none
    }

    article.fade-up-out {
        opacity: 0;
        transform: scale(0.8) translate3d(0, -10%, 0);
        transition: all 450ms cubic-bezier(0.165, 0.840, 0.440, 1.000);
    }

    article.easing-upward {
        transition: all 450ms cubic-bezier(0.165, 0.840, 0.440, 1.000);
    }
Java脚本(Javascript)
Before getting into the Javascript code, I want to first outline the algorithm used to transition the “next” article upward, and transition the “current” article up and away.
在进入Javascript代码之前,我想先概述一下用于向上转换“下一个”文章,以及向上和向下转换“当前”文章的算法。
用户点击下一篇文章的大图: (User clicks on big image of next article:)
- Disable scrolling on the page 禁用页面滚动
Fade current article to opacity of 0, a scale of 0.8, and move it upward by 10%.
使当前文章的不透明度变为0(比例为0.8),然后将其向上移动10%。
Show the next article’s content, give it smooth transitions, then move it upward to the top of the window
显示下一篇文章的内容,进行平滑过渡,然后将其向上移动到窗口顶部
After 500ms:
500ms后:
Remove the current article from the DOM
从DOM中删除当前文章
Remove smooth transitions from next article
从下一篇文章中删除平滑过渡
- Scroll to top of page programmatically.以编程方式滚动到页面顶部。
Make next article the current article
将下一篇设为当前文章
- Enable scroll on the page在页面上启用滚动
Make Ajax request for next article’s content
向Ajax请求下一篇文章的内容
代码(The Code)
  ArticleAnimator.animatePage = function(callback){
  var self              = this;
  var translationValue  = this.$next.get(0).getBoundingClientRect().top;
  this.canScroll        = false;

  this.$current.addClass('fade-up-out');

  this.$next.removeClass('content-hidden next')
       .addClass('easing-upward')
       .css({ "transform": "translate3d(0, -"+ translationValue +"px, 0)" });

  setTimeout(function(){
      scrollTop();
      self.$next.removeClass('easing-upward')
          self.$current.remove();

      self.$next.css({ "transform": "" });
          self.$current = self.$next.addClass('current');

      self.canScroll = true;
      self.currentPostIndex = self.nextPostIndex( self.currentPostIndex );

      callback();
  }, self.animationDuration + 300 );
}
Throughout the CSS & Javascript code, you’ll notice that, in order to achieve fluid animations, I am using transform: translate3d(x,y,z) to move my DOM elements. By doing this, we “hardware accelerate” the DOM elements movement. This method is preferred over animating an element using top/left or transform: translate(x,y,z), which are not hardware accelerated by default.
在整个CSS和Javascript代码中,您会注意到,为了实现流畅的动画,我使用了transform: translate3d(x,y,z)移动DOM元素。 通过这样做,我们“硬件加速”了DOM元素的运动。 此方法优于使用top/left或transform: translate(x,y,z)对元素进行动画处理的方法,默认情况下,该方法不会硬件加速。
旁注 (Side notes)
As outlined earlier, the page is populated by making Ajax requests to static json files. Page state is managed using the PushState API and location.hash.
如前所述,该页面是通过向静态json文件发出Ajax请求来填充的。 页面状态使用PushState API和location.hash 。
Photos in the demo were used courtesy of Unsplash. The page font is set in PT Serif and the headings in Source Sans.
演示中的照片由Unsplash提供。 页面字体在PT Serif中设置,标题在Source Sans中设置。
翻译自: https://tympanus.net/codrops/2013/10/30/medium-style-page-transition/
中型商城前端html页面


 2万+
2万+


 被折叠的 条评论
为什么被折叠?


