


 本文介绍如何使用SVG、JavaScript、jQuery和GreenSock的TweenMax库创建一个可玩且可编程的动画鼓套件。通过分组SVG元素、设置点击和动画目标、使用键盘和触摸事件,以及编程实现自动播放,让鼓套件具有真实感的互动体验。文章详细讲解了每个步骤,包括如何处理音频和动画,以及在不同浏览器中的兼容性问题。
svg交互
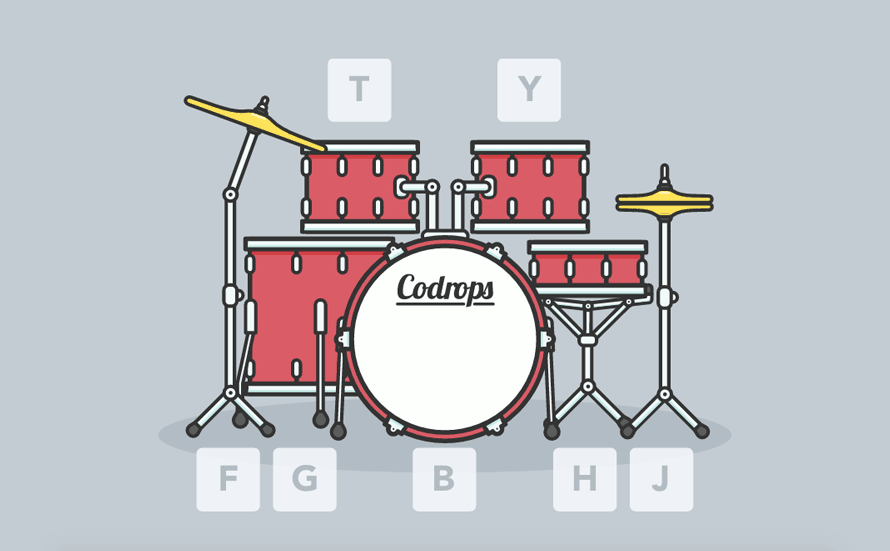
Today we’re going to create an animated SVG drum kit that can be played by clicking, tapping or using your keyboard, and that can also be programmed to play by itself! We’ll be making use of GreenSock’s TweenMax animation library, jQuery and the <audio> element.
今天,我们将创建一个动画SVG鼓组,可以通过单击,点击或使用键盘来演奏,也可以编程为单独演奏! 我们将使用GreenSock的TweenMax动画库,jQuery和<audio>元素。
创建SVG (Creating the SVG)
Open your vector editing software of choice (I used Adobe Illustrator but there are many alternatives to choose from, such as Affinity Designer, Sketch or Inkscape) and get drawing! I find it helpful to have a few photos of what I’m trying to draw dotted around my artboard for reference. Keeping the style flat and fairly simple will make life easier, both in terms of drawing and animation, and less powerful devices will thank you for having less stuff to render. In this style a drum kit is actually a fairly simple set of (mostly) rectangular objects. While drawing any SVG that you intend to animate there are a couple of things to keep in mind:
打开您选择的矢量编辑软件(我使用了Adobe Illustrator,但是有许多替代选择,例如Affinity Designer , Sketch或Inkscape )并获取绘图! 我发现在我的画板上点缀一些我要绘制的照片的照片很有帮助,以供参考。 保持样式扁平化和相当简单,无论是在绘图还是动画方面,都将使生活更加轻松,而功能较弱的设备将感谢您减少渲染的工作量。 在这种风格中,架子鼓实际上是一组相当简单的(主要是)矩形物体。 绘制要制作动画的任何SVG时,请记住以下几点:
<g>是关键 (<g> is Key)
“The g element is a container used to group other SVG elements. Transformations applied to the g element are performed on all of its child elements, and any of its attributes are inherited by its child elements.”
“ g元素是用于对其他SVG元素进行分组的容器。 应用于g元素的转换是对其所有子元素执行的,其任何属性均由其子元素继承。”
The key part of this for us is “Transformations applied to the g element are performed on all of its child elements” this will come in very handy when animating our SVG, e.g. instead of applying animations to each individual component of the snare drum, we can simply group the elements we want to animate and apply a single animation to that group. Well organised, well named groups will make manipulating the SVG much easier later on!
对我们来说,关键部分是“对g元素的所有子元素都执行变换”,这在为SVG设置动画时非常方便,例如,我们不是将动画应用于小军鼓的每个单独组件,而是可以简单地对我们要设置动画的元素进行分组,然后将单个动画应用于该组。 井井有条,名字井井有条的小组将使以后操作SVG更加容易!
id attribute of the elements and groups that we’ll use to target them.
id属性。用于定位他们。
There are two main sets of elements that we need to group together:
我们需要将主要元素分为两组:
1.点击/点击目标 (1. Tap/Click Targets)
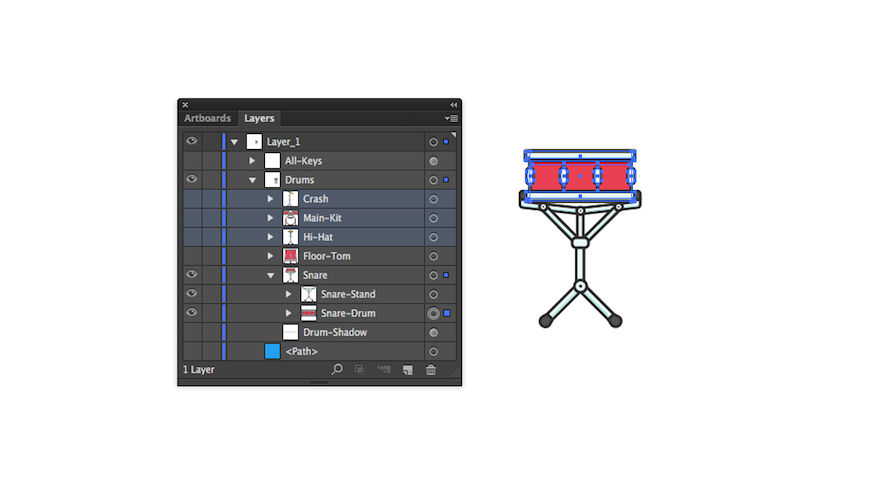
We want to be able to trigger our animations and sounds based on their respective drum being tapped/clicked, so we need to group the tap/click “target” elements together. For example, group the entire snare drum, including the stand, so any part the user touches will trigger the animation/sound.
我们希望能够根据被敲击/单击的相应鼓来触发动画和声音,因此我们需要将敲击/单击“目标”元素分组在一起。 例如,将包括架子在内的整个小军鼓分组,以便用户触摸的任何部分都会触发动画/声音。
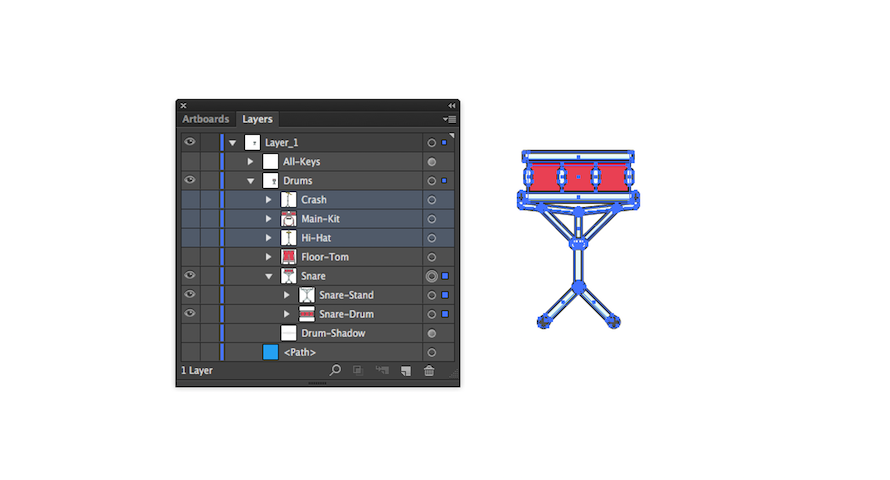
2.动画目标 (2. Animation Targets)
Group elements together that we want to animate. For example, group the snare drum; when the snare drum animation is triggered we only want to animate the drum, not the stand as well.
将我们要设置动画的元素分组在一起。 例如,对小军鼓进行分组; 当小军鼓动画被触发时,我们只希望对鼓进行动画处理,而不要对架子进行动画处理。
全部绘制,然后显示 (Draw it all, then reveal)
“I find it’s useful to draw everything then reveal parts when needed.”
“我发现绘制所有内容然后在需要时显示零件很有用。”
We want to be able to play the drums with a keyboard, so some indication of which keys trigger the drums would be useful. Choose the keys you want to “play” each drum with and add some indication to your SVG. Group these together so we can hide/show these later.
我们希望能够使用键盘弹奏鼓,因此某些指示触发鼓的键将很有用。 选择您要用来“弹奏”每个鼓的琴键,并向SVG添加一些指示。 将它们分组在一起,以便我们以后可以隐藏/显示它们。
导出SVG (Exporting the SVG)
Save your file with all your groups visible as a .svg and open it up in a text editor.
保存所有组为.svg的文件,然后在文本编辑器中将其打开。
We can put this straight into our HTML document. However, I recommend optimising the SVG for the Web first. There are plenty of tools available to do this, with SVGOMG probably being one of the simplest to use.
我们可以将其直接放入HTML文档中。 但是,我建议首先针对Web优化SVG。 有很多工具可以执行此操作,其中SVGOMG可能是最简单使用的工具之一。
看到鼓,听到鼓 (See Drums, Hear Drums)
We don’t just want our drums to look like they’re being played; we want to hear them, too! We’ll need separate audio files for each of our drum sounds. I exported the audio used in the demo from Logic, using some of the packaged royalty-free loops. However, there are many other resources for getting free drum samples on the Web, such as 99 Sounds and Bedroom Producers Blog.
我们不只是希望我们的鼓看起来像正在被演奏。 我们也想听听他们的声音! 每个鼓声都需要单独的音频文件。 我使用一些打包的免版税循环从Logic导出了演示中使用的音频。 但是,还有许多其他资源可以在网上获得免费的鼓采样,例如99 Sounds和Bedroom Producers Blog 。
We can include our audio files using the <audio> element. Then we set the src attribute on either the <audio> element or a child <source> element where we also need to include its type (the audio file format).
我们可以使用<audio>元素包含音频文件。 然后,在<audio>元素或子<source>元素上设置src属性,我们还需要包括其type (音频文件格式)。
We give the audio elements IDs so that we can target them when they need to be played.
我们给音频元素ID,以便在需要播放它们时可以将它们作为目标。
<audio id="Snare-Audio">
  <source src="mp3/Snare.mp3" type="audio/mp3">
</audio>
(预)加载那些节拍 ((Pre)Load those Beats)
By adding the attribute preload="auto" we can tell the browser “the user needs this, make sure it gets downloaded”. That’s how it works in some browsers anyway. Other browsers (particularly those on mobile devices) actually ignore this, which can lead to some odd behavior, but we’ll come back to this later.
通过添加属性preload="auto"我们可以告诉浏览器“用户需要此文件,请确保将其下载”。 无论如何,这就是它在某些浏览器中的工作方式。 其他浏览器(尤其是移动设备上的浏览器)实际上忽略了此操作,这可能导致某些奇怪的行为,但我们稍后会再讨论。
<audio id="Snare-Audio" preload="auto">
  <source src="mp3/Snare.mp3" type="audio/mp3">
</audio>
是时候使用JavaScript了! (Time to JavaScript!)
We’ve got a lot to do before we can play our drums, but each drum part can be broken down into three steps:
在演奏鼓之前,我们还有很多事情要做,但是每个鼓部分可以分为三个步骤:
- Audio. 音频。
- Animation. 动画。
- Trigger these on user interaction. 在用户交互时触发它们。
Let’s start by storing the DOM elements we need as variables. E.g., for the snare we want the snare audio, and snare drum, both bits we want to animate and the parts that will trigger the animation and audio.
首先,将所需的DOM元素存储为变量。 例如,对于小军鼓,我们需要小军鼓音频和小军鼓,我们都希望对其进行动画处理以及触发动画和音频的部分。
音调 (Tunes)
Playing our audio is actually pretty straightforward: we simply use the .play() method on the audio element we’d like to play.
播放音频实际上非常简单:我们只需在要播放的音频元素上使用.play()方法。
var snareAudio = $('#Snare-Audio');
snareAudio.get(0).play();
That’s it! Well almost… This works great, but if we call the method again while the audio is already playing, nothing will happen. We want the sound to be triggered from the beginning of the audio file every time a drum is triggered. So we need to set where the audio start position is every time it’s being triggered.
而已! 好吧,几乎……这很好,但是如果我们在音频已经播放时再次调用该方法,将不会发生任何事情。 我们希望每次触发鼓时从音频文件的开头触发声音。 因此,我们需要设置每次触发时音频开始位置。
var snareAudio = $('#Snare-Audio');
var snareAudioEl = snareAudio.get(0);
snareAudioEl.currentTime = 0;
snareAudioEl.play();
补间 (Tweens)
For those not familiar, TweenMax is a JavaScript library that handles “tweening” one or more properties of any object (or array of objects) over time. I’m not going to go too deep into the anatomy of every animation but each can be broken down into a few simple steps:
对于不熟悉的人来说, TweenMax是一个JavaScript库,可处理随时间推移“补间”任何对象(或对象数组)的一个或多个属性。 我不会深入探讨每个动画的结构,但是可以将每个动画分解为几个简单的步骤:
Create a new timeline
创建一个新的时间表
Tween a property (or lots of properties) of the element
补间元素的一个或多个属性
- Tween back to the original state补间回到原始状态
We’re simply trying to emulate something close to how we “expect” the drum to move when it’s hit. Sometimes it pays to exaggerate the amount of movement to get the desired effect. This is partly trial and error but fortunately there are lots of great examples of GreenSock in action you can check out for inspiration.Also, following people like Chris Gannon is a great way of seeing what GreenSock can do.
我们只是在尝试模仿一种类似于我们“期望”击打鼓时的运动方式的东西。 有时需要夸大动作量以获得预期效果。 这部分是反复试验的结果,但幸运的是,有很多出色的GreenSock实例可以从中汲取灵感。此外,跟随Chris Gannon这样的人也是了解GreenSock可以做什么的好方法。
Finally, easing is one of the most useful tools GreenSock provides to give your animation the right “feel”. GreenSock have a great ease visualizer which can help you decide what’s right for your animation.
最后,缓动是GreenSock提供的最有用的工具之一,可以使您的动画具有正确的“感觉”。 GreenSock的可视化工具非常简单,可以帮助您确定适合动画的内容。
snareDrum = $('#Snare-Drum');

// Create a new timeline, that's paused by default
var snaretl = new TimelineMax({
  paused: true
});

// The animation tweens
snaretl.to(snareDrum, 0.1, {scaleX: 1.04, transformOrigin: "50% 50%", ease: Expo.easeOut})
       .to(snareDrum, 0.1, {scaleY: 0.9, transformOrigin: "50% 100%", ease: Expo.easeOut}, '0')
       // The last tween, returns the element to it's original properties
       .to(snareDrum, 0.4, {scale: 1, transformOrigin: "50% 100%", ease: Elastic.easeOut});
停止。 触发时间 (Stop. Trigger Time)
We have our audio and our animation ready. Now we just need to put it together and trigger it on a user interaction. We’ll wrap the audio and animation methods in a function:
我们已经准备好音频和动画。 现在,我们只需要将其放在一起并在用户交互时触发它。 我们将音频和动画方法包装在一个函数中:
function snare(){
  snaretl.restart();
  snaretl.play();
  var snareAudioEl = snareAudio.get(0);
  snareAudioEl.currentTime = 0;
  snareAudioEl.play();
}
Then, call that function on a click/touch event:
然后,在单击/触摸事件上调用该函数:
var clickTouchSnareDone = false;
snareDrumAll.on("touchstart click", function() {
	if(!clickTouchSnareDone) {
		clickTouchSnareDone = true;
		setTimeout(function() {
			clickTouchSnareDone = false;
		}, 100);
		snare();
		return false;
	}
});
When the user clicks or touches the drum it’ll trigger the animation and the audio. The next step is to hook up the keyboard.
当用户单击或触摸鼓时,它将触发动画和音频。 下一步是连接键盘。
document.onkeydown = function(e) {
  switch (e.keyCode) {
    case 72:
      snare();
      break;
  }
};
We can even animate the key guides when the keyboard is used:
使用键盘时,我们甚至可以为按键指南设置动画:
function animateKey(key) {
  keytl = new TimelineMax({
    paused: true
  });
  keytl.to(key, 0.1, {scale: 1.1, transformOrigin: "50% 50%", ease: Expo.easeOut})
  .to(key, 0.4, {scale: 1, transformOrigin: "50% 50%", ease: Elastic.easeOut});
  keytl.restart();
  keytl.play();
}

document.onkeydown = function(e) {
  // This string will have to match the id of your key guides
  thisKeyID = 'Key-' + e.keyCode;
  thisKey = $('#' + thisKeyID);
  switch (e.keyCode) {
    case 72:
    snare();
    animateKey(thisKey);
    break;
  }
};
Rinse and repeat this process for each drum in our kit.
冲洗并为我们套件中的每个鼓重复此过程。
Now we’ve got a fully functioning drum kit we can play with a mouse, keyboard or on touch. But let’s not stop here.
现在,我们已经有了功能齐全的架子鼓,可以用鼠标,键盘或触摸来演奏。 但是,我们不要在这里停下来。
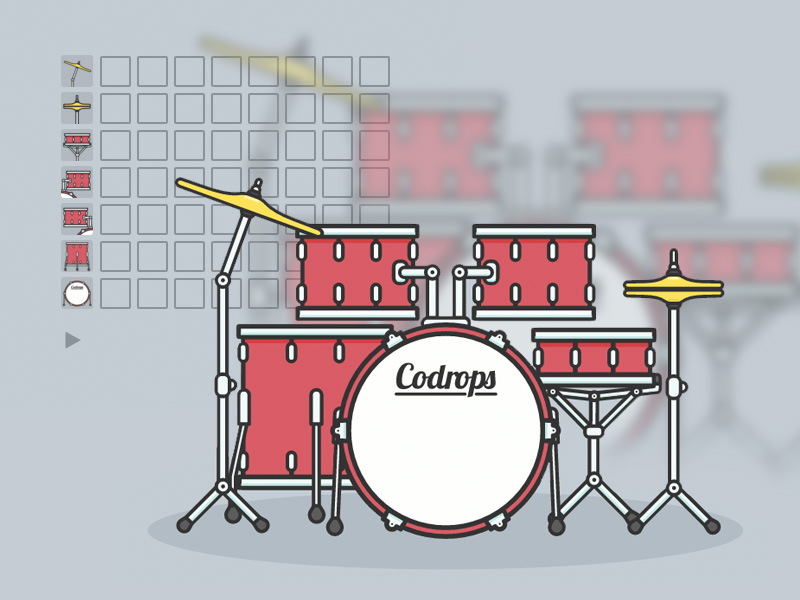
对可编程程序(节拍)进行编程 (Program the Programmable (Beats))
We’ve got playable drums, but could make our drums programmable. We’re going to build a sequencer that can be programmed to play loops. This is potentially quite complicated, but again, it can be broken down into simple steps:
我们有可演奏的鼓,但是可以使我们的鼓可编程。 我们将构建一个可以编程以播放循环的音序器。 这可能很复杂,但是再次可以将其分解为简单的步骤:
Create a “matrix” that represents the drums and time (or beats)
创建一个代表鼓和时间(或节拍)的“矩阵”
- Cycle through the columns or beats 在列或节拍中循环
- If a drum is active in the current beat, play the drum如果当前拍子中有鼓处于活动状态,请播放鼓
建立矩阵(Build the Matrix)
“Unfortunately, no one can be told what the Matrix is. You have to see it for yourself.”
“不幸的是,没有人能知道矩阵是什么。 您必须自己看看。”
Fortunately, I can tell you exactly what our matrix is! It’s a simple grid where:
幸运的是,我可以确切地告诉您我们的矩阵是什么! 这是一个简单的网格,其中:
- Rows will represent our drums 行将代表我们的鼓
- Columns will represent the beat列将代表节拍
We need to be able to choose whether a drum is played or not on each beat in our sequencer. The <input> element with the type="checkbox" attribute is perfectly suited for this, however, it’s not that easy to style, but there’s a hack for that.
我们需要能够选择音序器中每个节拍是否打鼓。 具有type="checkbox"属性的< input>元素非常适合此设置,但是,它的样式设置并不容易,但是有一个技巧。
We’ll create a row for each drum and a column for each beat. In this demo we are going to use 8 beats. We’ll add a data-target-drum attribute (this could be called anything) with the name of our drum functions we created earlier. We can use the attribute to help us identify which corresponding function to call.
我们将为每个鼓创建一行,为每个节拍创建一列。 在此演示中,我们将使用8个节拍。 我们将添加一个data-target-drum属性(可以称为任何东西),并带有我们先前创建的鼓函数的名称。 我们可以使用该属性来帮助我们识别要调用的相应函数。
<!-- A "row" of our sequencer, we'll need one of these for each drum -->
<div class="row" data-target-drum="snare">
  <!-- This image indicates which drum the row controls -->
  <img src="img/snare.png">
  <label><input type="checkbox"><div></div></label>
  <label><input type="checkbox"><div></div></label>
  <label><input type="checkbox"><div></div></label>
  <label><input type="checkbox"><div></div></label>
  <label><input type="checkbox"><div></div></label>
  <label><input type="checkbox"><div></div></label>
  <label><input type="checkbox"><div></div></label>
  <label><input type="checkbox"><div></div></label>
</div>
And the function to cycle through the “rows” and “beat” at a time looks as follows:
一次循环“行”和“跳动”的功能如下所示:
rows = $('.row');
rowLength = rows.first().children().length;
labels = $('label');
// Beat starts at 1 because 0 is the img for each row
beat = 1;

// Sequencer
function sequencer () {
  labels.removeClass('active');
  // Do this function for each .row
  $(rows).each(function() {
    // Select the child element at the "beat" index
    current = $(this).children().eq(beat);
    current.addClass('active');
    // If the current input is checked do some stuff!
    if (current.find('input').is(":checked")) {
      targetDrum = (current.parent().attr('data-target-drum'));
      // If there a function that shares the same name as the data attribute, do it!
      fn = window[targetDrum];
      if (typeof fn === "function") {
        fn();
      }
    }
  });
  // If we get to the last child, start over
  if ( beat < (rowLength - 1) ) {
    ++beat;
  } else {
    beat = 1;
  }
}
时间就是一切 (Timing is Everything)
We’ve got a function to play our drums on the current beat. But we need to cycle through these beats. We can do this using the .setInterval() method. It essentially defines the frequency (in milliseconds) with which the function should be executed. So we can use this to start the sequencer and set its speed. In musical terms the frequency of beats (or tempo) is typically referred to as bpm or beats per minute. So the bpm can be defined simply as the number of milliseconds in a minute divided by the bpm. We’ll set the bpm to a sensible default of 150. And then we set the interval when we click the play button.
我们有一个功能可以按当前节拍演奏鼓。 但是,我们需要循环这些节奏。 我们可以使用.setInterval()方法执行此操作。 它从本质上定义了函数执行的频率(以毫秒为单位)。 因此,我们可以使用它来启动音序器并设置其速度。 用音乐术语来说,节拍(或拍子)的频率通常称为bpm或每分钟节拍。 因此,bpm可以简单地定义为每分钟的毫秒数除以bpm。 我们将bpm设置为明智的默认值150。然后,我们单击播放按钮时设置时间间隔。
sequencerOn = false;

// Start Sequencer
$('#sequencer-active-btn').click(function () {
  intervalId = window.setInterval(sequencer, interval);
  sequencerOn = true;
});
That works great, but what about when we need to stop the sequencer? We can stop the sequencer by passing the ID returned from the .setInterval() method to the .clearInterval() method:
效果很好,但是什么时候需要停止音序器呢? 我们可以通过传递从返回的ID停止序列器.setInterval()方法将.clearInterval()方法:
sequencerOn = false;

// Start/Stop Sequencer
$('#sequencer-active-btn').click(function () {
  if (sequencerOn === false) {
    intervalId = window.setInterval(sequencer, interval);
    sequencerOn = true;
  } else {
    window.clearInterval(intervalId);
    sequencerOn = false;
  }
});
快,慢 (Go Fast, Go Slow)
“All right. Let me go for a few bars. Come in soft, but then finish strong.”
“行。 让我去几个酒吧。 变柔和,但结实。
It would be even more cool if we could change the bpm of our beats for faster or slower loops:
如果我们可以将节拍的bpm更改为更快或更慢的循环,那就更酷了:
bpm = 150;
interval = 60000 / bpm;

// Set tempo
function setTempo() {
  window.clearInterval(intervalId);
  intervalId = window.setInterval(sequencer, interval);
}

// Increase tempo
$('#bpm-increase-btn').click(function() {
  if ( bpm < 300 ) {
    bpm = parseInt($('#bpm-indicator').val());
    bpm += 10;
    interval = 60000 / bpm;
    $('#bpm-indicator').val(bpm);
    if(sequencerOn === true) {
      setTempo();
    }
  }
});

//Decrease tempo
$('#bpm-decrease-btn').click(function() {
  if ( bpm > 100 ) {
    bpm = parseInt($('#bpm-indicator').val());
    bpm -= 10;
    interval = 60000 / bpm;
    $('#bpm-indicator').val(bpm);
    if(sequencerOn === true) {
      setTempo();
    }
  }
});
给它打电话 (Phoning it in)
A lot of mobile browsers not only ignore the preload="auto" but will actually only load the audio on a user touch event. This basically means that our sequencer won’t trigger any audio until it has already been triggered by the user. So we need to load the audio on the first user interaction. This is a bit a of a hack, but it means the sequencer will work on mobile devices.
许多移动浏览器不仅会忽略preload="auto"而且实际上只会在用户触摸事件时加载音频。 基本上,这意味着我们的音序器将不会触发任何音频,除非该音频已被用户触发。 因此,我们需要在第一次用户交互时加载音频。 这有点骇人听闻,但这意味着音序器将在移动设备上运行。
// Load audio on iOS devices on the first user interaction
$('#sequencer-visible-btn').one('click', function() {
  $("audio").each(function(i) {
    this.play();
    this.pause();
  });
});
That’s it! We’ve built a drum kit we can play and we can program to play by itself. I hope this tutorial has inspired you to create your own interactive, animated SVG. Using the same techniques you could build other musical instruments, or anything! If you do, please let me know, I’d love to see what you create!
而已! 我们已经制作了一个可以演奏的架子鼓,也可以自己编程演奏。 希望本教程能够启发您创建自己的交互式动画SVG。 使用相同的技术,您可以制造其他乐器,或其他任何东西! 如果您这样做,请告诉我,我很乐意看到您创造的东西!
Browser Support: 浏览器支持:ChromeSupported
支援Chrome
FirefoxSupported
Firefox支持
Internet ExplorerSupported from version 11
版本11支持Internet Explorer
SafariSupported
Safari支持
OperaNot supported
Opera不支持
Note that while the functionality works from IE 9 on, the layout for the demo is only supported by modern browsers.
请注意,虽然该功能可从IE 9开始使用,但该演示的布局仅受现代浏览器支持。
翻译自: https://tympanus.net/codrops/2016/03/16/interactive-animated-svg-drum-kit/
svg交互


 1981
1981

 被折叠的 条评论
为什么被折叠?
被折叠的 条评论
为什么被折叠?
 到【灌水乐园】发言


