
Enforcement of broadband caps is on the rise. Whether you’ve received a warning letter from your ISP or you just curious and want to keep an eye on things, this tutorial will show you how you can monitor, log, and save your bandwidth usage with Tomato.
宽带上限的强制执行正在上升。 无论您是从ISP收到警告信,还是只是好奇并希望随时注意,本教程将向您展示如何使用Tomato监视,记录和保存带宽使用情况。
你需要什么 (What You’ll Need)
For this tutorial you’ll need the following things:
对于本教程,您需要满足以下条件:
A router running the aftermarket firmware, Tomato.
运行售后市场固件Tomato的路由器。
- A computer to access the Tomato web-based GUI from. 用于从中访问Tomato Web基于GUI的计算机。
- A network share if you wish to save your logs off the router (recommended). 如果您希望将日志保存在路由器之外,则为网络共享(推荐)。
If you’re not already running Tomato, check out our guide to it here to get it up and running on your router.
如果您尚未运行Tomato, 请在此处查看我们的指南以在路由器上启动并运行它。
启用带宽监控 (Enabling Bandwidth Monitoring)
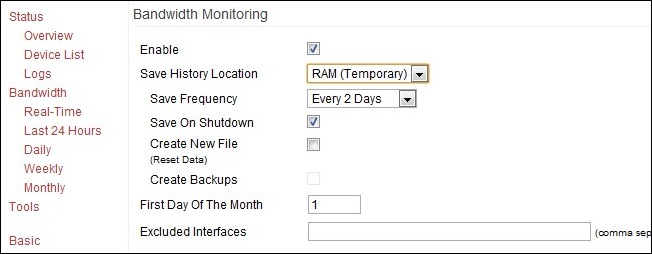
The very first order of business is turning on the monitoring functionality in Tomato. Visit your router’s GUI (typically available from within your LAN at 192.168.1.1) and navigate to Administration –> Bandwidth Monitoring. Check the box next to Enable.
首要任务是打开Tomato的监视功能。 访问路由器的GUI(通常可从192.168.1.1的LAN中获得),并导航至管理–>带宽监控 。 选中启用旁边的框。
Beneath the Enable box you’ll find a set of options including save history location, save frequency, and the designation of the first day of the month.
在“启用”框下方,您会找到一组选项,包括保存历史记录位置,保存频率以及指定当月第一天。
Let’s take a look at the Save History Location. For those interested in storing logs long term there are several options in the Saving History Location pull down menu. For most routers you should see RAM (temporary), NVRAM, JFFS2, CIFS1, CIFS2, and Custom Path. What are these things and what are the positives and negatives to using them?
让我们看一下保存历史记录位置。 对于那些有兴趣长期存储日志的人,“保存历史记录位置”下拉菜单中有几个选项。 对于大多数路由器,您应该看到RAM(临时),NVRAM,JFFS2,CIFS1,CIFS2和自定义路径。 这些东西是什么?使用它们的正面和负面是什么?
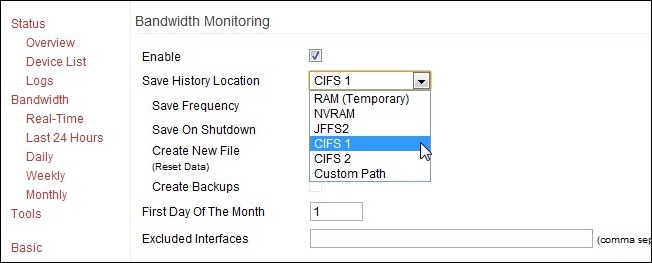
RAM (temporary): The positive to using the RAM is that it’s quick and you don’t have to configure anything. The downside is that you lose all your data when the router shuts down or crashes. As the log gets too big the tail end of the log is cut off.
RAM(临时):使用RAM的积极之处在于它速度很快,您无需进行任何配置。 缺点是,当路由器关闭或崩溃时,您将丢失所有数据。 当原木太大时,原木的末端会被切断。
NVRAM: The Non-volatile Random-Access Memory aboard the router. This is simply RAM that retains the data when the power is off. It’s marginally better than plain old RAM because of this feature but not by much. You get the benefit of the RAM with a lowered risk of data loss.
NVRAM:路由器上的非易失性随机存取存储器。 这只是RAM,在断电时会保留数据。 由于此功能,它比普通的旧RAM稍好一些,但幅度不大。 您可以从RAM中受益,降低数据丢失的风险。
JFFS2: The Journaling Flash File System is a portion of NVRAM specifically formatted for file writing. It’s still not very big but for month-by-month logging it should be adequate.The problem with both the NVRAM/JFFS2 is that neither system was designed for frequent writing. There’s no sense prematurely wearing out a component in your router when there are alternatives, like CIFS.
JFFS2:日记闪存文件系统是NVRAM的一部分,专门用于文件写入。 它仍然不是很大,但是对于逐月记录来说应该足够了。NVRAM/ JFFS2的问题在于这两个系统都不是为频繁写入而设计的。 如果存在诸如CIFS之类的替代产品,则过早地耗尽路由器中的组件是没有意义的。
CIFS 1/2: Tomato has a small CIFS (Common Internet File System) client built in. Essentially this allows Tomato to access a Samba/Windows Share share and mount it like a drive. If you want to archive your logs without worrying about running out of space this is your best option. It requires minimal configuration which we’ll delve into in the next section.
CIFS 1/2: Tomato具有内置的小型CIFS(通用Internet文件系统)客户端。从本质上讲,这允许Tomato访问Samba / Windows共享共享并将其像驱动器一样安装。 如果要归档日志而不必担心空间不足,这是最好的选择。 它需要最少的配置,我们将在下一部分中进行介绍。
Custom Path: This simply allows you to create a custom directory within the JFFS2 for your log files. Not really necessary unless you’re actively using the JFFS2 for something and you’d really like a custom directory to keep things neat and tidy.
定制路径:这仅允许您在JFFS2中为您的日志文件创建定制目录。 除非您正在积极地使用JFFS2来做某事,并且您真的想要一个自定义目录来使事情保持整洁,否则这不是真正必要的。
As for the other settings you’ll find in the Bandwidth Monitoring:
至于其他设置,您可以在带宽监控中找到:
Save Frequency: Denotes how often Tomato will save the logs. If you’re using the RAM this setting doesn’t really matter. If you’re using any of the storage options like JFFS2/CIFS, this allows you to set how often the logs are saved. The higher your save frequency the less chance you’ll lose data because of a power out or some other router interruption.
保存频率:表示Tomato将多久保存一次日志。 如果您使用的是RAM,则此设置并不重要。 如果使用的是JFFS2 / CIFS之类的任何存储选项,则可以设置日志的保存频率。 保存频率越高,由于断电或其他路由器中断而丢失数据的机会就越少。
Save On Shutdown: Just like it sounds, if you (or an application) sends the shut down signal to Tomato it will save the logs first.
关闭时保存:听起来像一样,如果您(或应用程序)将关闭信号发送给Tomato,它将首先保存日志。
Create New File: Wipes your current file and creates a new one. Sometimes when you switch save locations (such as moving from RAM to CIFS) it is necessary to create a new file in order for the new files to save properly.
创建新文件:擦除当前文件并创建一个新文件。 有时,当您切换保存位置时(例如从RAM移到CIFS),有必要创建一个新文件,以便正确保存新文件。
Create Backups: Again, just like it sounds. Will generate backup reports in your specified download directory. In addition to the regular log saves you’ll have matching files with a .BAK extension.
创建备份:同样,听起来很像。 将在您指定的下载目录中生成备份报告。 除了常规的日志保存,您还将拥有带有.BAK扩展名的匹配文件。
First Day of the Month: The default of 1 should be fine unless your ISP logs from the middle of the month or something odd like that.
本月的第一天:默认值1应该很好,除非您的ISP是从月中开始记录日志或类似的日志。
If you’ve opted to store your files on a network share via CIFS (and we highly recommend you do) you’ll need to set up the CIFS client before you go any further.
如果您选择通过CIFS将文件存储在网络共享上(我们强烈建议您这样做),则需要先设置CIFS客户端,然后再进行操作。
启用Tomato的CIFS客户端 (Enabling Tomato’s CIFS Client)
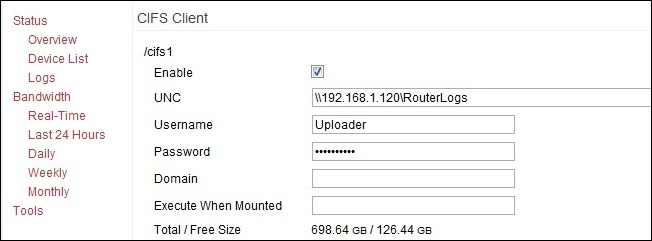
In order to save to a network share you need to enable the CIFS client. Navigate to Administration – > CIFS Client.
为了保存到网络共享,您需要启用CIFS客户端。 导航到管理–> CIFS客户端 。
From within the CIFS client menu check the Enable box under /cifs 1. Fill in the following information:
在CIFS客户端菜单中,选中/ cifs 1下的Enable框。 填写以下信息:
UNC: The IP address of your network share source and the directory, i.e. \\192.168.1.120\RouterLogs—do not use the name of the source on the network, use the IP.
UNC:网络共享源的IP地址和目录,即\\ 192.168.1.120 \ RouterLogs-不要使用网络上源的名称,请使用IP 。
Username/Password: You can use an existing account that has access to the network share or create a new account (on the host machine) just for the router to use. Either way you need a login and a password. Some people report success using the Guest account and just putting in a string of random key presses for the password (the CIFS client insists on there being a password in the password slot). The official Tomato documentation recommends against this.
用户名/密码:您可以使用有权访问网络共享的现有帐户,也可以(在主机上)创建新帐户(仅供主机使用)。 无论哪种方式,您都需要登录名和密码。 有人报告使用来宾帐户成功,只是随机输入了一系列字符串作为密码(CIFS客户端坚持要求密码插槽中有密码)。 官方的Tomato文档建议与此相反。
Domain: Can usually be left blank; if computer is on an actual Domain it may need to be filled in with the appropriate domain name.
域:通常可以留空; 如果计算机位于实际的域中,则可能需要使用适当的域名填写。
Execute When Mounted: This allows you to execute scripts on the router’s Linux OS when a remote drive is mounted. For our purposes leave it blank.
挂载时执行:挂载远程驱动器后,可以在路由器的Linux OS上执行脚本。 为了我们的目的,请将其留空。
When you’ve filled in all your information click Save at the bottom. It should take a moment or two to mount (perhaps even upwards of 5 minutes) but then you should see the drive data listed in the Total / Free Size slot. If it fails to mount double check your password, make sure that the account you’re using has access to that directory (and can write to it), and, if you run into a wall, create a whole new share directory. We had an issue with Windows Home Server not wanting to grant access to a directory that was already part of the WHS share structure (the //Server/Public/ folder) so we made a brand new root share //Server/RouterLogs and all our CIFS creation woes vanished.
填写完所有信息后,单击底部的“保存”。 安装可能需要一两分钟的时间(也许甚至超过5分钟),但是随后您应该会在Total / Free Size插槽中看到驱动器数据。 如果无法挂载,请再次检查您的密码,请确保所使用的帐户有权访问该目录(并且可以写入该目录),如果遇到问题,请创建一个全新的共享目录。 Windows Home Server遇到问题,不想授予对WHS共享结构已包含的目录(// Server / Public /文件夹)的访问权限,因此我们建立了全新的根目录// Server / RouterLogs以及所有我们的CIFS创作困境消失了。
Once you’ve created the CIFS and it has been successfully mounted, go back to the Bandwidth Monitoring section and change the save location to CIFS 1.
创建CIFS并成功安装后,请返回“带宽监视”部分,并将保存位置更改为CIFS 1。
番茄实时监控 (Real Time Monitoring with Tomato)
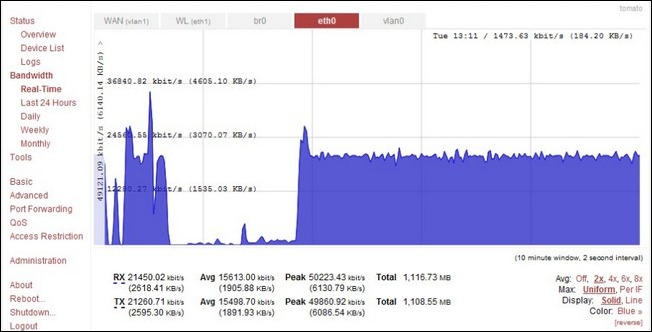
Now that we have the logging and the saving of those logs on lock down, let’s take a look at how you can use Tomato to monitor your bandwidth in real time and quickly look back over how much data you’ve used in the previous day, week, and month.
现在我们已经锁定了日志记录并保存了这些日志,下面让我们看一下如何使用Tomato实时监视带宽,并快速回顾一下前一天使用了多少数据,周和月。
Navigate to Bandwidth in the left hand menu within the Tomato GUI. The default view is real time and should look like the screenshot above. You can look at all the traffic at once or you can look at just a slice of it by clicking the tabs along the top of the graph. Here’s what those tabs represent:
在Tomato GUI的左侧菜单中导航至“ 带宽” 。 默认视图是实时视图,应该类似于上面的屏幕截图。 您可以一次查看所有流量,也可以通过单击图表顶部的标签来查看其中的一部分。 这些选项卡代表以下内容:
WAN (vlan1): This is the traffic coming into and going out of the WAN/Broadband port on your router. If your router is hooked directly to your data modem this is the best way to see exactly how much you’re downloading and uploading.
WAN(vlan1):这是进出路由器上WAN /宽带端口的流量。 如果您的路由器直接挂接到数据调制解调器,则这是准确查看您要下载和上传的数量的最佳方法。
WL (eth1): This is your Wi-Fi traffic. Here you can see all the data activity happening inside your network on the Wi-Fi band. Generally you’ll only check this out if you’re trying to trouble shoot a Wi-FI device or if you suspect somebody is using your Wi-Fi.
WL(eth1):这是您的Wi-Fi流量。 在这里,您可以查看Wi-Fi频段上网络内部发生的所有数据活动。 通常,只有在尝试排除Wi-Fi设备故障或怀疑有人正在使用Wi-Fi时,您才需要检查此内容。
br0: This is the bridge connection between the WAN and LAN ports. Watching this shows you the total traffic over the router including the Wi-Fi traffic, hardwire Ethernet connections, and out to the greater internet. This tab offers such sweeping view it’s hard to take in.
br0:这是WAN和LAN端口之间的网桥连接。 观看此消息,您将看到路由器上的总流量,包括Wi-Fi流量,硬线以太网连接以及更大范围的Internet。 此选项卡提供了难以收拾的一览无余的视图。
eth0: This tab shows all the hardwire traffic which includes the local ports and the WAN port with the internet traffic.
eth0:此选项卡显示所有硬件流量,包括本地端口和WAN端口以及Internet流量。
vlan0: Not actually a LAN, as it were, despite the “lan” portion of the name. Shows the hardwired ports, internet traffic, and internal traffic. If you want to see both the internet traffic (the data you’re uploading and downloading) as well as the data being moved around the internal network at the same time, use this view. It’s handy for seeing both that a large volume of data is coming in and where it’s going.
vlan0:尽管名称中有“ lan”部分,但实际上不是LAN。 显示有线端口,互联网流量和内部流量。 如果要同时查看互联网流量(正在上传和下载的数据)以及在内部网络中移动的数据,请使用此视图。 方便地查看大量数据正在传入以及它正在走向何方。
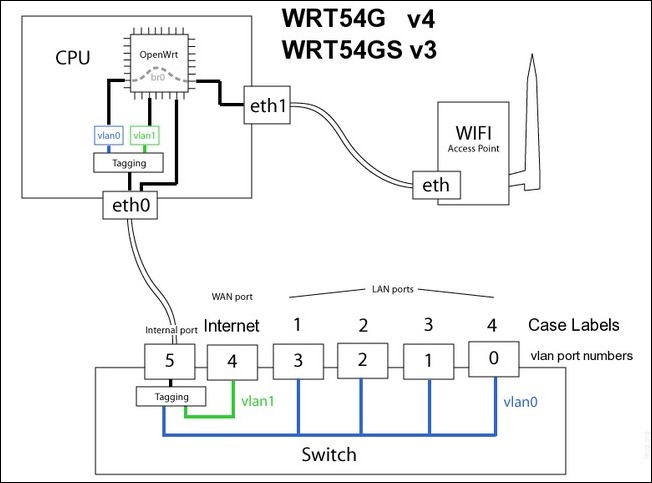
The above diagram highlights the internal setup and naming structure for a line of popular Linksys routers and should help you better visualize what is going on with each monitoring tab.
上图突出显示了一系列流行的Linksys路由器的内部设置和命名结构,并应帮助您更好地可视化每个监视选项卡的状况。
In addition to real-time monitoring you can also look at the prior day, week, and month. These views are much less colorful and simply give you the numbers in your preferred scale (KB, MB, or GB).
除了实时监视之外,您还可以查看前一天,一周和一个月。 这些视图的色彩要少得多,它们只是以您喜欢的比例(KB,MB或GB)为您提供数字。
Now that we’re finished with the tutorial we’ve got a router that actively logs our bandwidth consumption, displays our usage in real time, and archives the logs to a network share for backup and further analysis. Have a question or a router trick? Let’s hear about it in the comments.
现在,我们已经完成了本教程,我们已经有了一个路由器,该路由器可以主动记录带宽消耗,实时显示我们的使用情况,并将日志存档到网络共享中以进行备份和进一步分析。 有问题或路由器技巧吗? 让我们在评论中听到它。
翻译自: https://www.howtogeek.com/74881/how-to-monitor-and-log-your-bandwidth-usage-with-tomato/


 1558
1558

 被折叠的 条评论
为什么被折叠?


