


raspberry pi

A Raspberry Pi proxy server allows you to control the websites people can visit. It can also remove trackers and other unwanted junk from those web pages. Follow these simple steps to set it up.
Raspberry Pi代理服务器使您可以控制人们可以访问的网站。 它还可以从这些网页中删除跟踪器和其他不需要的垃圾。 请按照以下简单步骤进行设置。
Privoxy代理服务器 (The Privoxy Proxy Server)
A web proxy sits between the computers on your network and the internet. The proxy intercepts HTTP and HTTPS traffic, acting as a border control officer. It checks the web address (or URL) someone is trying to access, and, if it’s on the banned list or matches any of the banned criteria, the proxy refuses the connection.
Web代理位于网络上的计算机和Internet之间。 代理拦截HTTP和HTTPS流量,充当边界控制人员。 它检查Web地址 (或URL)有人试图访问,并且,如果它是被禁止的名单上或任何相匹配的取缔标准,代理拒绝连接。
If the proxy is happy with the website, it retrieves the web page and forwards it to the computer that requested it. This provides a degree of anonymity for the devices on your network.
如果代理对网站感到满意,它将检索该网页并将其转发给请求该网页的计算机。 这为您网络上的设备提供了一定程度的匿名性。
The proxy frisks the web pages it retrieves. Any tracking scripts, adverts, or other unwanted material is stripped, so you only receive a clean web page. The hidden payload of snooping and privacy-invading cruft that often accompanies a visit to a website is removed. It’s like a sheep dip for web pages.
代理使检索到的网页混乱。 所有跟踪脚本,广告或其他不需要的材料都会被删除,因此您只会收到一个干净的网页。 经常伴随对网站的访问的隐藏的窥探和侵犯隐私的隐藏有效载荷被删除了。 这就像一个羊浸的网页。
Of course, ad-blocking is a controversial topic. Much of the content you access freely on the web is only available due to funding from adverts. From a privacy point of view, though, the tracking and cross-correlation of everything you do on the internet is creepy at best, and invasive at worst.
当然,广告屏蔽是一个有争议的话题。 您在网络上自由访问的许多内容仅可从广告中获得资金。 但是,从隐私的角度来看,您在互联网上所做的所有事情的跟踪和互相关充其量都是令人毛骨悚然的,而最糟糕的是侵入性的。
Privoxy (the privacy-enhancing proxy) allows you to sidestep a lot of that. Because it’s centrally managed, it’s also easy to administer. Once you’ve set the browser on the various machines on your network to use the proxy, all of the administration is performed on the proxy, rather than the individual devices.
Privoxy(增强隐私的代理)使您可以避免很多事情。 因为它是集中管理的,所以也很容易管理。 将网络上的各种计算机上的浏览器设置为使用代理后,所有管理都在代理上执行,而不是在单个设备上执行。
安装Privoxy (Installing Privoxy)
To install a Privoxy, make an SSH connection to your Raspberry Pi. The IP address of our test unit is 192.168.4.18, so we type the following:
要安装Privoxy,请与Raspberry Pi建立SSH连接 。 我们测试单元的IP地址是192.168.4.18,因此我们输入以下内容:
ssh pi@192.168.4.18

We’re going to install new software on a Raspberry Pi, so it’s a good idea to update the repository indexes and install any available updates. We can perform both of these tasks with a single command that uses && to chain two apt-get commands sequentially. The second command will only run if the first one finishes without errors.
我们将在Raspberry Pi上安装新软件,因此最好更新存储库索引并安装所有可用的更新。 我们可以使用一个命令来执行这两个任务,该命令使用&&顺序地链接两个apt-get命令。 仅当第一个命令没有错误完成时,第二个命令才会运行。
We type the following:
我们输入以下内容:
sudo apt-get update && sudo apt-get upgrade

Depending on the vintage of your Raspberry Pi and when you last updated it, this might take a little while. When it’s completed, we install Privoxy:
根据您的Raspberry Pi的年份和上次更新时间,这可能需要一些时间。 完成后,我们将安装Privoxy:
sudo apt-get install privoxy

接受连接 (Accepting Connections)
By default, Privoxy will accept HTTP and HTTPS connections from the computer on which it’s running. We need to tell it to accept connections from any other computers we decide to point at it. The config file for Privoxy is located in: “/etc/privoxy/config.” We’ll need to use sudo to write changes to it.
默认情况下,Privoxy将接受运行它的计算机的HTTP和HTTPS连接。 我们需要告诉它接受我们决定指向它的任何其他计算机的连接。 Privoxy的配置文件位于:“ / etc / privoxy / config”。 我们将需要使用sudo 进行更改 。
Our command is:
我们的命令是:
sudo nano /etc/privoxy/config

The config file is very long. However, the majority of the file is made up of comments and instructions. Scroll down until you see the beginning of section 4.2.
配置文件很长。 但是,文件的大部分由注释和说明组成。 向下滚动,直到看到第4.2节的开头。

We’re looking for the listen-address settings. Comment out the two original commands by placing a number sign (#) at the start of the line, and then add the following new entry:
我们正在寻找listen-address设置。 通过在行的开头放置数字符号( # )注释掉两个原始命令,然后添加以下新条目:
listen-address :8118
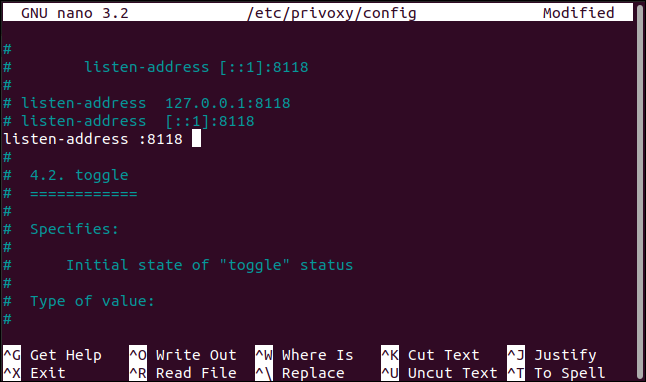
This instructs Privoxy to accept connections on port 8118 from any IP address. Privoxy runs using a set of filters that are applied to URLs through a set of rules called actions. You can edit the filters and actions as text files or use the Privoxy browser interface to make changes.
这指示Privoxy从任何IP地址接受端口8118上的连接。 Privoxy使用一组过滤器运行,这些过滤器通过一组称为动作的规则应用于URL。 您可以将过滤器和操作编辑为文本文件,也可以使用Privoxy浏览器界面进行更改。
The admin account on Privoxy isn’t password-protected, so you need to consider whether you want this feature enabled on your network. If you do, scroll to the bottom of the file and type this line:
Privoxy上的管理员帐户不受密码保护,因此您需要考虑是否要在网络上启用此功能。 如果这样做,请滚动到文件底部,然后输入以下行:
enable-edit-actions 1

To save your changes, press Ctrl+O, Enter, and then press Ctrl+X to close the editor.
要保存更改,请按Ctrl+O , Enter ,然后按Ctrl+X关闭编辑器。
We now need to restart Privoxy for the changes to take effect:
现在,我们需要重新启动Privoxy才能使更改生效:
sudo systemctl restart privoxy

We can use systemctl to verify Privoxy is running and see its status:
我们可以使用systemctl来验证Privoxy是否正在运行,并查看其状态:
sudo systemctl status privoxy
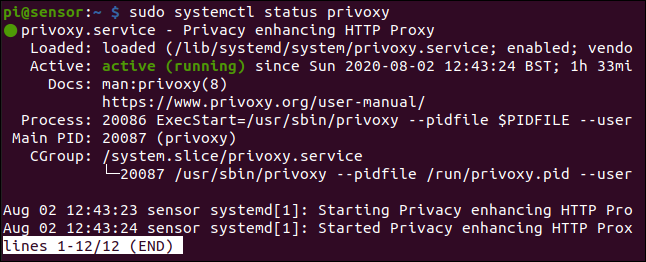
We’ve got green lights and no error messages. Let’s try a remote administrative connection from a browser. Open a browser on another computer, and then browse to the IP address of your Raspberry Pi on port 8118.
我们有绿灯,没有错误消息。 让我们尝试通过浏览器进行远程管理连接。 打开另一台计算机上的浏览器,然后在端口8118上浏览到Raspberry Pi的IP地址。
In our example, this is:
在我们的示例中,这是:
192.168.4.18:8118
You should see the Privoxy home page, as shown below.
您应该看到Privoxy主页,如下所示。
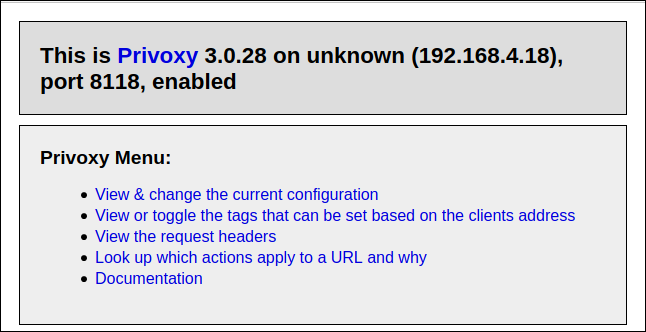
This means Privoxy is running and working with its default settings. The defaults have been carefully chosen, and, in most cases, they’ll be a good fit.
这意味着Privoxy正在运行并使用其默认设置。 默认值是经过仔细选择的,在大多数情况下,它们非常合适。
Now, we need to tell the browsers on all the computers on your network to use Privoxy as a proxy server.
现在,我们需要告诉网络上所有计算机上的浏览器将Privoxy用作代理服务器。
配置浏览器 (Configuring Your Browser)
All browsers allow you to use proxy settings. The “Help” function within a browser will show you how to do this. In Firefox, just type “about:preferences” in the address bar.
所有浏览器均允许您使用代理设置。 浏览器中的“帮助”功能将向您展示如何执行此操作。 在Firefox中,只需在地址栏中输入“ about:preferences”。
Scroll to the “Network Settings” section, and then click “Settings.”
滚动到“网络设置”部分,然后单击“设置”。

Under “Configure Proxy Access to the Internet,” select the radio button next to the “Manual Proxy Configuration” option. Type the IP address of your Raspberry Pi in the “HTTP Proxy” address field, and then type “8118” in the “Port” field.
在“配置对Internet的代理访问”下,选择“手动代理配置”选项旁边的单选按钮。 在“ HTTP代理”地址字段中键入Raspberry Pi的IP地址,然后在“端口”字段中键入“ 8118”。
Select the checkbox next to “Also use this proxy for FTP and HTTPS” option (the “HHTPS Proxy” and “FTP Proxy” fields will be filled in for you), and then click “OK” at the bottom.
选中“也为FTP和HTTPS使用此代理”选项旁边的复选框(将为您填写“ HHTPS代理”和“ FTP代理”字段),然后单击底部的“确定”。

Close the configuration tabs and open a website—it should appear as usual with no problems. If so, Privoxy is up and running with its default settings.
关闭配置选项卡,然后打开一个网站-它应该照常显示,没有问题。 如果是这样,则Privoxy将使用其默认设置启动并运行。
配置Privoxy (Configuring Privoxy)
Open a browser and head to config.privoxy.org.
打开浏览器并转到config.privoxy.org。
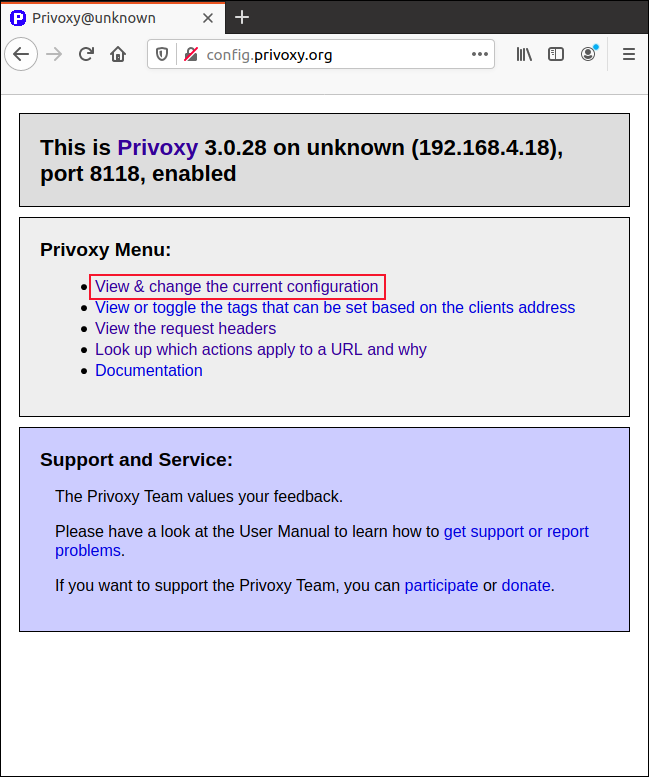
Click “View and Change the Current Configuration” on the Privoxy home page. The configuration summary page allows you to view the configuration of actions and filters.
在Privoxy主页上单击“查看并更改当前配置”。 通过配置摘要页面,您可以查看操作和过滤器的配置。
You can edit the files directly in an editor (the file paths are provided onscreen). It’s much easier to use the configuration capabilities of the browser interface. Note that, by design, you can’t edit the “default.action” settings.
您可以直接在编辑器中编辑文件(文件路径在屏幕上提供)。 使用浏览器界面的配置功能要容易得多。 请注意,根据设计,您无法编辑“ default.action”设置。
Click the “Edit” to open the “Match-All.Action” settings.
单击“编辑”以打开“匹配所有动作”设置。

The editing options appear. Clicking any of the light blue text will open a link to a help page that describes that item.
出现编辑选项。 单击任何浅蓝色文本将打开指向描述该项目的帮助页面的链接。
The “Set to Cautious,” “Set to Medium,” and “Set to Advanced” buttons will increase or decrease how lenient Privoxy is with its filtering. You can crank up Privoxy’s paranoia setting, so it aggressively filters everything that’s even mildly suspicious. Or, you can relax it and let it operate with a moderate degree of trust.
“设置为谨慎”,“设置为中”和“设置为高级”按钮将增加或减少Privoxy过滤时的宽容程度。 您可以提高Privoxy的偏执设置,因此它会主动过滤所有轻度可疑的内容。 或者,您可以放松它并让它以中等信任度运行。
Click “Edit” to adjust each of the parameters individually.
单击“编辑”以分别调整每个参数。

Click the radio buttons next to each option to “Enabled,” “Disabled,” or “No Change.”
单击“启用”,“禁用”或“无更改”每个选项旁边的单选按钮。
The “Description” column provides a short explanation for each setting. However, if you click any of the links in the “Action” column, you can check out a full “Help” page for that item.
“说明”列为每种设置提供了简短说明。 但是,如果单击“操作”列中的任何链接,则可以检出该项目的完整“帮助”页面。

To save your settings, click “Submit” at the top or bottom of the page.
要保存设置,请单击页面顶部或底部的“提交”。
首先尝试默认值 (Try the Defaults First)
The default settings should work just fine in most cases. However, if you want to tweak a setting for any particular reason, Privoxy gives you all the options you need.
在大多数情况下,默认设置应该可以正常工作。 但是,如果您出于任何特定原因想要调整设置,Privoxy会为您提供所需的所有选项。
Before you make any changes, though, you might want to make a copy of the plain-text settings files. This will allow you to easily reverse whatever you did if you’re locked out of the browser interface.
但是,在进行任何更改之前,您可能需要复制纯文本设置文件。 如果您被锁定在浏览器界面之外,这将使您轻松撤消所做的一切。
翻译自: https://www.howtogeek.com/683971/how-to-use-a-raspberry-pi-as-a-proxy-server-with-privoxy/
raspberry pi


 5352
5352


 被折叠的 条评论
为什么被折叠?
被折叠的 条评论
为什么被折叠?
 到【灌水乐园】发言


