


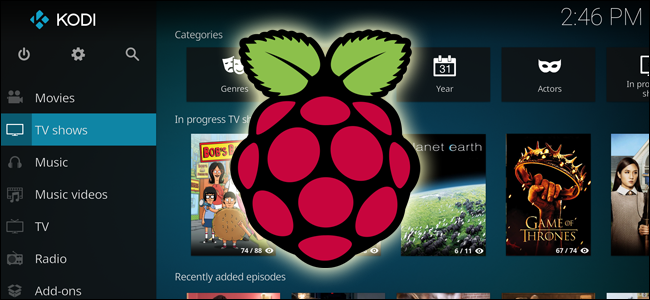
If you’ve been holding off on setting up a Kodi-based media center computer because they’re loud, expensive, don’t fit in your media rack, the Raspberry Pi is your savior. For only $35 (plus a few accessories you may have lying around), you can get a small, efficient computer that can play all your media from one beautiful, couch-friendly interface.
如果您由于声音大,价格昂贵,不适合您的媒体架而一直在安装基于Kodi的媒体中心计算机,那么Raspberry Pi是您的救星。 仅需35美元(加上您可能在附近摆着的一些配件),您就可以得到一台小型高效的计算机,该计算机可以通过一个漂亮的沙发友好界面播放所有媒体。
This guide assumes you’re at least somewhat familiar with the Raspberry Pi and Kodi, so if you aren’t, be sure to check out our complete guide to the Raspberry Pi and read up on Kodi before continuing.
本指南假定您至少对Raspberry Pi和Kodi有所了解,因此,如果您不熟悉Raspberry Pi和Kodi,请务必阅读我们完整的Raspberry Pi指南,并在继续之前阅读Kodi 。
你需要什么 (What You’ll Need)
As far as hardware goes, you’ll need the typical batch of Raspberry Pi hardware and accessories:
就硬件而言,您将需要典型的Raspberry Pi硬件和配件批次:
A Raspberry Pi board (we recommend the latest Raspberry Pi 3 for best performance)
Raspberry Pi板(我们建议使用最新的Raspberry Pi 3以获得最佳性能)
A microUSB power supply (we recommend the official CanaKit Raspberry Pi 3 power supply for best results)
microUSB电源(我们建议使用官方的CanaKit Raspberry Pi 3电源以获得最佳效果)
A microSD card (8GB or larger recommended)
microSD卡 (建议8GB或更大)
A case (you can find many cool ones on Amazon, though this official Kodi case is pretty sweet too)
一个案例(您可以在亚马逊上找到很多很酷的 案例 ,尽管这个官方的Kodi案例也很不错)
An HDMI cable to connect to your TV
HDMI电缆连接到电视
An ethernet cable or Wi-Fi adapter (ethernet is strongly recommended for best performance)
以太网电缆或Wi-Fi适配器(强烈建议使用以太网以获得最佳性能)
You’ll also need a mouse and keyboard for some of the initial setup, a PC you can use to install Kodi to your SD card, and—if you want—a remote and infrared receiver for couch-friendly control. We like the FLIRC paired with a Logitech Harmony 650.
您还需要鼠标和键盘来进行一些初始设置,您可以使用一台PC将Kodi安装到SD卡上,还可以(如果需要)一个远程红外接收器,用于对沙发进行友好控制。 我们喜欢将FLIRC与Logitech Harmony 650配对。
All told, these parts may run you more than the advertised $35 if you need to buy them all, but chances are you have some (if not all) of this stuff lying around, so you may be able to get by with very little. Again, you can read more about gathering these parts up in our complete guide to the Raspberry Pi.
综上所述,如果您需要全部购买,这些零件可能比标价的35美元要贵得多,但是您很有可能会拥有其中的一些(如果不是全部)这种东西,因此您可能只需要很少的钱就可以得到。 同样,您可以在我们的Raspberry Pi完整指南中阅读有关收集这些部分的更多信息。
哪个版本的Kodi? (Which Version of Kodi?)
Installing Kodi on a Raspberry Pi isn’t quite the same as installing it on a Windows or Linux machine. Instead of installing an operating system and then installing Kodi on top of that, you’ll generally install an all-in-one package that just delivers Kodi and the bare essentials. The underlying operating system may still be some variant of Debian Linux, but optimized to bring a powerful, lightweight version of Kodi to your TV screen with little effort.
在Raspberry Pi上安装Kodi与在Windows或Linux计算机上安装Kodi并不完全相同。 通常,您将安装只提供Kodi和基本要素的多合一软件包,而不是安装操作系统然后再在其之上安装Kodi。 底层操作系统可能仍是Debian Linux的某种变体,但经过优化后可以毫不费力地将功能强大,轻巧的Kodi版本带入电视屏幕。
There are many different builds of Kodi for the Pi, but these days, we recommend LibreELEC. It’s incredibly lightweight, well-maintained with updates, and popular, so you’re sure to find help along the way if you need it. If you don’t like it, there are other options, such as OpenELEC (the precursor to LibreELEC), OSMC (the successor to the now-defunct Raspbmc), and XBian. Installing them will be very similar to installing LibreELEC, so you should be able to follow most of the instructions below.
Pi有许多不同的Kodi版本,但是最近 ,我们推荐使用LibreELEC 。 它非常轻巧,维护良好,具有更新功能,并且很受欢迎,因此您一定会在需要时找到帮助。 如果您不喜欢它,则还有其他选择,例如OpenELEC (LibreELEC的前身), OSMC (现已失效的Raspbmc的后继者)和XBian 。 安装它们与安装LibreELEC非常相似,因此您应该能够按照以下大多数说明进行操作。
第一步:将Kodi下载并闪存到SD卡中 (Step One: Download and Flash Kodi to Your SD Card)
The first step takes place on your PC. In our testing, LibreELEC’s standalone installer didn’t work, so we’re going to create our SD card manually using Etcher, a free program for Windows, macOS, and Linux. Head to Etcher’s home page and download the version for your operating system—if you’re using Windows, we recommend the portable version, since you don’t have to install it.
第一步在您的PC上进行。 在我们的测试中,LibreELEC的独立安装程序无法正常工作,因此我们将使用Etcher手动创建SD卡, Etcher是Windows,macOS和Linux的免费程序。 前往Etcher的主页并下载适用于您的操作系统的版本-如果您使用的是Windows,我们建议您使用便携式版本,因为您无需安装它。
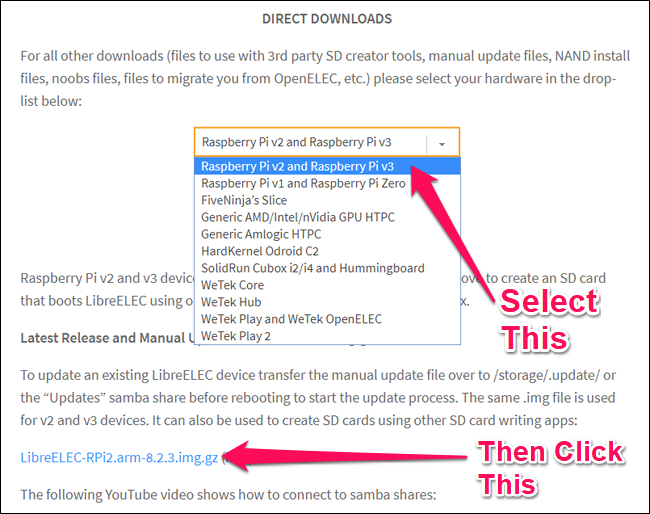
Next, head to LibreELEC’s download page and scroll down to the “Direct Downloads” section. Select “Raspberry Pi v2 and Raspberry Pi v3” from the dropdown (unless you’re using the Raspberry Pi 1 or Zero, in which case select that option instead. Then, scroll down and click the link to the .img.gz file for the platform you just selected.
接下来,转到LibreELEC的下载页面,然后向下滚动到“直接下载”部分。 从下拉列表中选择“ Raspberry Pi v2和Raspberry Pi v3”(除非您使用的是Raspberry Pi 1或Zero,否则请选择该选项。然后,向下滚动并单击指向.img.gz文件的链接您刚刚选择的平台。
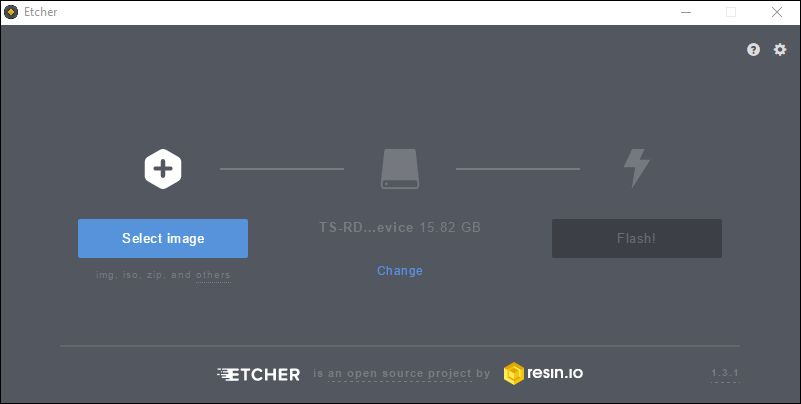
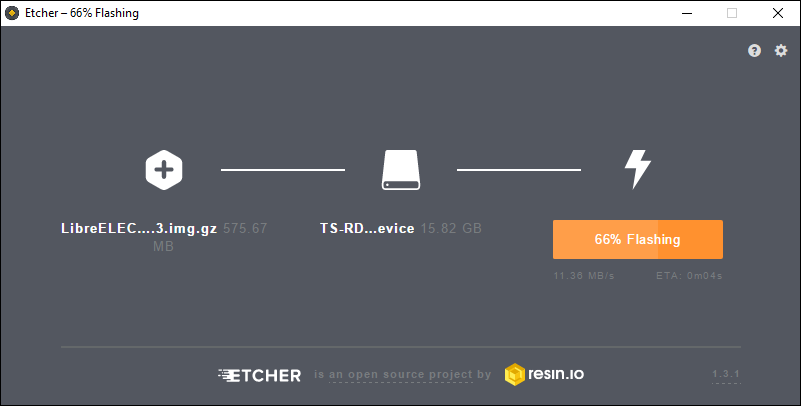
Once the file downloads, start up Etcher. Click “Select Image” and then choose the .img.gz file you just downloaded.
下载文件后,启动Etcher。 单击“选择图像”,然后选择刚下载的.img.gz文件。
Then, click the “Change” link under the second step to make sure Etcher has selected the right device. In our case, it’s a Transcend SD card reader with a 16GB SD card in it, so Etcher chose wisely.
然后,在第二步下单击“更改”链接,以确保Etcher选择了正确的设备。 在我们的案例中,它是其中装有16GB SD卡的创见SD卡读卡器,因此Etcher做出了明智的选择。
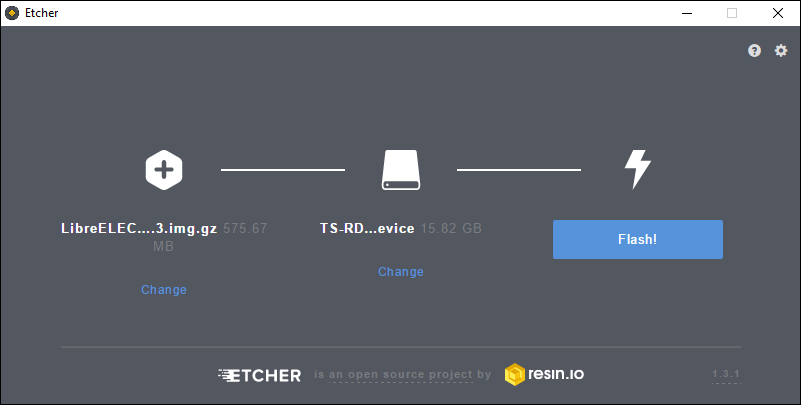
When you’re done, click the “Flash!” button. It’ll take a minute or two to complete the process. You may get a popup error about Windows not being able to read the drive, but don’t format it! This is normal, since the resulting SD card will use a Linux filesystem. Just close that window and continue on with the below steps.
完成后,点击“ Flash!” 按钮。 需要一两分钟才能完成该过程。 您可能会收到有关Windows无法读取驱动器但不格式化驱动器的弹出错误! 这是正常现象,因为生成的SD卡将使用Linux文件系统。 只需关闭该窗口,然后继续以下步骤即可。
When it’s finished, eject your microSD card and gather up your Pi hardware.
完成后,弹出microSD卡并收集Pi硬件。
第二步:启动Raspberry Pi并配置系统 (Step Two: Fire Up Your Raspberry Pi and Configure Your System)
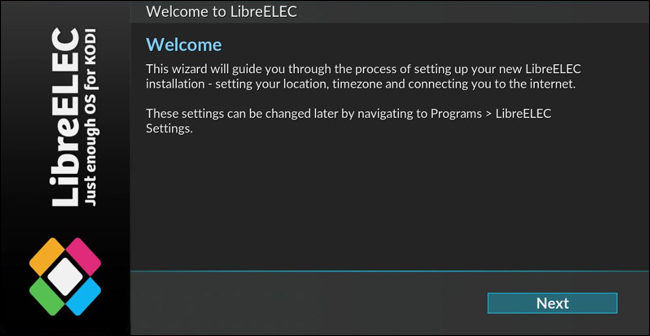
Pop your microSD card into your Raspberry Pi, and hook it up to your TV with the HDMI cable (and plug in the ethernet cable, if applicable). Then, plug the power supply into your Pi and a standard wall outlet, and it should start up. You should see the LibreELEC splash screen appear on your TV.
将您的microSD卡弹出到Raspberry Pi中,然后使用HDMI电缆将其连接到电视(并插入以太网电缆,如果适用)。 然后,将电源插入Pi和标准壁装电源插座,然后应会启动。 您应该看到LibreELEC初始屏幕出现在电视上。
Give it a few minutes on first boot to create the necessary folders and get everything in order. You’ll be presented with the traditional Kodi home screen, with a LibreELEC popup to walk you through initial steps like setting up your time zone.
在首次启动时花几分钟时间,以创建必要的文件夹并按顺序整理所有内容。 您将看到传统的Kodi主屏幕,并显示一个LibreELEC弹出窗口,以引导您完成设置时区的初始步骤。
This should be all you need to get up and running—almost everything from here on out is the same as setting up Kodi on any other box. You can add new videos to your library, control playback with a remote (or the official remote apps for iOS and Android), and do other advanced stuff—like sync your libraries with MySQL or Control Kodi with an Amazon Echo.
这应该是您启动和运行所需要的—从这里开始几乎所有内容都与在其他任何盒子上设置Kodi相同。 您可以将新视频添加到库中,使用遥控器(或iOS和Android上的官方远程应用程序)控制播放,以及执行其他高级操作,例如将库与MySQL同步或将Control Kodi与Amazon Echo 同步 。
If you ever run into any LibreELEC or Pi-specific problems, though, you’ll find a few extra settings under Add-Ons > Program Add-Ons > LibreELEC Configuration. Most of these will be similar to the settings you set in that initial wizard, though there are a few things you may want to pay attention to:
但是,如果遇到任何LibreELEC或Pi特定的问题,您将在“附件”>“程序附件”>“ LibreELEC配置”下找到一些其他设置。 其中大多数将与您在初始向导中设置的设置相似,尽管您可能需要注意以下几点:
- If you’re using network sources and/or MySQL for your video library, you may want to head to Network > Advanced Network Settings and enable “Wait for Network Before Starting Kodi”. This ensures that the library appears properly when you boot up. 如果您正在使用网络源和/或MySQL作为视频库,则可能需要转到“网络”>“高级网络设置”并启用“启动Kodi之前等待网络”。 这样可以确保在启动时库正确显示。
- Under Services, you can enable or disable Samba and SSH, which are useful for accessing your Pi from other computers on your network. Samba lets you view and edit files (useful for editing Kodi’s configuration files), while SSH is useful for command line troubleshooting. 在服务下,您可以启用或禁用Samba和SSH,这对于从网络上的其他计算机访问Pi很有用。 Samba允许您查看和编辑文件(用于编辑Kodi的配置文件),而SSH可用于命令行故障排除。
If you watch videos that require an MPEG-2 or VC-1 license, you can buy a cheap license and add it to your Pi using these instructions. (You’ll need to add it to your config.txt for LibreELEC since it isn’t built into the configuration menu.)
如果您观看需要MPEG-2或VC-1许可证的视频,则可以按照以下说明购买便宜的许可证并将其添加到Pi中。 (您需要将其添加到LibreELEC的config.txt中,因为它没有内置在配置菜单中。)
Apart from some basic setup, though, you should be off to the races! You can customize Kodi to your heart’s content just like on any other platform—get new skins, install add-ons, and meticulously organize all your movies and shows (and when you’re done, clone the SD card for foolproof backup). The sky’s the limit, and it only cost you $35.
除了一些基本设置,您还应该参加比赛! 您可以像在任何其他平台上一样自定义Kodi以适应您的内心需求- 获取新外观 , 安装附加组件并精心组织所有电影和节目 (完成后, 克隆SD卡以实现万无一失的备份 )。 天空是极限,它只需花费$ 35。
翻译自: https://www.howtogeek.com/163541/build-a-35-media-center-with-raspbmc-and-raspberry-pi-redux/


 1472
1472

 被折叠的 条评论
为什么被折叠?
被折叠的 条评论
为什么被折叠?
 到【灌水乐园】发言


