


outlook自定义快捷键
If you work in an office, then the chances are you spend a lot of time dealing with email, most probably in Microsoft Outlook. It’s worth taking a little time to get Outlook to display the information you need. For email, the best way to do this is with folder views. Here’s how they work.
如果您在办公室工作,则很可能会花费大量时间处理电子邮件,很可能是在Microsoft Outlook中。 花一点时间让Outlook显示您所需的信息是值得的。 对于电子邮件,最好的方法是使用文件夹视图。 这是他们的工作方式。
什么是文件夹视图? (What Is a Folder View?)
Every place you keep your email in Outlook—whether it’s the inbox, sent items, archive, deleted items, or any other place—is a folder. Each of those folders looks the same by default, with columns that contain metadata about the email, like the sender, subject, date and time received, and so on. Outlook groups the emails by date (with the latest at the top), styles unread messages in bold blue text, and shows messages you’ve read in a regular black font.
您将电子邮件保存在Outlook中的每个位置(无论是收件箱,已发送邮件,存档,已删除邮件还是其他任何地方)都是一个文件夹。 默认情况下,这些文件夹中的每个文件夹看起来都是相同的,其中的列包含有关电子邮件的元数据,例如发件人,主题,收到的日期和时间等。 Outlook按日期对电子邮件进行分组(顶部为最新),将未读邮件设置为蓝色粗体,并以常规黑色字体显示已阅读的邮件。
This is the default folder view.
这是默认的文件夹视图 。

But you can change that view if you want. You could create a different view for each folder, or you could create a folder view you like and apply it to every folder. Outlook even has some alternative built-in views you can start with.
但是您可以根据需要更改该视图。 您可以为每个文件夹创建一个不同的视图,也可以创建所需的文件夹视图并将其应用于每个文件夹。 Outlook甚至可以使用其他一些内置视图。
如何更改为另一个内置视图 (How to Change to Another Built-In View)
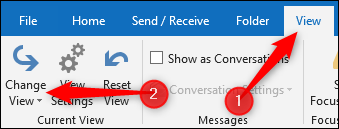
To start with, let’s change to one of the other built-in views by clicking View > Change View.
首先,让我们通过单击视图>更改视图更改为其他内置视图之一。
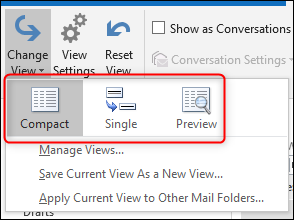
The Compact view is the default view that every folder uses, but you can change to either of the other two:
压缩视图是每个文件夹使用的默认视图,但是您可以更改为其他两个视图之一:
Single: This removes the By Date grouping and shows all your messages in a simple list.
单个:这将删除按日期分组,并在一个简单列表中显示所有消息。
Preview: This (somewhat counter-intuitively) removes the Preview panel.
预览:这(有点违反直觉)删除了“预览”面板。
如何自定义现有视图 (How to Customize the Existing View)
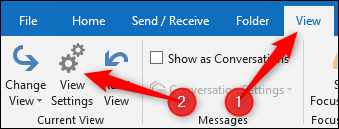
You can customize the current folder view by clicking View > View Settings.
您可以通过单击视图>视图设置来自定义当前文件夹视图。
This opens the Advanced View Settings window, where you can change all manner of things about the view.
这将打开“高级视图设置”窗口,您可以在其中更改有关视图的所有方式。
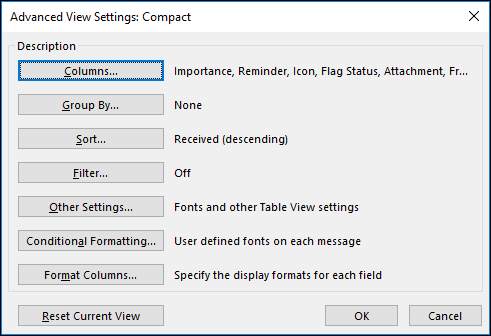
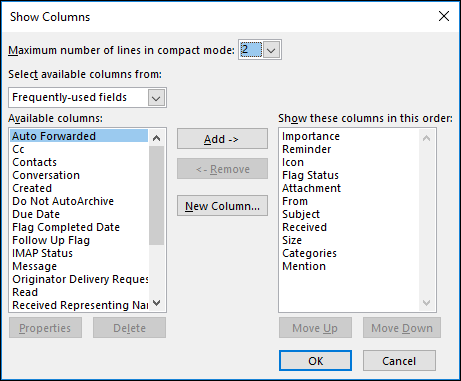
We’ll change the displayed columns and the sort settings as an example. Click “Columns” to open the Show Columns window.
作为示例,我们将更改显示的列和排序设置。 单击“列”以打开“显示列”窗口。
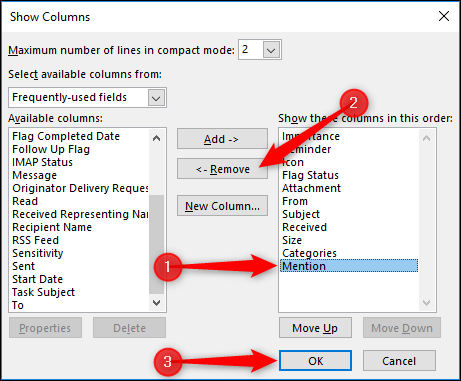
Select “Mention” in the right-hand column, click the “Remove” button, and then click “OK.”
在右侧列中选择“提及”,单击“删除”按钮,然后单击“确定”。
Back in the Advanced View Settings window, click the “Sort” button to open the Sort window.
返回“高级视图设置”窗口,单击“排序”按钮以打开“排序”窗口。
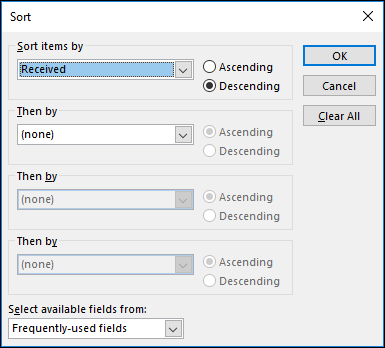
In the “Sort items by” drop-down menu, choose “From” and then click “OK.”
在“排序方式”下拉菜单中,选择“来自”,然后单击“确定”。
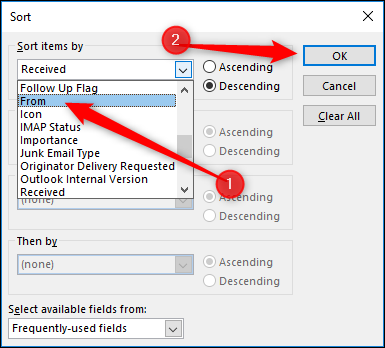
Now click “OK” on the Advanced View Settings. The folder view has now changed so that the “Mention” column is hidden and the folder is sorted by the person who sent the mail.
现在,在“高级视图设置”上单击“确定”。 文件夹视图现在已更改,以便隐藏“提及”列,并且该文件夹按发送邮件的人进行排序。

These are just two quick examples of what you can do. You can add or remove lots of different columns, group and sort messages in different ways, and even change the fonts and styles used to display messages. Play around with the various options to find what works best for you.
这些只是您可以做什么的两个简单示例。 您可以添加或删除许多不同的列,以不同的方式对消息进行分组和排序,甚至可以更改用于显示消息的字体和样式。 尝试各种选项,找到最适合您的选项。
将视图应用于其他文件夹 (Apply a View to Other Folders)
Once you’ve customized your view, you can apply the same view to any other folder without having to customize each one. Click View > View Settings again and this time, click the “Apply Current View to Other Folders” command.
自定义视图后,您可以将同一视图应用于任何其他文件夹,而不必自定义每个视图。 再次单击“视图”>“查看设置”,这一次,单击“将当前视图应用于其他文件夹”命令。

Select the folders to which you want to apply the view and then click “OK.”
选择要应用视图的文件夹,然后单击“确定”。
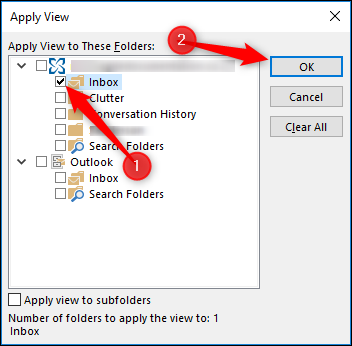
You can select as many folders (or subfolders) as you want.
您可以根据需要选择任意数量的文件夹(或子文件夹)。
保存自定义的文件夹视图 (Save a Customized Folder View)
You can also keep your customized view as a template so that you can apply it to other folders in the future. Click View > View Settings again and select the “Save Current View as a New View” command.
您还可以将自定义视图保留为模板,以便将来将其应用于其他文件夹。 再次单击视图>视图设置,然后选择“将当前视图另存为新视图”命令。

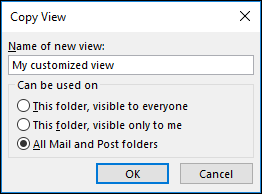
This opens the Copy View window, where you can give your view a name and choose who can see the view. Click “OK” when you’ve set everything up.
这将打开“复制视图”窗口,您可以在其中为视图命名并选择可以看到该视图的人。 设置完毕后,单击“确定”。
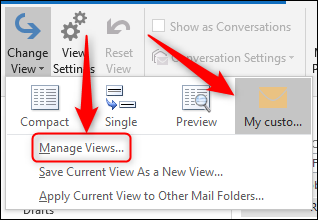
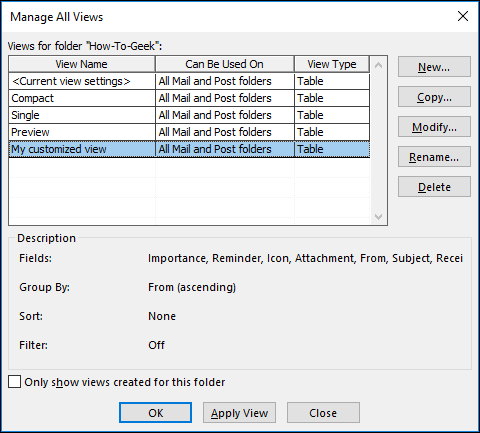
If you click View > View Settings again, Outlook displays your new view as an available option. Click “Manage Views” to see all of the views to which you have access.
如果再次单击“视图”>“视图设置”,则Outlook会将新视图显示为可用选项。 单击“管理视图”以查看您有权访问的所有视图。
The Manage All Views window lets you add, edit and delete views, as well as see the settings applied to each view.
通过“管理所有视图”窗口,您可以添加,编辑和删除视图,以及查看应用于每个视图的设置。
从头开始创建视图 (Create a View From Scratch)
If you want to create a brand new view, click the “New” button in the Manage All View window. This opens the Create a New View window.
如果要创建全新的视图,请在“管理所有视图”窗口中单击“新建”按钮。 这将打开“创建新视图”窗口。
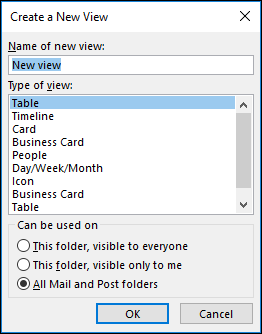
Select the type of base view you want to start with and click the “OK” button. The Advanced View Settings window opens, and you can customize your view the way you want. When you’re done, click “OK” until you get back to the Manage All Views window and then click “Apply View” to apply the view to the current folder.
选择要开始使用的基本视图的类型,然后单击“确定”按钮。 将打开“高级视图设置”窗口,您可以根据需要自定义视图。 完成后,单击“确定”,直到返回到“管理所有视图”窗口,然后单击“应用视图”将视图应用于当前文件夹。

Once you’ve created a new view, you can apply to any other folder, customize it further, or use it as the base for another new view.
创建新视图后,可以将其应用于任何其他文件夹,进一步对其进行自定义,或将其用作另一个新视图的基础。
从视图中删除自定义项 (Remove Customizations from a View)
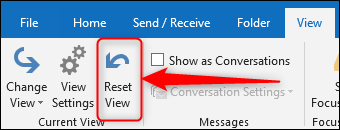
If you’ve made some customizations to your existing view, you can revert back to the existing view easily. This is a good way of trying things out without having to worry about undoing them if the changes don’t work for you. Click View > Reset View to remove any unsaved customizations from the current folder.
如果您对现有视图进行了一些自定义,则可以轻松地还原到现有视图。 这是一种尝试的好方法,无需担心更改对您不起作用时便会撤消它们。 单击视图>重置视图,以从当前文件夹中删除所有未保存的自定义设置。
With these View tools to hand, you can make your folders work exactly the way you want, and start to tame that overflowing message list.
使用这些View工具,您可以使文件夹完全按照您想要的方式工作,并开始处理溢出的消息列表。
翻译自: https://www.howtogeek.com/366677/how-to-create-and-customize-a-folder-view-in-outlook/
outlook自定义快捷键


 1844
1844


 被折叠的 条评论
为什么被折叠?
被折叠的 条评论
为什么被折叠?
 到【灌水乐园】发言


