


已安装的应用程序移植
Since I’ve been working with the community on porting desktop applications from .NET Framework to .NET Core, I’ve noticed that there are two camps of folks: some want a very simple and short list of instructions to get their apps ported to .NET Core while others prefer a more principled approach with more background information. Instead of writing up a “Swiss Army knife”-document, we are going to publish two blog posts, one for each camp:
由于我一直在与社区合作,将桌面应用程序从.NET Framework移植到.NET Core,因此我注意到有两个阵营:有些人希望获得一个非常简单的简短说明列表,以将其应用程序移植到.NET Core,而其他人则更喜欢使用更多背景信息的更有原则的方法。 我们不会撰写“瑞士军刀”文档,而是将发布两篇博客文章,每个营地一篇:
This post is the simple case. It’s focused on simple instructions and smaller applications and is the easiest way to move your app to .NET Core.
这个帖子很简单 。 它着重于简单的指令和较小的应用程序,是将应用程序移至.NET Core的最简单方法。
We will publish another post for more complicated cases. This post will focus more on non-trivial applications, such WPF application with dependencies on WCF and third-party UI packages.
对于更复杂的案例,我们将另发表文章 。 这篇文章将重点放在非平凡的应用程序上,例如依赖于WCF和第三方UI包的WPF应用程序。
If you prefer watching videos instead of reading, here is the video where I do everything that is described below.
如果您喜欢观看视频而不是阅读,请按照下面介绍的方法进行操作。
步骤0 –先决条件 (Step 0 – Prerequisites)
To port your desktop apps to Core, you’ll need .NET Core 3 and Visual Studio 2019.
要将桌面应用程序移植到Core,您需要.NET Core 3和Visual Studio 2019。
步骤1 –运行可移植性分析器 (Step 1 – Run portability analyzer)
Before porting, you should check how compatible your application is with .NET Core. To do so, download and run .NET Portability Analyzer.
移植之前,您应该检查应用程序与.NET Core的兼容性。 为此,请下载并运行.NET Portability Analyzer 。
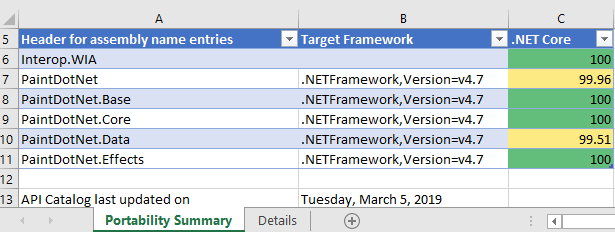
- On the first tab, Portability Summary, if you have only 100% in .NET Core column (everything is highlighted in green), your code is fully compatible, go to Step 2. 在第一个选项卡可移植性摘要上,如果.NET Core列中只有100%(所有内容以绿色突出显示),则您的代码是完全兼容的,请转到步骤2。
- If you have values of less than 100%, first look at all assemblies that aren’t part of you application. For those, check if their authors are providing versions for .NET Core or .NET Standard. 如果您的值小于100%,请首先查看不属于应用程序的所有程序集。 对于这些,请检查其作者是否提供.NET Core或.NET Standard版本。
- Now look at the other part of assemblies that are coming from your code. If you don’t have any of your assemblies listed in the portability report, go to Step 2. If you do, open Details tab, filter the table by clicking on the column Assembly and only focus on the ones that are from your application. Walk the list and refactor your code to stop using the API or replace the API usage with alternatives from .NET Core. 现在查看来自代码的程序集的另一部分。 如果在可移植性报告中没有列出任何程序集,请转到步骤2。如果要打开,请打开“详细信息”选项卡,通过单击“程序集”列来过滤表,仅关注来自应用程序的程序集。 遍历列表并重构代码,以停止使用API或用.NET Core的替代方法替代API的用法。
第2步–迁移到SDK样式的.csproj (Step 2 – Migrate to SDK-style .csproj)
In Solution Explorer right-click on your project (not on the solution!). Do you see Edit Project File? If you do, you already use the SDK-style project file, so you should move to Step 3. If not, do the following.
在解决方案资源管理器中,右键单击您的项目(而不是解决方案!)。 您看到编辑项目文件了吗? 如果这样做,您已经使用了SDK风格的项目文件,因此应转到步骤3 。 如果不是,请执行以下操作。
Check in the Solution Explorer if your project contains a
packages.configfile. If you don’t, no action is needed, if you do, right-click onpackages.configand choose Migrate packages.config to PackageReference. Then click OK.在解决方案资源管理器中签入您的项目是否包含
packages.config文件。 如果不这样做,则无需采取任何措施,如果您这样做,请右键单击packages.config然后选择将packages.config迁移到PackageReference 。 然后单击“ 确定” 。Open your project file by right-clicking on the project and choose Unload Project. Then right-click on the project and choose Edit <your project name>.csproj.
右键单击项目,打开项目文件,然后选择Unload Project 。 然后右键单击该项目,然后选择Edit <您的项目名称> .csproj 。
- Copy the content of the project file somewhere, for example into Notepad, so you can search in it later. 将项目文件的内容复制到某处,例如复制到记事本中,以便稍后进行搜索。
Delete everything from your project file opened in Visual Studio (I know it sounds aggressive, but we will add only needed content from the copy we’ve just made in a few steps). Instead of the text you’ve just deleted, paste the following code.For a WinForms application:
从您在Visual Studio中打开的项目文件中删除所有内容(我知道这听起来很激进,但只需几个步骤,我们将仅从刚刚制作的副本中添加所需的内容)。 粘贴以下代码,而不是刚删除的文本:对于WinForms应用程序:
<Project Sdk="Microsoft.NET.Sdk.WindowsDesktop">
  <PropertyGroup>
    <OutputType>WinExe</OutputType>
    <TargetFramework>net472</TargetFramework>
    <UseWindowsForms>true</UseWindowsForms>
    <GenerateAssemblyInfo>false</GenerateAssemblyInfo>
  </PropertyGroup>
</Project>
For a WPF application:
对于WPF应用程序:
<Project Sdk="Microsoft.NET.Sdk.WindowsDesktop">
  <PropertyGroup>
    <OutputType>WinExe</OutputType>
    <TargetFramework>net472</TargetFramework>
    <UseWPF>true</UseWPF>
    <GenerateAssemblyInfo>false</GenerateAssemblyInfo>
  </PropertyGroup>
</Project>
In Notepad, search for
PackageReference. If you did not find anything, move on. If you foundPackageReference, copy the entire<ItemGroup>that containsPackageReferencein your project file, opened in Visual Studio, right below the lines you’ve pasted in the step above. Do it for each occurrence of thePackageReferenceyou have found. The copied block should look like this.在记事本中,搜索
PackageReference。 如果找不到任何内容,请继续。 如果找到PackageReference,则在项目文件中复制包含PackageReference的整个<ItemGroup>,该文件在Visual Studio中打开,就在上述步骤中粘贴的行的正下方。 对找到的PackageReference每次出现执行此操作。 复制的块应如下所示。<ItemGroup> <PackageReference Include="NUnit"> <Version>3.11.0</Version> </PackageReference> </ItemGroup>Now do the same as above for
ProjectReference. If you did not find anything, move on. If you found anyProjectReferenceitems, they would look like this.现在,对
ProjectReference进行与上述相同的操作。 如果找不到任何内容,请继续。 如果找到任何ProjectReference项,它们将如下所示。<ItemGroup> <ProjectReference Include="..\WindowsFormsApp1\WindowsFormsApp1.csproj"> <Project>{7bce0d50-17fe-4fda-b6b7-e7960aed8ac2}</Project> <Name>WindowsFormsApp1</Name> </ProjectReference> </ItemGroup>You can remove lines with
<Project>and<Name>properties, since they are not needed in the new project file style. So for eachProjectReferencethat you have found (if any), copy onlyItemGroupandProjectReferencelike this.您可以删除具有
<Project>和<Name>属性的行,因为在新的项目文件样式中不需要它们。 因此,对于找到的每个ProjectReference(如果有的话),只复制ItemGroup和ProjectReference就像这样。<ItemGroup> <ProjectReference Include="..\WindowsFormsApp1\WindowsFormsApp1.csproj" /> </ItemGroup>Save everything. Close the .csproj file in Visual Studio. Right-click on your project in the
保存一切。 在Visual Studio中关闭.csproj文件。 右键点击项目
Solution Explorer and select Reload Project. Rebuild and make sure there are no errors.
解决方案资源管理器,然后选择“ 重新加载项目” 。 重建并确保没有错误。
Great news, you just updated your project file to the new SDK-style! The project is still targeting .NET Framework, but now you’ll be able to retarget it to .NET Core.
好消息,您刚刚将项目文件更新为新的SDK样式! 该项目仍以.NET Framework为目标,但是现在您可以将其重新定位为.NET Core。
步骤3 –重新定位到.NET Core (Step 3 – Retarget to .NET Core)
Open your project file by double-clicking on your project in Solution Explorer. Find the property
<TargetFramework>and change the value tonetcoreapp3.0. Now your project file should look like this:通过在解决方案资源管理器中双击您的项目来打开项目文件。 找到属性
<TargetFramework>并将其值更改为netcoreapp3.0。 现在,您的项目文件应如下所示:<Project Sdk="Microsoft.NET.Sdk.WindowsDesktop"> <PropertyGroup> <OutputType>WinExe</OutputType> <TargetFramework>netcoreapp3.0</TargetFramework> ... </PropertyGroup> ... </Project>Build and run your project. Congratulations, you ported to .NET Core 3!
生成并运行您的项目。 恭喜,您已移植到.NET Core 3!
修正错误 (Fixing errors)
If you get errors like
如果出现类似错误
The type or namespace <some name> could not be foundor
要么
The name <some name> does not exist in the current contextand your portability report was green, it should be easy to fix by adding a NuGet package with the corresponding library. If you cannot find the NuGet package with the library that is missing, try referencing Microsoft.Windows.Compatibility. This package adds ~21K .NET APIs from .NET Framework.
并且您的可移植性报告是绿色的,应该容易地通过在相应库中添加NuGet软件包来进行修复。 如果找不到缺少库的NuGet程序包,请尝试引用Microsoft.Windows.Compatibility 。 该软件包从.NET Framework添加了约21K个.NET API。
与设计师合作 (Working with designers)
Even though it is possible to edit the user interface of your application via code, developers usually prefer using the visual designers. With .NET Core we had to rearchitect the way the designers work with .NET Core projects:
即使可以通过代码编辑应用程序的用户界面,开发人员通常还是更喜欢使用视觉设计器。 使用.NET Core,我们必须重新设计设计人员处理.NET Core项目的方式:
- The WPF designer is already in preview and we are working on adding more functionality to it. WPF设计器已经处于预览阶段,我们正在努力为其添加更多功能。
- The WinForms designer for .NET Core will be available later, and meanwhile there you can use the .NET Framework WinForms designer as a workaround. .NET Core的WinForms设计器将在以后提供,与此同时,您可以在其中使用.NET Framework WinForms设计器作为解决方法。
Here is how you can use the .NET Framework WinForms designer:
这是使用.NET Framework WinForms设计器的方法:
Copy your .csproj file (let’s say you have
MyProject.csproj), give it a different name, for exampleMyProject.NetFramework.csprojand put it next to your existing project file.复制您的.csproj文件(假设您有
MyProject.csproj),给它一个不同的名称,例如MyProject.NetFramework.csproj然后将其放在现有项目文件旁边。Make sure your project is closed in Visual Studio, open the new project
MyProject.NetFramework.csproj.确保在Visual Studio中关闭了项目,然后打开新项目
MyProject.NetFramework.csproj。In
在
Solution Explorer right-click on your project and select Properties. In the Application tab (should be open by default) set Assembly name and Default namespace to the same values as in your initial project (remove “.NetFramework” from the names).
解决方案资源管理器在项目上单击鼠标右键,然后选择“ 属性” 。 在“应用程序”选项卡(默认情况下应打开)中,将“ 程序集名称”和“ 默认名称空间”设置为与初始项目中相同的值(从名称中删除“ .NetFramework”)。
Save this solution next to your existing solution.
将此解决方案保存在现有解决方案旁边。
Open the new project file and change the
<TargetFramework>tonet472.打开新的项目文件,然后将
<TargetFramework>更改为net472。Now when you need to use the WinForms designer, load your project with the
MyProject.NetFramework.csprojproject file and you’ll get the full experience of .NET Framework designer. When you are done with the designer, close and open your project with the .NET Core project file.现在,当您需要使用WinForms设计器时,使用
MyProject.NetFramework.csproj项目文件加载您的项目,您将获得.NET Framework设计器的完整经验。 完成设计器工作后,使用.NET Core项目文件关闭并打开您的项目。- This is just a workaround until the WinForms designer for .NET Core is ready. 在准备好用于.NET Core的WinForms设计器之前,这只是一个解决方法。
为什么要移植到.NET Core (Why port to .NET Core)
Check out the video where Scott Hunter and I are talking about all the new things coming with .NET Core 3 Porting to .NET Core 3.0.
观看视频,我和Scott Hunter讨论了.NET Core 3 移植到.NET Core 3.0带来的所有新功能。
已安装的应用程序移植


 111
111


 被折叠的 条评论
为什么被折叠?
被折叠的 条评论
为什么被折叠?
 到【灌水乐园】发言


